MMRotate从零开始训练自己的数据集
1.虚拟环境安装
step1:下载并安装Anaconda,Anaconda的国内镜像:
Index of /anaconda/archive/ | 清华大学开源软件镜像站 | Tsinghua Open Source Mirror
这里建议选择较新的 Anaconda 版本
上面的是32位系统,下面的是64位系统(一般选第二个就可以)
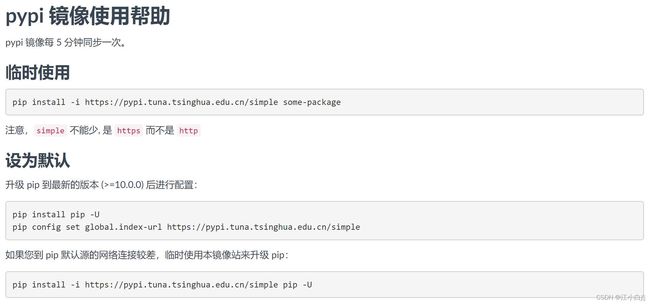
step2:更新国内源
下面的指令都在 Anaconda Prompt 中操作
如果不更新国内源可能会导致安装某些包的时候出错
pypi | 镜像站使用帮助 | 清华大学开源软件镜像站 | Tsinghua Open Source Mirror
step3:Anaconda下创建虚拟环境
conda create --name mmrotate python=3.8

conda activate mmrotate这里mmrotate是虚拟环境的名称,可以修改为你想要的,这里指定的是 python3.8 版本。
step4:下载torch和torchvision(本地安装稳定些)
https://download.pytorch.org/whl/torch_stable.html
这里我选择的版本是torch==1.8.1 torchvision==0.9.1(这里要注意python版本的对应,比如这里选择cp=38。还有我的环境是cuda10.1)
(还有一点要注意的是30系列以上的显卡要下载cuda11以上的版本,否则会出错)
![]()
![]()
下载好whl文件后,从虚拟环境中进入到下载目录,然后pip install依次安装torch和torchvision ,如图所示:
step5:安装mmcv_full、mmdetection和mmrotate
安装完成后,下面先进行mmcv_full与mmdetection的安装,因为mmrotate是基于以上两个模型库的。
mmcv_full:https://download.openmmlab.com/mmcv/dist/cu101/torch1.8.0/index.html
Installation — mmcv 1.6.0 documentation
根据自己的版本进行下载,这里我下载的是:
![]()
下载之后还是用pip install 命令进行安装
mmdetection:
pip install mmdet最后是安装mmrotate :
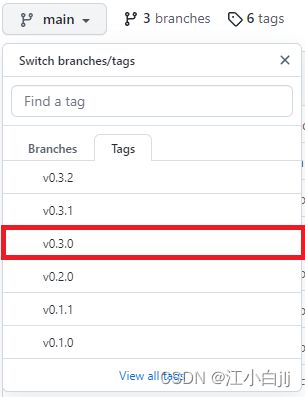
pip install mmrotate这里我下载官方的代码版本为:
cmd界面下cd进入到mmrotate目录下,再执行
pip install -r requirements.txt至此,环境搭建部分就结束了。
2.测试mmrotate是否安装成功
修改image_demo.py
# Copyright (c) OpenMMLab. All rights reserved.
"""Inference on single image.

Example:


```
wget -P checkpoint https://download.openmmlab.com/mmrotate/v0.1.0/oriented_rcnn/oriented_rcnn_r50_fpn_1x_dota_le90/oriented_rcnn_r50_fpn_1x_dota_le90-6d2b2ce0.pth  # noqa: E501, E261.
python demo/image_demo.py \
    demo/demo.jpg \
    configs/oriented_rcnn/oriented_rcnn_r50_fpn_1x_dota_le90.py \
    work_dirs/oriented_rcnn_r50_fpn_1x_dota_v3/epoch_12.pth
```
"""  # nowq

from argparse import ArgumentParser

from mmdet.apis import inference_detector, init_detector, show_result_pyplot

import mmrotate  # noqa: F401
import os

ROOT = os.getcwd()


def parse_args():
    parser = ArgumentParser()
    parser.add_argument('--img', default=os.path.join(ROOT, 'demo.jpg'), help='Image file')
    parser.add_argument('--config', default=os.path.join(ROOT, '../configs/oriented_rcnn/oriented_rcnn_r50_fpn_1x_dota_le90.py'), help='Config file')
    parser.add_argument('--checkpoint', default=os.path.join(ROOT, '../pre-models/oriented_rcnn_r50_fpn_1x_dota_le90-6d2b2ce0.pth'), help='Checkpoint file')
    parser.add_argument(
        '--device', default='cuda:0', help='Device used for inference')
    parser.add_argument(
        '--palette',
        default='dota',
        choices=['dota', 'sar', 'hrsc', 'hrsc_classwise', 'random'],
        help='Color palette used for visualization')
    parser.add_argument(
        '--score-thr', type=float, default=0.3, help='bbox score threshold')
    args = parser.parse_args()
    return args


def main(args):
    # build the model from a config file and a checkpoint file
    model = init_detector(args.config, args.checkpoint, device=args.device)
    # test a single image
    result = inference_detector(model, args.img)
    # show the results
    show_result_pyplot(
        model,
        args.img,
        result,
        palette=args.palette,
        score_thr=args.score_thr)


if __name__ == '__main__':
    args = parse_args()
    main(args)
其中,需要自己下载预训练权重,网站在代码上方。下载慢的话可以复制链接到迅雷下载。
3.训练自己的数据集
训练自己的数据集,自定义数据集制作这部分其实是最麻烦的。MMrotate所使用的数据集格式是dota类型的,图片为.png格式且尺寸是 n×n 的(方形),不过不用担心,官方项目中有相应的工具包可自动转换。
不给我发现高宽不相等的数据集也可以进行训练。
具体参考:是否支持其他尺寸的图片输入而不用转化为DOTA类型1024*1024尺寸的图片? · Issue #237 · open-mmlab/mmrotate · GitHub
part1:训练数据集准备
这一部分可以参考我之前的博客:
记录使用yolov5进行旋转目标的检测_江小白jlj的博客-CSDN博客_yolov5旋转目标检测
这里给出rolabelimg生成的xml文件转dota数据格式的代码
'''
rolabelimg xml data to dota 8 points data
'''
import os
import xml.etree.ElementTree as ET
import math
import cv2
import numpy as np


def edit_xml(xml_file):

    if ".xml" not in xml_file:
        return

    tree = ET.parse(xml_file)
    objs = tree.findall('object')

    txt=xml_file.replace(".xml",".txt")

    png=xml_file.replace(".xml",".png")
    src=cv2.imread(png,1)

    with open(txt,'w') as wf:
        wf.write("imagesource:Google\n")
        # wf.write("gsd:0.115726939386\n")

        for ix, obj in enumerate(objs):

            x0text = ""
            y0text =""
            x1text = ""
            y1text =""
            x2text = ""
            y2text = ""
            x3text = ""
            y3text = ""
            difficulttext=""
            className=""

            obj_type = obj.find('type')
            type = obj_type.text

            obj_name = obj.find('name')
            className = obj_name.text

            obj_difficult= obj.find('difficult')
            difficulttext = obj_difficult.text

            if type == 'bndbox':
                obj_bnd = obj.find('bndbox')
                obj_xmin = obj_bnd.find('xmin')
                obj_ymin = obj_bnd.find('ymin')
                obj_xmax = obj_bnd.find('xmax')
                obj_ymax = obj_bnd.find('ymax')
                xmin = float(obj_xmin.text)
                ymin = float(obj_ymin.text)
                xmax = float(obj_xmax.text)
                ymax = float(obj_ymax.text)

                x0text = str(xmin)
                y0text = str(ymin)
                x1text = str(xmax)
                y1text = str(ymin)
                x2text = str(xmin)
                y2text = str(ymax)
                x3text = str(xmax)
                y3text = str(ymax)

                points=np.array([[int(x0text),int(y0text)],[int(x1text),int(y1text)],[int(x2text),int(y2text)],[int(x3text),int(y3text)]],np.int32)
                cv2.polylines(src,[points],True,(255,0,0)) #画任意多边

            elif type == 'robndbox':
                obj_bnd = obj.find('robndbox')
                obj_bnd.tag = 'bndbox'   # 修改节点名
                obj_cx = obj_bnd.find('cx')
                obj_cy = obj_bnd.find('cy')
                obj_w = obj_bnd.find('w')
                obj_h = obj_bnd.find('h')
                obj_angle = obj_bnd.find('angle')
                cx = float(obj_cx.text)
                cy = float(obj_cy.text)
                w = float(obj_w.text)
                h = float(obj_h.text)
                angle = float(obj_angle.text)

                x0text, y0text = rotatePoint(cx, cy, cx - w / 2, cy - h / 2, -angle)
                x1text, y1text = rotatePoint(cx, cy, cx + w / 2, cy - h / 2, -angle)
                x2text, y2text = rotatePoint(cx, cy, cx + w / 2, cy + h / 2, -angle)
                x3text, y3text = rotatePoint(cx, cy, cx - w / 2, cy + h / 2, -angle)

                points=np.array([[int(x0text),int(y0text)],[int(x1text),int(y1text)],[int(x2text),int(y2text)],[int(x3text),int(y3text)]],np.int32)
                cv2.polylines(src,[points],True,(255,0,0)) #画任意多边形


            # print(x0text,y0text,x1text,y1text,x2text,y2text,x3text,y3text,className,difficulttext)
            wf.write("{} {} {} {} {} {} {} {} {} {}\n".format(x0text,y0text,x1text,y1text,x2text,y2text,x3text,y3text,className,difficulttext))

        # cv2.imshow("ddd",src)
        # cv2.waitKey()


# 转换成四点坐标
def rotatePoint(xc, yc, xp, yp, theta):
    xoff = xp - xc;
    yoff = yp - yc;
    cosTheta = math.cos(theta)
    sinTheta = math.sin(theta)
    pResx = cosTheta * xoff + sinTheta * yoff
    pResy = - sinTheta * xoff + cosTheta * yoff
    return str(int(xc + pResx)), str(int(yc + pResy))


if __name__ == '__main__':
    dir = r"H:\duocicaiji\biaozhu_all"
    filelist = os.listdir(dir)
    for file in filelist:
        edit_xml(os.path.join(dir, file))
part2:数据集划分与预处理
这一步主要是将 整个数据集划分为训练集、验证集与测试集。
其文件结构如下所示:(我是将其划分80%, 10%, 10%)
datasets
--train
--images
--labels
--val
--images
--labels
--test
--images
下一步是将对数据进行裁剪 ,要将其裁剪为n x n大小的,主要利用的是官方项目中提供的裁剪代码。./mmrotate-0.3.0/tools/data/dota/split/img_split.py (裁剪脚本),该脚本通过读取
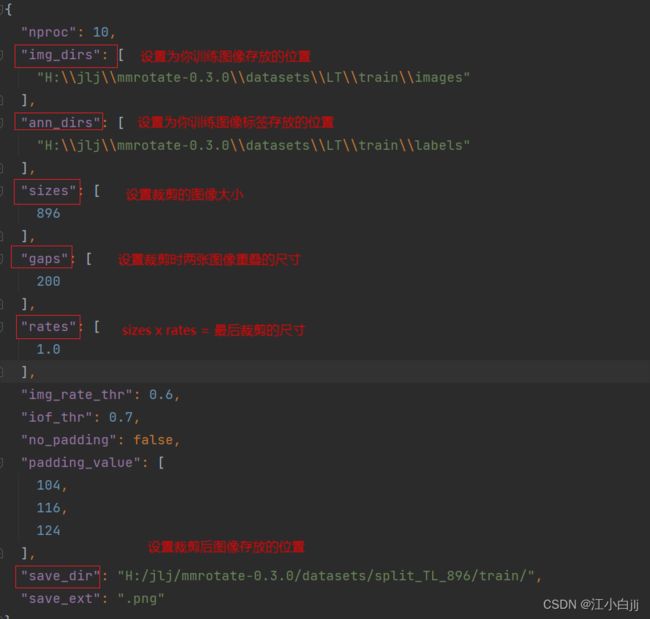
./mmrotate-0.3.0/tools/data/dota/split/split_configs 文件夹下的各个json文件中的参数设置来进行图像裁剪。我们需要修改其中的参数,让其加载上述的train、test、val中的图像及标签,并进行裁剪。
具体操作如下:(以train为例,val和test的操作相同)(其中ss_表示单一尺度裁剪,ms_表示多尺度裁剪)
修改split_configs文件夹下的ss_train.json文件
修改好以上的参数之后,再修改img_split.py 中的base_json参数
然后直接运行 img_split.py就行。
之后对val、test的裁剪也是同理。
至此完成对图像的裁剪预处理。
part3:模型训练与测试
以训练Rotated FasterRCNN为例:
训练:
首先,下载模型的预训练权重
mmrotate/README_zh-CN.md at main · open-mmlab/mmrotate · GitHub
从这里找到相应的链接进行权重文件下载
其次,修改 ./configs/rotated_faster_rcnn/rotated_faster_rcnn_r50_fpn_1x_dota_le90.py
主要就是修改其中的num_classes参数,根据你自己的数据集修改类别个数。
在该文件下还要设置预训练权重的地址,修改为你下载的预训练权重地址。
![]()
同时,修改 ./mmrotate-0.3.0/mmrotate/datasets/dota.py 中的类别名称
还需要修改的是, ./configs/_base_/datasets/dotav1.py 文件
# dataset settings
dataset_type = 'DOTADataset'

# 修改为你裁剪后数据集存放的路径
data_root = 'H:/jlj/mmrotate-0.3.0/datasets/split_TL_896/'
img_norm_cfg = dict(
    mean=[123.675, 116.28, 103.53], std=[58.395, 57.12, 57.375], to_rgb=True)
train_pipeline = [
    dict(type='LoadImageFromFile'),
    dict(type='LoadAnnotations', with_bbox=True),
    dict(type='RResize', img_scale=(1024, 1024)),
    dict(type='RRandomFlip', flip_ratio=0.5),
    dict(type='Normalize', **img_norm_cfg),
    dict(type='Pad', size_divisor=32),
    dict(type='DefaultFormatBundle'),
    dict(type='Collect', keys=['img', 'gt_bboxes', 'gt_labels'])
]
test_pipeline = [
    dict(type='LoadImageFromFile'),
    dict(
        type='MultiScaleFlipAug',
        img_scale=(1024, 1024),
        flip=False,
        transforms=[
            dict(type='RResize'),
            dict(type='Normalize', **img_norm_cfg),
            dict(type='Pad', size_divisor=32),
            dict(type='DefaultFormatBundle'),
            dict(type='Collect', keys=['img'])
        ])
]
data = dict(

    # 设置的batch_size
    samples_per_gpu=2,

    # 设置的num_worker
    workers_per_gpu=2,
    train=dict(
        type=dataset_type,
        ann_file=data_root + 'train/annfiles/',
        img_prefix=data_root + 'train/images/',
        pipeline=train_pipeline),
    val=dict(
        type=dataset_type,
        ann_file=data_root + 'val/annfiles/',
        img_prefix=data_root + 'val/images/',
        pipeline=test_pipeline),
    test=dict(
        type=dataset_type,
        ann_file=data_root + 'test/images/',
        img_prefix=data_root + 'test/images/',
        pipeline=test_pipeline))
还有 ./configs/_base_/schedules/schedule_1x.py 中
# evaluation
evaluation = dict(interval=5, metric='mAP')  # 训练多少轮评估一次
# optimizer
optimizer = dict(type='SGD', lr=0.0025, momentum=0.9, weight_decay=0.0001)
optimizer_config = dict(grad_clip=dict(max_norm=35, norm_type=2))
# learning policy
lr_config = dict(
    policy='step',
    warmup='linear',
    warmup_iters=500,
    warmup_ratio=1.0 / 3,
    step=[8, 11])
runner = dict(type='EpochBasedRunner', max_epochs=100)  # 训练的总次数
checkpoint_config = dict(interval=10)  # 训练多少次后保存模型
还有 ./configs/_base_/default_runtime.py
# yapf:disable
log_config = dict(
    interval=50,  # 训练多少iter后打印输出训练日志
    hooks=[
        dict(type='TextLoggerHook'),
        # dict(type='TensorboardLoggerHook')
    ])
# yapf:enable

dist_params = dict(backend='nccl')
log_level = 'INFO'
load_from = None
resume_from = None
workflow = [('train', 1)]

# disable opencv multithreading to avoid system being overloaded
opencv_num_threads = 0
# set multi-process start method as `fork` to speed up the training
mp_start_method = 'fork'
最后,修改 train.py
主要有两个参数: - -config: 使用的模型文件 (我使用的是 faster rcnn) ; - -work-dir:训练得到的模型及配置信息保存的路径。
一切都配置完毕后,运行 train.py 即可。
预测:
预测的话,修改 test.py 中的路径参数即可。
主要有三个参数: - -config: 使用的模型文件 ; - -checkpoint:训练得到的模型权重文件; --show-dir: 预测结果存放的路径。
参考博文:
基于MMRotate训练自定义数据集 做旋转目标检测 2022-3-30_YD-阿三的博客-CSDN博客_旋转目标检测数据集
【扫盲】MMRotate旋转目标检测训练_哔哩哔哩_bilibili
https://github.com/open-mmlab/mmrotate


