【Python机器学习基础教程】(三)
无监督学习与预处理
无监督学习的预处理
本章研究两类无监督学习:数据集变换与聚类
数据集的无监督变换是创建数据新的表示的算法。
无监督变换的一个常见应用是降维,它接受包含许多特征的数据的高维表示,并找到表示该数据的一种新方法,用较少的特征就可以概括其特性。
降维的一个常见应用是为了可视化将数据将为2维。
与之相反,聚类算法将数据划分成不同的组,每组包含相似的物项。
预处理和缩放
一些算法(如神经网络和SVM)对数据缩放非常敏感。
因此,通常的做法是对特征进行调节,使数据表示更适合于这些算法。
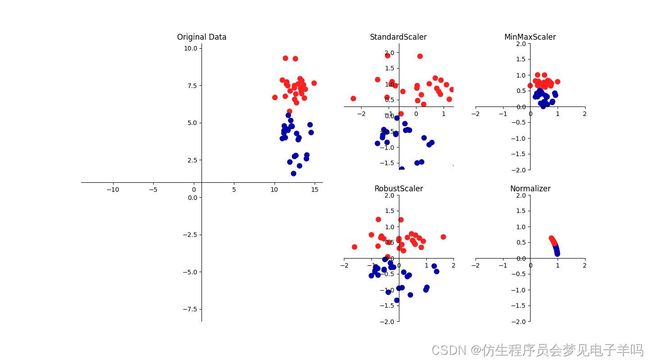
通常来说,这是对数据的一种简单的按特征的缩放 和移动。
mglearn.plots.plot_scaling()
降维、特征提取与流形学习
利用无监督学习进行数据变换可能有很多目的。最常见的 目的就是可视化、压缩数据,以及寻找数据量更大的数据表示以用于进一步的处理。
为实现这些目的,最简单也最常用的一种算法就是主成分分析。
我们也将学习另外两种算法:非负矩阵分解和t-SNE,前者通常用于特征提取,后者通常用于二维散点图的可视化。
主成分分析
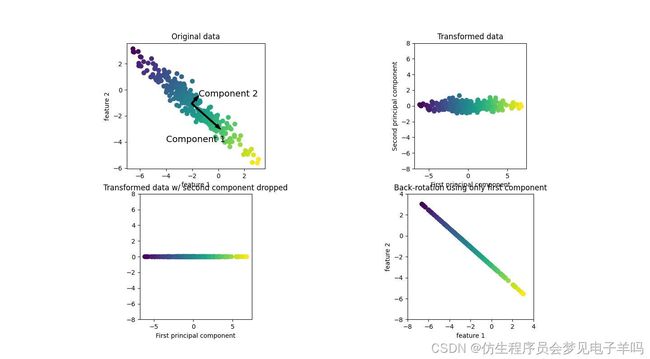
主成分分析(PCA)是一种旋转数据集的方法,旋转后的特征在统计上不相关。在做完这种旋转之后,通常是根据新特征对解释数据的重要性来选择它的一个子集。
mglearn.plots.plot_pca_illustration()
将PCA应用于cancer数据集并可视化
PCA最常见的应用之一就是将高维数据集可视化。
from sklearn.datasets import load_breast_cancer
from sklearn.preprocessing import StandardScaler
cancer = load_breast_cancer()

fig,axes = plt.subplots(15,2,figsize=(10,20))
malignant=cancer.data[cancer.target==0]
benign=cancer.data[cancer.target==1]

ax=axes.ravel()

for i in range(30):
    _,bins = np.histogram(cancer.data[:,i],bins=50)
    ax[i].hist(malignant[:,i],bins=bins,color=mglearn.cm3(0),alpha=.5)
    ax[i].hist(benign[:,i],bins=bins,color=mglearn.cm3(2),alpha=.5)
    ax[i].set_title(cancer.feature_names[i])
    ax[i].set_yticks(())
ax[0].set_xlabel("Feature magnitude")
ax[0].set_ylabel("Frequency")
ax[0].legend(["malignant","benign"],loc="best")
fig.tight_layout()
乳腺癌数据集中每个类别的特征直方图:
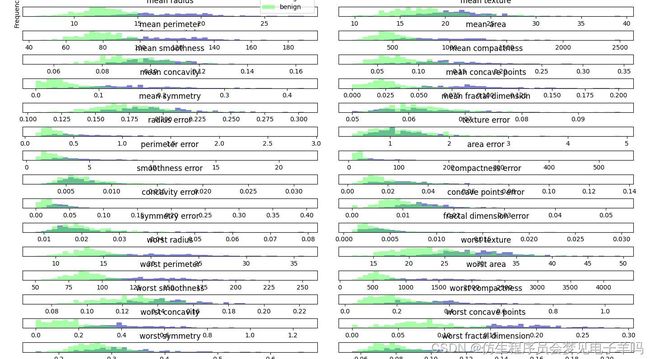
我们为每个特征创建一个直方图,计算具有某一特征的数据点在特定范围内(bin)的出现频率。
每张图都包含两个直方图,一个是良性类别的所有点(蓝色),一个是恶性类别的所有点(红色)。
但这种图无法向我们展示变量之间的相互作用以及这种相互作用与类别之间的关系。
利用PCA,我们可以获取到主要的相互作用,并得到稍微完整的图像。
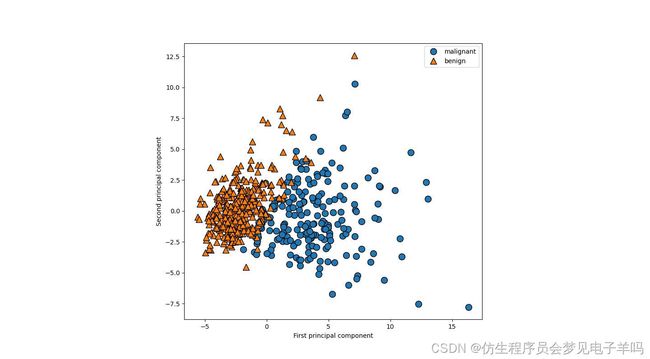
我们可以找到前两个主成分,并在这个新的二维空间中用散点图将数据可视化。
在应用PCA之前,我们利用StandardScaler缩放数据,使每个特征的方差均为1:
from sklearn.datasets import load_breast_cancer

cancer = load_breast_cancer()

scaler=StandardScaler()
scaler.fit(cancer.data)
X_scaled=scaler.transform(cancer.data)
from sklearn.decomposition import PCA
#保留数据的前两个成分
pca=PCA(n_components=2)
#对乳腺癌数据拟合PCA模型
pca.fit(X_scaled)

#将数据变换到前两个主成分的方向上
X_pca=pca.transform(X_scaled)
print("Original shape:{}".format(str(X_scaled.shape)))
print("Reduced shape:{}".format(str(X_pca.shape)))
Original shape:(569, 30)
Reduced shape:(569, 2)
现在我们可以对前两个主成分作图:
#对第一个和第二个 主成分作图,按类别着色
plt.figure(figsize=(8,8))
mglearn.discrete_scatter(X_pca[:,0],X_pca[:,1],cancer.target)
plt.legend(cancer.target_names,loc="best")
plt.gca().set_aspect("equal")
plt.xlabel("First principal component")
plt.ylabel("Second principal component")
在拟合过程中,主成分被保存在PCA对象的components_属性 中:
print("PCA component shape:{}".format(pca.components_.shape))
PCA component shape:(2, 30)
看一下components_的内容:
print("PCA components:\n{}".format(pca.components_))
PCA components:
[[ 0.21890244 0.10372458 0.22753729 0.22099499 0.14258969 0.23928535
0.25840048 0.26085376 0.13816696 0.06436335 0.20597878 0.01742803
0.21132592 0.20286964 0.01453145 0.17039345 0.15358979 0.1834174
0.04249842 0.10256832 0.22799663 0.10446933 0.23663968 0.22487053
0.12795256 0.21009588 0.22876753 0.25088597 0.12290456 0.13178394]
[-0.23385713 -0.05970609 -0.21518136 -0.23107671 0.18611302 0.15189161
0.06016536 -0.0347675 0.19034877 0.36657547 -0.10555215 0.08997968
-0.08945723 -0.15229263 0.20443045 0.2327159 0.19720728 0.13032156
0.183848 0.28009203 -0.21986638 -0.0454673 -0.19987843 -0.21935186
0.17230435 0.14359317 0.09796411 -0.00825724 0.14188335 0.27533947]]
我们还可以用热图将系数可视化:
plt.matshow(pca.components_,cmap='viridis')
plt.yticks([0,1],["First component","Second component"])
plt.colorbar()
plt.xticks(range(len(cancer.feature_names)),cancer.feature_names,rotation=60,ha='left')
plt.xlabel("Feature")
plt.ylabel("Principal components")
特征提取的特征脸
特征提取背后的思想是,可以找到一种数据表示,比给定的原始表示更适合于分析。
特征提取很有用,它的一个很好的应用实例就是图像。
图像由像素组成,通常存储为红绿蓝(RGB)强度。图像中的对象通常由上千个 像素组成,它们只有放在一起才有意义。
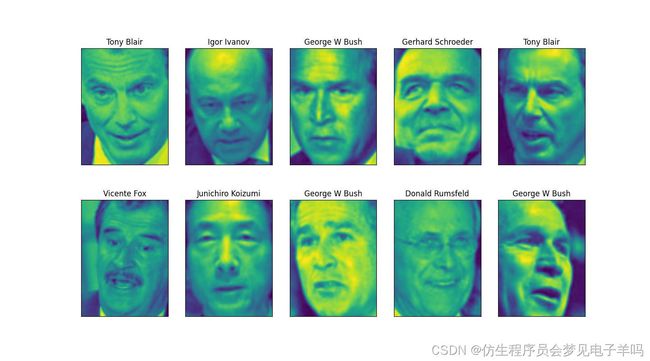
我们将给出PCA对图像做特征提取的一个简单应用,即处理Wild数据集Labeled Faces(标记人脸)中的人脸图像。
这一数据集包含从互联网上下载的名人脸部图像,它包含从21世纪初开始的政治家、歌手、演员和运动员的人脸图像。
我们使用这些图像的灰度版本,并将它们按照比例缩小以加快处理速度。
from sklearn.datasets import fetch_lfw_people
people = fetch_lfw_people(min_faces_per_person=20,resize=0.7)

image_shape=people.images[0].shape
fix,axes=plt.subplots(2,5,figsize=(15,8),subplots_kw={'xticks':(),'yticks':()})
for target,image,ax in zip(people.target,people.images,axes.ravel()):
    ax.imshow(image)
    ax.set_title(people.target_names[target])
print("people.image.shape:{}".format(people.image.shape))
print("Number of class :{}".format(len(people.target_names)))
people.image.shape:(1780, 87, 65)
Number of class :23
#计算每个目标出现的次数
counts=np.bincount(people.target)
#将次数与目标名称一起打印出来
for i,(count,name) in enumerate(zip(counts,people.target_names)):
    print("{0:25}{1:3}".format(name,count),end='  ')
    if (i+1)%3==0:
        print()
输出:
Alejandro Toledo          39  Amelie Mauresmo           21  Ariel Sharon              77
Atal Bihari Vajpayee      24  Bill Clinton              29  Colin Powell             236
Donald Rumsfeld          121  George W Bush            530  Gerhard Schroeder        109
Gloria Macapagal Arroyo   44  Hamid Karzai              22  Hans Blix                 39
Igor Ivanov               20  Junichiro Koizumi         60  Kofi Annan                32
Laura Bush                41  Lleyton Hewitt            41  Megawati Sukarnoputri     33
Serena Williams           38  Tiger Woods               23  Tom Daschle               25
Tony Blair               144  Vicente Fox               32
为了降低数据偏斜,我们对每个人最多只取50张图像
mask =np.zeros(people.target.shape,dtype=np.bool)
for target in np.unique(people.target):
    mask[np.where(people.target==target)[0][:50]]=1
X_people=people.data[mask]
y_people=people.target[mask]

#将灰度值缩放到0到1之间,而不是在0到255之间
#以得到更好的数据稳定性
X_people=X_people/255
使用单一最近邻分类器,寻找与要分类的人脸最为相似的人脸。
这个分类器原则上可以处理每个类别只有一个训练器样例的情况。
from sklearn.neighbors import KNeighborsClassifier
#将数据分为训练集和测试集
X_train,X_test,y_train,y_test=train_test_split(X_people,y_people,stratify=y_people,random_state=0)
#使用一个邻居构建KNeighborsClassifier
knn =KNeighborsClassifier(n_neighbors=1)
knn.fit(X_train,y_train)
print("Test set score of 1-nn:{:.2f}".format(knn.score(X_test,y_test)))
Test set score of 1-nn:0.40
我们得到的精度为40%
我们希望,使用沿着主成分方向的距离可以提高精度。
这里我们启用PCA的白化选项,它将主成分缩放到相同的尺度。
变换后的结果与使用StandardScaler相同。
再次使用数据,白化不仅对应于旋转数据,还对应于缩放数据 使其形状是圆形而不是椭圆。
mglearn.plots.plot_pca_whitening()
利用启用白化的PCA进行数据变换:
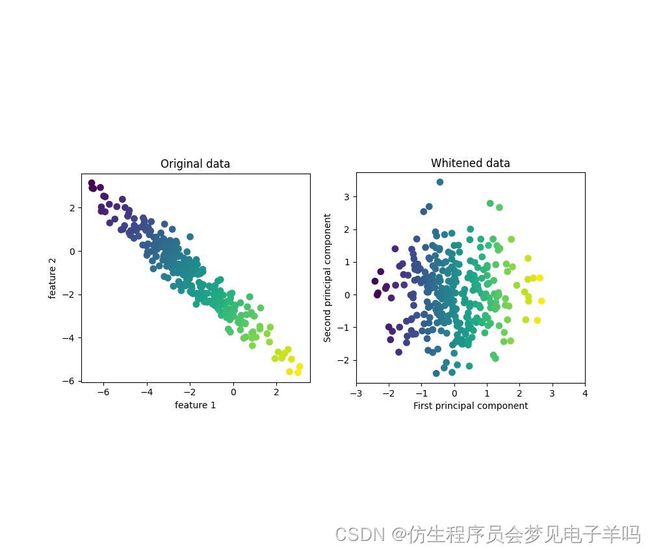
我们对训练数据拟合PCA对象,并提取前100个主成分。
然后对训练数据和测试数据进行变换:
pca=PCA(n_components=100,whiten=True,random_state=0).fit(X_train)
X_train_pca=pca.transform(X_train)
X_test_pca=pca.transform(X_test)

print("X_train_pca.shape:{}".format(X_train_pca.shape))
X_train_pca.shape:(639, 100)
新数据有100个特征,即前100个主成分。
现在,可以用新表示使用单一最近邻分类器来将我们的图像分类。
knn =KNeighborsClassifier(n_neighbors=1)
knn.fit(X_train_pca,y_train)
print("Test set accuracy:{:.2f}".format(knn.score(X_test_pca,y_test)))
Test set accuracy:0.43
精度提升为43%
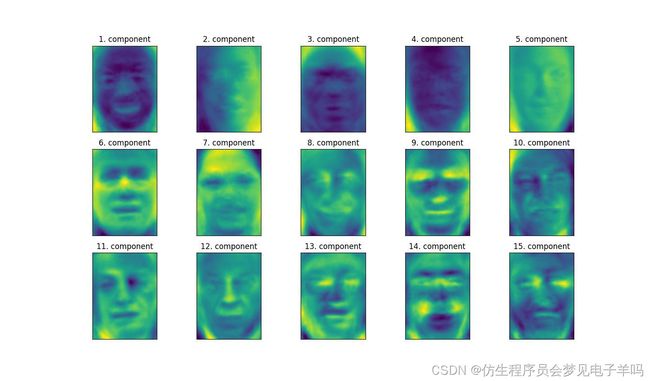
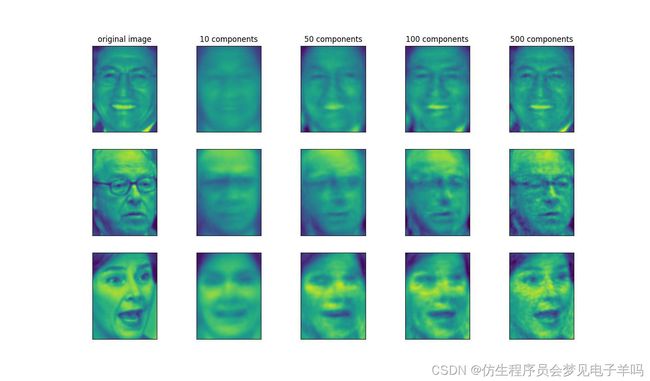
对于图像数据,我们还可以很容易地将找到的主成分可视化。成分对应于输入空间里的方向。
这里的输入空间是87像素x65像素的灰度图像,所以在这个空间中的方向也是87像素x65像素的灰度图像。
image_shape=people.images[0].shape
fix,axes=plt.subplots(3,5,figsize=(15,12),subplot_kw={'xticks':(),'yticks':()})
for i,(component,ax) in enumerate(zip(pca.components_,axes.ravel())):
    ax.imshow(component.reshape(image_shape),cmap='viridis')
    ax.set_title("{}.component".format((i+1)))
mglearn.plots.plot_pca_faces(X_train,X_test,image_shape)
这里我们分别用10个、50个、100个和500个成分对一些人脸进行重建并将其可视化:
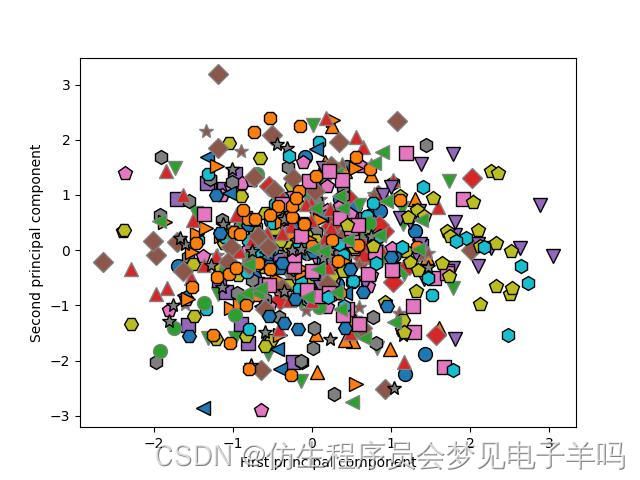
我们还可以尝试使用PCA的前两个主成分,将数据集中的所有人脸在散点图中可视化,其类别在图中给出。
mglearn.discrete_scatter(X_train_pca[:,0],X_train_pca[:,1],y_train)
plt.xlabel("First principal component")
plt.ylabel("Second principal component")
非负矩阵分解
非负矩阵分解(NMF)是另一种无监督学习算法,其目的在于提取有用的特征。
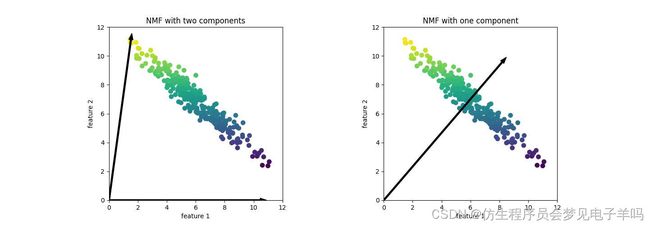
将NMF应用于模拟数据
mglearn.plots.plot_nmf_illustration()
将NMF应用于人脸图像
首先,观察分量个数如何影响NMF重建数据的好坏:
mglearn.plots.plot_nmf_faces(X_train,X_test,image_shape)
未完待续
假设我们对一个信号感兴趣,它是三个不同信号源合成的:
S=mglearn.datasets.make_signals()
plt.figure(figsize=(6,3))
plt.plot(S,'-')
plt.xlabel("Time")
plt.ylabel("Signal")
原始信号源

我们无法观测到原始信号,只能观察到三个信号的叠加混合。
我们想要将混合信号分解为 原始分量。
假设我们有许多种不同的方法来观测混合信号,每种方法都为我们提供了一系列测量结果。
#将数据混合成100维的状态
A=np.random.RandomState(0).uniform(size=(100,3))
X=np.dot(S,A.T)
print("Shape of measurements:{}".format(X.shape))
Shape of measurements:(2000, 100)
我们可以使用NMF来还原这三个信号:
from sklearn.decomposition import NMF

nmf=NMF(n_components=3,random_state=42)
S_=nmf.fit_transform(X)
print("Recovered signal shape:{}".format(S_.shape))
Recovered signal shape:(2000, 3)
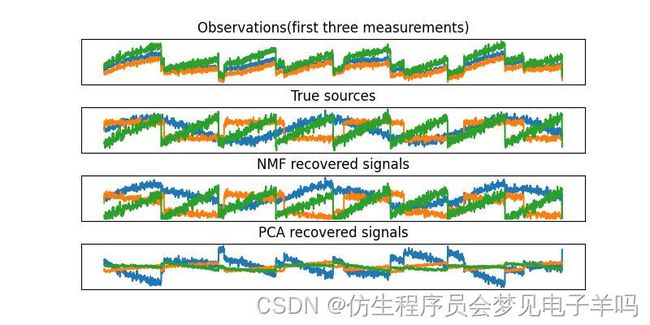
为了对比,我们也应用了PCA
from sklearn.decomposition import PCA
pca=PCA(n_components=3)
H=pca.fit_transform(X)
models=[X,S,S_,H]
names=['Observations(first three measurements)',
'True sources','NMF recovered signals','PCA recovered signals']
fig,axes=plt.subplots(4,figsize=(8,4),gridspec_kw={'hspace':.5},subplot_kw={'xticks':(),'yticks':()})
for model,name,ax in zip(models,names,axes):
    ax.set_title(name)
    ax.plot(model[:,:3],'-')
用t-SNE进行流形学习
有一类用于可视化的算法 叫做流形学习算法,它允许进行更复杂的映射,通常也可以给出更好的可视化。
其中特别有用的一个就是t-SNE算法。
我们将对scikit-learn包含的一个手写数字数据集应用 t-SNE流形学习算法。
在这个数据集中,每个数据点都是0到9之间手写数字的一张8x8灰度图像。
from sklearn.datasets import load_digits
digits = load_digits()
fig,axes=plt.subplots(2,5,figsize=(10,5),subplot_kw={'xticks':(),'yticks':()})
for ax,img in zip(axes.ravel(),digits.images):
    ax.imshow(img)

我们用PCA将降到二维的数据可视化。
我们对前两个主成分作图,并按类别对数据点着色:
#构建一个PCA模型
pca=PCA(n_components=2)
pca.fit(digits.data)
#将digits数据变换到前两个主成分的方向上
digits_pca=pca.transform(digits.data)
colors=["#476A2A","#7851B8","#BD3430","#4A2D4E","#8755255","#A83683","#4E655E","#853541","#3A3120","#535D8E"]
plt.figure(figsize=(10,10))
plt.xlim(digits_pca[:,0].min(),digits_pca[:,0].max())
plt.ylim(digits_pca[:,1].min(),digits_pca[:,1].max())
for i in range(len(digits.data)):
    plt.text(digits_pca[i,0],digits_pca[i,1],str(digits.target[i]),color=colors[digits.target[i]],fontdict={'weight':'bold','size':9})
plt.xlabel("First principal component")
plt.ylabel("Second principal component")
利用前两个主成分绘制digits数据集的散点图
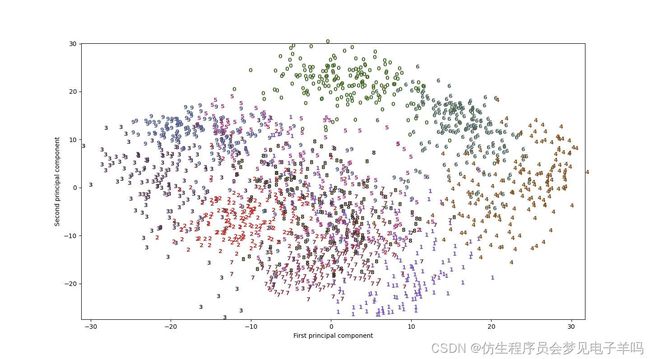
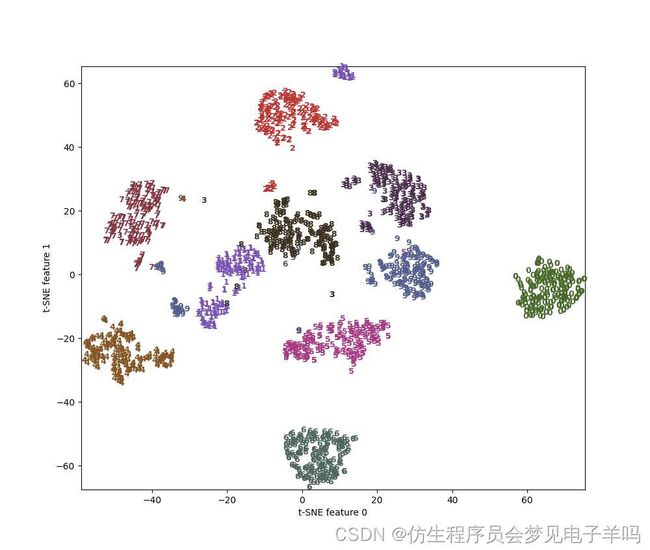
我们将t-SNE应用于同一个数据集,并对结果进行比较。
from sklearn.manifold import TSNE
tsne=TSNE(random_state=42)
#使用fit_transform而不是fit,因为TSNE没有transform方法
digits_tsne=tsne.fit_transform(digits.data)
plt.figure(figsize=(10,10))
plt.xlim(digits_tsne[:,0].min(),digits_tsne[:,0].max()+1)
plt.ylim(digits_tsne[:,1].min(),digits_tsne[:,1].max()+1)
for i in range(len(digits.data)):
    plt.text(digits_tsne[i,0],digits_tsne[i,1],str(digits.target[i]),color=colors[digits.target[i]],fontdict={'weight':'bold','size':9})
plt.xlabel("t-SNE feature 0")
plt.ylabel("t-SNE feature 1")
聚类
聚类是将数据集划分成组的任务,这些组叫做簇。
其目标是划分区域,使得一个簇内的数据点非常相似且不同于簇内的数据点非常不同。
与分类算法类似,聚类算法为每个数据点分配(或预测)一个数字,表示这个点属于哪个簇。
k均值聚类
k均值聚类是最简单也是最常用的聚类算法之一。
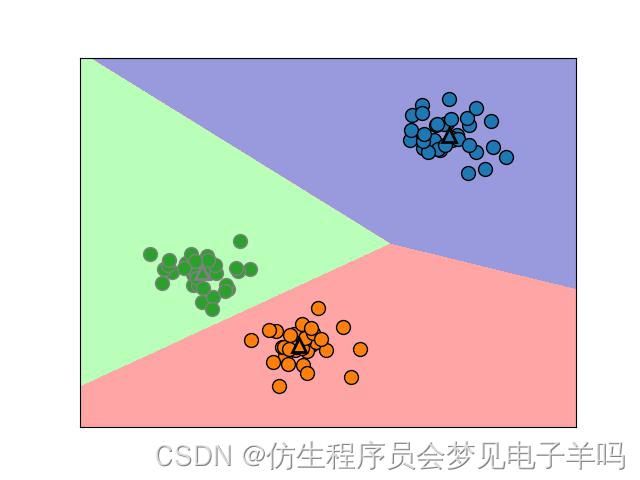
它试图找到代表数据特定区域的簇中心。
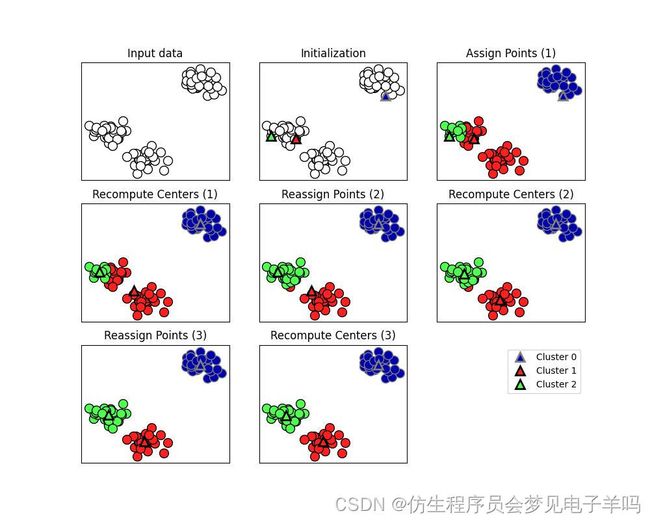
算法交替执行以下两个步骤:
将每个数据点分配给最近的簇中心,然后将每个簇中心设置为所分配的所有数据点的平均值。
如果簇的分配不再发生变化,那么算法结束。
mglearn.plots.plot_kmeans_algorithm()
mglearn.plots.plot_kmeans_boundaries()
