语义分割enet模型在ultra96开发板上的实现
语义分割enet模型在ultra96开发板上的实现
CSDN不能直接上传DOC文档,没时间整理插图,请大家见谅!
目 录
一、硬件和软件环境 2
1.1 主开发板Ultra96v2 2
1.2 独立硬件系统连接图 3
1.3 安装脚本cityscapesscripts 4
1.4 生成金标TrainIdLabelImgs文件 4
二、改变训练浮点模型 5
2.1 计算机侧项目目录 5
2.2 训练模型层改动 6
2.3 训练模型训练参数 7
2.3.1 训练输入目录 7
2.3.2 输入命令和参数 8
2.4 各种语义分割模型比较 9
三、Vitis-AI量化 11
3.1 量化浮点图像模型改动 11
3.2 量化浮点图像模型参数 13
3.3 量化浮点视频模型改动 14
3.4 量化命令与输入参数 14
3.5 部署模型输入层 15
四、测试用浮点模型 16
4.1增加输入层DeephiResize 16
4.2 训练和测试输入层ImageSegData 16
4.3 模型评估与测试 17
4.3.1 评估脚本命令 17
4.3.2 浮点评估命令 18
4.3.3 量化评估命令 18
4.3.4 mIOU指标评估 18
4.3.5 图形命令与显示 18
五、制作DPU 20
5.1 DPU IP 2304 20
5.2 DPU CLK 300M 20
六、编译 20
6.1 编译程序 20
6.1.1 判断cf还是tf模型 21
6.1.2 hwh生成dcf文件 21
6.1.3 编译命令 21
6.2 图像处理elf文件 22
6.3 视频处理elf文件 24
七、Ultra96板开发 25
7.1 项目文件夹 25
7.2 Makefile文件 25
7.3 源程序介绍 26
7.4 制作链接库 28
7.5 加载overlay程序 28
7.6 并行编译 29
7.7 多线程 29
7.8 单线程 30
7.9 图像和视频演示 31
一、硬件和软件环境
1.1 主开发板Ultra96v2
Ultra96采用了Zynq® UltraScale+ MPSoC 器件,跟银行卡一样大的板卡放下了Xilinx最先进的MPSoC,其搭载的xczu3eg提供了大约7020两倍的逻辑资源。

1.2 独立硬件系统连接图

1.3 安装脚本cityscapesscripts
#Installation cityscapesscripts
Install cityscapesscripts with pip
python -m pip install cityscapesscripts
Graphical tools (viewer and label tool) are based on Qt5 and can be installed via
python -m pip install cityscapesscripts[gui]
1.4 生成金标TrainIdLabelImgs文件
john@john-wang:~/Vitis-AI_1.2/Segment/workspace/cityscapesScripts/cityscapesscripts/preparation$ vim ~/.bashrc
export CITYSCAPES_DATASET=/home/john/Vitis-AI_1.2/Segment/Cityscapes
john@john-wang:~/Vitis-AI_1.2/Segment/workspace/cityscapesScripts/cityscapesscripts/preparation$ python createTrainIdLabelImgs.py
/home/john/Vitis-AI_1.2/Segment/workspace/cityscapesScripts/cityscapesscripts/preparation/…/…/gtFine///_gt_polygons.json
/workspace/Segment/Cityscapes/leftImg8bit/train/aachen/aachen_000000_000019_leftImg8bit.png /workspace/Segment/Cityscapes/gtFine/train/aachen/aachen_000000_000019_gtFine_labelTrainIds.png
二、改变训练浮点模型
2.1 计算机侧项目目录
2.2 训练模型层改动
**Replacing the un-pooling layer with deconvolution layer in the decoder module
layer {
  name: "UpsamplingBilinear2d_1"
  type: "Deconvolution"
  bottom: "BatchNorm_72"
  top: "UpsamplingBilinear2d_1"
  param {
    lr_mult: 0.0
    decay_mult: 0.0
  }
  convolution_param {
    num_output: 64
    bias_term: false
    pad: 1
    kernel_size: 4
    group: 64
    stride: 2
    weight_filler {
      type: "bilinear"
    }
  }
}
Replacing all PReLU with ReLU
Removing spatial dropout layers
Replace Batchnorm layers with a merged Batchnorm + Scale layer
layer {
  name: "BatchNorm_85"
  type: "BatchNorm"
  bottom: "ConvNd_87"
  top: "BatchNorm_85"
  param {
    lr_mult: 1
    decay_mult: 0
  }
  param {
    lr_mult: 1
    decay_mult: 0
  }
  param {
    lr_mult: 0
    decay_mult: 0
  }
  param {
    lr_mult: 0
    decay_mult: 0
  }
  batch_norm_param {
    use_global_stats: false
    eps: 1e-05
    scale_filler {
      type: "constant"
      value: 1
    }
    bias_filler {
      type: "constant"
      value: 0
    }
  }
}
Position Batchnorm layers in parallel with ReLU
In UNet-full/Unet-lite models Batchnorm/scale layer combinations were inserted before relu layers (after d0c, d1c, d2c, and d3c) as the DPU doesn’t support the data flow from Convolution to both the Concat and relu simultaneously**
2.3 训练模型训练参数
2.3.1 训练输入目录
img_seg.txt的真实位置
/home/john/Vitis-AI_1.2/Segment/Cityscapes/img_seg.txt
根据你的计算机内存调整batch_size大小和img_seg.txt的真实位置调整prototxt
2.3.2 输入命令和参数
2.3.2.1 进入GPU镜像
双系统的Ubuntu命令行输入:
john@john-wang:~/Vitis-AI_1.2$ ./docker_run.sh xilinx:gpunetscope
2.3.2.2 训练解码模型和batch_size参数
(vitis-ai-caffe)john@john-wang:/workspace/Segment/model/enet$ caffe train -solver solver_encoder.prototxt 2>&1 | tee encoder_models/train_encoder_log.txt
train_val_encoder.prototxt文件中batch_size决定于计算机内存大小,我的计算机是16G,只能取4,而 solver_encoder.prototxt的iter_size并不受限。
2.3.2.3 迁移训练全模型和batch_size参数
caffe train -solver solver.prototxt -weights final_models/pretrained.caffemodel 2>&1 | tee caffe-fine-tune-full.log
train_val.prototxt文件中batch_size决定于计算机内存大小,不同于解码模型,只能取2,而 solver.prototxt的iter_size并不受限。
2.4 各种语义分割模型比较
caffe train –solver solver.prototxt –weights final_models/pretrained.caffemodel 2>&1 | tee caffe-fine-tune-full.log
训练时计算机截图:
下图是各语义分割模型训练时的指标:
• ENet -> 6K 迭代模型
• ESPNet -> 18K 迭代模型
• FPN -> 10K 迭代模型
• Unet-Lite -> 13K 迭代模型
• Unet-Full -> 16K 迭代模型
鉴于以上分析结果,我们选用mIOU与迭代时间指标都不错的ENet模型。
三、Vitis-AI量化
3.1 量化浮点图像模型改动
train_val.prototxt 与 VAI float.prototxt 输入层对比
The input layer has changed from “ImageSegData” type to “ImageData”
原训练模型train_val.prototxt开始部分
layer {
  name: "data"
  type: "ImageSegData"
  top: "data"
  top: "label"
  transform_param {
    mean_value: 73
    mean_value: 82
    mean_value: 72
    scale: 0.022
    crop_size: 512
  }
  image_data_param {
    source: "/workspace/Segment/Cityscapes/img_seg.txt"
    #batch_size: 7
    batch_size: 3
    #root_folder: "/data2/datasets/Cityscapes/"
    shuffle: true
    mirror: false
  }
 include {
   phase: TRAIN
  }
}
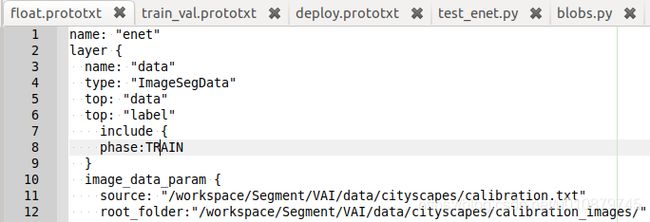
量化用浮点模型float.prototxt开始部分
name: "enet"
layer {
  name: "data"
  type: "ImageData"
  top: "data"
  top: "label"
    include {
    phase:TRAIN
  }
  image_data_param {
    source: "/workspace/Segment/VAI/data/cityscapes/calibration.txt"                    **#文件中没有目录**
    root_folder:"/workspace/Segment/VAI/data/cityscapes/calibration_images/"    **#指定目录**
    batch_size: 1         **#改为1**
    new_height: 512       **#指出图像分辨率**
    new_width: 1024
    shuffle: true
  }
  transform_param {
    mean_value: 73
    mean_value: 82
    mean_value: 72
    scale: 0.022
    resize_param {         **#代替crop_size: 512**
      prob: 1.0
      resize_mode: WARP
      height: 512          **#can change to 512x256 input size for video**
      width: 1024
    }
  }
}
原训练模型train_val.prototxt开始部分
layer {
  name: "loss"
  type: "SoftmaxWithLoss"        **#change to Softmax in VAI**
  bottom: "ConvNd_91"
  bottom: "label"
  top: "loss"
  loss_param {
    ignore_label: 255
  }
#  include {
#   phase: TRAIN
#  }
}
#===========accurcay=====
layer {
  name: "acc"                       **#delete acc layer in VAI**
  type: "Accuracy"
  bottom: "ConvNd_91"
  bottom: "label"
  top: "acc"
  top: "per_acc"
  accuracy_param {
  ignore_label: 255
  }
#  include {
#   phase: TRAIN
#  }
}
VAI float.prototxt
layer {
  name: "score"
  type: "Softmax"                  **#change to Softmax in VAI**
  bottom: "ConvNd_91"
  top: "score"
}
3.2 量化浮点图像模型参数
train_val.prototxt
3.3 量化浮点视频模型改动
量化输入video模型文件float.prototxt
name: “enet”
layer {
name: “data”
type: “ImageData”
top: “data”
top: “label”
include {
phase:TRAIN
}
image_data_param {
source: “/workspace/Segment/VAI/data/cityscapes/calibration.txt”
root_folder:"/workspace/Segment/VAI/data/cityscapes/calibration_images/"
batch_size: 1
new_height: 256
new_width: 512
shuffle: true
}
transform_param {
mean_value: 73
mean_value: 82
mean_value: 72
scale: 0.022
resize_param {
  prob: 1.0
  resize_mode: WARP
  height: 256
  width: 512
}
}
}
3.4 量化命令与输入参数
(vitis-ai-caffe) john@john-wang:/workspace/Segment/VAI/enet$ ./quantize_and_compile.sh
vai_q_caffe quantize
-model $(pwd)/float.prototxt
-weights $(pwd)/float.caffemodel
-gpu $GPUID
-calib_iter 1000
-output_dir ${model_dir} 2>&1 | tee ${model_dir}/quantize.txt
量化开始:
量化结束:
3.5 部署模型输入层
量化后输入层:
四、测试用浮点模型
4.1增加输入层DeephiResize
测试用浮点模型float_test.prototxt
"DeephiResize"是在测试中增加的一层,采用原来的float.prototxt能成功,但IOU下降一点。
** 增加DeephiResize 层**
# Resize to expected resolution
layer {
  name: "resize_down"
  type: "DeephiResize"
  bottom: "data"
  top: "data"
  include {
    phase: TEST
  }
  deephi_resize_param {
#    new_height: 256
#    new_width: 512
    new_height: 512
    new_width: 1024
#    new_height: 1024
#    new_width: 2048
    resize_type: 0
  }
}
4.2 训练和测试输入层ImageSegData
An additional input layer “ImageSegData” has been added which has a path to the val_img_seg_nomap.txt file. 只要用到标的,就必须用ImageSegData
如果反过来,在量化中采用ImageSegData层,则会出错。
从下面浮点与定点的带DEEPHI层与不带的对比,可以看到采用DEEPHI层要高2%
带DEEPHI层浮点模型IOU
带DEEPHI层部署模型IOU,但如果用这个模型编译会出错
不带DEEPHI层浮点模型IOU
不带DEEPHI层部署模型IOU
4.3 模型评估与测试
4.3.1 评估脚本命令
Docker xilinx:gpunetscope镜像中输入
(vitis-ai-caffe) john@john-wang:/workspace/Segment/VAI/enet$./test_float_and_quantized.sh
4.3.2 浮点评估命令
vai_q_caffe test -model float_test.prototxt -weights float.caffemodel -test_iter 500 -gpu $GPUID 2>&1 | tee test_results/float_model_test.txt
4.3.3 量化评估命令
vai_q_caffe quantize
-model ${model_dir}/float_test.prototxt
-weights ${model_dir}/float.caffemodel
-gpu $GPUID
-calib_iter 1000
-test_iter 500
-auto_test
-output_dir ${output_dir} 2>&1 | tee test_results/quantized_model_test.txt
4.3.4 mIOU指标评估
4.3.5 图形命令与显示
4.3.5.1 图形处理命令
./test_enet.sh
python test_enet.py
–model …/…/model/enet/deploy.prototxt
–weights …/…/model/enet/final_models/pretrained.caffemodel
–input …/munich_000000_000019_leftImg8bit.png
–out_dir ./
4.3.5.2 显示程序与效果
官方的镜像文件图形不能显示图片,调用Python的标准图像库里show()函数,而它调用了xv,但xv在后面的ubuntu版本中xv都不装了。
解决办法:先装一个ImageMagic,就相当于把xv的入口换成了ImageMagic的display:
(vitis-ai-caffe) john@john-wang:/workspace/segment/scripts/test_scripts$ sudo apt-get update
(vitis-ai-caffe) john@john-wang:/workspace/segment/scripts/test_scripts$ sudo apt-get install imagemagick
注意对这个镜像进行commit生成新的镜像文件。
以下是在计算机侧展示的图像:
处理前后图像
五、DPU选型与制作
5.1 DPU 2304制作
5.1.1 Vitis-AI输入文件
DPU2304比DPU1600算力更强,ultra96也能接受,可以在300M DPU时钟工作,时钟更高则由于电源设计缺陷而呈现不稳定。
Prj_config文件
Ultra96.json文件
5.1.2 DPU制作脚本
5.2 Vivado原理图
5.3 DPU 2304性能
六、Kernel编译
6.1 编译程序
john@john-virtual-machine:/workspace$ ./compile.sh
6.1.1 判断cf还是tf模型
if [ $FRAMEWORK = ‘cf’ ]; then
conda activate vitis-ai-caffe
elif [ $FRAMEWORK = ‘tf’ ]; then
conda activate vitis-ai-tensorflow
else
echo “Error: currently only caffe and tensorflow are supported.”
exit 1
fi
6.1.2 hwh生成dcf文件
if [ KaTeX parse error: Undefined control sequence: \ at position 109: …f Ultra96.json \̲ ̲ /opt/vitis_ai…{BOARD}/*.dcf
sudo cp *.dcf /opt/vitis_ai/compiler/arch/dpuv2/ B O A R D / {BOARD}/ BOARD/{BOARD}.dcf
fi
6.1.3 编译命令
if [ $FRAMEWORK = ‘cf’ ]; then
vai_c_caffe
–prototxt ${MODEL_UNZIP}/quantized/deploy.prototxt
–caffemodel KaTeX parse error: Undefined control sequence: \ at position 43: …loy.caffemodel \̲ ̲ --arch /opt/v…{BOARD}/${BOARD}.json
–output_dir ./model
–net_name ${MODEL}
elif [ $FRAMEWORK = ‘tf’ ]; then
echo “FRAMEWORK tensorflow”
vai_c_tensorflow
–frozen_pb KaTeX parse error: Undefined control sequence: \ at position 41: …eploy_model.pb \̲ ̲ --arch /opt/v…{BOARD}/KaTeX parse error: Undefined control sequence: \ at position 14: {BOARD}.json \̲ ̲ --output_dir …{MODEL}
6.2 图像处理elf文件
分辨率为512 x 1024
6.3 视频处理elf文件
分辨率为256 x 512
七、Ultra96板开发
7.1 项目文件夹
7.2 Makefile文件
PROJECT = seg
OBJ := main.o
CXX := g++
CC := gcc
linking libraries of OpenCV
LDFLAGS = $(shell pkg-config --libs opencv)
linking libraries of DNNDK
LDFLAGS += -ln2cube -lpthread -lhineon
CUR_DIR = $(shell pwd)
SRC = $(CUR_DIR)/src
BUILD = $(CUR_DIR)/build
MODEL = $(CUR_DIR)/model
VPATH = $(SRC)
MODEL = $(CUR_DIR)/model/dpu_segmentation_0.elf
ARCH = ( s h e l l u n a m e − m ∣ s e d − e s / a r m . ∗ / a r m v 71 / − e s / a a r c h 64. ∗ / a a r c h 64 / ) C F L A G S : = − O 2 − W a l l − W p o i n t e r − a r i t h − s t d = c + + 11 − f f a s t − m a t h − I . . / c o m m o n / i f e q ( (shell uname -m | sed -e s/arm.*/armv71/ -e s/aarch64.*/aarch64/) CFLAGS := -O2 -Wall -Wpointer-arith -std=c++11 -ffast-math -I../common/ ifeq ( (shelluname−m∣sed−es/arm.∗/armv71/−es/aarch64.∗/aarch64/)CFLAGS:=−O2−Wall−Wpointer−arith−std=c++11−ffast−math−I../common/ifeq((ARCH),armv71)
CFLAGS += -mcpu=cortex-a9 -mfloat-abi=hard -mfpu=neon -I…/common/
endif
ifeq ($(ARCH),aarch64)
CFLAGS += -mcpu=cortex-a53 -I…/common/
endif
all: $(BUILD) $(PROJECT)
$(PROJECT): $(OBJ)
$(CXX) $(CFLAGS) $(addprefix $(BUILD)/, $^) $(MODEL) -o $@ $(LDFLAGS)
%.o : %.cc
$(CXX) -c $(CFLAGS) $< -o ( B U I L D ) / (BUILD)/ (BUILD)/@
%.o : %.cpp
$(CXX) -c $(CFLAGS) $< -o ( B U I L D ) / (BUILD)/ (BUILD)/@
clean:
$(RM) -r $(BUILD)
$(RM) $(PROJECT)
$(BUILD) :
-mkdir -p $@
7.3 源程序介绍
源程序分为图像、视频和摄像头三个主程序。
enet_cap、enet_image、enet_videosingle、enet_videomulti四个文件夹分别负责实时实景、图像处理、单线程视频处理和多线程视频处理。
模型名称和节点:
#define KERNEL_CONV “segmentation_0”
#define CONV_INPUT_NODE “ConvNd_1”
#define MAXPOOL_INPUT_NODE “MaxPool2d_1”
#define CONV_OUTPUT_NODE “ConvNd_91”
19种对象的色彩
uint8_t colorB[] = {128, 232, 70, 156, 153, 153, 30, 0, 35, 152,
180, 60, 0, 142, 70, 100, 100, 230, 32};
uint8_t colorG[] = {64, 35, 70, 102, 153, 153, 170, 220, 142, 251,
130, 20, 0, 0, 0, 60, 80, 0, 11};
uint8_t colorR[] = {128, 244, 70, 102, 190, 153, 250, 220, 107, 152,
70, 220, 255, 0, 0, 0, 0, 0, 119};
图像预处理子程序
int dpuSetInputImageWithScale(DPUTask task, const char nodeName, const cv::Mat &image, float *mean, float scale, int idx)
读取指定目录图像文件名
void ListImages(string const &path, vector &images)
读入图像文件并调用DPU处理子程序
void Read(DPUTask *task, int argc)
DPU处理子程序
void runSegmentation(DPUTask *task, string filename, Mat img, int argc)
根据输入命令行,调用不同的图像均值初始化值
float mean[3];
if (argc == 1) {
mean[0]=73.0;mean[1]=82.0;mean[2]=72.0;
} else {
mean[0]=104.0;mean[1]=84.0;mean[2]=86.0;}
按照原图与DPU输出图一定比例混合输出
for (int i = 0; i < segMat.rows * segMat.cols * 3; i++) {
segMat.data[i] = img.data[i] * 0.2 + segMat.data[i] * 0.8;}
cv::imshow( “Display”, segMat );
根据输入命令行参数,选择不同的输入图像文件夹
if (argc == 2) {
lindau_images = path + argv[1] + “/”;
cout << " directory : " << lindau_images << endl;
} else {
cout << " directory : " << lindau_images << endl;
}
每幅图像停留300ms,期间若按下ESC,程序暂停,按回车,程序继续运行
if(waitKey(300)==27) while(getchar() != ‘\n’);//getchar();
调整视频窗口
cv::namedWindow(“Segmentation Display”, cv::WINDOW_NORMAL);
cv::resizeWindow(“Segmentation Display”, cv::Size(1024,512));
7.4 制作链接库
#!/bin/bash
set -e
model=segmentation
overlays=overlays_300M2304
cd KaTeX parse error: Expected 'EOF', got '#' at position 12: {overlays} #̲pwd aarch64-lin…{model}_0.elf -o libdpumodelKaTeX parse error: Expected group after '_' at position 57: …PIC -shared dpu_̲{model}_0.elf -o libdpumodel{KaTeX parse error: Expected 'EOF', got '}' at position 6: model}̲.so" cp libdpum…{model}.so /usr/lib/
ls -l /usr/lib/libdpu*.so
cd …
pwd
cp ./${overlays}/* /usr/local/lib/python3.6/dist-packages/pynq_dpu/overlays/
python3 overlay.py
7.5 加载overlay程序
import os
from pynq_dpu import DpuOverlay
overlay = DpuOverlay(“dpu.bit”)
os.system(“dexplorer -w”)
7.6 并行编译
尝试用make -j4并行编译, 提高编译速度
7.7 多线程
Ultra96v2 三线程 read segmentation display,的确能提高一点处理速度,但由于Ultra96的电源本身的缺陷,极不稳定,放弃。
多线程死掉
7.8 单线程
Ultra96v2 单线程 read segmentation display
7.9 图像和视频演示
这张是我们用自己的图片进行调试中的截图

以下效果图是在计算机侧展示的图像:
ultra96效果图一:

ultra96效果图二:

ultra96效果图三:

以下是调试过程记录:
https://github.com/Xilinx/Vitis-AI-Tutorials/tree/ML-Caffe-Segmentation-Tutorial
Installation cityscapesscripts
Install cityscapesscripts with pip
python -m pip install cityscapesscripts

Graphical tools (viewer and label tool) are based on Qt5 and can be installed via
python -m pip install cityscapesscripts[gui]
生成TrainIdLabelImgs图形文件
john@john-wang:~/Vitis-AI_1.2/Segment/workspace/cityscapesScripts/cityscapesscripts/preparation$ vim ~/.bashrc
export CITYSCAPES_DATASET=/home/john/Vitis-AI_1.2/Segment/Cityscapes
john@john-wang:~/Vitis-AI_1.2/Segment/workspace/cityscapesScripts/cityscapesscripts/preparation$ python createTrainIdLabelImgs.py
/home/john/Vitis-AI_1.2/Segment/workspace/cityscapesScripts/cityscapesscripts/preparation/…/…/gtFine///_gt_polygons.json
![]()
/workspace/Segment/Cityscapes/leftImg8bit/train/aachen/aachen_000000_000019_leftImg8bit.png /workspace/Segment/Cityscapes/gtFine/train/aachen/aachen_000000_000019_gtFine_labelTrainIds.png
模型的改变
https://github.com/Xilinx/Vitis-AI-Tutorials/tree/ML-Caffe-Segmentation-Tutorial
Note that these models may differ somewhat from the original models as they have been modified for end use in the DPU IP. Some of the types of modifications that were made to these models include:
Replacing the un-pooling layer with deconvolution layer in the decoder module
This essentially removes the decoder stage that is present in the (d) ESPNet model, and in place of that decoder stage, a single deconvolution layer is added to resize up 8x back to the original input size which matches the annotation size.
layer {
  name: "UpsamplingBilinear2d_1"
  type: "Deconvolution"
  bottom: "BatchNorm_72"
  top: "UpsamplingBilinear2d_1"
  param {
    lr_mult: 0.0
    decay_mult: 0.0
  }
  convolution_param {
    num_output: 64
    bias_term: false
    pad: 1
    kernel_size: 4
    group: 64
    stride: 2
    weight_filler {
      type: "bilinear"
    }
  }
}
Replacing all PReLU with ReLU
Removing spatial dropout layers
Replace Batchnorm layers with a merged Batchnorm + Scale layer
layer {
  name: "BatchNorm_85"
  type: "BatchNorm"
  bottom: "ConvNd_87"
  top: "BatchNorm_85"
  param {
    lr_mult: 1
    decay_mult: 0
  }
  param {
    lr_mult: 1
    decay_mult: 0
  }
  param {
    lr_mult: 0
    decay_mult: 0
  }
  param {
    lr_mult: 0
    decay_mult: 0
  }
  batch_norm_param {
    use_global_stats: false
    eps: 1e-05
    scale_filler {
      type: "constant"
      value: 1
    }
    bias_filler {
      type: "constant"
      value: 0
    }
  }
}
Position Batchnorm layers in parallel with ReLU
In UNet-full/Unet-lite models Batchnorm/scale layer combinations were inserted before relu layers (after d0c, d1c, d2c, and d3c) as the DPU doesn’t support the data flow from Convolution to both the Concat and relu simultaneously**
The ESPNet model will not compile properly due to the enablement of the channel augmentation setting in the DPU for those boards
you will need to create your own board image without channel augmentation in the DPU settings
“float.prototxt” that is included as an example in the VAI subfolders (i.e. ENet, ESPNet, etc.).
The “float.prototxt” files should be mostly identical to your “train_val.prototxt” except for the following:
train_val.prototxt 与 VAI float.prototxt 输入层对比
#train_val.prototxt
The input layer has changed from "ImageSegData" type to "ImageData"
layer {
  name: "data"
  type: "ImageSegData"
  top: "data"
  top: "label"
  transform_param {
    mean_value: 73
    mean_value: 82
    mean_value: 72
    scale: 0.022
    crop_size: 512
  }
  image_data_param {
    source: "/workspace/Segment/Cityscapes/img_seg.txt"
    #batch_size: 7
    batch_size: 3
    #root_folder: "/data2/datasets/Cityscapes/"
    shuffle: true
    mirror: false
  }
 include {
   phase: TRAIN
  }
}
# VAI float.prototxt
name: "enet"
layer {
  name: "data"
  type: "ImageData"
  top: "data"
  top: "label"
    include {
    phase:TRAIN
  }
  image_data_param {
    source: "/workspace/Segment/VAI/data/cityscapes/calibration.txt"                    **#文件中没有目录**
    root_folder:"/workspace/Segment/VAI/data/cityscapes/calibration_images/"    **#指定目录**
    batch_size: 1         **#改为1**
    new_height: 512    **#指出图像分辨率**
    new_width: 1024
    shuffle: true
  }
  transform_param {
    mean_value: 73
    mean_value: 82
    mean_value: 72
    scale: 0.022
    resize_param {       **#代替crop_size: 512**
      prob: 1.0
      resize_mode: WARP
      height: 512          **#can change to 512x256 input size for video**
      width: 1024
    }
  }
}
train_val.prototxt
layer {
  name: "loss"
  type: "SoftmaxWithLoss"        **#change to Softmax in VAI**
  bottom: "ConvNd_91"
  bottom: "label"
  top: "loss"
  loss_param {
    ignore_label: 255
  }
#  include {
#   phase: TRAIN
#  }
}
#===========accurcay=====
layer {
  name: "acc"                       **#delete acc layer in VAI**
  type: "Accuracy"
  bottom: "ConvNd_91"
  bottom: "label"
  top: "acc"
  top: "per_acc"
  accuracy_param {
  ignore_label: 255
  }
#  include {
#   phase: TRAIN
#  }
}
VAI float.prototxt
layer {
  name: "score"
  type: "Softmax"                  **#change to Softmax in VAI**
  bottom: "ConvNd_91"
  top: "score"
}
测试浮点模型float_test.prototxt
"DeephiResize"是在测试中增加的一层,尝试下不增加,采用原来的float.prototxt能成功,但IOU下降一点。
float_test.prototxt 增加DeephiResize 层
# Resize to expected resolution
layer {
  name: "resize_down"
  type: "DeephiResize"
  bottom: "data"
  top: "data"
  include {
    phase: TEST
  }
  deephi_resize_param {
#    new_height: 256
#    new_width: 512
    new_height: 512
    new_width: 1024
#    new_height: 1024
#    new_width: 2048
    resize_type: 0
  }
}
An additional input layer “ImageSegData” has been added which has a path to the val_img_seg_nomap.txt file. 只要用到标的,就必须用ImageSegData
量化过程中用ImageSegData,则报错
if type is ImageSegData, then error
量化过程中若文件包含ImageSegData in quantize.sh , 则因寻找标的图像文件而失败

如果将ImageSegData change to ImageData,则成功


编译过程用name: resize_down, type: DeephiResize, 则报错。
因无法识别该层。

从下面浮点与定点的带DEEPHI与不带的对比,可以看到采用DEEPHI层要高2%,但由于移植到板上并无该层,有意用该层是否有美化效果之意,有待观察


A new layer called “SegmentPixelIOU” within the vai_q_caffe tool. The val_img_seg_nomap.txt file actually points to the gtFIne_labelIds rather than gtFine_labelTrainIds. This is because the SegmentPixelIOU layer has been coded to automatically relabel the classes.
程序个性调整
img_seg.txt的真实位置
/home/john/Vitis-AI_1.2/Segment/Cityscapes/img_seg.txt

根据你的计算机内存调整batch_size大小和img_seg.txt的真实位置调整prototxt

For ESPNet or ENet:
(vitis-ai-caffe) john@john-wang:/workspace/Segment/model/enet$ cd Segment/model/enet
从头训练:
(vitis-ai-caffe) john@john-wang:/workspace/Segment/model/enet$
caffe train -solver solver_encoder.prototxt 2>&1 | tee encoder_models/train_encoder_log.txt
迁移训练:
(vitis-ai-tensorflow) john@john-wang:/workspace/Segment/model/enet$
caffe train -solver solver.prototxt -weights encoder_models/pretrained_encoder.caffemodel 2>&1 | tee final_models/train_log.txt
从头训练:
For FPN, Unet-Full, or Unet-Lite:
(vitis-ai-caffe) john@john-wang:/workspace/Segment/model/FPN$ caffe train -solver solver.prototxt 2>&1 | tee final_models/train_log.txt
迁移训练:
john@john-wang:/workspace/Segment/model/enet$
caffe train -solver solver.prototxt -weights final_models/pretrained.caffemodel 2>&1 | tee caffe-fine-tune-full.log
python test_enet.py --model …/…/model/enet/deploy.prototxt --weights …/…/model/enet/final_models/pretrained.caffemodel --input …/…/Cityscapes/leftImg8bit/val/frankfurt/frankfurt_000000_000576_leftImg8bit.png --out_dir ./


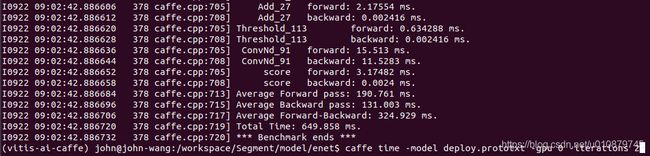
./build/tools/caffe time -model …/workspace/model/enet/deploy.prototxt -gpu 0 -iterations 100
Python评估
(vitis-ai-caffe) john@john-wang:/workspace/Segment/scripts/eval$ python cls34_to_cls19.py
(vitis-ai-caffe) john@john-wang:/workspace/Segment/scripts/eval$ ./forward_inference_enet.sh
(vitis-ai-caffe) john@john-wang:/workspace/Segment/scripts/eval$ ./eval_segmentation.sh
(vitis-ai-caffe) john@john-wang:/workspace/Segment/VAI/enet$ ./quantize_and_compile.sh*
quantizing network: /workspace/Segment/VAI/enet/float.prototxt
内存仅为8G时:
WARNING: Logging before InitGoogleLogging() is written to STDERR
F0925 02:21:10.564823 75 gpu_memory.cpp:191] Check failed: error == cudaSuccess (2 vs. 0) out of memory
内存为16G,可以正常运行
Calibration 1000张图片,时间大概十分钟

官方指导模型与权重对应文件
以下用于测试的两个模型与权重文件一一对应:
–model …/…/model/enet/deploy.prototxt
–weights …/…/model/enet/final_models/pretrained.caffemodel \
以下VAI文件夹的两个模型与权重文件一一对应:

成功生成elf文件


vitis ai 无法用cv2显示
cv2.error: OpenCV(3.4.2) /tmp/build/80754af9/opencv-suite_1535558553474/work/modules/highgui/src/window.cpp:632: error: (-2:Unspecified error) The function is not implemented. Rebuild the library with Windows, GTK+ 2.x or Carbon support. If you are on Ubuntu or Debian, install libgtk2.0-dev and pkg-config, then re-run cmake or configure script in function ‘cvShowImage’
import os
os.getcwd()
‘/workspace/Segment’pa="./scripts/test_scripts/frankfurt_000000_000576_leftImg8bit.png"
im=cv2.imread(pa)
type(im)
cv2.imshow(“im”,im)
(vitis-ai-caffe) john@john-wang:/workspace$ conda remove opencv
https://repo.anaconda.com/pkgs/main/linux-64
调用Python的标准图像库里show()函数,有可能无法显示图片。因为它调用了xv,但xv在后面的ubuntu版本中xv都不装了。
解决办法:先装一个ImageMagic,就相当于把xv的入口换成了ImageMagic的display:
sudo apt-get update
sudo apt-get install imagemagick
(vitis-ai-caffe) john@john-wang:/workspace/segment/scripts/test_scripts$ sudo apt-get update
(vitis-ai-caffe) john@john-wang:/workspace/segment/scripts/test_scripts$ sudo apt-get install imagemagick
xhost + 是使所有用户都能访问Xserver.

Unpooling
Unpooling是在CNN中常用的来表示max pooling的逆操作。这是从2013年纽约大学Matthew D. Zeiler和Rob Fergus发表的《Visualizing and Understanding Convolutional Networks》中产生的idea:
鉴于max pooling不可逆,因此使用近似的方式来反转得到max pooling操作之前的原始情况
简单来说,记住做max pooling的时候的最大item的位置,比如一个3x3的矩阵,max pooling的size为2x2,stride为1,反卷积记住其位置,其余位置至为0就行:

(171条消息) CNN概念之上采样,反卷积,Unpooling概念解释_g11d111的博客-CSDN博客 https://blog.csdn.net/g11d111/article/details/82350563
转置卷积(反卷积)
之所以叫转置矩阵,是因为下采样卷积核矩阵kernel逆运算上采样卷积必须旋转180,输入正常补零或间隔补零。
转置卷积
一般的卷积操作(我们这里只考虑最简单的无padding, stride=1的情况),都将输入的数据越卷越小。根据卷积核大小的不同,和步长的不同,输出的尺寸变化也很大。但是有的时候我们需要输入一个小的特征,输出更大尺寸的特征该怎么办呢?比如图像语义分割中往往要求最终输出的特征尺寸和原始输入尺寸相同,但在网络卷积核池化的过程中特征图的尺寸却逐渐变小。在这里转置卷积便能派上了用场。在数学上,转置卷积的操作也非常简单,把正常卷积的操作反过来即可。
对应上面公式,我们有转置卷积的公式:

如下所示:

这样我们就将一个转置卷积操作转换为对应的直接卷积。如下图所示:
总结一下将转置卷积转换为直接卷积的步骤:(这里只考虑stride=1,padding=0的情况)
设卷积核大小为k*k,输入为方形矩阵
对输入进行四边补零,单边补零的数量为k-1
将卷积核旋转180°,在新的输入上进行直接卷积
验证实验代码:
首先调用TensorFlow的conv_transpose函数来进行转置卷积
import tensorflow as tf

x = tf.reshape(tf.constant([[1,2],
                            [4,5]],dtype=tf.float32), [1, 2, 2, 1])
kernel = tf.reshape(tf.constant([[1,2,3],
                                 [4,5,6],
                                 [7,8,9]],dtype=tf.float32), [3, 3, 1, 1])
transpose_conv = tf.nn.conv2d_transpose(x, kernel, output_shape=[1, 4, 4, 1], strides=[1,1,1,1], padding='VALID')
sess = tf.Session()
print(sess.run(x))
print(sess.run(kernel))
print(sess.run(transpose_conv))
输出结果如下:
tf转置卷积
input: 1 2
4 5
kernel: 1 2 3
4 5 6
7 8 9
output: 1 4 7 6
8 26 38 27
23 62 74 48
28 67 76 45
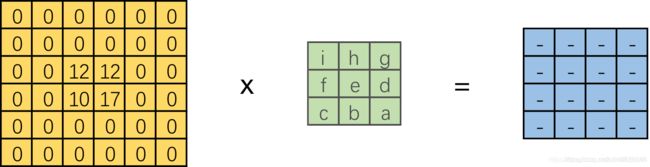
接下来按照上面的方式,将转置卷积转换为一个等效的直接卷积
#转换为等效普通卷积
x2 = tf.reshape(tf.constant([[0, 0, 0, 0, 0, 0],
                             [0, 0, 0, 0, 0, 0],
                             [0, 0, 1, 2, 0, 0],
                             [0, 0, 4, 5, 0, 0],
                             [0, 0, 0, 0, 0, 0],
                             [0, 0, 0, 0, 0, 0]],dtype=tf.float32), [1, 6, 6, 1])
kernel2  = tf.reshape(tf.constant([[9,8,7],
                                   [6,5,4],
                                   [3,2,1]],dtype=tf.float32), [3, 3, 1, 1])
conv = tf.nn.conv2d(x2,kernel2,strides=[1,1,1,1],padding='VALID')

print(sess.run(x2))
print(sess.run(kernel2))
print(sess.run(conv))
输出结果和转置卷积相同
等效直接卷积
input: 0 0 0 0 0 0
补零 0 0 0 0 0 0
0 0 1 2 0 0
0 0 4 5 0 0
0 0 0 0 0 0
0 0 0 0 0 0
kernel: 9 8 7
旋转180度 6 5 4
3 2 1
output: 1 4 7 6
输出不变 8 26 38 27
23 62 74 48
28 67 76 45
实验结果和我们的预测一致。
总结
通过这一篇文章,仔细的梳理的了转置卷积由来以及其等效的直接卷积形式。希望以后在使用转置卷积的过程中可以做到心中有数,有画面。有关其他不同参数的转置卷积还有很多,比如当stride不为1时怎么办,padding不为0时怎么办。关于这些细节的讨论建议可以去参看参考文献:https://arxiv.org/pdf/1603.07285.pdf 。这里作者做了更加详尽的讨论,这里就不赘述了。
参考
(171条消息) 抽丝剥茧,带你理解转置卷积(反卷积)_史丹利复合田的博客-CSDN博客 https://blog.csdn.net/tsyccnh/article/details/87357447
set() 函数创建一个无序不重复元素集
np.array.diag, sum(0), sum(1)的研究
>>> import numpy as np
>>> b=np.arange(9)
>>> b=b.reshape(3,3)
>>> b
array([[0, 1, 2],
       [3, 4, 5],
       [6, 7, 8]])
>>> np.diag(b)
array([0, 4, 8])
>>> b.sum(1)
array([ 3, 12, 21])
>>> b.sum(0)
array([ 9, 12, 15])
>>> 3+12+21
36
>>> 9+12+15
36
ious[np.isnan(ious)] ious[True]时置0 研究
def per_class_iu(hist):
    print(np.diag(hist))
    ious = np.diag(hist) / (hist.sum(1) + hist.sum(0) - np.diag(hist))
    print(ious)
    ious[np.isnan(ious)] = 0
    ious[True]=0
    print(ious)
    return ious
np.unique(gt) 该函数是去除数组中的重复数字,并进行排序之后输出
gt_id_set.update(np.unique(gt).tolist())
max_element类型是指针,指向值最大的那个元素;max_element指向值最小的那个元素。
测试如下:
#include
#include
using namespace std;
int main()
{
int a[] = { 42, 13, 12, 68, 25, 6, 5, 32 };
int len = sizeof(a) / sizeof(int);
auto s1 = max_element(a, a + len);
auto s2 = min_element(a, a + len);
cout << s1 << endl; //指向值最大的元素的地址
cout << s2 << endl; //指向值最小的元素的地址
cout << *s1 << endl; //值最大的元素
cout << *s2 << endl; //值最小的元素
cout << s1 - a << endl; //值最大的元素的索引
cout << s2 - a << endl; //值最小的元素的索引
return 0;
}