Tensorflow---使用Tensorflow进行VGG模型的迁移学习和自定义训练
一、代码中所需的数据集可以通过以下链接进行下载
百度网盘提取码:lala
二、代码运行环境
Tensorflow-gpu==2.4.0
Python==3.7
三、数据的读取处理代码如下:
import tensorflow as tf
import os
import glob
import random
import matplotlib.pyplot as plt

# 环境变量的配置
os.environ['TF_XLA_FLAGS'] = '--tf_xla_enable_xla_devices'
os.environ['TF_FORCE_GPU_ALLOW_GROWTH'] = 'true'

label_to_index = {
    'cat': 0,
    'dog': 1
}

index_to_label = {
    0: 'cat',
    1: 'dog'
}


# 进行图片的解析,同时进行图片增强
def train_load_image_by_path(path, label):
    img = tf.io.read_file(path)
    img = tf.image.decode_jpeg(img, channels=3)
    img = tf.image.resize(img, [360, 360])
    img = tf.image.random_crop(img, [256, 256, 3])  # 随机裁剪
    img = tf.image.random_flip_left_right(img)  # 随机左右翻转
    img = tf.image.random_flip_up_down(img)  # 随机上下翻转
    # img = tf.image.random_brightness(img, 0.5)  # 随机改变亮度
    # img = tf.image.random_contrast(img, 0, 1)  # 随机改变图像的对比度
    img = tf.cast(img, tf.float32)
    img = img / 255.0
    label = [tf.cast(label, tf.int64)]
    return img, label


# 进行图片的解析
def test_load_image_by_path(path, label):
    img = tf.io.read_file(path)
    img = tf.image.decode_jpeg(img, channels=3)
    img = tf.image.resize(img, [256, 256])
    img = tf.cast(img, tf.float32)
    img = img / 255.0
    label = [tf.cast(label, tf.int64)]
    return img, label


# 数据的提取
def make_dataset():
    train_image_path = glob.glob('dataset/train/*.jpg')
    random.shuffle(train_image_path)
    train_image_label = [label_to_index.get(img_path.split('\\')[1].split('.')[0]) for img_path in train_image_path]

    dataset = tf.data.Dataset.from_tensor_slices((train_image_path, train_image_label))
    count = len(train_image_path)
    test_count = int(count * 0.2)

    train_dataset = dataset.skip(test_count)
    test_dataset = dataset.take(test_count)

    train_dataset = train_dataset.map(train_load_image_by_path, num_parallel_calls=tf.data.experimental.AUTOTUNE)
    train_dataset = train_dataset.shuffle(100).batch(16)
    train_dataset = train_dataset.prefetch(tf.data.experimental.AUTOTUNE)

    test_dataset = test_dataset.map(test_load_image_by_path, num_parallel_calls=tf.data.experimental.AUTOTUNE)
    test_dataset = test_dataset.batch(16)
    test_dataset = test_dataset.prefetch(tf.data.experimental.AUTOTUNE)

    return train_dataset, test_dataset


if __name__ == '__main__':
    train_data, test_data = make_dataset()
    for imgg, labeel in test_data.take(1):
        plt.title(index_to_label.get(labeel.numpy()[0][0]))
        plt.imshow(imgg[0])
        plt.show()
四、模型的构建如下:
import tensorflow as tf
import os

# 环境变量的配置
os.environ['TF_XLA_FLAGS'] = '--tf_xla_enable_xla_devices'
os.environ['TF_FORCE_GPU_ALLOW_GROWTH'] = 'true'


# 进行模型的构建
def make_model():
    conv_base = tf.keras.applications.VGG16(weights='imagenet', include_top=False)
    model = tf.keras.Sequential()
    model.add(conv_base)
    model.add(tf.keras.layers.GlobalAveragePooling2D())
    model.add(tf.keras.layers.Dense(512, activation='relu'))
    model.add(tf.keras.layers.Dense(1, activation='sigmoid'))
    conv_base.trainable = False
    model.summary()
    return model


if __name__ == '__main__':
    make_model()
五、模型的训练如下:
import tensorflow as tf
import os
from data_loader import make_dataset
from model import make_model
import tqdm
import datetime

# 环境变量的配置
os.environ['TF_XLA_FLAGS'] = '--tf_xla_enable_xla_devices'
os.environ['TF_FORCE_GPU_ALLOW_GROWTH'] = 'true'

# 数据的加载
train_dataset, test_dataset = make_dataset()

# 模型的构建
my_model = make_model()

# 模型的相关配置
loss_func = tf.keras.losses.BinaryCrossentropy()
optimizer = tf.keras.optimizers.Adam()

# 评估指标
train_loss_mean = tf.keras.metrics.Mean('train_loss')
train_accuracy = tf.keras.metrics.Accuracy('train_accuracy')
test_loss_mean = tf.keras.metrics.Mean('test_loss')
test_accuracy = tf.keras.metrics.Accuracy('test_accuracy')

# 日志写入定义
run_now_time = datetime.datetime.now().strftime('%Y-%m-%d---%H-%M-%S')
log_dir = os.path.join('logs', run_now_time)
train_writer = tf.summary.create_file_writer(logdir=log_dir + 'train')
test_writer = tf.summary.create_file_writer(logdir=log_dir + 'test')

NUM_EPOCHS = 30


# 定义单步训练
def train_steps(model, images, labels):
    with tf.GradientTape() as t:
        pre = model(images)
        loss_step = loss_func(labels, pre)
    grads = t.gradient(loss_step, model.trainable_variables)
    optimizer.apply_gradients(zip(grads, model.trainable_variables))
    train_loss_mean(loss_step)
    train_accuracy(labels, tf.cast(pre > 0.5, tf.int32))


# 定义单步测试
def test_steps(model, images, labels):
    pre = model(images)
    loss_step = loss_func(labels, pre)
    test_loss_mean(loss_step)
    test_accuracy(labels, tf.cast(pre > 0.5, tf.int32))


def train():
    for epoch in range(NUM_EPOCHS):
        train_tqdm = tqdm.tqdm(iter(train_dataset), total=len(train_dataset))
        for image, label in train_tqdm:
            train_steps(my_model, image, label)
            train_tqdm.set_description_str('Epoch: {}'.format(epoch))
            train_tqdm.set_postfix_str(
                'Train loss : {} Train accuracy is : {}'.format(train_loss_mean.result(), train_accuracy.result()))
        with train_writer.as_default():
            tf.summary.scalar('train_loss', data=train_loss_mean.result(), step=epoch)
            tf.summary.scalar('train_accuracy', data=train_accuracy.result(), step=epoch)
        train_tqdm.close()
        train_loss_mean.reset_states()
        train_accuracy.reset_states()

        test_tqdm = tqdm.tqdm(iter(test_dataset), total=len(test_dataset))
        for image_test, label_test in test_tqdm:
            test_steps(my_model, image_test, label_test)
            test_tqdm.set_description_str('Epoch: {}'.format(epoch))
            test_tqdm.set_postfix_str(
                'Test loss : {} Test accuracy is : {}'.format(test_loss_mean.result(), test_accuracy.result()))
        with test_writer.as_default():
            tf.summary.scalar('test_loss', data=test_loss_mean.result(), step=epoch)
            tf.summary.scalar('test_accuracy', data=test_accuracy.result(), step=epoch)
        test_tqdm.close()
        test_loss_mean.reset_states()
        test_accuracy.reset_states()


if __name__ == '__main__':
    train()
六、模型预测代码如下:
import tensorflow as tf
import os
from data_loader import index_to_label
import matplotlib.pyplot as plt

# 环境变量的配置
os.environ['TF_XLA_FLAGS'] = '--tf_xla_enable_xla_devices'
os.environ['TF_FORCE_GPU_ALLOW_GROWTH'] = 'true'

# 模型的加载
my_model = tf.keras.models.load_model(r'model_data/model.h5')


# 图片的读取
def load_image(path):
    image = tf.io.read_file(path)
    image = tf.image.decode_jpeg(image, channels=3)
    image = tf.image.resize(image, [256, 256])
    image = tf.cast(image / 256, tf.float32)
    return image


# 进行预测
while True:
    input_path = input('请输入图片路径:\n')
    try:
        img = load_image(input_path)
    except:
        print('路径输入不正确!\n')
        continue
    else:
        plt.imshow(img)
        img = tf.expand_dims(img, 0)
        pre = my_model(img)
        plt.title(index_to_label.get(tf.cast(pre > 0.5, tf.int32).numpy()[0][0]))
        plt.show()
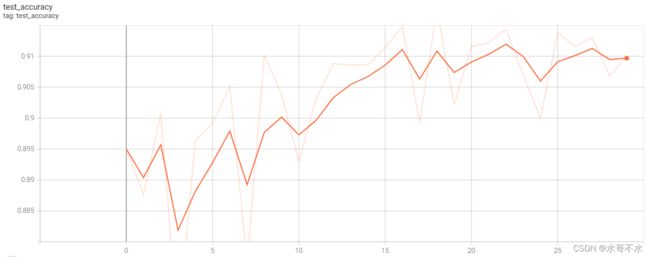
七、模型训练过程中,各个指标的变化情况


八、模型的预测结果如下
