集成学习-Bagging和Boosting算法
文章目录
- 集成学习
- Bagging
-
- 随机森林
- Bosting
-
- Adaboost
- GBDT
- XGBoost
集成学习
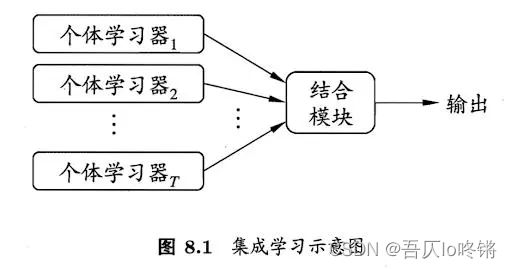
集成学习(ensemble learning)博采众家之长,通过构建并结合多个学习器来完成学习任务。“三个臭皮匠顶个诸葛亮”,一个学习器(分类器、回归器)效果可能并不好,通过结合若干学习器取得更好的效果,进一步提高精度等。
工作原理是⽣成多个学习器,每个学习器独⽴地学习并作出预测。这些预测最后结合成组合预测,因此优于任何⼀个单分类的做出预测。不难理解,如果3个学习器的预测结果是2正1负,若基于简单投票,则组合预测结果就是正,故也称为基于委员会的学习。
对于弱学习器(效果略优于随机猜测的学习器)来说,集成效果尤为明显。已证明,随着个体分类器数量的增加,集成的错误率将指数级下降,最终区域零。
但是如果生成的个体学习器的差异太小,得出的结果基本一致,那么集成学习后也不会有什么改善提高。也就是说,个体学习器应好而不同,既有一定准确性,又有一定多样性。
为了解决这个问题,一种方法是使用不同的算法,如分别用支持向量机、决策树、朴素贝叶斯、KNN等生成个体学习器。但更主流的是另一种方法:使用同种算法。
那新的问题是,怎么保证同种算法训练出的学习器有差异性呢?自然只能从数据下手。根据依赖性,可分为Bagging和Bosting两种方法。
Bagging
Bagging(Bootstrap Aggregating)生成个体学习器时,学习器之间没有任何依赖,也就是并行的生成个体学习器,主要解决过拟合。
Bagging主要关注降低方差。通过使用自助采样法,即通过有放回的抽样方式,生成n个新的数据集,并用这些数据集分别训练n个个体学习器,最后使用多数投票或取均值等结合策略生成集成器。
- 自助采样法
自助采样法(Bootstrap sampling)是对原始数据有放回的均匀采样,放回意味着可能重复抽到同一样本,也可能从来抽不到一些样本(约占36.8%),这些样本可用作测试集来对泛化性能进行评估。
- 结合策略
结合策略包括平均法、投票法和学习法。
对数值输出型可采用平均法。设 T T T个个体学习器 h 1 , h 2 , . . . h T {h_1,h_2,...h_T} h1,h2,...hT,用 h i ( x ) h_i(x) hi(x)表示 h i h_i hi在示例 x x x上的输出。
简单平均法: H ( x ) = 1 T ∑ i = 1 T h i ( x ) H(x)=\frac{1}{T}\sum_{i=1}^Th_i(x) H(x)=T1i=1∑Thi(x)
加权平均法: H ( x ) = ∑ i = 1 T w i h i ( x ) H(x)=\sum_{i=1}^Tw_ih_i(x) H(x)=i=1∑Twihi(x)
对分类任务可采用投票法。学习器 h i h_i hi从类别 c 1 , c 2 , . . . , c N c_1,c_2,...,c_N c1,c2,...,cN中预测类别,用 h i j ( x ) h_i^j(x) hij(x)表示 h i h_i hi在类别 c j c_j cj上的输出。
绝对多数投票法:超过半数则预测为该类别,否则拒绝。 H ( x ) = { c j , i f ∑ i = 1 T h i j ( x ) > 0.5 ∑ k = 1 N ∑ i = 1 T h i k ( x ) r e j e c t , o t h e r w i s e H(x)=\begin{cases}c_j,\quad if \sum_{i=1}^Th_i^j(x)>0.5\sum_{k=1}^N\sum_{i=1}^Th_i^k(x)\\reject,\quad otherwise \end{cases} H(x)={cj,if∑i=1Thij(x)>0.5∑k=1N∑i=1Thik(x)reject,otherwise
相对多数投票法: H ( x ) = c a r g m a x j ∑ i = 1 T h i j ( x ) H(x)=c_{arg max_j\sum^T_{i=1}h_i^j(x)} H(x)=cargmaxj∑i=1Thij(x)
加权投票法: H ( x ) = c a r g m a x j ∑ i = 1 T w i h i j ( x ) H(x)=c_{argmax_j\sum^T_{i=1}w_ih_i^j(x)} H(x)=cargmaxj∑i=1Twihij(x)
学习法通过另一个学习器来进行结合,如Stacking算法先从初始数据集训练出初级学习器,然后用初级学习器的输出作为次级学习器的输入,从而对初级学习器进行结合。简单说就是套娃。
随机森林
随机森林(Random Forest,RF)是Bagging的一个扩展变体,顾名思义是对决策树的集成。
决策树是在选择划分属性时,是在当前数据集所有特征属性集合中选择一个最优属性。而在随机森林中,对基决策树的每个结点,先从该结点的属性集合中随机选择一个包含 k k k个属性的子集,然后再在该子集中选择最优属性。
对原始数据集每次随机的选择 k k k个属性,构成 n n n个新数据集并训练基决策树,然后采用投票法等结合策略进行集成。而 k k k的取值,一般推荐 k = l o g 2 d k=log_2d k=log2d, d d d为属性个数。
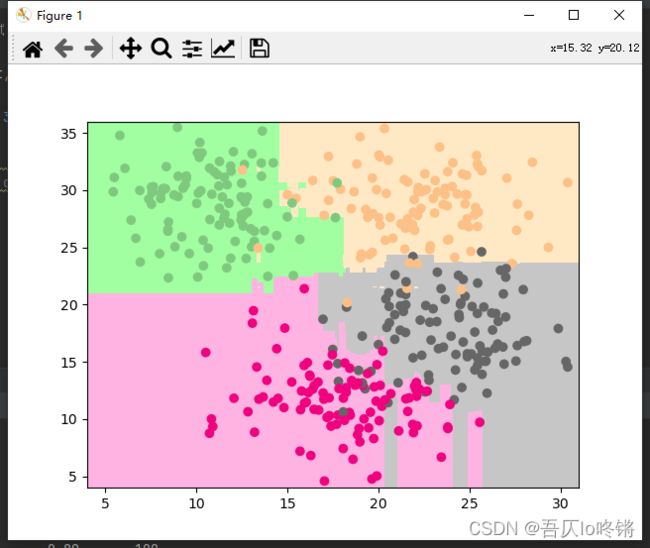
可以使用sklearn库中的RandomForestClassifier()函数创建随机森林分类模型,RandomForestRegressor()函数创建随机森林回归模型。
默认用基尼指数作为划分依据,包括一些剪枝参数等,可查文档不再赘述。
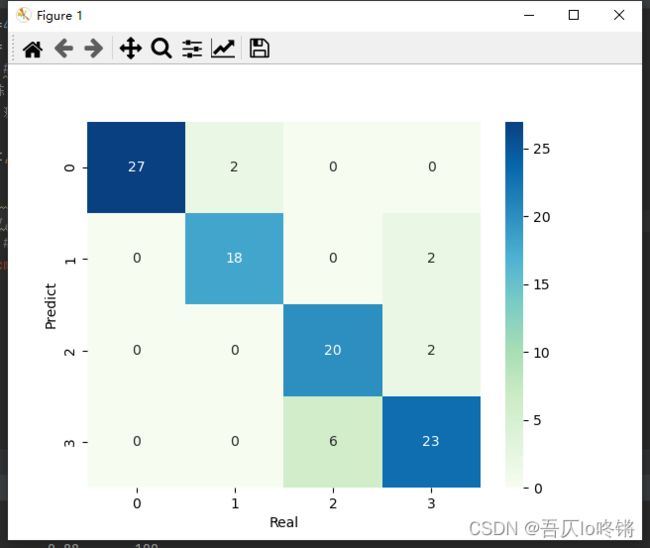
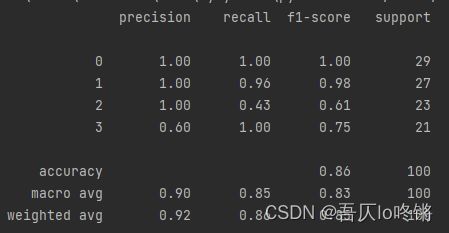
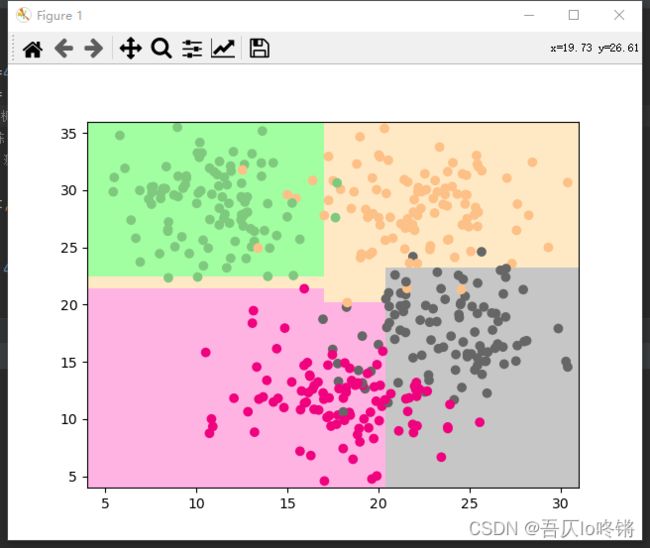
分类应用示例:
import matplotlib.pyplot as plt
import numpy as np
import pandas as pd
from matplotlib.colors import ListedColormap
from sklearn.datasets import make_blobs
from sklearn.ensemble import RandomForestClassifier
from sklearn.model_selection import train_test_split
from sklearn.metrics import classification_report
import seaborn as sns

def plot_boundary(model, axis):  # 画边界
    x0, x1 = np.meshgrid(
        np.linspace(axis[0], axis[1], int((axis[1] - axis[0]) * 100)).reshape(-1, 1),
        np.linspace(axis[2], axis[3], int((axis[3] - axis[2]) * 100)).reshape(-1, 1),
    )
    X_new = np.c_[x0.ravel(), x1.ravel()]
    y_predict = model.predict(X_new)
    zz = y_predict.reshape(x0.shape)
    custom_cmap = ListedColormap(['#A1FFA1', '#FFE9C5', '#FFB3E2', '#C6C6C6'])
    plt.contourf(x0, x1, zz, cmap=custom_cmap)


# 创建数据:400个样本,2个特征,4个类别,方差3
X, y = make_blobs(400, 2, centers=4, cluster_std=3, center_box=(10, 30), random_state=20221026)
x_train, x_test, y_train, y_test = train_test_split(X, y)  # 划分训练集测试集
rf = RandomForestClassifier()  # 随机森林
rf.fit(x_train, y_train)  # 训练
y_pred = rf.predict(x_test)  # 测试
# 评估
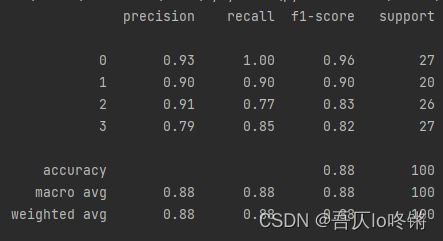
print(classification_report(y_test, y_pred))
# 可视化
plot_boundary(rf, axis=[4, 31, 4, 36])  # 边界
plt.scatter(X[:, 0], X[:, 1], c=y, cmap='Accent')  # 数据点
#cm = pd.crosstab(y_pred, y_test)  # 混淆矩阵
#sns.heatmap(data=cm, annot=True, cmap='GnBu', fmt='d')
#plt.xlabel('Real')
#plt.ylabel('Predict')
plt.show()
随机森林的结果是普遍优于决策树的,RF还有一些其他变体,这里不再深入。
Bosting
Bosting生成个体学习器时,学习器之间存在强依赖,后一个学习器是对前一个学习器的优化,也就是串行(序列化)的生成个体学习器,主要解决欠拟合
Bosting主要关注增加模型复杂度来降低偏差。先从初始训练集训练出一个基学习器,再根据基学习器的表现对训练样本分布进行调整,使先前学习做错的训练样本得到更多关注,即放大做错样本的权重,重复进行,直至基学习器个数达到指定值,最终将这些基学习器进行加权结合。
与Bagging自助采样不同,Boosting使用全部训练样本,根据前一个学习器的结果调整数据的权重,然后串行的生成下一个学习器,最后根据结合策略进行集成。
核心问题就是权重的调整和结合策略,主要有3种算法:Adaboost、GBDT、XGBoost。
Adaboost
Adaboost(Adaptive Boosting)基本分类器组成的加法模型,损失函数为指数损失函数,适用于分类任务。主要思想是对上一个基学习器的结果,提高分类错误样本的权重,降低分类正确样本的权重,然后通过加权后各基模型进行投票表决进行集成。
省去亿点点推导,多分类主要步骤是:
-
初始化样本权重 w 0 = 1 m w_0=\frac{1}{m} w0=m1,m是训练样本数。
-
训练学习器,计算误差 e t e_t et。 e t = w 0 ∑ i = 1 m ( y _ t r u e i ! = y _ p r e d i ) e_t=w_0\sum_{i=1}^m(y\_true_i!=y\_pred_i) et=w0i=1∑m(y_truei!=y_predi)
-
更新学习器权重:R表示分类数量。 α t = l e a r n i n g r a t e ∗ ( l n 1 − e t e t + l n ( R − 1 ) ) \alpha_t=learning_rate*(ln\frac{1-e^t}{e^t}+ln(R-1)) αt=learningrate∗(lnet1−et+ln(R−1))
-
更新样本权重: Z t Z_t Zt是归一化因子,表示所有样本权重的和。 w t = w t − 1 ∗ e x p ( α t ∗ ( y _ t r u e ! = y _ p r e d ) ) Z t w_t=\frac{w_{t-1}*exp(\alpha_t*(y\_true!=y\_pred))}{Z_t} wt=Ztwt−1∗exp(αt∗(y_true!=y_pred))
-
循环步骤2-4,训练T个学习器,加权投票得到集成器: H ( x ) = s i g n ( ∑ t = 1 T α t h t ( x ) ) H(x)=sign(\sum_{t=1}^T\alpha_th_t(x)) H(x)=sign(t=1∑Tαtht(x))
可以使用sklearn中的AdaBoostClassifier()函数创建Adaboost分类模型,AdaBoostRegressor()函数创建Adaboost回归模型,默认基学习器是决策树。
参数n_estimators是基学习器个数,默认50,过大易过拟合。learning_rate学习率默认1,过大易错过最优值,过小收敛慢。
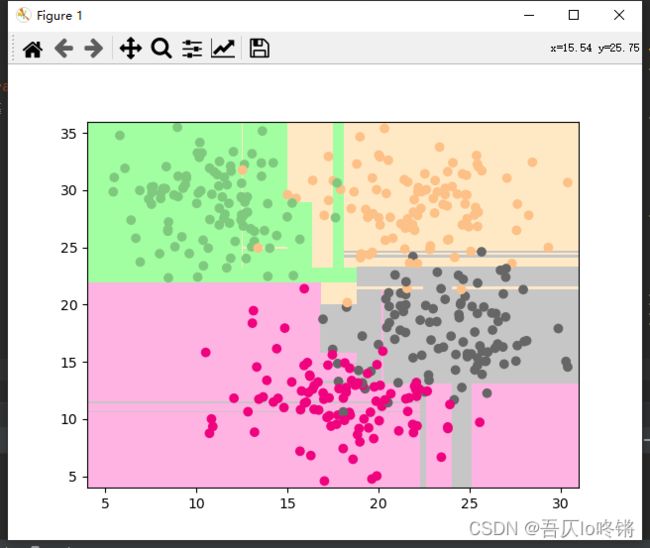
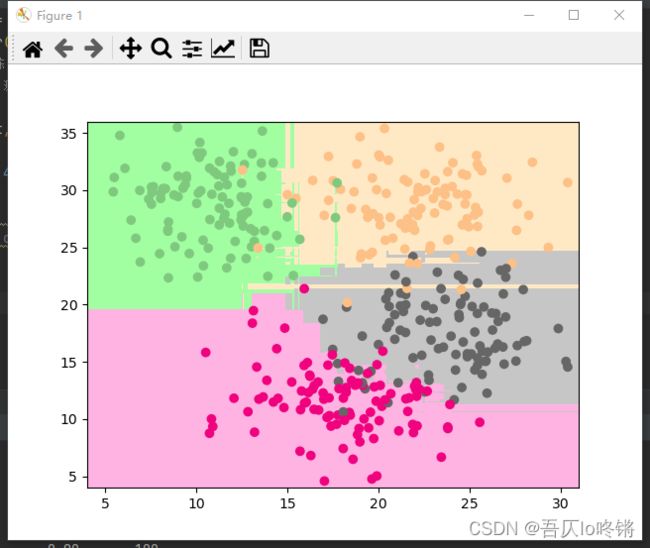
分类应用示例:
import matplotlib.pyplot as plt
import numpy as np
import pandas as pd
from matplotlib.colors import ListedColormap
from sklearn.datasets import make_blobs
from sklearn.ensemble import AdaBoostClassifier
from sklearn.model_selection import train_test_split
from sklearn.metrics import classification_report
import seaborn as sns

def plot_boundary(model, axis):  # 画边界
    x0, x1 = np.meshgrid(
        np.linspace(axis[0], axis[1], int((axis[1] - axis[0]) * 100)).reshape(-1, 1),
        np.linspace(axis[2], axis[3], int((axis[3] - axis[2]) * 100)).reshape(-1, 1),
    )
    X_new = np.c_[x0.ravel(), x1.ravel()]
    y_predict = model.predict(X_new)
    zz = y_predict.reshape(x0.shape)
    custom_cmap = ListedColormap(['#A1FFA1', '#FFE9C5', '#FFB3E2', '#C6C6C6'])
    plt.contourf(x0, x1, zz, cmap=custom_cmap)


# 创建数据:400个样本,2个特征,4个类别,方差3
X, y = make_blobs(400, 2, centers=4, cluster_std=3, center_box=(10, 30), random_state=20221026)
x_train, x_test, y_train, y_test = train_test_split(X, y)  # 划分训练集测试集
model = AdaBoostClassifier()  # AdaBoost
model.fit(x_train, y_train)  # 训练
y_pred = model.predict(x_test)  # 测试
# 评估
print(classification_report(y_test, y_pred))
# 可视化
plot_boundary(model, axis=[4, 31, 4, 36])  # 边界
plt.scatter(X[:, 0], X[:, 1], c=y, cmap='Accent')  # 数据点
#cm = pd.crosstab(y_pred, y_test)  # 混淆矩阵
#sns.heatmap(data=cm, annot=True, cmap='GnBu', fmt='d')
#plt.xlabel('Real')
#plt.ylabel('Predict')
plt.show()
(
插播反爬信息)博主CSDN地址:https://wzlodq.blog.csdn.net/
GBDT
GBDT(Gradient Boosting Decision Tree)梯度提升决策树,即梯度下降 + Boosting + 决策树,是以决策树为基学习器,以样本残差代替分类错误率作为模型提升的标准。
思想步骤基本与AdaBoost一致,只是将错误率用残差来计算,即真实值与预测值的差距,而最小残差的计算需要带入梯度公式,置偏导为0,求解梯度下降最大的负方向,即如名梯度提升决策树。也就是说损失函数同线性回归中最小二乘。
可以使用sklearn中的GradientBoostingClassifier()函数创建GBDT分类模型,GradientBoostingRegressor()函数创建GBDT回归模型,默认基学习器是决策树。
分类应用示例:
import matplotlib.pyplot as plt
import numpy as np
import pandas as pd
from matplotlib.colors import ListedColormap
from sklearn.datasets import make_blobs
from sklearn.ensemble import GradientBoostingClassifier
from sklearn.model_selection import train_test_split
from sklearn.metrics import classification_report
import seaborn as sns

def plot_boundary(model, axis):  # 画边界
    x0, x1 = np.meshgrid(
        np.linspace(axis[0], axis[1], int((axis[1] - axis[0]) * 100)).reshape(-1, 1),
        np.linspace(axis[2], axis[3], int((axis[3] - axis[2]) * 100)).reshape(-1, 1),
    )
    X_new = np.c_[x0.ravel(), x1.ravel()]
    y_predict = model.predict(X_new)
    zz = y_predict.reshape(x0.shape)
    custom_cmap = ListedColormap(['#A1FFA1', '#FFE9C5', '#FFB3E2', '#C6C6C6'])
    plt.contourf(x0, x1, zz, cmap=custom_cmap)


# 创建数据:400个样本,2个特征,4个类别,方差3
X, y = make_blobs(400, 2, centers=4, cluster_std=3, center_box=(10, 30), random_state=20221026)
x_train, x_test, y_train, y_test = train_test_split(X, y)  # 划分训练集测试集
model = GradientBoostingClassifier()  #梯度提升决策树
model.fit(x_train, y_train)  # 训练
y_pred = model.predict(x_test)  # 测试
# 评估
print(classification_report(y_test, y_pred))
# 可视化
plot_boundary(model, axis=[4, 31, 4, 36])  # 边界
plt.scatter(X[:, 0], X[:, 1], c=y, cmap='Accent')  # 数据点
#cm = pd.crosstab(y_pred, y_test)  # 混淆矩阵
#sns.heatmap(data=cm, annot=True, cmap='GnBu', fmt='d')
#plt.xlabel('Real')
#plt.ylabel('Predict')
plt.show()
XGBoost
XGBoost(eXtreme Gradient Boosting)算法本质上也是梯度提升决策树算法(GBDT),但其速度和效率较前者更高,是进一步优化改良,可理解为二阶泰勒展开+ boosting + 决策树 + 正则化。
对目标函数进行优化,用泰勒展开来近似目标,泰勒展开式含二阶导数利于梯度下降更快更准,可以不知到损失函数的显示表达,通过数据带入就可进行结点分裂计算。
同时添加正则项,预防过拟合,提高模型泛化能力。
sklearn库中并没有封装较新的XGBoost算法,可以安装开源的xgboost库:
pip install xgboost

使用xgboost库中XGBClassifier()函数创建XGBoost分类模型,XGBRegressor()函数创建XGBoost回归模型。
分类应用示例:
import matplotlib.pyplot as plt
import numpy as np
import pandas as pd
from matplotlib.colors import ListedColormap
from sklearn.datasets import make_blobs
from xgboost import XGBClassifier
from sklearn.model_selection import train_test_split
from sklearn.metrics import classification_report
import seaborn as sns

def plot_boundary(model, axis):  # 画边界
    x0, x1 = np.meshgrid(
        np.linspace(axis[0], axis[1], int((axis[1] - axis[0]) * 100)).reshape(-1, 1),
        np.linspace(axis[2], axis[3], int((axis[3] - axis[2]) * 100)).reshape(-1, 1),
    )
    X_new = np.c_[x0.ravel(), x1.ravel()]
    y_predict = model.predict(X_new)
    zz = y_predict.reshape(x0.shape)
    custom_cmap = ListedColormap(['#A1FFA1', '#FFE9C5', '#FFB3E2', '#C6C6C6'])
    plt.contourf(x0, x1, zz, cmap=custom_cmap)


# 创建数据:400个样本,2个特征,4个类别,方差3
X, y = make_blobs(400, 2, centers=4, cluster_std=3, center_box=(10, 30), random_state=20221026)
x_train, x_test, y_train, y_test = train_test_split(X, y)  # 划分训练集测试集
model = XGBClassifier()  #XGBoost
model.fit(x_train, y_train)  # 训练
y_pred = model.predict(x_test)  # 测试
# 评估
print(classification_report(y_test, y_pred))
# 可视化
plot_boundary(model, axis=[4, 31, 4, 36])  # 边界
plt.scatter(X[:, 0], X[:, 1], c=y, cmap='Accent')  # 数据点
#cm = pd.crosstab(y_pred, y_test)  # 混淆矩阵
#sns.heatmap(data=cm, annot=True, cmap='GnBu', fmt='d')
#plt.xlabel('Real')
#plt.ylabel('Predict')
plt.show()
原创不易,请勿转载(
本不富裕的访问量雪上加霜)
博主首页:https://wzlodq.blog.csdn.net/
来都来了,不评论两句吗
如果文章对你有帮助,记得一键三连❤
