YOLO-V5 目标检测教程(参数含义-数据集制作)
代码github:https://github.com/ultralytics/yolov5
任务:应用于目标检测
环境和配置部分:
调用Conda,新建环境--激活环境:conda activate 新环境
如果没有安装Conda的,建议安装一个,管理环境比较方便,这里就不讲了。
安装包:requirements.txt里面通过上方提示来进行安装。(没用pycharm的,用命令行安装把)
pip install -r requirements.txt其中pycocotools windows包该指令安装不了,改为数据指令,进行手动安装.
pip install pycocotools-windows插一小段:建议每次代码写完打包的时候,都自己手写一个环境配置的文本。如下:(纯属方便自己后续,换设备的时候,不用一个一个的配环境了,方便别人也方便自己。)
matplotlib>=3.2.2
numpy>=1.18.5
opencv-python>=4.1.2
Pillow>=7.1.2
PyYAML>=5.3.1
requests>=2.23.0
scipy>=1.4.1
torch>=1.7.0
torchvision>=0.8.1
tqdm>=4.41.0
注意:yolo中每个模型其实要求一个最好的图像尺寸的,但是这个不是必要的,具体操作过程为:输入图像reshape为模型适合的尺寸,之后进行物体目标的检测,检测结果之后再将图像reshape为原始的图像尺寸。
预训练模型:
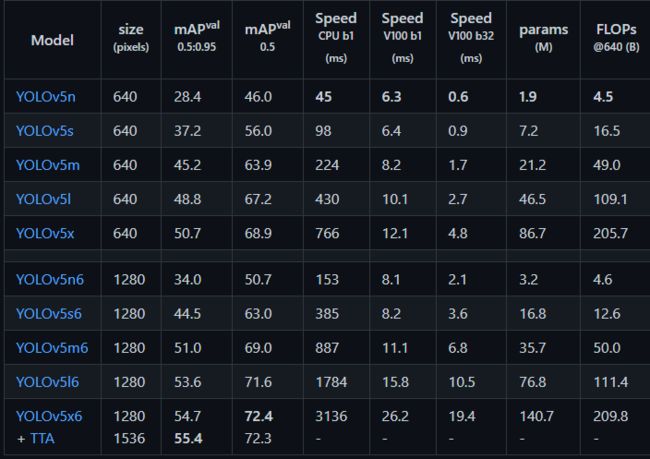
原始代码中,其实提供预训练模型的:
model:文件的下载
detect:通过联网方式下载。容易失败,网速顶不住.在下方进行更改.
![]()
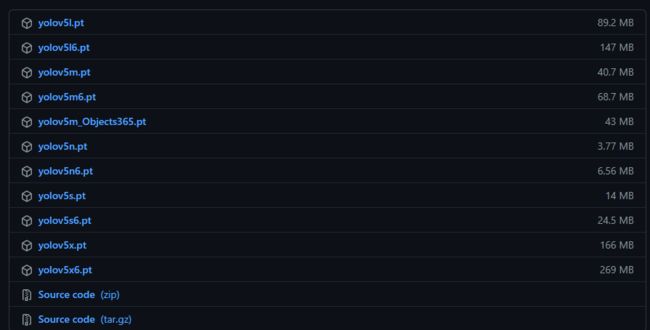
第二种,直接github上网页下载模型文件:(比较推荐这种方式)
下载地址: https://github.com/ultralytics/yolov5/releases
参数解释和配置:
parser.add_argument()这种类型的写法:是在命令行输入的时候,可以通过加入该项指令来进行启动。
例如开启下面一项,那么具体操作:python xxx.py --view=img 通过该行代码,view—img则设置为了True.
pycharm的参数配置方法如下:
具体参数解释:
该指令:置信区间大于该指标的时候,才会输出
parser.add_argument('--conf-thres', type=float, default=0.25, help='confidence threshold')该指令:iou算法,取得是两个框之间的重叠程度,0不重叠,1是全部重叠,重叠之后选取一个。
具体公式:对应的两个框交集除以并集。
parser.add_argument('--iou-thres', type=float, default=0.45, help='NMS IoU threshold')具体理解:
该指令:最大框的面积
parser.add_argument('--max-det', type=int, default=1000, help='maximum detections per image')该命令:通过是否在运行过程中显示结果。
parser.add_argument('--view-img', action='store_true', help='show results')该命令:保存结果在TXT文本,文本中保存的则有:类别和对应的概率。
parser.add_argument('--save-txt', action='store_true', help='save results to *.txt')该命令:保存对应的置信区间。
parser.add_argument('--save-conf', action='store_true', help='save confidences in --save-txt labels'该指令:保存预测结果的准确率
parser.add_argument('--save-crop', action='store_true', help='save cropped prediction boxes')该指令:不保存结果
parser.add_argument('--nosave', action='store_true', help='do not save images/videos')该指令:保存对应的类。例如--classes 0 那么结果将会只保存为0的一类。
parser.add_argument('--classes', nargs='+', type=int, help='filter by class: --classes 0, or --classes 0 2 3')该指令:NMS算法增强
parser.add_argument('--agnostic-nms', action='store_true', help='class-agnostic NMS')该指令:算法增强
parser.add_argument('--augment', action='store_true', help='augmented inference')该指令:特征可视化
parser.add_argument('--visualize', action='store_true', help='visualize features')该指令:丢弃模型中多于成分,例如优化器的结果等,只保留模型的预测文件
parser.add_argument('--update', action='store_true', help='update all models')该指令:结果保存路径
parser.add_argument('--project', default=ROOT / 'runs/detect', help='save results to project/name')该指令:保存结果放在上面路劲的文件下。
parser.add_argument('--name', default='exp', help='save results to project/name')该指令:保存结果不新建新的exp文件夹,直接在已有的exp文件夹下保存。不会导致每次执行代码都会生成一个新的文件夹.
parser.add_argument('--exist-ok', action='store_true', help='existing project/name ok, do not increment')模型的训练:(本地训练:)
数据的结构
image ---图像
训练参数:
设置模型用那个模型进行参数的初始化。相当于预训练的加载模型
parser.add_argument('--weights', type=str, default=ROOT / 'yolov5s.pt', help='initial weights path')初始化选取那么模型的结构,提供了四个yaml的初始化参数列表:【这个可以自己写yaml的配置文件,也可以直接用作者的】里面就是一些模型参数的配置文件。
parser.add_argument('--cfg', type=str, default='', help='model.yaml path')选择那部分的数据集:默认为从coco128.yaml选取作为训练.
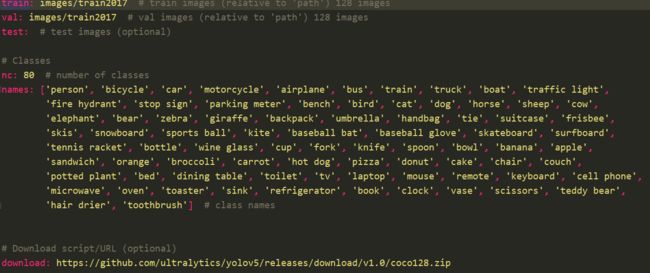
parser.add_argument('--data', type=str, default=ROOT / 'data/coco128.yaml', help='dataset.yaml path')数据的类型如下: 路径配置,nc为类别数。 names:为对应每个类别。如class 0 那么就是person。 download:去哪里下载数据集。
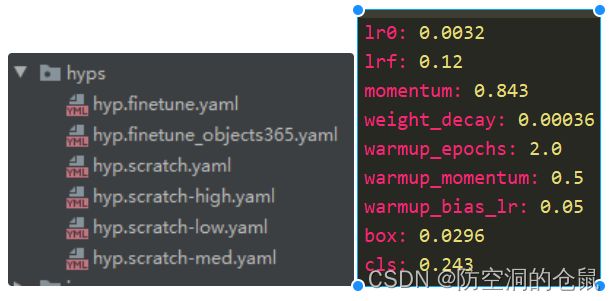
arser.add_argument('--hyp', type=str, default=ROOT / 'data/hyps/hyp.scratch.yaml', help='hyperparameters path')超参数的配置:
矩阵填充:较少训练数据中的不必要成分,加速训练。
parser.add_argument('--rect', action='store_true', help='rectangular training')类似断电保存,让模型从上次的那个最近模型中进行继续训练.
default需要指定模型,例如:default = 'runs/train/exp2/weights/best.pt'
parser.add_argument('--resume', nargs='?', const=True, default=False, help='resume most recent training')锚点检测,而非滑动窗口的方式遍历图像。给定一个感兴趣区,从而在roi区间之间进行遍历和搜索。
parser.add_argument('--noautoanchor', action='store_true', help='disable autoanchor check')调优方式的改进
parser.add_argument('--evolve', type=int, nargs='?', const=300, help='evolve hyperparameters for x generations')上一轮训练结果不好的图片,在下一轮训练中加入更多的权重。
parser.add_argument('--image-weights', action='store_true', help='use weighted image selection for training')图像训练完是否进行缩放。
parser.add_argument('--multi-scale', action='store_true', help='vary img-size +/- 50%%')训练的数据是单类别还是多类别,默认为多类别,默认未开启。
parser.add_argument('--single-cls', action='store_true', help='train multi-class data as single-class')训练数据如果采用了640,那么如果测试图像大于640,在开启这项功能之后结果可能会更好。缺点将会降低640尺寸的的预测结果。
parser.add_argument('--quad', action='store_true', help='quad dataloader')学习率自适应,余弦退火。
parser.add_argument('--linear-lr', action='store_true', help='linear LR')标签平滑,防止过拟合。
parser.add_argument('--label-smoothing', type=float, default=0.0, help='Label smoothing epsilon')开启模型日志,通过WB方式。pip install wandb装对应的wandb的库。
parser.add_argument('--bbox_interval', type=int, default=-1, help='W&B: Set bounding-box image logging interval')制作自己的数据集
标注:人工标注/半人工标注 仿真数据集:(GAN,数据图像处理的方式)
先准备好自己需要的图像数据,之后通过网页makesense.ai进行任何加Ai的方式生成标签。
标签网站:Make Sense
选择目标检测部分。
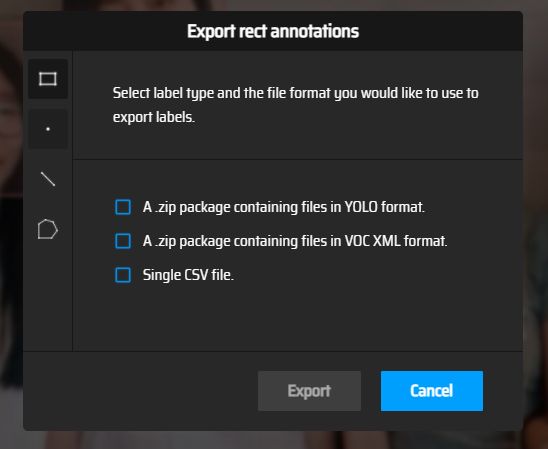
导出标签文件:
最后的数据格式的形式:
Mydata
Images
test
picture.png
train
label
test
picture.txt
train
之后制作yml的数据文件格式:我这里就只选择了一类,并且检测的是头,所以我写了head。如果这边检测好多类的话,在上面那个标签标注以后,标注了几类,下面写几类就好了,注意的是标签的序号一定要和你下面的names的顺序一一对应的。
结果:我这边是标记的头的检测。
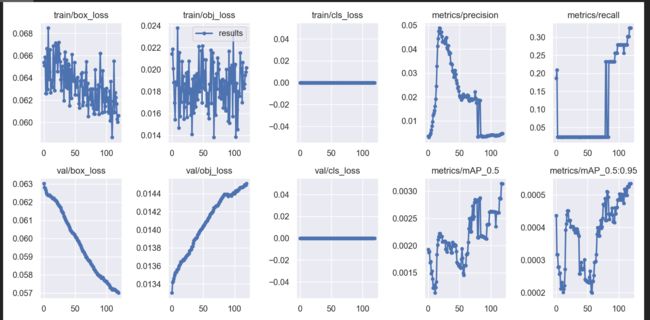
下面是模型训练期间的一些结果
