unet分割如何取其中一类_深度学习与医学图像处理 案例学习1——Unet肺部分割(CT图像)...
内容引用自https://www.kaggle.com/toregil/a-lung-u-net-in-keras?select=2d_masks.zip
#引入普通包
1 import os2 import numpy asnp3 import pandas as pd 4 import cv2 #后面用于图像放缩(插值)5 import matplotlib.pyplot asplt6 %matplotlib inline7 from sklearn.model_selection import train_test_split #将总数据集分为训练集和测试集
#引入深度学习包
fromkeras.models import Model #keras模型from keras.layers import * #keras层
fromkeras.optimizers import Adam #keras优化算法fromkeras.regularizers import l2 #l2正则化fromkeras.preprocessing.image import ImageDataGenerator #图像增强生成器
import keras.backendasKfrom keras.callbacks import LearningRateScheduler, ModelCheckpoint
#导入图像文件并图像设置为指定大小
IMAGE_LIB = '../input/2d_images/'#图片路径
MASK_LIB= '../input/2d_masks/' #掩模路径IMG_HEIGHT, IMG_WIDTH= 32, 32 #输入网络的图片大小SEED=42 #随机种子
all_images = [x for x in sorted(os.listdir(IMAGE_LIB)) if x[-4:] == '.tif'] #图片名数组(格式tif)
x_data= np.empty((len(all_images), IMG_HEIGHT, IMG_WIDTH), dtype='float32') #图片数据开辟空间for i, name inenumerate(all_images): #导入图片数据
im= cv2.imread(IMAGE_LIB + name, cv2.IMREAD_UNCHANGED).astype("int16").astype('float32') #cv2.IMREAD_UNCHANGED 包括alpha通道
im= cv2.resize(im, dsize=(IMG_WIDTH, IMG_HEIGHT), interpolation=cv2.INTER_LANCZOS4) #cv2. INTER_LANCZOS4,8x8像素邻域Lanczos插值
im= (im - np.min(im)) / (np.max(im) -np.min(im)) #归一化
x_data[i]=im
y_data= np.empty((len(all_images), IMG_HEIGHT, IMG_WIDTH), dtype='float32') #掩模数据开辟空间for i, name inenumerate(all_images): #导入掩模数据
im= cv2.imread(MASK_LIB + name, cv2.IMREAD_UNCHANGED).astype('float32')/255.
im= cv2.resize(im, dsize=(IMG_WIDTH, IMG_HEIGHT), interpolation=cv2.INTER_NEAREST) #cv2.INTER_NEAREST,最近邻域插值
y_data[i]= im
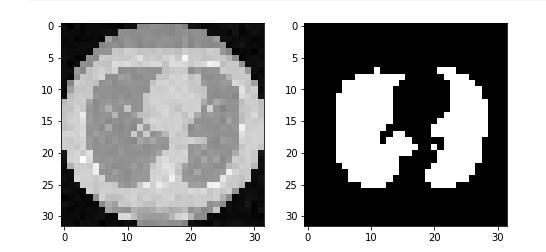
#显示图像及掩模
fig, ax = plt.subplots(1,2, figsize = (8,4)) #1行两列显示图像
ax[0].imshow(x_data[10], cmap='gray') #图像
ax[1].imshow(y_data[10], cmap='gray') #掩模
plt.show()
x_data =x_data[:,:,:,np.newaxis] #喂入神经网络前需新增第四维度
y_data=y_data[:,:,:,np.newaxis]
x_train, x_val, y_train, y_val= train_test_split(x_data, y_data, test_size = 0.5) #按0.5的比例分割训练集和测试集
#定义标准——dice系数
def dice_coef(y_true, y_pred):
y_true_f=K.flatten(y_true) #多维张量一维化
y_pred_f=K.flatten(y_pred)
intersection= K.sum(y_true_f *y_pred_f) #交叉部分1*1=1return (2. * intersection + K.epsilon()) / (K.sum(y_true_f) + K.sum(y_pred_f) + K.epsilon()) #2*(A交B)/(A+B) 当A=B时,该值为1
#模型
input_layer = Input(shape=x_train.shape[1:]) #shape=32,32,1
c1= Conv2D(filters=8, kernel_size=(3,3), activation='relu', padding='same')(input_layer) #shape=32,32,8
l= MaxPool2D(strides=(2,2))(c1) #shape=16,16,8
c2= Conv2D(filters=16, kernel_size=(3,3), activation='relu', padding='same')(l) #shape=16,16,16
l= MaxPool2D(strides=(2,2))(c2) #shape=8,8,16
c3= Conv2D(filters=32, kernel_size=(3,3), activation='relu', padding='same')(l) #shape=8,8,32
l= MaxPool2D(strides=(2,2))(c3) #shape=4,4,32
c4= Conv2D(filters=32, kernel_size=(1,1), activation='relu', padding='same')(l) #shape=4,4,32
l= concatenate([UpSampling2D(size=(2,2))(c4), c3], axis=-1) #UpSampling2D上采样,shape=8,8,64
l= Conv2D(filters=32, kernel_size=(2,2), activation='relu', padding='same')(l) #shape=8,8,32
l= concatenate([UpSampling2D(size=(2,2))(l), c2], axis=-1) #上采样,shape=16,16,48
l= Conv2D(filters=24, kernel_size=(2,2), activation='relu', padding='same')(l) #shape=16,16,24
l= concatenate([UpSampling2D(size=(2,2))(l), c1], axis=-1) #上采样,shape=32,32,32
l= Conv2D(filters=16, kernel_size=(2,2), activation='relu', padding='same')(l) #shape=32,32,16
l= Conv2D(filters=64, kernel_size=(1,1), activation='relu')(l) #shape=32,32,64
l= Dropout(0.5)(l) #shape=32,32,64
output_layer= Conv2D(filters=1, kernel_size=(1,1), activation='sigmoid')(l) #shape=32,32,1
model= Model(input_layer, output_layer)
#模型参数数量
#数据增强器
def my_generator(x_train, y_train, batch_size):
data_generator=ImageDataGenerator(
width_shift_range=0.1,
height_shift_range=0.1,
rotation_range=10,
zoom_range=0.1).flow(x_train, x_train, batch_size, seed=SEED)
mask_generator=ImageDataGenerator(
width_shift_range=0.1,
height_shift_range=0.1,
rotation_range=10,
zoom_range=0.1).flow(y_train, y_train, batch_size, seed=SEED)whileTrue:
x_batch, _=data_generator.next()
y_batch, _=mask_generator.next()yield x_batch, y_batch
#使用相同的随机种子得到增强的图像对应增强的掩模,显示一个小批量增强后的图像及掩模
image_batch, mask_batch = next(my_generator(x_train, y_train, 8))
fix, ax= plt.subplots(8,2, figsize=(8,20))for i in range(8):
ax[i,0].imshow(image_batch[i,:,:,0])
ax[i,1].imshow(mask_batch[i,:,:,0])
plt.show()
#编译模型
model.compile(optimizer=Adam(2e-4), loss='binary_crossentropy', metrics=[dice_coef]) #optimizer优化器,loss损失函数,metrics评价指标
#为模型条件检查点
weight_saver = ModelCheckpoint('lung.h5', monitor='val_dice_coef', save_best_only=True, save_weights_only=True)
#文件名,mnitor监视的值,save_best_only:当设置为True时,将只保存在验证集上性能最好的模型,save_weights_only:若设置为True,只保存模型权重,否则将保存整个模型
#自动调整学习率
annealer = LearningRateScheduler(lambda x: 1e-3 * 0.8 ** x)
#训练
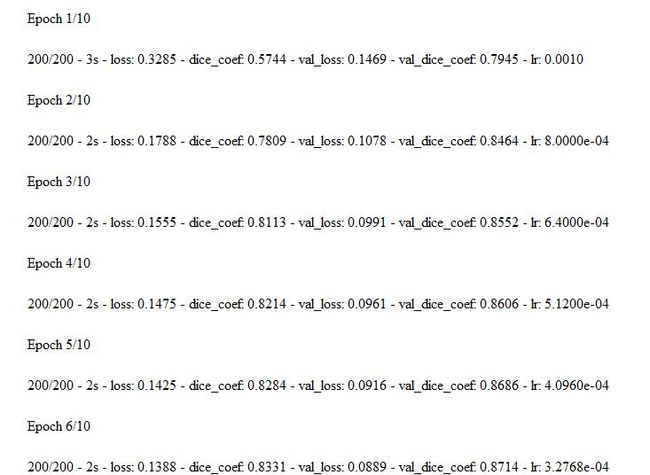
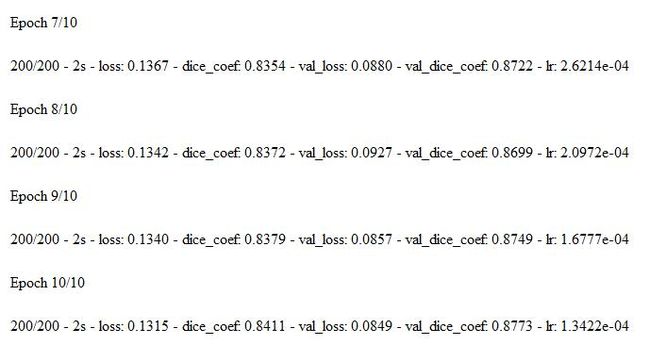
hist = model.fit_generator(my_generator(x_train, y_train, 8),
steps_per_epoch= 200,
validation_data=(x_val, y_val),
epochs=10, verbose=2,
callbacks= [weight_saver, annealer])
#generator:生成器函数
#steps_per_epoch:整数,当生成器返回steps_per_epoch次数据时计一个epoch结束,执行下一个epoch
#epochs:整数,数据迭代的轮数
#verbose:日志显示,0为不在标准输出流输出日志信息,1为输出进度条记录,2为每个epoch输出一行记录
#结果
#评价
#model.load_weights('lung.h5') #使用最佳参数
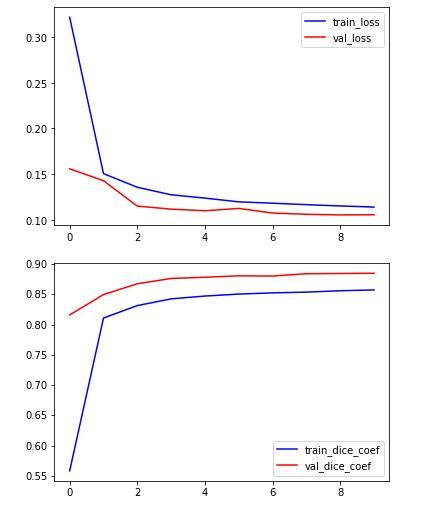
plt.plot(hist.history['loss'], color='b')
plt.plot(hist.history['val_loss'], color='r')
plt.legend(['train_loss','val_loss'])
plt.show()
plt.plot(hist.history['dice_coef'], color='b')
plt.plot(hist.history['val_dice_coef'], color='r')
plt.legend(['train_dice_coef','val_dice_coef'])
plt.show()
#测试
pre=model.predict(x_train[10].reshape(1,IMG_HEIGHT, IMG_WIDTH, 1))[0,:,:,0]
fig, ax = plt.subplots(1,3, figsize = (12,6))
ax[0].imshow(x_train[10],cmap='gray')
ax[1].imshow(y_train[10],cmap='gray')
ax[2].imshow(pre)
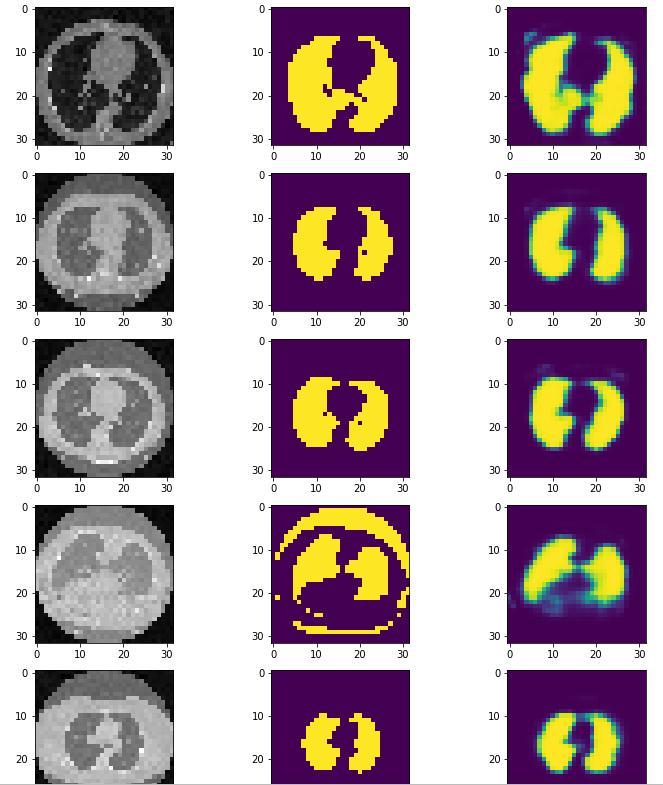
y_hat =model.predict(x_val)
fig, ax= plt.subplots(10,3,figsize=(12,30))
for i in range(10):
ax[i,0].imshow(x_val[i,:,:,0], cmap='gray')
ax[i,1].imshow(y_val[i,:,:,0])
ax[i,2].imshow(y_hat[i,:,:,0])
#讨论
深度学习得到的图像并非二值图像,每个像素点的值都是从0-1之间,实际上再小的数都大于0,因为网络的最后一层是sigmoid函数,dice系数的计算并不是想象中的交比并。
生成真正的预测掩模还需要一个阈值。
倒数第二幅图的分割明显有问题。
为什么测试集的dice系数总好于训练接的dice系数? 答:测试集的数据未经过增强
#数据分享:链接: https://pan.baidu.com/s/1xXlHwn7Ek4mjJlJ4OFkgaw 提取码: rd5y
欢迎探讨、指教。
