lstm训练情感分析的优点_评论上的情感分析:主题与情感词抽取
问题描述
针对评论网站上的用户评论进行细粒度的情感分析,区别于传统的粗粒度的情感分类(判断一句话的表达情感的正/负性),评论者在一句话中往往会提到多个角度,并在每个角度都抱有不同的观点内容与正/负极性
- 举例:金拱门快餐的食品质量一般,但是服务很周到
- 抽取结果:食品质量 → 一般;服务 → 周到,这里 “食品质量” 与 “服务” 是两个不同的角度(aspect,也叫opinion target),前一个角度对应的情感词(opinion word)是 “一般”,极性为负(negative),后一个角度对应的情感词为 “周到”,极性为正(positive)
- 问题抽象:其实可以看作一个类似于分词问题的 “序列标注” 问题,如下图所示,给出分词后的输入序列,输出两个同等长度的 BIO 序列,一个作为角度词抽取的输出序列结果,一个作为情感词抽取的输出序列结果,这里 BIO 标记为序列标注问题的惯用标记法,“B” 即为欲标记的目标内容的开始词,“I” 为欲标记内容的中间词(或结尾词),“O” 为不标记的内容
另外,将这个问题抽象成序列标注问题还有一个很大的缺点,就是角度词和情感词的抽取是单独的,不是成对匹配的,即就算抽取出两个角度词和两个情感词,也不能将每个情感词对应到每个角度词上,万一两个情感词说的都是同一个角度呢,比如 “美国记者我不知道,但是香港记者啊最快且最吼”,这个问题暂时不知道其他的解决办法
目标
- 刚从 Keras 转到 Tensorflow(极其智障的做法,一定要先学 tf 再学 keras),实践一下
- 实践一下序列标注这类 seq2seq 类问题的操作方式
- 探索一下文本上的细粒度情感分析
源代码与数据下载
wavewangyue/opinion_extractiongithub.comword2vec 模型下载(基于 Yelp 数据预训练): https:// pan.baidu.com/s/1CJjmTr MoTzL7m6VBYrz_OQ
提取码 hdzi
数据集
- SemEval 2014 ( Restaurant ) :数据来源是用户在网上对餐厅的评价,处理好的数据都放在 git 里了,而原始数据长下面这个样子
- 从数据示例看,数据集只提供了角度词(aspectTerm)的抽取结果,没有情感词的抽取结果,训练加测试数据总共 3841 条,需要人工标注情感词结果(WTF...)
不过还好我拿到了别人标注过的一个结果,提供者是南洋理工大学的 Wang Wenya (感激不尽),目前 state-of-art 的论文 Coupled Multi-Layer Attentions for Co-Extraction of Aspect and Opinion Terms(AAAI 2017)的作者
还是先上结论
- 像主题词与情感词提取这种细粒度情感分析问题并不是一个简单的问题,目前是当成一个序列标注问题来处理,可是无法满足成对提取的要求,目前我还不知道什么更好的办法
- 虽然都是深度学习工具,但是使用 Tensorflow 比使用 Keras 更难,更底层,但是不能只学傻瓜式的高层接口,还是要学习下底层的具体的东西,能实现的东西要更灵活,对模型的理解也更深刻
1. 数据预处理
标注数据集下载下来的数据示例上面贴出来过,是 xml 格式的,提供了抽取出来的单词,需要自己把原句子序列处理成 BIO 序列的形式,数据量比较小,不到 4000 条,并且是英文的,涉及不到什么万恶的编码问题,所以没啥可说的,放一下处理好的数据结果
test_docs.txt
test_labels_a.txt(角度词标注结果)
这里把 BIO 序列换成了 012 序列,B 对应 0,I 对应 1,因为数字标签方便之后操作
test_labels_p.txt(情感词标注结果)
词向量模型
训练一个 word2vec 词向量模型,这个是独立在模型外面提前做的,因为数据集提供的数据只有 4000 条很少,不使用预训练的 word embedding 模型效果就会不好。训练数据用的是“Yelp”(外国版“大众点评”)的数据,数据内容就是很多用户在它们网站上留下的对酒店的评论文本,下载地址上面有
2 模型搭建
tensorflow 可太挑战传统编程思维了,但是很有趣。分两步
- 先搭模型,模型相当于数据流动的管道,在管道里有各种操作(比如加减乘除等等),但是此时只是一个管道,你可以看每个管道口的数据形状(shape),但是没有任何具体数据
- 放数据进去,让数据在管道里流,流到底就出结果了,每次放一条数据(也可以一次放多条,也就是一个batch,因为数据量很少就没弄batch),每条数据流完出结果计算一下 loss,优化一下参数,然后继续放
分两个代码文件说,一个是 lstm.py,负责搭建模型,包括输入,输出,loss,参数更新方式等等一切细节,另一个是 train_lstm.py,负责读入数据,数据预处理,以及调用前一个 py 进行训练等操作
lstm.py
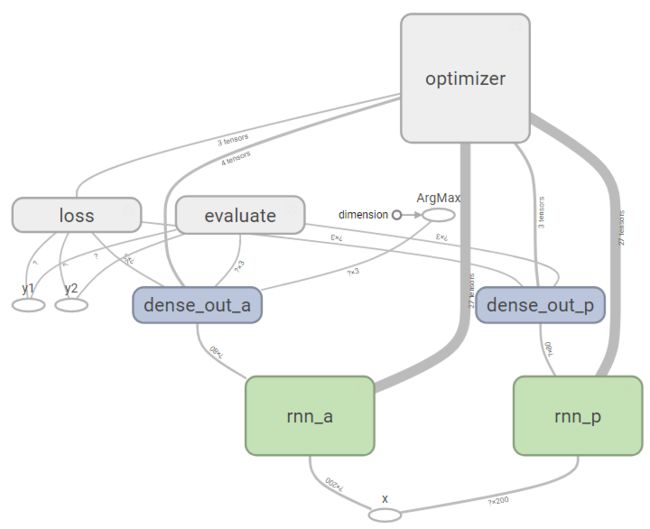
先放一个模型框架,包括两个并列的 LSTM 层,两个全连接层(dense_out),最后是损失函数(loss)与优化器(optimizer),evaluate 是用来在训练过程中定期计算准确度的,方便自己看结果
首先定义输入输出,在 tf 的模型搭建过程中,输入输出用 tf.placeholder(占位符)表示,而参数用 tf.Variable 表示
 def build_input(self):
        config = self.config
        x  = tf.placeholder(tf.float32, shape=(None, config.embedding_dim), name='x')
        y1 = tf.placeholder(tf.int32, shape=(None,), name='y1')
        y2 = tf.placeholder(tf.int32, shape=(None,), name='y2')
        return x, y1, y2
这里输入格式是(None,config.embedding_dim),None 是指序列的长度,因为每个句子长度不一样,无法提前确定有多长,我又不想做 padding 把它们切割到同样的长度,所以就用 None 占位,而 config.embedding_dim 是每个单词的词向量的维度,也就是词向量训练的维度,即 200
然后 y1,y2 就分别是角度词与情感词的结果序列,格式是(None,),这个 None 跟 x 的 None 相等,然后第二维为空就相当于第二维为 1,因为输出的只是一个数字(0,1 或 2,对应B,I 与 O),只有 1 维
接下来是模型,首先输入的 x 分别进入两个 LSTM 中,得到结果分别为 r_a 与 r_p,然后再分别进入两个全连接层,得到结果 logits_a 与 logits_p,最后 softmax 一下,得到最终的结果 out_a 与 out_p ,放代码:
def __init__(self, config):
        self.config = config
        self.init_state = []
        self.final_state = []
        self.x, self.y1, self.y2 = self.build_input()
        for i in ['a','p']:
            with tf.variable_scope("rnn_"+i):
                with tf.variable_scope("gru_cell"):
                    cell = tf.nn.rnn_cell.BasicLSTMCell(config.gru_hidden_size)
                    cell = tf.nn.rnn_cell.DropoutWrapper(cell, output_keep_prob=config.drop_rate)
                    init_state = cell.zero_state(1, tf.float32)
                self.init_state.append(init_state)
                r, final_state = tf.nn.dynamic_rnn(cell, tf.reshape(self.x, [1, -1, config.embedding_dim]), initial_state=init_state)
                self.final_state.append(final_state)
                r = tf.reshape(r, [-1, config.gru_hidden_size])
            if i == 'a':
                r_a = r
            else:
                r_p = r

        with tf.variable_scope("dense_out_a"):
            C_a = tf.Variable(tf.random_normal([config.gru_hidden_size, 3]), name='C')
            logits_a = tf.matmul(r_a, C_a)
            out_a = tf.nn.softmax(logits_a)

        with tf.variable_scope("dense_out_p"):
            C_p = tf.Variable(tf.random_normal([config.gru_hidden_size, 3]), name='C')
            logits_p = tf.matmul(r_p, C_p)
            out_p = tf.nn.softmax(logits_p)
这里 tensorflow 和 keras 的区别就出来了,keras 做到以上几点只需要无脑一层一层往上堆就可以了,但是 tensorflow 就要很具体的写了,比如 keras 里全连接是这么写
model.add(Dense(labels.shape[1], activation='softmax'))反正就是堆一层,我具体怎么个全连接法你也不用管,但是 tensorflow 里就得明白写出来,是先新建一个参数张量 C_a ,然后再去和输入 r_a 去做矩阵乘法,让你有一种 “哦,原来如此” 的感觉
这里 LSTM 是个比较难写的地方,因为需要提前处理好 init_state,也就是 LSTM 单元的初始状态,也就针对每条数据,当第一个单词还没有输入进去的时候,LSTM单元里的状态参数是什么样的
修正:其实没必要,这里有点多余了,dynamic_rnn 不需要输入 init_state,让它帮你初始化就可以了
dynamic_rnn 这个函数非常强大,直接把整个单词序列输入进去,他帮你把单词一个一个按顺序输入 LSTM 单元,最后返回所有结果,不用你自己写循环一个一个单词输入了
另外 with tf.variable_scope 这句话属于没有作用但是很有意义的语句,保持良好的为变量建立命名空间的习惯,既能避免重名参数产生冲突的尴尬,又能让人在使用 tensorboard 对模型进行检查的时候看上去很整齐,而不是乱七八糟一大团
接下来是 loss 的定义和参数更新函数的定义,loss 直接在上面得到的输出结果 logits_a 与 logits_p (注意不是 softmax 之后的 out_a 与 out_p)上加一个交叉熵损失函数 sparse_softmax_cross_entropy_with_logits ,然后将得到的 loss 输入 optimizer 中,用 Adam 优化器对参数进行反向传播更新,就打完收工了。上代码:
def build_loss(self, logits_a, logits_p):
        logits = tf.concat([logits_a, logits_p], 0)
        y = tf.concat([self.y1, self.y2], 0)
        loss = tf.nn.sparse_softmax_cross_entropy_with_logits(logits=logits, labels=y)
        loss = tf.reduce_sum(loss)
        return loss

def build_optimizer(self, loss):
        config = self.config
        tvars = tf.trainable_variables()
        grads, _ = tf.clip_by_global_norm(tf.gradients(loss, tvars), config.max_grad_norm)
        optimizer = tf.train.AdamOptimizer(config.learning_rate)
        train_op = optimizer.apply_gradients(zip(grads, tvars), global_step=tf.contrib.framework.get_or_create_global_step())
        return train_op
3 训练与测试
train_lstm.py
首先随便设置一些参数
class Config(object):
    embedding_dim = 200 # 词向量维度
    gru_hidden_size = 80 # lstm 隐层个数
    batch_size = 1 # 数据量小,没有用 batch
    learning_rate = 0.007 # 学习率
    drop_rate = 0.5 # LSTM 层drop率
然后就是把数据读入,然后处理成模型输入所需的向量形式,代码就不放了。直接放训练代码
epochs = 100
with tf.Session() as sess:
        tf.summary.FileWriter('graph', sess.graph)
        sess.run(tf.global_variables_initializer())

        start = time.time()
        new_state = sess.run(model.init_state)
        statistic_step = 200
        total_loss = 0
        for e in range(epochs):
            for i in range(len(x_train)):
                feed_dict = {model.x: x_train[i],
                             model.y1: y_train_a[i],
                             model.y2: y_train_p[i]}
                for ii, dd in zip(model.init_state, new_state):
                    feed_dict[ii] = dd
                loss, new_state, _ = sess.run([model.loss, model.final_state, model.optimizer], feed_dict=feed_dict)
                total_loss += loss
                end = time.time()
                if i % statistic_step == 0:
                    print '********************************************'
                    print 'epoch: '+str(e)+' / '+str(epochs)
                    print 'steps: '+str(i)
                    print 'cost_time: '+str(end-start)
                    if i == 0:
                        print 'loss: '+str(total_loss)
                    else:
                        print 'loss: '+str(total_loss/statistic_step)
                    total_loss = 0
                if i % statistic_step == 0:
                    correct_a_num = 0
                    correct_p_num = 0
                    test_batch_size = 128
                    for j in range(test_batch_size):
                        index = random.randint(0, len(x_train)-1)
                        feed_dict[model.x] = x_train[index]
                        feed_dict[model.y1] = y_train_a[index]
                        feed_dict[model.y2] = y_train_p[index]
                        correct_a, correct_p, out_a = sess.run([model.correct_a, model.correct_p, model.out_a], feed_dict=feed_dict)
                        if correct_a:
                            correct_a_num += 1
                        if correct_p:
                            correct_p_num += 1
                    score1 = float(correct_a_num)*100/test_batch_size
                    score2 = float(correct_p_num)*100/test_batch_size
                    print 'precision: '+str(score1)+' '+str(score2)
这里 epochs=100 是指跑 100 轮,每轮把所有数据跑一遍。statistic_step=200 是指每输入200条句子就测试一下目前的准确度
tensorflow 的训练很有意思,这个 sess.run 这个函数,你放模型里哪个位置的变量进去,他就运行到哪个位置。比如这里如果只放 model.loss,他就跑一遍模型到 loss 函数那个位置,然后输出,但是如果只放 model.r_a 进去(就是 LSTM 层的输出结果),他就只运行到 LSTM 层然后输出,后面的就不管了,自然也运行不到优化器那块,也不能进行参数的更新,很清奇的脑回路
总结
具体运行结果就不放了,因为忘截图了。。。反正准确度大概就在 60%-70%之间这样吧
总结放开头了
就酱,收工


