记录python 使用opencv 碰到的问题
最近项目需求使用opencv处理摄像头和图片,记录一下使用当中碰到的问题。
保存图片
保存图片中文路径问题 ,
直接使用cv2.imwrite存储图片 如果文件没有中文,正常 ,如果有中文 会显示乱码,下面是不乱码的一种写法
#中文乱码
cv2.imwrite(filename, img)
# 没问题的写法
cv2.imencode('.png', img)[1].tofile(filename)
安装
- 没难度
pip install opencv-python即可 - 或者在pycharm里面搜索
opencv-python安装即可 - 然后又装了一个
pip install opencv-contrib-python库
摄像头相关
打开摄像头
cap = cv2.VideoCapture(id)id 从0 开始 0 代表计算机上面第一个摄像头 有内置一般是内置 如果没有内置,插上的usb摄像头就是0- 如果提示打开失败,则可能是电脑的摄像头打开方式和相机不匹配,要设置成
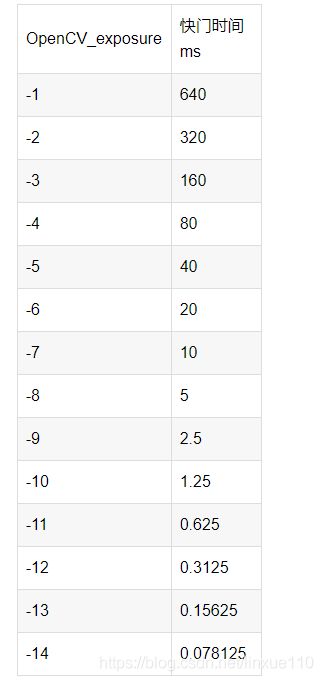
cv2.VideoCapture(i,cv2.CAP_DSHOW)就可以了,亲测win10 没问题 win7出现报错 改成这样解决。 - 常用参数 3,4,15 摄像头 分辨率 和曝光时间(快门时间)
- 曝光时间 15 get到的 如果是正值 例如100 实际设置的是10ms,这个单位应该是100us
- get(10) 如果获取到正值 是获取到的单位是us的曝光时间(某些相机)
CAP_PROP_POS_MSEC       =0, //!< Current position of the video file in milliseconds.  当前视频位置
CAP_PROP_POS_FRAMES     =1, //!< 0-based index of the frame to be decoded/captured next. 从0开始下一帧索引
CAP_PROP_POS_AVI_RATIO  =2, //!< Relative position of the video file: 0=start of the film, 1=end of the film. 视频相对位置
CAP_PROP_FRAME_WIDTH    =3, //!< Width of the frames in the video stream. 宽度
CAP_PROP_FRAME_HEIGHT   =4, //!< Height of the frames in the video stream. 高度
CAP_PROP_FPS            =5, //!< Frame rate.帧率 帧/秒
CAP_PROP_FOURCC         =6, //!< 4-character code of codec. see VideoWriter::fourcc .
CAP_PROP_FRAME_COUNT    =7, //!< Number of frames in the video file. 视频帧数
CAP_PROP_FORMAT         =8, //!< Format of the %Mat objects returned by VideoCapture::retrieve(). 格式
CAP_PROP_MODE           =9, //!< Backend-specific value indicating the current capture mode.
CAP_PROP_BRIGHTNESS    =10, //!< Brightness of the image (only for those cameras that support). 亮度
CAP_PROP_CONTRAST      =11, //!< Contrast of the image (only for cameras). 对比度
CAP_PROP_SATURATION    =12, //!< Saturation of the image (only for cameras).饱和度
CAP_PROP_HUE           =13, //!< Hue of the image (only for cameras). 色调
CAP_PROP_GAIN          =14, //!< Gain of the image (only for those cameras that support).
CAP_PROP_EXPOSURE      =15, //!< Exposure (only for those cameras that support). 曝光时间
读取一帧数据
ret,frame =cap.read()读取一帧数据 如果是视频 就是读取下一帧- ret
true表示正确 flase 表示 读取失败 cv2.imshow("cap", frame)cap 是窗口名称 frame 是显示的图像数据if cv2.waitKey(100) & 0xff == ord('q'):等待100mscv2.waitKey(100)或者输入q:条件成立 如果时间设置是0 就一直等待键盘输入 卡线程- cap.release() 释放摄像头资源
- cv2.destroyAllWindows() 销毁创建的窗口
RGB转换
RBG 转灰度测试
- 转换的数据是 numpy 数组格式
- cv2.color 接收到输入数组 里面元素 是float32类型 不能是float64
- 源码
import cv2
import numpy as np

testlist = []
for i in range(8):
    testlist.append(([0,255][i&4>0],[0,255][i&2>0],[0,255][i&1>0]))
test=np.array([testlist]).astype(np.float32)
# b=np.array((255,0,0)).astype(np.float32)
# c=np.array((0,255,0)).astype(np.float32)

image = cv2.cvtColor(test, cv2.COLOR_BGR2GRAY)


for i in range(8):
    print(f"BGR:{test[0][i]} \t 灰度:{image[0][i]}")
print(f"B系数\t{image[0][4]/255}\nG系数\t{image[0][2]/255}\nR系数\t{image[0][1]/255}")

"""
结果
BGR:[0. 0. 0.] 	 灰度:0.0
BGR:[  0.   0. 255.] 	 灰度:76.2449951171875
BGR:[  0. 255.   0.] 	 灰度:149.68499755859375
BGR:[  0. 255. 255.] 	 灰度:225.92999267578125
BGR:[255.   0.   0.] 	 灰度:29.06999969482422
BGR:[255.   0. 255.] 	 灰度:105.31499481201172
BGR:[255. 255.   0.] 	 灰度:178.7550048828125
BGR:[255. 255. 255.] 	 灰度:255.0
B系数	0.11399999880323224
G系数	0.5869999904258578
R系数	0.2989999808517157
"""
光斑相关
im = cv2.imread("1.jpg", cv2.IMREAD_GRAYSCALE)
# Set up the detector with default parameters.
detector = cv2.SimpleBlobDetector()
# Detect blobs.
print(1)
keypoints = detector.detect(im)
print(2)
# Draw detected blobs as red circles.
# cv2.DRAW_MATCHES_FLAGS_DRAW_RICH_KEYPOINTS ensures the size of the circle corresponds to the size of blob
im_with_keypoints = cv2.drawKeypoints(im, keypoints, np.array([]), (0,0,255), cv2.DRAW_MATCHES_FLAGS_DRAW_RICH_KEYPOINTS)
# Show keypoints
cv2.imshow("Keypoints", im_with_keypoints)
cv2.waitKey(0)
上面代码执行直接报错 异常退出Process finished with exit code -1073741819 (0xC0000005)
- 碰到这个问题 查看一下你的cv库是不是 3版本以前的
- 在3版本以后,
detector = cv2.SimpleBlobDetector_create()
解决办法
源码
# Standard imports
import cv2
import numpy as np
# Read image
im = cv2.imread("1.jpg", cv2.IMREAD_GRAYSCALE)
params = cv2.SimpleBlobDetector_Params()
# Change thresholds 更改阈值
params.minThreshold = 10
params.maxThreshold = 250
#按颜色过滤
params.filterByColor =1
params.blobColor=255

# Create a detector with the parameters
ver = (cv2.__version__).split('.')

if int(ver[0]) < 3 :
    detector = cv2.SimpleBlobDetector(params)
else:
    detector = cv2.SimpleBlobDetector_create(params)
# detector = cv2.SimpleBlobDetector_create()
# Detect blobs.
keypoints = detector.detect(im)
print("*"*60)
for keypoint in keypoints:

    print("keypoint.angle",keypoint.angle)
    print("keypoint.class_id",keypoint.class_id)
    print("keypoint.octave",keypoint.octave)
    print("keypoint.pt",keypoint.pt)
    print("keypoint.response",keypoint.response)
    print("keypoint.size",keypoint.size)
    print("*"*60)
im_with_keypoints = cv2.drawKeypoints(im, keypoints, np.array([]), (0,0,255), cv2.DRAW_MATCHES_FLAGS_DRAW_RICH_KEYPOINTS)
# print(im_with_keypoints)
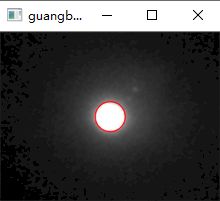
cv2.imshow("guangban",im_with_keypoints,)
cv2.waitKey(0)

结果
************************************************************
keypoint.angle -1.0
keypoint.class_id -1
keypoint.octave 0
keypoint.pt (109.7587890625, 84.21231842041016)
keypoint.response 0.0
keypoint.size 30.068204879760742
************************************************************

