YOLOv3+opencv实现简单的实时目标检测
YOLOv3+opencv实现简单的实时目标检测
- 实现思路
-
- opencv调用摄像头
- YOLOv3算法
- 实时检测实现
- 总结
实现思路
经过了各种环境配置,最近终于初步跑通了YOLOv3,用的是以下程序。
[https://github.com/eriklindernoren/PyTorch-YOLOv3]
跑通了之后想着是可以配合摄像头做一个简单的目标检测试试,主要是用opencv调用摄像头拍照,然后YOLOv3检测最后呈现。整体实现过程还算顺利,也最终感受到了GPU加速的强大,用和不用视频流畅度天差地别。这里主要是对过程的一个记录吧,第一次写,着实有点紧张。
opencv调用摄像头
opencv调用摄像头这个代码网上能搜到的很多了,代码如下:
import cv2
cap = cv2.VideoCapture(0)## 0 电脑摄像头 1 usb摄像头
while 1:
    ret, frame = cap.read()
    cv2.imshow("cap", frame)
    if cv2.waitKey(10) == ord('q'):
        break
cap.release()
cv2.destroyAllWindows()
YOLOv3算法
我也是初步接触这个算法以及这篇程序,所以对其内在底层计算原理目前了解的不是很透彻,不过如果只是简单的用它目前还不需要了解那么深。
按照程序链接配置好之后,可以根据其detect.py函数了解程序主要流程。主要包括加载模型、加载训练数据,然后调用YOLOv3网络预测结果,结果主要包括检测目标的坐标信息、目标标签等。最后通过plt函数保存图片。
实时检测实现
了解了opencv以及配置好了YOLOv3之后,则可以开始简单的实现了,主要是在detect.py的基础上进行修改,加入调用摄像头的内容。
这里遇到的一个问题主要是opencv调用摄像头拍的照片所生成的数组没法直接给YOLOv3网络作为输入(改了维度也不行),结果会出错,试了很久这里也没解决,最后只能想了一个比较笨的办法,拍照之后先保存一张图片,然后再由DataLoader函数加载这个图片,这样做出来结果是对的。
基本流程为opencv打开摄像头,拍照,保存图片,加载YOLOv3模型,加载前面保存的图片,根据图片计算结果,opencv画出目标位置及标签并展示照片。整体代码如下:
from __future__ import division

from models import *
from utils.utils import *
from utils.datasets import *

import os
import sys
import time
import datetime
import argparse

from PIL import Image

import torch
from torch.utils.data import DataLoader
from torchvision import datasets
from torch.autograd import Variable

import matplotlib.pyplot as plt
import matplotlib.patches as patches
from matplotlib.ticker import NullLocator

import cv2

if __name__ == "__main__":
    parser = argparse.ArgumentParser()
    parser.add_argument("--image_folder", type=str, default="data/samples/ceshi", help="path to dataset")
    parser.add_argument("--model_def", type=str, default="config/yolov3.cfg", help="path to model definition file")
    parser.add_argument("--weights_path", type=str, default="weights/yolov3.weights", help="path to weights file")
    parser.add_argument("--class_path", type=str, default="data/coco.names", help="path to class label file")
    parser.add_argument("--conf_thres", type=float, default=0.8, help="object confidence threshold")
    parser.add_argument("--nms_thres", type=float, default=0.4, help="iou thresshold for non-maximum suppression")
    parser.add_argument("--batch_size", type=int, default=1, help="size of the batches")
    parser.add_argument("--n_cpu", type=int, default=0, help="number of cpu threads to use during batch generation")
    parser.add_argument("--img_size", type=int, default=416, help="size of each image dimension")
    parser.add_argument("--checkpoint_model", type=str, help="path to checkpoint model")
    opt = parser.parse_args()
    print(opt)

    device = torch.device("cuda")


    # Set up model
    model = Darknet(opt.model_def, img_size=opt.img_size).to(device)

    if opt.weights_path.endswith(".weights"):
        # Load darknet weights
        model.load_darknet_weights(opt.weights_path)
    else:
        # Load checkpoint weights
        model.load_state_dict(torch.load(opt.weights_path))

    model.eval()  # Set in evaluation mode
    cap = cv2.VideoCapture(1) ## 打开摄像头


    classes = load_classes(opt.class_path)  # Extracts class labels from file
    Tensor = torch.cuda.FloatTensor


    while 1:
    	## 拍照并保存
        img_detections = []
        ret, frame = cap.read()
        cv2.imwrite('./data/samples/ceshi/lena.png',frame)
        # Get detections
        aaa = cv2.waitKey(10)
        if aaa == ord('a'):
            break
        ## 加载照片
        dataloader = DataLoader(
        ImageFolder(opt.image_folder, img_size=opt.img_size),
        batch_size=opt.batch_size,
        shuffle=False,
        num_workers=opt.n_cpu,
        )

        for batch_i, (img_paths, input_imgs) in enumerate(dataloader):
        # Configure input

            input_imgs = Variable(input_imgs.type(Tensor))
            with torch.no_grad():
                detections = model(input_imgs)
                detections = non_max_suppression(detections, opt.conf_thres, opt.nms_thres)

            img_detections.extend(detections)
        cmap = plt.get_cmap("tab20b")
        colors = [cmap(i) for i in np.linspace(0, 1, 20)]
        print("\nSaving images:")
        # Iterate through images and save plot of detections
                # Create plot
        for (path,detections) in enumerate(img_detections):

                    # Draw bounding boxes and labels of detections
            if detections is not None:
                    # Rescale boxes to original image
                detections = rescale_boxes(detections, opt.img_size, frame.shape[:2])
                unique_labels = detections[:, -1].cpu().unique()
                n_cls_preds = len(unique_labels)
                bbox_colors = random.sample(colors, n_cls_preds)
                ## 标注目标位置及信息
                ## 其中x1,x2,y1,y2为目标矩形框对角点坐标
                for x1, y1, x2, y2, conf, cls_conf, cls_pred in detections:

                    edgecolor = bbox_colors[int(np.where(unique_labels == int(cls_pred))[0])]
                    # Create a Rectangle patch
                    cv2.rectangle(frame,(x1 , y1), (x2 , y2), thickness = 2, color = edgecolor)
                    # Add the bbox to the plot
                    font = cv2.FONT_HERSHEY_SIMPLEX
                    text = classes[int(cls_pred)]

                    cv2.putText(frame, text, (x1 , y1 ),font, 0.8, edgecolor, 2)

                    # Add label
        cv2.imshow("cap",frame)
    cap.release()
    cv2.destroyAllWindows()
总结
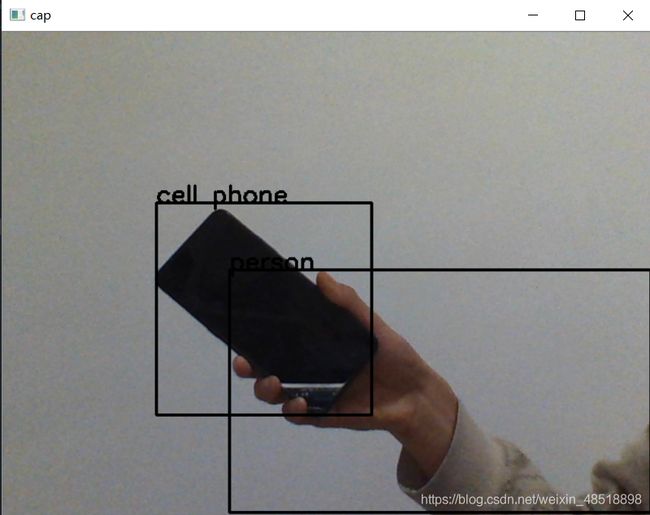
YOLOv3环境配置用了很久的时间,也是很感谢这篇代码让我有机会使用它,简单的使用就到这里,我并不是这个专业也不是这个方向,只是兴趣爱好,所以并未对其深入了解。最后,附上结果图。
Credit
YOLOv3: An Incremental Improvement Joseph Redmon, Ali FarhadiAbstract We present some updates to YOLO! We made a bunch of little
design changes to make it better. We also trained this new network
that’s pretty swell. It’s a little bigger than last time but more
accurate. It’s still fast though, don’t worry. At 320 × 320 YOLOv3
runs in 22 ms at 28.2 mAP, as accurate as SSD but three times faster.
When we look at the old .5 IOU mAP detection metric YOLOv3 is quite
good. It achieves 57.9 AP50 in 51 ms on a Titan X, compared to 57.5
AP50 in 198 ms by RetinaNet, similar performance but 3.8× faster. As
always, all the code is online at https://pjreddie.com/yolo/.
[Paper] [Project Webpage] [Authors’ Implementation]
@article{yolov3, title={YOLOv3: An Incremental Improvement},
author={Redmon, Joseph and Farhadi, Ali}, journal = {arXiv},
year={2018} }
[https://github.com/eriklindernoren/PyTorch-YOLOv3]