浅谈改进模型小技巧----提升感受野
浅谈改进模型小技巧----提升感受野
- 前言
- 什么是spp?
-
- SPP-NET用于物体检测(可以不用看,我感觉没啥价值,因为太过古老)
- 什么是RFB?
- 什么是ASPP?
前言
想写写yolov4的,但是想把yolov4中的小技巧介绍一部分小技巧介绍完在介绍吧!
我们来看看下面这张图,我感觉特别精彩,很好的诠释了yolov4的思想。

什么是spp?
为什么CNN需要固定的输入呢?CNN网络可以分解为卷积网络部分以及全连接网络部分。我们知道卷积网络的参数主要是卷积核,完全能够适用任意大小的输入,并且能够产生任意大小的输出。但是全连接层部分不同,全连接层部分的参数是神经元对于所有输入的连接权重,也就是说输入尺寸不固定的话,全连接层参数的个数都不能固定。
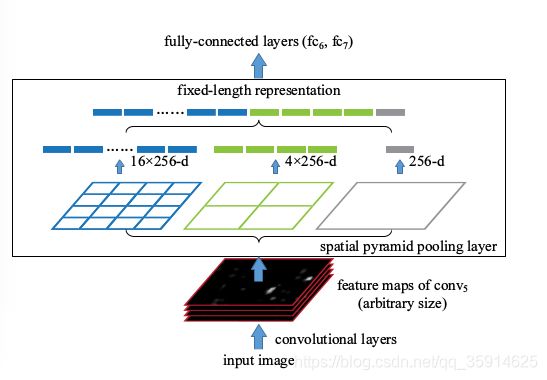
何凯明团队的SPPNet给出的解决方案是,既然只有全连接层需要固定的输入,那么我们在全连接层前加入一个网络层,让他对任意的输入产生固定的输出不就好了吗?一种常见的想法是对于最后一层卷积层的输出pooling一下,但是这个pooling窗口的尺寸及步伐设置为相对值,也就是输出尺寸的一个比例值,这样对于任意输入经过这层后都能得到一个固定的输出。SPPnet,主要思路就是对于一副图像分成若干尺度的一些块,比如一幅图像分成1份,4份,16份等。然后对于每一块提取特征然后融合在一起,这样就可以兼容多个尺度的征啦。SPPNet首次将这种思想应用在CNN中,对于卷积层特征我们也先给他分成不同的尺寸,然后每个尺寸提取一个固定维度的特征,最后拼接这些特征成一个固定维度。
具体步骤:
1)首先,把卷积后特征图划分为4x4的网格,每个网格的宽是W / 4、高是 h / 4、通道是c。当不能整除时,取整。然后对每个网格施加最大池化(max pooling),取每个网格的最大值,最终4x4的网格会输出16c的特征。
2)同理,把特征图划分为2x2的网格,每个网格的宽是W / 2、高是 h / 2、通道是c。当不能整除时,取整。然后对每个网格施加最大池化(max pooling),
取每个网格的最大值,最终2x2的网格会输出4c的特征。
3)最后,把特征图划分为1x1的网格,相当于对输入特征图施加最大池化(max pooling),取每个网格的最大值,最终会输出c的特征。
4)将1)2)3)中的输出特征拼接,会得到一个21c维的特征, 很显然,最后的输出与输入图像的尺寸并无关系,但输出可以得到固定维数的特征。过程见下图:

有spp,输入图像就可以是任意尺寸了。不但允许任意比例关系,而且支持任意缩放尺度。我们也可以将输入图像缩放到任意尺度(例如min(w;h)=180,224,…)并且使用同一个深度网络。当输入图像处于不同的尺度时,带有相同大小卷积核的网络就可以在不同的尺度上抽取特征。在全局池化中减小模型尺寸,并减少过拟合。
在yolov4中的spp分别利用四个不同尺度的最大池化进行处理,最大池化的池化核大小分别为13x13、9x9、5x5、1x1(1x1即无处理)
yolov4中spp代码:
# 使用了SPP结构,即不同尺度的最大池化后堆叠。
maxpool1 = MaxPooling2D(pool_size=(13,13), strides=(1,1), padding='same')(P5)
maxpool2 = MaxPooling2D(pool_size=(9,9), strides=(1,1), padding='same')(P5)
maxpool3 = MaxPooling2D(pool_size=(5,5), strides=(1,1), padding='same')(P5)
P5 = Concatenate()([maxpool1, maxpool2, maxpool3, P5])
SPP-NET用于物体检测(可以不用看,我感觉没啥价值,因为太过古老)

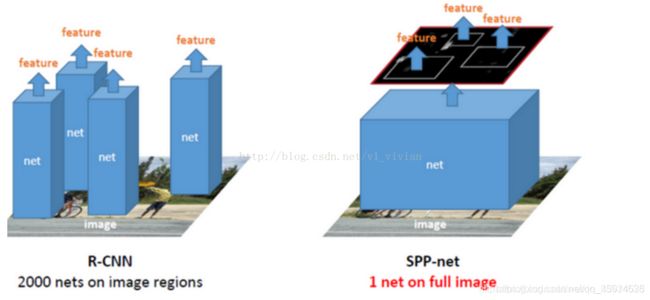
对于R-CNN,整个过程是:
通过选择性搜索,对待检测的图片进行搜索出~2000个候选窗口。
把这2k个候选窗口的图片都缩放到227*227,然后分别输入CNN中,每个proposal提取出一个特征向量,(即:利用CNN对每个proposal进行提取特征向量。)
把上面每个候选窗口的对应特征向量,利用SVM算法进行分类识别。 可以看出R-CNN的计算量是非常大的,因为2000个候选窗口都要输入到CNN中,分别进行特征提取。
而对于SPP-Net,整个过程是:
首先通过选择性搜索,对待检测的图片进行搜索出2000个候选窗口。(这一步和R-CNN一样)
特征提取阶段。这一步骤的具体操作如下:把整张待检测的图片,输入CNN中,进行一次性特征提取,得到特征图,然后在特征图中找到各个候选框的区域,再对各个候选框采用空间金字塔池化,提取出固定长度的特征向量。而R-CNN输入的是每个候选框,然后在进入CNN,因为SPP-Net只需要一次对整张图片进行特征提取,速度会大大提升。
最后一步,采用SVM算法进行特征向量分类识别
什么是RFB?
引入了RFB结构,RFB的效果示意图如下图所示,其中中间虚线框部分就是RFB结构。RFB结构主要有两个特点:1、不同尺寸卷积核的卷积层构成的多分枝结构,这部分可以参考Inception结构。在下图的RFB结构中也用不同大小的圆形表示不同尺寸卷积核的卷积层。2、引入了dilated卷积层,dilated卷积层之前应用在分割算法Deeplab中,主要作用也是增加感受野,和deformable卷积有异曲同工之处。在下图的RFB结构中用不同rate表示dilated卷积层的参数。在RFB结构中最后会将不同尺寸和rate的卷积层输出进行concat,达到融合不同特征的目的。在下图的RFB结构中用3种不同大小和颜色的输出叠加来展示。在下图最后一列中将融合后的特征与人类视觉感受野做对比,从图可以看出是非常接近的,这也是这篇文章的出发点,换句话说就是模拟人类视觉的感受野进行RFB结构的设计。

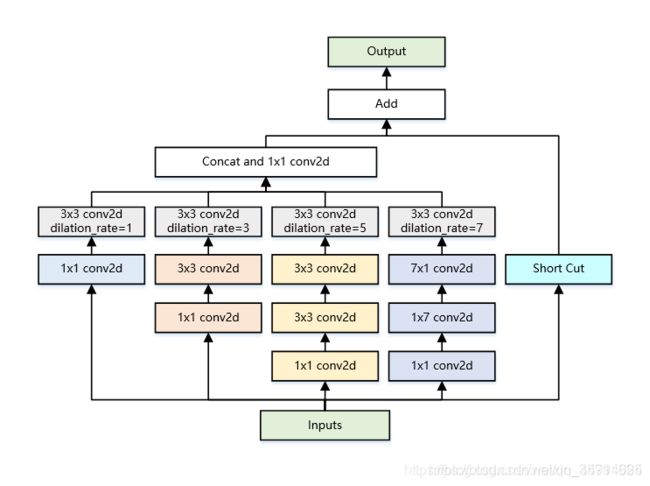
这里两种RFB结构示意图。(a)是BasicRFB,整体结构上借鉴了Inception的思想,主要不同点在于引入3个dilated卷积层(比如33conv, rate=1),这也是这篇文章增大感受野的主要方式之一。(b)是RFB-a。RFB-a和BasicRFB相比主要有两个改进,一方面用33卷积层代替55卷积层,另一方面用13和31卷积层代替33卷积层,主要目的应该是为了减少计算量,类似Inception后期版本对Inception结构的改进。
BasicRFB的结构如下:

代码:
import keras.backend as K
from keras.layers import Activation
from keras.layers import Conv2D
from keras.layers import Dense
from keras.layers import Flatten
from keras.layers import GlobalAveragePooling2D
from keras.layers import Input,Lambda
from keras.layers import MaxPooling2D,Concatenate,UpSampling2D
from keras.layers import merge, concatenate
from keras.layers import Reshape
from keras.layers import ZeroPadding2D,BatchNormalization
from keras.models import Model


def conv2d_bn(x,filters,num_row,num_col,padding='same',stride=1,dilation_rate=1,relu=True):
    x = Conv2D(
        filters, (num_row, num_col),
        strides=(stride,stride),
        padding=padding,
        dilation_rate=(dilation_rate, dilation_rate),
        use_bias=False)(x)
    x = BatchNormalization(scale=False)(x)
    if relu:
        x = Activation("relu")(x)
    return x


def BasicRFB(x,input_filters,output_filters,stride=1,map_reduce=8):
    input_filters_div = input_filters//map_reduce

    branch_0 = conv2d_bn(x,input_filters_div*2,1,1,stride=stride)
    branch_0 = conv2d_bn(branch_0,input_filters_div*2,3,3,relu=False)

    branch_1 = conv2d_bn(x,input_filters_div,1,1)
    branch_1 = conv2d_bn(branch_1,input_filters_div*2,3,3,stride=stride)
    branch_1 = conv2d_bn(branch_1,input_filters_div*2,3,3,dilation_rate=3,relu=False)

    branch_2 = conv2d_bn(x,input_filters_div,1,1)
    branch_2 = conv2d_bn(branch_2,(input_filters_div//2)*3,3,3)
    branch_2 = conv2d_bn(branch_2,input_filters_div*2,3,3,stride=stride)
    branch_2 = conv2d_bn(branch_2,input_filters_div*2,3,3,dilation_rate=5,relu=False)

    branch_3 = conv2d_bn(x,input_filters_div,1,1)
    branch_3 = conv2d_bn(branch_3,(input_filters_div//2)*3,1,7)
    branch_3 = conv2d_bn(branch_3,input_filters_div*2,7,1,stride=stride)
    branch_3 = conv2d_bn(branch_3,input_filters_div*2,3,3,dilation_rate=7,relu=False)

    out = concatenate([branch_0,branch_1,branch_2,branch_3],axis=-1)
    out = conv2d_bn(out,output_filters,1,1,relu=False)

    short = conv2d_bn(x,output_filters,1,1,stride=stride,relu=False)
    out = Lambda(lambda x: x[0] + x[1])([out,short])
    out = Activation("relu")(out)
    return out

def BasicRFB_c(x,input_filters,output_filters,stride=1,map_reduce=8):
    input_filters_div = input_filters//map_reduce

    branch_0 = conv2d_bn(x,input_filters_div*2,1,1,stride=stride)
    branch_0 = conv2d_bn(branch_0,input_filters_div*2,3,3,relu=False)

    branch_1 = conv2d_bn(x,input_filters_div,1,1)
    branch_1 = conv2d_bn(branch_1,input_filters_div*2,3,3,stride=stride)
    branch_1 = conv2d_bn(branch_1,input_filters_div*2,3,3,dilation_rate=3,relu=False)

    branch_2 = conv2d_bn(x,input_filters_div,1,1)
    branch_2 = conv2d_bn(branch_2,(input_filters_div//2)*3,1,7)
    branch_2 = conv2d_bn(branch_2,input_filters_div*2,7,1,stride=stride)
    branch_2 = conv2d_bn(branch_2,input_filters_div*2,3,3,dilation_rate=7,relu=False)

    out = concatenate([branch_0,branch_1,branch_2],axis=-1)
    out = conv2d_bn(out,output_filters,1,1,relu=False)

    short = conv2d_bn(x,output_filters,1,1,stride=stride,relu=False)
    out = Lambda(lambda x: x[0] + x[1])([out,short])
    out = Activation("relu")(out)
    return out

def BasicRFB_a(x,input_filters,output_filters,stride=1,map_reduce=8):
    input_filters_div = input_filters//map_reduce

    branch_0 = conv2d_bn(x,input_filters_div,1,1,stride=stride)
    branch_0 = conv2d_bn(branch_0,input_filters_div,3,3,relu=False)

    branch_1 = conv2d_bn(x,input_filters_div,1,1)
    branch_1 = conv2d_bn(branch_1,input_filters_div,3,1)
    branch_1 = conv2d_bn(branch_1,input_filters_div,3,3,dilation_rate=3,relu=False)

    branch_2 = conv2d_bn(x,input_filters_div,1,1)
    branch_2 = conv2d_bn(branch_2,input_filters_div,1,3)
    branch_2 = conv2d_bn(branch_2,input_filters_div,3,3,dilation_rate=3,relu=False)

    branch_3 = conv2d_bn(x,input_filters_div,1,1)
    branch_3 = conv2d_bn(branch_3,input_filters_div,3,1)
    branch_3 = conv2d_bn(branch_3,input_filters_div,3,3,dilation_rate=5,relu=False)

    branch_4 = conv2d_bn(x,input_filters_div,1,1)
    branch_4 = conv2d_bn(branch_4,input_filters_div,1,3)
    branch_4 = conv2d_bn(branch_4,input_filters_div,3,3,dilation_rate=5,relu=False)

    branch_5 = conv2d_bn(x,input_filters_div//2,1,1)
    branch_5 = conv2d_bn(branch_5,(input_filters_div//4)*3,1,3)
    branch_5 = conv2d_bn(branch_5,input_filters_div,3,1,stride=stride)
    branch_5 = conv2d_bn(branch_5,input_filters_div,3,3,dilation_rate=7,relu=False)

    branch_6 = conv2d_bn(x,input_filters_div//2,1,1)
    branch_6 = conv2d_bn(branch_6,(input_filters_div//4)*3,3,1)
    branch_6 = conv2d_bn(branch_6,input_filters_div,1,3,stride=stride)
    branch_6 = conv2d_bn(branch_6,input_filters_div,3,3,dilation_rate=7,relu=False)

    out = concatenate([branch_0,branch_1,branch_2,branch_3,branch_4,branch_5,branch_6],axis=-1)
    out = conv2d_bn(out,output_filters,1,1,relu=False)

    short = conv2d_bn(x,output_filters,1,1,stride=stride,relu=False)
    out = Lambda(lambda x: x[0] + x[1])([out,short])
    out = Activation("relu")(out)
    return out


def Normalize(net):
    branch_0 = conv2d_bn(net["conv4_3"],256,1,1)
    branch_1 = conv2d_bn(net['fc7'],256,1,1)
    branch_1 = UpSampling2D()(branch_1)
    out = concatenate([branch_0,branch_1],axis=-1)
    out = BasicRFB_a(out,512,512)
    return out
什么是ASPP?
可以看我写的deeplabv3
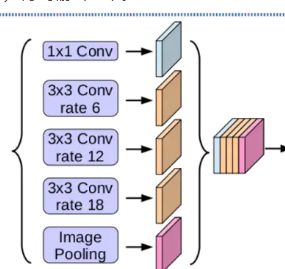
ASPP,翻译为中文叫做基于空洞卷积的空间金字塔池化。 ASPP 能够有效的捕获多尺度信息.采用多个 atrous rate 的空洞卷积卷积层并联的方式,使模型在多尺度物体上的表现更好。整体的 ASPP 结构就是图中黄色框中的部分,也由 (a), (b) 两个部分组成。
(a) 包含 1 个 1x1 的卷积和 3 个atrous rate 分别为 (6, 12, 18) 的 3x3 的空洞卷积;
(b)将最终 feature map 经过池化+1x1卷积+bn+bilinear unsample,这么做是为了包含更多的全局信息。

  img_input = Input(shape=input_shape)

    # (64, 64, 320)
    x,skip1 = mobilenetV2(img_input,alpha)
    size_before = tf.keras.backend.int_shape(x)

    # 全部求平均后,再利用expand_dims扩充维度,1x1
    # shape = 320
    b4 = GlobalAveragePooling2D()(x)

    # 1x1x320
    b4 = Lambda(lambda x: K.expand_dims(x, 1))(b4)
    b4 = Lambda(lambda x: K.expand_dims(x, 1))(b4)

    # 压缩filter
    b4 = Conv2D(256, (1, 1), padding='same',
                use_bias=False, name='image_pooling')(b4)
    b4 = BatchNormalization(name='image_pooling_BN', epsilon=1e-5)(b4)
    b4 = Activation('relu')(b4)

    # 直接利用resize_images扩充hw
    # b4 = 64,64,256
    b4 = Lambda(lambda x: tf.image.resize_images(x, size_before[1:3]))(b4)
    # 调整通道
    b0 = Conv2D(256, (1, 1), padding='same', use_bias=False, name='aspp0')(x)
    b0 = BatchNormalization(name='aspp0_BN', epsilon=1e-5)(b0)
    b0 = Activation('relu', name='aspp0_activation')(b0)

    # rate值与OS相关,SepConv_BN为先3x3膨胀卷积,再1x1卷积,进行压缩
    # 其膨胀率就是rate值
    b1 = SepConv_BN(x, 256, 'aspp1',
                    rate=6, depth_activation=True, epsilon=1e-5)
    b2 = SepConv_BN(x, 256, 'aspp2',
                    rate=12, depth_activation=True, epsilon=1e-5)
    b3 = SepConv_BN(x, 256, 'aspp3',
                    rate=18, depth_activation=True, epsilon=1e-5)

    x = Concatenate()([b4, b0, b1, b2, b3])

    # 利用conv2d压缩
    # 52,52,256
    x = Conv2D(256, (1, 1), padding='same',
               use_bias=False, name='concat_projection')(x)
    x = BatchNormalization(name='concat_projection_BN', epsilon=1e-5)(x)
    x = Activation('relu')(x)
    x = Dropout(0.1)(x)

