【NLP】使用 PyTorch 通过 Hugging Face 使用 BERT 和 Transformers 进行情感分析
大家好,我是Sonhhxg_柒,希望你看完之后,能对你有所帮助,不足请指正!共同学习交流
个人主页-Sonhhxg_柒的博客_CSDN博客
欢迎各位→点赞 + 收藏⭐️ + 留言
系列专栏 - 机器学习【ML】 自然语言处理【NLP】 深度学习【DL】
foreword
✔说明⇢本人讲解主要包括Python、机器学习(ML)、深度学习(DL)、自然语言处理(NLP)等内容。
如果你对这个系列感兴趣的话,可以关注订阅哟
文章目录
什么是BERT?
掩码语言建模(Masked LM)
下一句预测(NSP)
这东西在实践中有用吗?
设置
数据探索
数据预处理
Special Tokens
选择序列长度
使用 BERT 和Hugging Face进行情感分类
训练
评估
预测原始文本
概括
在本教程中,您将学习如何微调 BERT 以进行情感分析。您将进行所需的文本预处理(特殊标记、填充和注意掩码),并使用 Hugging Face 令人惊叹的 Transformers 库构建情感分类器!
您将学习如何:
- 直观了解什么是BERT
- 为 BERT 预处理文本数据并构建 PyTorch 数据集(标记化、注意掩码和填充)
- 通过 Hugging Face 使用 Transformers 库使用迁移学习构建情感分类器
- 根据测试数据评估模型
- 预测原始文本的情绪
什么是BERT?
BERT(在本文中介绍)代表来自 Transformers 的双向编码器表示。如果您不知道其中大部分是什么意思 - 您来对地方了!让我们解开主要思想:
- 双向 - 要理解您正在查看的文本,您必须向后看(在前面的单词)和向前看(在下一个单词)
- Transformers - The Attention Is All You Need论文介绍了 Transformer 模型。Transformer 一次读取整个令牌序列。从某种意义上说,该模型是非定向的,而 LSTM 是按顺序读取的(从左到右或从右到左)。注意机制允许学习单词之间的上下文关系(例如
his,在一个句子中指的是吉姆)。 - (预训练的)上下文词嵌入——ELMO 论文介绍了一种根据词义/上下文对词进行编码的方法。指甲有多重含义——手指甲和金属钉。
BERT 通过屏蔽 15% 的标记进行训练,目的是猜测它们。另一个目标是预测下一句话。让我们看一下这些任务的示例:
掩码语言建模(Masked LM)
此任务的目的是猜测掩码标记。让我们看一个例子,尽量不要让它变得比它必须的更难:
That’s [mask] she [mask] -> That’s what she said
下一句预测(NSP)
给定一对两个句子,任务是判断第二个是否跟在第一个之后(二元分类)。让我们继续这个例子:
Input = [CLS] That’s [mask] she [mask]. [SEP] Hahaha, nice! [SEP]
Label = IsNext
Input = [CLS] That’s [mask] she [mask]. [SEP] Dwight, you ignorant [mask]! [SEP]
Label = NotNext
训练语料库由两个条目组成:多伦多图书语料库(800M 词)和英语维基百科(2,500M 词)。原始的 Transformer 有一个编码器(用于读取输入)和一个解码器(进行预测),而 BERT 只使用解码器。
BERT 只是一组预训练的 Transformer 编码器。多少个编码器?我们有两个版本——12(BERT base)和 24(BERT Large)。
这东西在实践中有用吗?
BERT 论文与源代码和预训练模型一起发布。
最好的部分是,您可以使用 BERT 进行迁移学习(得益于 OpenAI Transformer 的想法)以完成许多 NLP 任务——分类、问答、实体识别等。您可以使用少量数据进行训练并获得出色的性能!
设置
我们需要Hugging Face的 Transformers 库:
!pip install -qq transformers%reload_ext watermark
%watermark -v -p numpy,pandas,torch,transformers
CPython 3.6.9
IPython 5.5.0
numpy 1.18.2
pandas 1.0.3
torch 1.4.0
transformers 2.8.0import transformers
from transformers import BertModel, BertTokenizer, AdamW, get_linear_schedule_with_warmup
import torch
import numpy as np
import pandas as pd
import seaborn as sns
from pylab import rcParams
import matplotlib.pyplot as plt
from matplotlib import rc
from sklearn.model_selection import train_test_split
from sklearn.metrics import confusion_matrix, classification_report
from collections import defaultdict
from textwrap import wrap
from torch import nn, optim
from torch.utils.data import Dataset, DataLoader
%matplotlib inline
%config InlineBackend.figure_format='retina'
sns.set(style='whitegrid', palette='muted', font_scale=1.2)
HAPPY_COLORS_PALETTE = ["#01BEFE", "#FFDD00", "#FF7D00", "#FF006D", "#ADFF02", "#8F00FF"]
sns.set_palette(sns.color_palette(HAPPY_COLORS_PALETTE))
rcParams['figure.figsize'] = 12, 8
RANDOM_SEED = 42
np.random.seed(RANDOM_SEED)
torch.manual_seed(RANDOM_SEED)
device = torch.device("cuda:0" if torch.cuda.is_available() else "cpu")数据探索
我们将加载我们在上一部分中汇总的 Google Play 应用评论数据集:
!gdown --id 1S6qMioqPJjyBLpLVz4gmRTnJHnjitnuV
!gdown --id 1zdmewp7ayS4js4VtrJEHzAheSW-5NBZv
df = pd.read_csv("reviews.csv")
df.head()| userName | userImage | content | score | thumbsUpCount | reviewCreatedVersion | at | replyContent | repliedAt | sortOrder | appId | |
|---|---|---|---|---|---|---|---|---|---|---|---|
| 0 | Andrew Thomas | https://lh3.googleusercontent.com/a-/AOh14GiHd... | Update: After getting a response from the deve... | 1 | 21 | 4.17.0.3 | 2020-04-05 22:25:57 | According to our TOS, and the term you have ag... | 2020-04-05 15:10:24 | most_relevant | com.anydo |
| 1 | Craig Haines | https://lh3.googleusercontent.com/-hoe0kwSJgPQ... | Used it for a fair amount of time without any ... | 1 | 11 | 4.17.0.3 | 2020-04-04 13:40:01 | It sounds like you logged in with a different ... | 2020-04-05 15:11:35 | most_relevant | com.anydo |
| 2 | steven adkins | https://lh3.googleusercontent.com/a-/AOh14GiXw... | Your app sucks now!!!!! Used to be good but no... | 1 | 17 | 4.17.0.3 | 2020-04-01 16:18:13 | This sounds odd! We are not aware of any issue... | 2020-04-02 16:05:56 | most_relevant | com.anydo |
| 3 | Lars Panzerbjørn | https://lh3.googleusercontent.com/a-/AOh14Gg-h... | It seems OK, but very basic. Recurring tasks n... | 1 | 192 | 4.17.0.2 | 2020-03-12 08:17:34 | We do offer this option as part of the Advance... | 2020-03-15 06:20:13 | most_relevant | com.anydo |
| 4 | Scott Prewitt | https://lh3.googleusercontent.com/-K-X1-YsVd6U... | Absolutely worthless. This app runs a prohibit... | 1 | 42 | 4.17.0.2 | 2020-03-14 17:41:01 | We're sorry you feel this way! 90% of the app ... | 2020-03-15 23:45:51 | most_relevant | com.anydo |
df.shape(15746, 11)
我们有大约 16k 个示例。让我们检查缺失值:
df.info()
RangeIndex: 15746 entries, 0 to 15745
Data columns (total 11 columns):
 #   Column                Non-Null Count  Dtype
---  ------                --------------  -----
 0   userName              15746 non-null  object
 1   userImage             15746 non-null  object
 2   content               15746 non-null  object
 3   score                 15746 non-null  int64
 4   thumbsUpCount         15746 non-null  int64
 5   reviewCreatedVersion  13533 non-null  object
 6   at                    15746 non-null  object
 7   replyContent          7367 non-null   object
 8   repliedAt             7367 non-null   object
 9   sortOrder             15746 non-null  object
 10  appId                 15746 non-null  object
dtypes: int64(2), object(9)
memory usage: 1.3+ MB
太棒了,评分和评论文本中没有缺失值!我们有阶级失衡吗?
sns.countplot(df.score)
plt.xlabel('review score');
这是非常不平衡的,但没关系。我们要将数据集转换为负面、中性和正面情绪:
def to_sentiment(rating):
    rating = int(rating)
    if rating <= 2:
        return 0
    elif rating == 3:
        return 1
    else:
        return 2

df['sentiment'] = df.score.apply(to_sentiment)

class_names = ['negative', 'neutral', 'positive']

ax = sns.countplot(df.sentiment)
plt.xlabel('review sentiment')
ax.set_xticklabels(class_names); 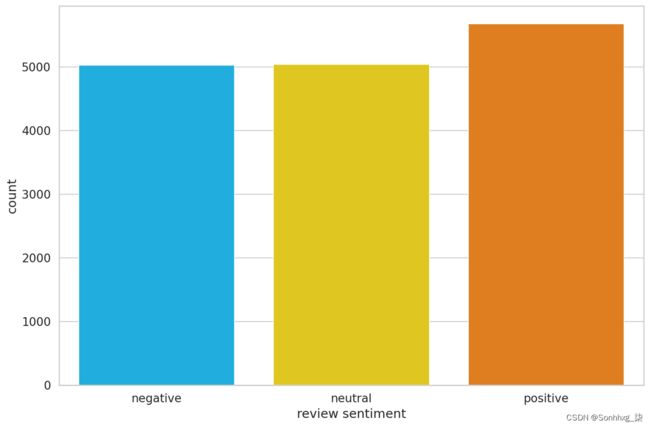
平衡(大部分)恢复了。
数据预处理
您可能已经知道机器学习模型不适用于原始文本。您需要将文本转换为数字(某种)。BERT 需要更多的关注(好的,对吧?)。以下是要求:
- 添加特殊标记来分隔句子并进行分类
- 传递恒定长度的序列(引入填充)
- 创建 0s(pad token)和 1s(real token)的数组,称为注意力掩码
Transformers 库提供(您已经猜到了)各种各样的 Transformer 模型(包括 BERT)。它适用于 TensorFlow 和 PyTorch!它还包括为我们完成繁重工作的预构建分词器!
PRE_TRAINED_MODEL_NAME= 'bert-base-cased'您可以使用 BERT 和分词器的大小写和非大小写版本。我已经尝试过两者。外壳版本效果更好。直觉上,这是有道理的,因为“BAD”可能比“bad”传达更多情绪。
让我们加载一个预训练的BertTokenizer:
tokenizer = BertTokenizer.from_pretrained(PRE_TRAINED_MODEL_NAME)我们将使用此文本来了解标记化过程:
sample_txt = 'When was I last outside? I am stuck at home for 2 weeks.'一些基本操作可以将文本转换为标记,并将标记转换为唯一的整数 (ids):
tokens = tokenizer.tokenize(sample_txt)
token_ids = tokenizer.convert_tokens_to_ids(tokens)

print(f' Sentence: {sample_txt}')
print(f'   Tokens: {tokens}')
print(f'Token IDs: {token_ids}')
Sentence: When was I last outside? I am stuck at home for 2 weeks. Tokens: ['When', 'was', 'I', 'last', 'outside', '?', 'I', 'am', 'stuck', 'at', 'home', 'for', '2', 'weeks', '.'] Token IDs: [1332, 1108, 146, 1314, 1796, 136, 146, 1821, 5342, 1120, 1313, 1111, 123, 2277, 119]
Special Tokens
[SEP]- 句子结束标记
tokenizer.sep_token, tokenizer.sep_token_id('[SEP]', 102)
[CLS]- 我们必须将此标记添加到每个句子的开头,以便 BERT 知道我们在进行分类
tokenizer.cls_token, tokenizer.cls_token_id('[CLS]', 101)
还有一个用于填充的特殊标记:
tokenizer.pad_token, tokenizer.pad_token_id('[PAD]', 0)
BERT 理解训练集中的标记。其他一切都可以使用[UNK](未知)令牌进行编码:
tokenizer.unk_token, tokenizer.unk_token_id('[UNK]', 100)
所有这些工作都可以使用以下encode_plus()方法完成:
encoding = tokenizer.encode_plus(
    sample_txt,
    max_length=32,
    add_special_tokens=True, # Add '[CLS]' and '[SEP]'
    return_token_type_ids=False,
    pad_to_max_length=True,
    return_attention_mask=True,
    return_tensors='pt',  # Return PyTorch tensors
)

encoding.keys()
dict_keys(['input_ids', 'attention_mask'])
令牌 id 现在存储在张量中并填充到 32 的长度:
print(len(encoding['input_ids'][0]))
encoding['input_ids'][0]
32 tensor([ 101, 1332, 1108, 146, 1314, 1796, 136, 146, 1821, 5342, 1120, 1313, 1111, 123, 2277, 119, 102, 0, 0, 0, 0, 0, 0, 0, 0, 0, 0, 0, 0, 0, 0, 0])
注意掩码具有相同的长度:
print(len(encoding['attention_mask'][0]))
encoding['attention_mask']
32 tensor([[1, 1, 1, 1, 1, 1, 1, 1, 1, 1, 1, 1, 1, 1, 1, 1, 1, 0, 0, 0, 0, 0, 0, 0, 0, 0, 0, 0, 0, 0, 0, 0]])
我们可以反转标记化以查看特殊标记:
tokenizer.convert_ids_to_tokens(encoding['input_ids'][0])['[CLS]',
'When',
'was',
'I',
'last',
'outside',
'?',
'I',
'am',
'stuck',
'at',
'home',
'for',
'2',
'weeks',
'.',
'[SEP]',
'[PAD]',
'[PAD]',
'[PAD]',
'[PAD]',
'[PAD]',
'[PAD]',
'[PAD]',
'[PAD]',
'[PAD]',
'[PAD]',
'[PAD]',
'[PAD]',
'[PAD]',
'[PAD]',
'[PAD]']选择序列长度
BERT 适用于固定长度的序列。我们将使用一个简单的策略来选择最大长度。让我们存储每个评论的令牌长度:
token_lens = []
for txt in df.content:
    tokens = tokenizer.encode(txt, max_length=512)
    token_lens.append(len(tokens))
并绘制分布:
sns.distplot(token_lens)
plt.xlim([0, 256]);
plt.xlabel('Token count');
大多数评论似乎包含少于 128 个标记,但为了安全起见,我们选择最大长度为 160。
MAX_LEN = 160我们拥有创建 PyTorch 数据集所需的所有构建块。我们开始做吧:
class GPReviewDataset(Dataset):

    def __init__(self, reviews, targets, tokenizer, max_len):
        self.reviews = reviews
        self.targets = targets
        self.tokenizer = tokenizer
        self.max_len = max_len

    def __len__(self):
        return len(self.reviews)

    def __getitem__(self, item):
        review = str(self.reviews[item])
        target = self.targets[item]

        encoding = self.tokenizer.encode_plus(
            review,
            add_special_tokens=True,
            max_length=self.max_len,
            return_token_type_ids=False,
            pad_to_max_length=True,
            return_attention_mask=True,
            return_tensors='pt',
        )

        return {
            'review_text': review,
            'input_ids': encoding['input_ids'].flatten(),
            'attention_mask': encoding['attention_mask'].flatten(),
            'targets': torch.tensor(target, dtype=torch.long)
        }
分词器为我们做了大部分繁重的工作。我们还会返回评论文本,因此可以更轻松地评估我们模型的预测。让我们拆分数据:
df_train, df_test = train_test_split(
    df,
    test_size=0.1,
    random_state=RANDOM_SEED
)
df_val, df_test = train_test_split(
    df_test,
    test_size=0.5,
    random_state=RANDOM_SEED
)

df_train.shape, df_val.shape, df_test.shape
((14171, 12), (787, 12), (788, 12))
我们还需要创建几个数据加载器。这是一个辅助函数:
def create_data_loader(df, tokenizer, max_len, batch_size):
    ds = GPReviewDataset(
        reviews=df.content.to_numpy(),
        targets=df.sentiment.to_numpy(),
        tokenizer=tokenizer,
        max_len=max_len
    )

    return DataLoader(
        ds,
        batch_size=batch_size,
        num_workers=4
    )

BATCH_SIZE = 16

train_data_loader = create_data_loader(df_train, tokenizer, MAX_LEN, BATCH_SIZE)
val_data_loader = create_data_loader(df_val, tokenizer, MAX_LEN, BATCH_SIZE)
test_data_loader = create_data_loader(df_test, tokenizer, MAX_LEN, BATCH_SIZE)
让我们看一下来自训练数据加载器的示例批次:
data = next(iter(train_data_loader))
data.keys()
dict_keys(['review_text', 'input_ids', 'attention_mask', 'targets'])
print(data['input_ids'].shape)
print(data['attention_mask'].shape)
print(data['targets'].shape)
torch.Size([16, 160]) torch.Size([16, 160]) torch.Size([16])
使用 BERT 和Hugging Face进行情感分类
有很多助手可以通过 Transformers 库轻松使用 BERT。根据您可能想要使用BertForSequenceClassification、BertForQuestionAnswering或其他东西的任务。
但谁在乎,对吧?我们是铁杆!我们将使用基本的BertModel并在其之上构建我们的情感分类器。让我们加载模型:
bert_model = BertModel.from_pretrained(PRE_TRAINED_MODEL_NAME)并尝试在我们的示例文本的编码中使用它:
last_hidden_state, pooled_output = bert_model(
    input_ids=encoding['input_ids'],
    attention_mask=encoding['attention_mask']
)是模型最后一层的last_hidden_state一系列隐藏状态。获取pooled_output是通过在 上应用BertPooler来完成的last_hidden_state:
last_hidden_state.shapetorch.Size([1, 32, 768])
我们有 32 个标记(示例序列的长度)中每一个的隐藏状态。但为什么是 768?这是前馈网络中隐藏单元的数量。我们可以通过检查配置来验证:
bert_model.config.hidden_size768
pooled_output根据 BERT,您可以将其视为内容摘要。尽管如此,您可能会尝试做得更好。让我们看看输出的形状:
pooled_output.shapetorch.Size([1, 768])
我们可以使用所有这些知识来创建一个使用 BERT 模型的分类器:
class SentimentClassifier(nn.Module):

    def __init__(self, n_classes):
        super(SentimentClassifier, self).__init__()
        self.bert = BertModel.from_pretrained(PRE_TRAINED_MODEL_NAME)
        self.drop = nn.Dropout(p=0.3)
        self.out = nn.Linear(self.bert.config.hidden_size, n_classes)

    def forward(self, input_ids, attention_mask):
        _, pooled_output = self.bert(
            input_ids=input_ids,
            attention_mask=attention_mask
        )
        output = self.drop(pooled_output)
        return self.out(output
我们的分类器将大部分繁重的工作委托给了 BertModel。我们使用 dropout 层进行正则化,使用全连接层进行输出。请注意,我们要返回最后一层的原始输出,因为 PyTorch 中的交叉熵损失函数需要它才能工作。
这应该像任何其他 PyTorch 模型一样工作。让我们创建一个实例并将其移动到 GPU
model = SentimentClassifier(len(class_names))
model = model.to(device)
我们会将训练数据的示例批次移动到 GPU:
input_ids = data['input_ids'].to(device)
attention_mask = data['attention_mask'].to(device)

print(input_ids.shape) # batch size x seq length
print(attention_mask.shape) # batch size x seq length
torch.Size([16, 160]) torch.Size([16, 160])
为了从我们训练的模型中获得预测概率,我们将 softmax 函数应用于输出:
F.softmax(model(input_ids, attention_mask), dim=1)tensor([[0.5879, 0.0842, 0.3279],
[0.4308, 0.1888, 0.3804],
[0.4871, 0.1766, 0.3363],
[0.3364, 0.0778, 0.5858],
[0.4025, 0.1040, 0.4935],
[0.3599, 0.1026, 0.5374],
[0.5054, 0.1552, 0.3394],
[0.5962, 0.1464, 0.2574],
[0.3274, 0.1967, 0.4759],
[0.3026, 0.1118, 0.5856],
[0.4103, 0.1571, 0.4326],
[0.4879, 0.2121, 0.3000],
[0.3811, 0.1477, 0.4712],
[0.3354, 0.1354, 0.5292],
[0.3999, 0.2822, 0.3179],
[0.5075, 0.1684, 0.3242]], device='cuda:0', grad_fn=) 训练
为了重现 BERT 论文中的训练过程,我们将使用Hugging Face 提供的AdamW优化器。它纠正了权重衰减,因此它与原始论文相似。我们还将使用没有预热步骤的线性调度程序:
EPOCHS = 10

optimizer = AdamW(model.parameters(), lr=2e-5, correct_bias=False)
total_steps = len(train_data_loader) * EPOCHS

scheduler = get_linear_schedule_with_warmup(
    optimizer,
    num_warmup_steps=0,
    num_training_steps=total_steps
)

loss_fn = nn.CrossEntropyLoss().to(device)
我们如何提出所有超参数?BERT 作者有一些微调建议:
- 批量大小:16、32
- 学习率(Adam):5e-5、3e-5、2e-5
- epochs数:2、3、4
我们将忽略 epochs 推荐的数量,但坚持使用其余的。请注意,增加批量大小会显着减少训练时间,但会降低准确性。
让我们继续编写一个辅助函数来训练我们的模型一个时期:
def train_epoch(
    model,
    data_loader,
    loss_fn,
    optimizer,
    device,
    scheduler,
    n_examples
  ):
    model = model.train()

    losses = []
    correct_predictions = 0

    for d in data_loader:
        input_ids = d["input_ids"].to(device)
        attention_mask = d["attention_mask"].to(device)
        targets = d["targets"].to(device)
        outputs = model(
            input_ids=input_ids,
            attention_mask=attention_mask
        )

        _, preds = torch.max(outputs, dim=1)
        loss = loss_fn(outputs, targets)

        correct_predictions += torch.sum(preds == targets)
        losses.append(loss.item())

        loss.backward()
        nn.utils.clip_grad_norm_(model.parameters(), max_norm=1.0)
        optimizer.step()
        scheduler.step()
        optimizer.zero_grad()

    return correct_predictions.double() / n_examples, np.mean(losses)
训练模型应该看起来很熟悉,除了两件事。每次将批次提供给模型时都会调用调度程序。我们通过使用clip grad_norm裁剪模型的梯度来避免爆炸梯度。
让我们编写另一个帮助我们在给定数据加载器上评估模型的方法:
def eval_model(model, data_loader, loss_fn, device, n_examples):
    model = model.eval()

    losses = []
    correct_predictions = 0

    with torch.no_grad():
        for d in data_loader:
            input_ids = d["input_ids"].to(device)
            attention_mask = d["attention_mask"].to(device)
            targets = d["targets"].to(device)

            outputs = model(
                input_ids=input_ids,
                attention_mask=attention_mask
            )
            _, preds = torch.max(outputs, dim=1)

            loss = loss_fn(outputs, targets)

            correct_predictions += torch.sum(preds == targets)
            losses.append(loss.item())

    return correct_predictions.double() / n_examples, np.mean(losses)
使用这两个,我们可以编写我们的训练循环。我们还将存储训练历史:
%%time

history = defaultdict(list)
best_accuracy = 0

for epoch in range(EPOCHS):

    print(f'Epoch {epoch + 1}/{EPOCHS}')
    print('-' * 10)

    train_acc, train_loss = train_epoch(
        model,
        train_data_loader,
        loss_fn,
        optimizer,
        device,
        scheduler,
        len(df_train)
    )

    print(f'Train loss {train_loss} accuracy {train_acc}')

    val_acc, val_loss = eval_model(
        model,
        val_data_loader,
        loss_fn,
        device,
        len(df_val)
    )

    print(f'Val   loss {val_loss} accuracy {val_acc}')
    print()

    history['train_acc'].append(train_acc)
    history['train_loss'].append(train_loss)
    history['val_acc'].append(val_acc)
    history['val_loss'].append(val_loss)

    if val_acc > best_accuracy:
        torch.save(model.state_dict(), 'best_model_state.bin')
        best_accuracy = val_acc
Epoch 1/10
----------
Train loss 0.7330631300571541 accuracy 0.6653729447463129
Val loss 0.5767546480894089 accuracy 0.7776365946632783
Epoch 2/10
----------
Train loss 0.4158683338330777 accuracy 0.8420012701997036
Val loss 0.5365073362737894 accuracy 0.832274459974587
Epoch 3/10
----------
Train loss 0.24015077009679367 accuracy 0.922023851527768
Val loss 0.5074492372572422 accuracy 0.8716645489199493
Epoch 4/10
----------
Train loss 0.16012676668187295 accuracy 0.9546962105708843
Val loss 0.6009970247745514 accuracy 0.8703939008894537
Epoch 5/10
----------
Train loss 0.11209654617575301 accuracy 0.9675393409074872
Val loss 0.7367783848941326 accuracy 0.8742058449809403
Epoch 6/10
----------
Train loss 0.08572274737026433 accuracy 0.9764307388328276
Val loss 0.7251267762482166 accuracy 0.8843710292249047
Epoch 7/10
----------
Train loss 0.06132202987342602 accuracy 0.9833462705525369
Val loss 0.7083295831084251 accuracy 0.889453621346887
Epoch 8/10
----------
Train loss 0.050604159273123096 accuracy 0.9849693035071626
Val loss 0.753860274553299 accuracy 0.8907242693773825
Epoch 9/10
----------
Train loss 0.04373276197092931 accuracy 0.9862395032107826
Val loss 0.7506809896230697 accuracy 0.8919949174078781
Epoch 10/10
----------
Train loss 0.03768671146314381 accuracy 0.9880036694658105
Val loss 0.7431786182522774 accuracy 0.8932655654383737
CPU times: user 29min 54s, sys: 13min 28s, total: 43min 23s
Wall time: 43min 43s请注意,我们正在存储最佳模型的状态,以最高验证准确度表示。
哇,这花了一些时间!我们可以看看训练与验证的准确性:
plt.plot(history['train_acc'], label='train accuracy')
plt.plot(history['val_acc'], label='validation accuracy')

plt.title('Training history')
plt.ylabel('Accuracy')
plt.xlabel('Epoch')
plt.legend()
plt.ylim([0, 1]); 
训练准确率在 10 个 epoch 左右后开始接近 100%。您可能会尝试对参数进行更多微调,但这对我们来说已经足够了。
不想等?取消注释下一个单元格以下载我的预训练模型:
# !gdown --id 1V8itWtowCYnb2Bc9KlK9SxGff9WwmogA

# model = SentimentClassifier(len(class_names))
# model.load_state_dict(torch.load('best_model_state.bin'))
# model = model.to(device)
评估
那么我们的模型在预测情绪方面有多好?让我们从计算测试数据的准确性开始:
test_acc, _ = eval_model(
    model,
    test_data_loader,
    loss_fn,
    device,
    len(df_test)
)
test_acc.item()
0.883248730964467
测试集上的准确率大约低 1%。我们的模型似乎概括得很好。
我们将定义一个辅助函数来从我们的模型中获取预测:
def get_predictions(model, data_loader):
    model = model.eval()

    review_texts = []
    predictions = []
    prediction_probs = []
    real_values = []

    with torch.no_grad():
        for d in data_loader:

            texts = d["review_text"]
            input_ids = d["input_ids"].to(device)
            attention_mask = d["attention_mask"].to(device)
            targets = d["targets"].to(device)

            outputs = model(
                input_ids=input_ids,
                attention_mask=attention_mask
            )
            _, preds = torch.max(outputs, dim=1)

            review_texts.extend(texts)
            predictions.extend(preds)
            prediction_probs.extend(outputs)
            real_values.extend(targets)

    predictions = torch.stack(predictions).cpu()
    prediction_probs = torch.stack(prediction_probs).cpu()
    real_values = torch.stack(real_values).cpu()
    return review_texts, predictions, prediction_probs, real_values
这类似于评估函数,除了我们存储评论文本和预测概率:
y_review_texts, y_pred, y_pred_probs, y_test = get_predictions(
    model,
    test_data_loader
)
我们来看看分类报告
print(classification_report(y_test, y_pred, target_names=class_names))precision recall f1-score support
negative 0.89 0.87 0.88 245
neutral 0.83 0.85 0.84 254
positive 0.92 0.93 0.92 289
accuracy 0.88 788
macro avg 0.88 0.88 0.88 788
weighted avg 0.88 0.88 0.88 788看起来很难对中性(3 星)评论进行分类。我可以根据经验告诉你,看了很多评论,这些评论很难归类。
我们将继续混淆矩阵:
def show_confusion_matrix(confusion_matrix):
    hmap = sns.heatmap(confusion_matrix, annot=True, fmt="d", cmap="Blues")
    hmap.yaxis.set_ticklabels(hmap.yaxis.get_ticklabels(), rotation=0, ha='right')
    hmap.xaxis.set_ticklabels(hmap.xaxis.get_ticklabels(), rotation=30, ha='right')
    plt.ylabel('True sentiment')
    plt.xlabel('Predicted sentiment');

cm = confusion_matrix(y_test, y_pred)
df_cm = pd.DataFrame(cm, index=class_names, columns=class_names)
show_confusion_matrix(df_cm)
1 这证实了我们的模型难以对中性评论进行分类。它以大致相同的频率将那些误认为是负面的和正面的。
这是对我们模型性能的一个很好的概述。但是让我们看一下测试数据中的一个例子:
idx = 2

review_text = y_review_texts[idx]
true_sentiment = y_test[idx]
pred_df = pd.DataFrame({
    'class_names': class_names,
    'values': y_pred_probs[idx]
})

print("\n".join(wrap(review_text)))
print()
print(f'True sentiment: {class_names[true_sentiment]}')
I used to use Habitica, and I must say this is a great step up. I'd
like to see more social features, such as sharing tasks - only one
person has to perform said task for it to be checked off, but only
giving that person the experience and gold. Otherwise, the price for
subscription is too steep, thus resulting in a sub-perfect score. I
could easily justify $0.99/month or eternal subscription for $15. If
that price could be met, as well as fine tuning, this would be easily
worth 5 stars.
True sentiment: neutral现在我们可以查看模型中每种情绪的置信度:
sns.barplot(x='values', y='class_names', data=pred_df, orient='h')
plt.ylabel('sentiment')
plt.xlabel('probability')
plt.xlim([0, 1]);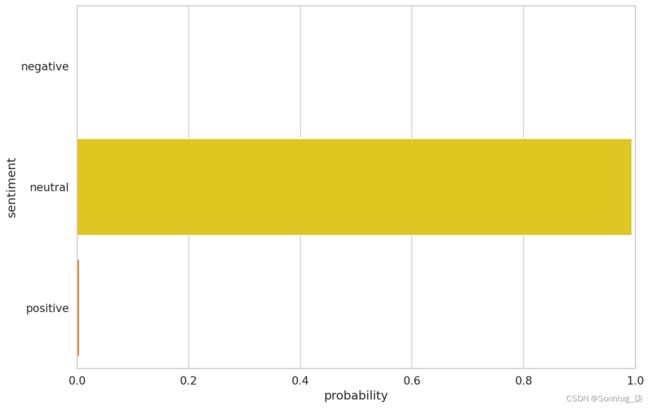
预测原始文本
让我们使用我们的模型来预测一些原始文本的情绪:
review_text = "I love completing my todos! Best app ever!!!"我们必须使用分词器对文本进行编码:
encoded_review = tokenizer.encode_plus(
    review_text,
    max_length=MAX_LEN,
    add_special_tokens=True,
    return_token_type_ids=False,
    pad_to_max_length=True,
    return_attention_mask=True,
    return_tensors='pt',
)
让我们从我们的模型中得到预测:
input_ids = encoded_review['input_ids'].to(device)
attention_mask = encoded_review['attention_mask'].to(device)

output = model(input_ids, attention_mask)
_, prediction = torch.max(output, dim=1)

print(f'Review text: {review_text}')
print(f'Sentiment  : {class_names[prediction]}')
Review text: I love completing my todos! Best app ever!!! Sentiment : positive
概括
不错的工作!您学习了如何使用 BERT 进行情感分析。您使用 Hugging Face 库构建了一个自定义分类器,并在我们的应用评论数据集上对其进行了训练!
您学会了如何:
- 直观了解什么是BERT
- 为 BERT 预处理文本数据并构建 PyTorch 数据集(标记化、注意掩码和填充)
- 通过 Hugging Face 使用 Transformers 库使用迁移学习构建情感分类器
- 根据测试数据评估模型
- 预测原始文本的情绪