【YOLOv3 net】YOLOv3网络结构及代码详解
文章目录
- 1 总体介绍
- 2 YOLOv3主干网络
- 3 FPN特征融合
-
- 3.1 构建方式解读1
- 3.2 构建方式解读2
- 4 利用Yolo Head获得预测结果
- 5 不同尺度的先验框anchor box
-
- 5.1 理论介绍
- 5.2 代码读取
- 6 YOLOv3整体网络结构代码理解
- 7 感谢链接
1 总体介绍
YOLOv3网络主要包括两部分,一个是主干网络(backbone)部分,一个是使用特征金字塔(FPN)融合、加强特征提取并利用卷积进行预测部分。
2 YOLOv3主干网络
以采用darknet53网络为例,详解见YOLOv3 backbone Darknet-53 详解
3 FPN特征融合
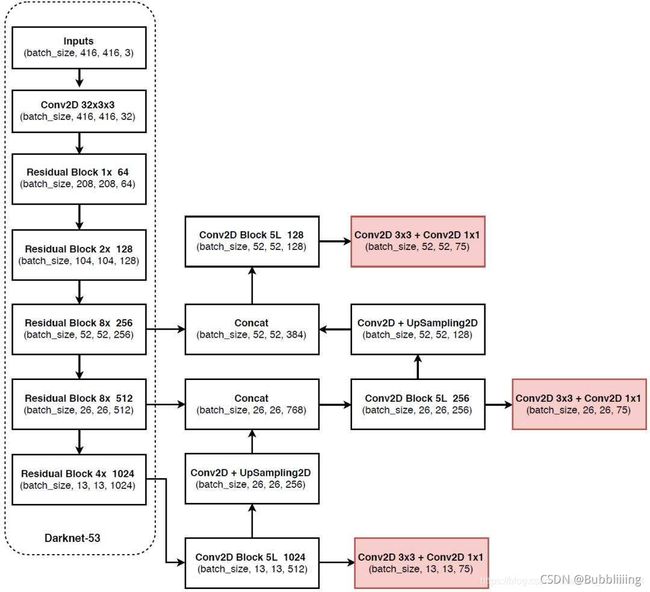
YOLOv3提取多特征层进行目标检测,一共提取三个特征层。
三个特征层位于主干部分Darknet53的不同位置,分别位于中间层,中下层,底层,三个特征层的shape分别为(52,52,256)、(26,26,512)、(13,13,1024)。
在获得三个有效特征层后,利用这三个有效特征层进行FPN层的构建。
3.1 构建方式解读1
- 13x13x1024的特征层进行5次卷积处理,处理完后的结果分两路走,一路利用**YoloHead(检测头)获得预测结果,一路用于进行卷积(降低通道数)+上采样UmSampling2d(c通道数不变,w,h尺寸变为原来2倍)**后与26x26x512特征层进行concat拼接,拼接后特征层的shape为(26,26,768)。
- 拼接后的特征层再次进行5次卷积处理,处理完后的结果 分两路 走,一路利用 YoloHead 获得预测结果,一路用于进行 卷积(降低通道数)+上采样UmSampling2d(c通道数不变,w,h尺寸变为原来2倍) 后与52x52x256特征层进行concat拼接,拼接后特征层的shape为(52,52,384)。
- 拼接后的特征层再次进行5次卷积处理,处理完后利用YoloHead获得预测结果。
3.2 构建方式解读2
- backbone最后一层经过5次卷积得到一层特征图,从这儿分成两路,一路去做预测,一路上采样和上一个Block进行concat拼接,类推形成特征金字塔(FPN,Feature Pyramid Networks,用于解决目标检测中的多尺度变化问题)
- 预测那一路包括分类预测和回归预测,使用的是3x3的卷积和1x1的卷积,最后得到的特征图尺寸为13x13,75的由来,每个像素点(网格思想)上有3个先验框,每个先验框属于每一类的概率(voc有20类)、是否有物体(1个参数)、对应的调整参数(4个参数,中心点x,y坐标,框宽w和高h),因此最后的13,13,75的理解为:
13,13,75 ->13,13,3x25 -> 13,13,3x[20(属于某一类的概率,voc有20类)+1(是否有物体)+4(调整参数)]。 - 上采样那一路,和上一层的输出特征图融合后,做5次卷积得到一层特征图,然后分成两路,一路去做预测,一路去。。。
ps:先验框是预设的( 9种尺度的先验框 ),经过网络训练,参数调整后才能变成 预测框。
特征金字塔可以将不同shape的特征层进行特征融合,有利于提取出更好的特征。
4 利用Yolo Head获得预测结果
利用FPN特征金字塔,可以获得三个加强特征,这三个加强特征的shape分别为(13,13,512)、(26,26,256)、(52,52,128),然后利用这三个shape的特征层传入Yolo Head获得预测结果。
Yolo Head本质上是一次3x3卷积加上一次1x1卷积,3x3卷积的作用是特征整合,1x1卷积的作用是调整通道数。
对所获得的三个加强特征层分别进行处理,假设预测是的VOC数据集,则输出层的shape分别为(13,13,75),(26,26,75),(52,52,75),最后一个维度为75是因为该例子是基于voc数据集的,它的类别数为20种,YoloV3针对每一个特征层的每一个特征点存在3个先验框,所以预测结果的通道数为3x25(20个类别,每个类别都有一个概率 + 4调整参数 + 1是否有物体);
如果使用的是coco训练集,类别数则为80种,最后的维度应该为255 = 3x85,三个特征层的shape为(13,13,255),(26,26,255),(52,52,255)。小总结: 输入N张416x416的图片,在经过多层的运算后,会输出三个shape分别为(N,13,13,255),(N,26,26,255),(N,52,52,255)的数据,分别对应每个图为13x13、26x26、52x52的网格上3个先验框的位置预测情况。
5 不同尺度的先验框anchor box
5.1 理论介绍
定义: anchor box是从训练集的所有ground truth box中统计(使用k-means)出来的在训练集中最经常出现的几个box形状和尺寸。
9种尺度先验框: 随着输出的特征图的数量和尺度的变化,先验框的尺寸也需要相应的调整。YOLOv2已经开始采用K-means聚类得到先验框的尺寸,YOLOv3延续了这种方法,为每种下采样尺度设定3种先验框,总共聚类出9种尺寸的先验框。在COCO数据集这9个先验框(voc用这个也ok,一般不改)是:(10x13),(16x30),(33x23),(30x61),(62x45),(59x119),(116x90),(156x198),(373x326)。
如何分配: 在最小的13x13特征图上(有最大的感受野)应用较大的先验框(116x90),(156x198),(373x326),适合检测较大的对象。中等的26x26特征图上(中等感受野)应用中等的先验框(30x61),(62x45),(59x119),适合检测中等大小的对象。较大的52x52特征图上(较小的感受野)应用较小的先验框(10x13),(16x30),(33x23),适合检测较小的对象。

5.2 代码读取
在yolo_anchors.txt中存有下列数据
10,13, 16,30, 33,23, 30,61, 62,45, 59,119, 116,90, 156,198, 373,326
import numpy as np
#---------------------------------------------------#
#   获得先验框
#---------------------------------------------------#
def get_anchors(anchors_path):
    '''loads the anchors from a file'''
    with open(anchors_path, encoding='utf-8') as f:
        anchors = f.readline()
    anchors = [float(x) for x in anchors.split(',')]
    anchors = np.array(anchors).reshape(-1, 2)
    return anchors, len(anchors)

anchors_path    = 'model_data/yolo_anchors.txt'
# anchors: ndarray:(9,2)        num_anchors:int  9
anchors, num_anchors     = get_anchors(anchors_path)
print(anchors)
[[ 10.  13.]
 [ 16.  30.]
 [ 33.  23.]
 [ 30.  61.]
 [ 62.  45.]
 [ 59. 119.]
 [116.  90.]
 [156. 198.]
 [373. 326.]]
6 YOLOv3整体网络结构代码理解
结合backbone------darknet53的代码,可直接运行下列代码
from collections import OrderedDict
import torch
import torch.nn as nn
# darknet53的分析可见https://blog.csdn.net/weixin_45377629/article/details/124078580?spm=1001.2014.3001.5501
from nets.darknet import darknet53


def conv2d(filter_in, filter_out, kernel_size):
    pad = (kernel_size - 1) // 2 if kernel_size else 0
    return nn.Sequential(OrderedDict([
        ("conv", nn.Conv2d(filter_in, filter_out, kernel_size=kernel_size, stride=1, padding=pad, bias=False)),
        ("bn", nn.BatchNorm2d(filter_out)),
        ("relu", nn.LeakyReLU(0.1)),
    ]))

#------------------------------------------------------------------------#
#   make_last_layers里面一共有七个卷积,前五个用于提取特征。
#   后两个用于获得yolo网络的预测结果,称之为yolo head
#------------------------------------------------------------------------#
def make_last_layers(filters_list, in_filters, out_filter):
    m = nn.Sequential(
        conv2d(in_filters, filters_list[0], 1),         # 1表示kernel_size
        conv2d(filters_list[0], filters_list[1], 3),
        conv2d(filters_list[1], filters_list[0], 1),
        conv2d(filters_list[0], filters_list[1], 3),
        conv2d(filters_list[1], filters_list[0], 1),
        conv2d(filters_list[0], filters_list[1], 3),
        nn.Conv2d(filters_list[1], out_filter, kernel_size=1, stride=1, padding=0, bias=True)
    )
    return m

# ---------------------------------------------------#
#   获得类,`voc_classes.txt`中包含voc数据集中所有类别名称
# ---------------------------------------------------#
def get_classes(classes_path):
    with open(classes_path, encoding='utf-8') as f:
        class_names = f.readlines()
    class_names = [c.strip() for c in class_names]
    return class_names, len(class_names)

class YoloBody(nn.Module):
    def __init__(self, anchors_mask, num_classes):
        super(YoloBody, self).__init__()
        #---------------------------------------------------#
        #   生成darknet53的主干模型
        #   获得三个有效特征层,他们的shape分别是:
        #   52,52,256
        #   26,26,512
        #   13,13,1024
        #---------------------------------------------------#
        self.backbone = darknet53()

        #---------------------------------------------------#
        #   out_filters : [64, 128, 256, 512, 1024],利用最后三个进行FPN融合
        #---------------------------------------------------#
        out_filters = self.backbone.layers_out_filters      # 表示Darknet53网络几个结构块的输出通道数,make_last_layers中用到此处

        #------------------------------------------------------------------------#
        #   计算yolo_head的输出通道数,对于voc数据集而言
        #   final_out_filter0 = final_out_filter1 = final_out_filter2 = 75
        #   final_out_filter0 = len(anchors_mask[0]) * (num_classes + 5) = 3*(20+5)
        #   3*(20+5)含义:
        #       3表示网格点上先验框个数,
        #       20表示voc分类类别数,coco是80类,5:
        #       4个先验框框调整参数+1表示网格内是否有物体
        #   anchors_mask:表示先验框尺寸变化,通常有9种,一般不改,具体详见正文分析
        #------------------------------------------------------------------------#
        self.last_layer0            = make_last_layers([512, 1024], out_filters[-1], len(anchors_mask[0]) * (num_classes + 5))

        self.last_layer1_conv       = conv2d(512, 256, 1)   # 2D卷积,降低通道数
        self.last_layer1_upsample   = nn.Upsample(scale_factor=2, mode='nearest')   # 上采样:c通道数不变,w,h尺寸变为原来2倍
        self.last_layer1            = make_last_layers([256, 512], out_filters[-2] + 256, len(anchors_mask[1]) * (num_classes + 5))

        self.last_layer2_conv       = conv2d(256, 128, 1)
        self.last_layer2_upsample   = nn.Upsample(scale_factor=2, mode='nearest')
        self.last_layer2            = make_last_layers([128, 256], out_filters[-3] + 128, len(anchors_mask[2]) * (num_classes + 5))

    def forward(self, x):
        #---------------------------------------------------#
        #   获得三个有效特征层,他们的shape分别是:
        #   52,52,256;26,26,512;13,13,1024
        #---------------------------------------------------#
        x2, x1, x0 = self.backbone(x)       # backbone return out3, out4, out5

        #---------------------------------------------------#
        #   第一个特征层
        #   out0 = (batch_size,255,13,13)
        #---------------------------------------------------#
        # 13,13,1024 -> 13,13,512 -> 13,13,1024 -> 13,13,512 -> 13,13,1024 -> 13,13,512
        # yolo head中有七层卷积(nn.Sequential整合的),前5层提取特征,同时其输出要进行 卷积+上采样 去和上一个layer输出融合形成FPN。
        # 故这个地方[:5]和[5:]
        out0_branch = self.last_layer0[:5](x0)
        out0        = self.last_layer0[5:](out0_branch)     # torch.size([1,75,13,13])

        # 13,13,512 -> 13,13,256 -> 26,26,256
        x1_in = self.last_layer1_conv(out0_branch)      # {Tensor:1}
        x1_in = self.last_layer1_upsample(x1_in)        # {Tensor:1}

        # 26,26,256 + 26,26,512 -> 26,26,768
        x1_in = torch.cat([x1_in, x1], 1)       # 所谓融合也就是特征图拼接,层数变多   # 后一个参数1的作用  {Tensor:1}  torch.size([1,768,26,26])
        #---------------------------------------------------#
        #   第二个特征层
        #   out1 = (batch_size,255,26,26)
        #---------------------------------------------------#
        # 26,26,768 -> 26,26,256 -> 26,26,512 -> 26,26,256 -> 26,26,512 -> 26,26,256
        out1_branch = self.last_layer1[:5](x1_in)
        out1        = self.last_layer1[5:](out1_branch)     # torch.size([1,75,26,26])

        # 26,26,256 -> 26,26,128 -> 52,52,128
        x2_in = self.last_layer2_conv(out1_branch)
        x2_in = self.last_layer2_upsample(x2_in)

        # 52,52,128 + 52,52,256 -> 52,52,384
        x2_in = torch.cat([x2_in, x2], 1)           # torch.size([1,384,52,52])
        #---------------------------------------------------#
        #   第一个特征层
        #   out3 = (batch_size,255,52,52)
        #---------------------------------------------------#
        # 52,52,384 -> 52,52,128 -> 52,52,256 -> 52,52,128 -> 52,52,256 -> 52,52,128
        out2 = self.last_layer2(x2_in)      # torch.size([1,75,52,52])
        return out0, out1, out2

if __name__ == '__main__':
    # ------------------------------------------------#
    # 	voc_classes.txt内容见下方
    # ------------------------------------------------#
    classes_path = './model_data/voc_classes.txt'
    class_names, num_classes = get_classes(classes_path)
    anchors_mask = [[6, 7, 8], [3, 4, 5], [0, 1, 2]]  # 10,13,  16,30,  33,23,  30,61,  62,45,  59,119,  116,90,  156,198,  373,326
    model = YoloBody(anchors_mask, num_classes)
    print(model)      # 包括网络结构和参数

    from thop import profile            # 用来测试网络能够跑通,同时可查看FLOPs和params
    input = torch.randn(1, 3, 416, 416)     # 1张3通道尺寸为416x416的图片作为输入
    flops, params = profile(model, (input,))
    print(flops, params)
voc_classes.txt内容如下:
aeroplane
bicycle
bird
boat
bottle
bus
car
cat
chair
cow
diningtable
dog
horse
motorbike
person
pottedplant
sheep
sofa
train
tvmonitor
7 感谢链接
https://blog.csdn.net/weixin_44791964/article/details/105310627
