微信小程序+PHP实现登录注册(手把手教程)
1.环境说明
环境版本
PHP版本号:PHP7(!!!!注意本文基于PHP7环境开发,PHP5与PHP7有很多语法不兼容,如果您的本地环境为PHP5,则需修改PHP代码中不兼容语法部分)MySQL版本号:5.7.26
开发工具
- PhPstudy 8.1.0.5
- 微信开发者工具
- Navicat12
2.创建 user 表
首先创建用户表,这里以 Navicat 工具为例
2.1 新建数据库
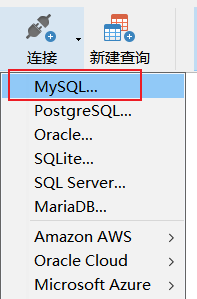
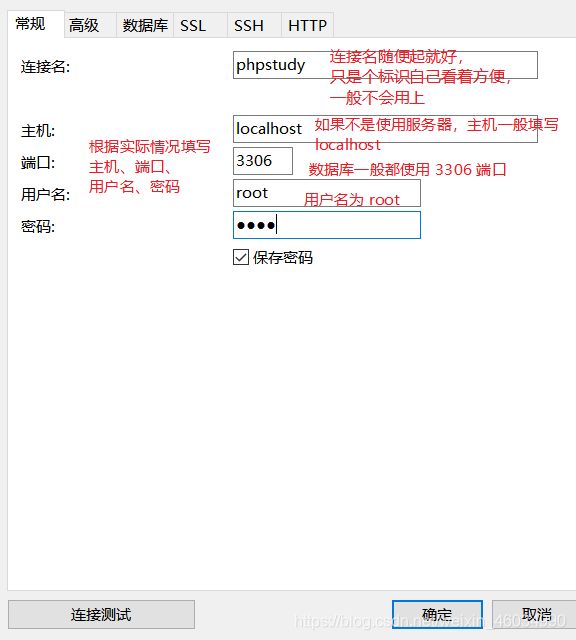
如果是第一次使用 Navicat,需要新建连接
这里需要注意的是:如果本机已安装了 MySQL,而安装 PhPstudy 时又安装了 PhPstudy 自带的 MySQL,这里如果想要连接 PHPstudy 安装时带的 MySQL,就需输入 PHPstudy 安装时带的 MySQL 的密码,参考链接:https://blog.csdn.net/weixin_46034990/article/details/104742459
2.1.1 选择连接右键 -> 新建数据库:

2.1.2 输入数据库信息:

2.2 导入 SQL 语句
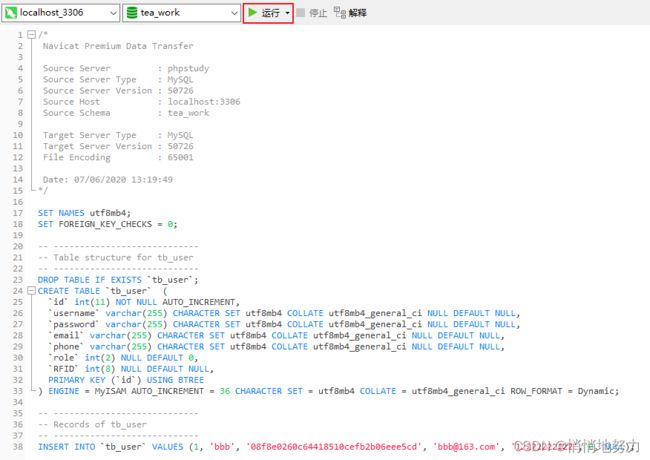
在新建的数据库右键 -> 选择新建查询
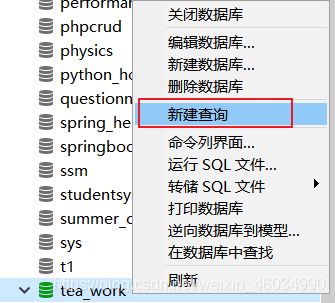
将如下 SQL 复制粘贴到新建查询页面:
/*
 Navicat Premium Data Transfer

 Source Server         : phpstudy
 Source Server Type    : MySQL
 Source Server Version : 50726
 Source Host           : localhost:3306
 Source Schema         : tea_work

 Target Server Type    : MySQL
 Target Server Version : 50726
 File Encoding         : 65001

 Date: 07/06/2020 13:19:49
*/

SET NAMES utf8mb4;
SET FOREIGN_KEY_CHECKS = 0;

-- ----------------------------
-- Table structure for tb_user
-- ----------------------------
DROP TABLE IF EXISTS `tb_user`;
CREATE TABLE `tb_user`  (
  `id` int(11) NOT NULL AUTO_INCREMENT,
  `username` varchar(255) CHARACTER SET utf8mb4 COLLATE utf8mb4_general_ci NULL DEFAULT NULL,
  `password` varchar(255) CHARACTER SET utf8mb4 COLLATE utf8mb4_general_ci NULL DEFAULT NULL,
  `email` varchar(255) CHARACTER SET utf8mb4 COLLATE utf8mb4_general_ci NULL DEFAULT NULL,
  `phone` varchar(255) CHARACTER SET utf8mb4 COLLATE utf8mb4_general_ci NULL DEFAULT NULL,
  `role` int(2) NULL DEFAULT 0,
  `RFID` int(8) NULL DEFAULT NULL,
  PRIMARY KEY (`id`) USING BTREE
) ENGINE = MyISAM AUTO_INCREMENT = 36 CHARACTER SET = utf8mb4 COLLATE = utf8mb4_general_ci ROW_FORMAT = Dynamic;

-- ----------------------------
-- Records of tb_user
-- ----------------------------
INSERT INTO `tb_user` VALUES (1, 'bbb', '08f8e0260c64418510cefb2b06eee5cd', '[email protected]', '12222222222', 0, NULL);
3.小程序前台部分
3.1 登录部分
3.1.1 登录界面
3.1.2 登录代码
wxml——类似 HTML
注意:
form标签的bindsubmit='login'表示提交此表单后触发login方法。input的name="xxx"属性要与js中的e.detail.value.xxx相对应。- 一定要有一个
按钮,点击此按钮后会提交表单,触发login方法。 - 所有标签的
class属性均是为了调节样式使用,如不追求页面美观,可不添加class="xxx"。
<view>
	<form bindsubmit='login'>
		<view class="first">
			<input id="username" placeholder="请输入用户名" placeholder-class="plas" class="inputs" type="text" name="username">input>
		view>
		<view class="second">
			<input id="password" placeholder="请输入密码" placeholder-class="plas" class="inputs" type="password" name="password">input>
		view>

		<view>
			<button class="loginBtn" type="primary" form-type='submit'>登录button>
		view>
		<view class="cha" bindtap="enroll"><text class="no">没有账号,点我注册text>view>
	form>
view>
wxss——类似 CSS
为了调节前台显示样式使用的,为了美观效果,与功能实现无关
/* pages/login/login.wxss */
page{
  left:10rpx;
  right:10rpx;
  background-color: white;
}
.first{
  width: 90%;
  height: 100rpx;
  margin-top: 80rpx;
  margin-left: 5%;
  margin-right: 5%;
  /* 排列方式 */
  display: flex;
  /* 纵向排列 */
  flex-direction: row;
  align-items: center;
  background-color: #f2f2f2;
  border-radius: 8rpx;
}
.plas{
  font-size: 30rpx;
  color: #ccc;
}
.inputs{
  /* 行高 */
  line-height: 100rpx;
  font-size: 30rpx;
  color: #000;
  margin:auto;
  margin-left: 20rpx;
  width: 100%;
}
.second{
  width: 90%;
  height: 100rpx;
  margin-top: 30rpx;
  margin-left: 5%;
  margin-right: 5%;
  /* 排列方式 */
  display: flex;
  /* 纵向排列 */
  flex-direction: row;
  align-items: center;
  background-color: #f2f2f2;
  border-radius: 8rpx;
}
.cha{
  width: 90%;
  height: 50rpx;
  margin: auto;
  margin-top: 30rpx;
  margin-left: 5%;
  margin-right: 5%;
}
.no{
  color: black;
  font-size: 28rpx;
  margin-left: 15rpx;
  font-family: PingFangSC-regular;
}
json——公共配置
通用配置,比如用来调节小程序上栏标题及背景颜色,可以不写。
{
  "usingComponents": {},
  "navigationBarBackgroundColor":"#349e20",
  "navigationBarTitleText": "用户登录",
  "navigationBarTextStyle":"black"
}
js——重点部分
1. const app = getApp();:为了获取 app.js 声明的全局变量 globalData,如果无需获取全局变量,则可以不引入此条语句。
2. const util = require('../../utils/util.js');:为了获取 util.js 内声明的变量,比如我这里将 url 的公共前缀部分声明在了 util.js 里面,每次要发起请求访问后台时,都需获取这个公共前缀,然后进行拼接:url: util.basePath + '/app/user-list.php',。(也可以直接声明为:url:http://192.168.0.105:8888/tea_work/app/user-list.php,就无需引入此 util.js 了)
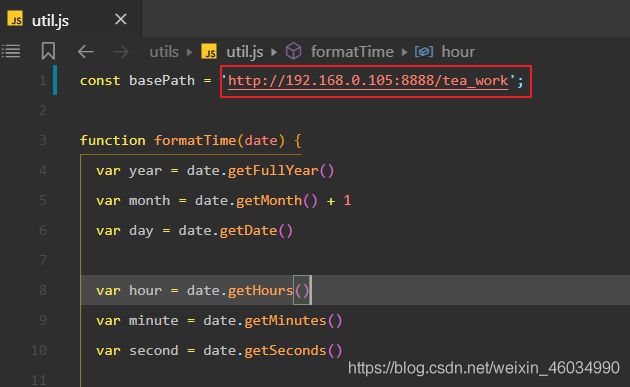
3. const { $Toast } = require('../../dist/base/index');为了其他额外功能,如不需要,则可以不引用。
login.js
具体看代码内的注释:
// pages/login/login.js
const app = getApp();
const util = require('../../utils/util.js');
const { $Toast } = require('../../dist/base/index');
Page({

  /**
   * 页面的初始数据
   */
  data: {
  },
  // 点击“注册”后触发 enroll 方法,跳转到 enroll 模块
  enroll: function (e) {
  	// 发起网络请求
    wx.navigateTo({
	  // 开发者服务器接口地址
      url: '/pages/enroll/enroll',
    })
  },

	// 点击登录按钮后,触发此login方法
  login: function (e) {
    var me = this;
    // 获取前台form表单传递过来的信息,
    // e.detail.value.xxx:xxx为name属性的值
    var formObject = e.detail.value;
    console.log(e.detail);
    var username = formObject.username;
    var password = formObject.password;
    console.log("username..." + username);
    console.log("password....." + password);
    // 发起网络请求
    wx.request({
      url: util.basePath + '/app/login.php',
      // 声明请求方式为 POST 请求
      method: 'POST',
      // 向后台传递的数据:用户名、密码(通过e.detail.value.xxx获取input输入框输入的值)
      data: {
        'username': e.detail.value.username,
        'password': e.detail.value.password
      },
      // POST请求,则header声明为如下:
      // 若为 GET请求,则header内声明为'content-type': 'application/json'
      header: {
        'content-type': 'application/x-www-form-urlencoded'
      },
      // 接口请求成功的返回数据
      success(res) {
        console.log(res.data);
        // 如果后台返回的数据为 "普通用户登录成功",则跳转到用户首页
        if ("普通用户登录成功" == res.data) {
          wx.switchTab({
            url: '../index/index'
          })
        } else if ("管理员登录成功" == res.data) {
        // 如果后台返回的数据为 "普通用户登录成功",则跳转到管理员首页
          wx.switchTab({
            url: '../index/index'
          })
        } else if ("用户名或密码错误" == res.data) {
        // 如果后台返回的数据为 "用户名或密码错误",则模态弹框,然后跳转到登录界面
          wx.showModal({
            title: '提示',
            content: '用户名或密码错误',
            showCancel: "false",
            success: function (res) {
              if (res.confirm) {
                console.log('用户点击确定');
                wx.redirectTo({
                  url: '../login/login'
                })
              }
            }
          })
        }

      }
    })
  },


  /**
   * 生命周期函数--监听页面加载
   */
  onLoad: function (options) {

  },

  /**
   * 生命周期函数--监听页面初次渲染完成
   */
  onReady: function () {

  },

  /**
   * 生命周期函数--监听页面显示
   */
  onShow: function () {

  },

  /**
   * 生命周期函数--监听页面隐藏
   */
  onHide: function () {

  },

  /**
   * 生命周期函数--监听页面卸载
   */
  onUnload: function () {

  },

  /**
   * 页面相关事件处理函数--监听用户下拉动作
   */
  onPullDownRefresh: function () {

  },

  /**
   * 页面上拉触底事件的处理函数
   */
  onReachBottom: function () {

  },

  /**
   * 用户点击右上角分享
   */
  onShareAppMessage: function () {

  }
})
uitl.js
login.js 中引入的 utils/util.js:
主要使用的为 const basePath = 'http://localhost:8888/tea_work'; 这一行代码
const basePath = 'http://localhost:8888/tea_work';

function formatTime(date) {
  var year = date.getFullYear()
  var month = date.getMonth() + 1
  var day = date.getDate()

  var hour = date.getHours()
  var minute = date.getMinutes()
  var second = date.getSeconds()


  return [year, month, day].map(formatNumber).join('-') + ' ' + [hour, minute, second].map(formatNumber).join(':')
}

function formatNumber(n) {
  n = n.toString()
  return n[1] ? n : '0' + n
}

/**
 * 封封微信的的request
 */
function request(url, data = {}, method = "POST", header = "application/x-www-form-urlencoded") {
  wx.showLoading({
    title: '加载中...',
  });
  return new Promise(function (resolve, reject) {
    wx.request({
      url: url,
      data: data,
      method: method,
      header: {
        'Content-Type': header,
        'X-Nideshop-Token': wx.getStorageSync('token'),
      },
      success: function (res) {
        wx.hideLoading();
        if (res.statusCode == 200) {

          if (res.data.errno == 401) {
            wx.navigateTo({
              url: '/pages/auth/btnAuth/btnAuth',
            })
          } else {
            resolve(res.data);
          }
        } else {
          reject(res.errMsg);
        }

      },
      fail: function (err) {
        reject(err)
      }
    })
  });
}


// 时间戳转换成刚刚、几分钟前、几小时前、几天前

//刚刚
var just = new Date().getTime();

//几分钟前
var afewminutesago = new Date("Nov 29, 2016 00:50:00").getTime();

//几周前
var afewweekago = new Date("Nov 29, 2016 00:50:00").getTime();

//几年前
var someday = new Date("Nov 21, 2012 01:15:00").getTime();

var helloData = {
  time: afewweekago
}

function getDateDiff(date) {
  date = date.substring(0, 19);
  date = date.replace(/-/g, '/');
  var dateTimeStamp = new Date(date).getTime();

  var result;
  var minute = 1000 * 60;
  var hour = minute * 60;
  var day = hour * 24;
  var halfamonth = day * 15;
  var month = day * 30;
  var now = new Date().getTime();
  var diffValue = now - dateTimeStamp;
  if (diffValue < 0) {
    return;
  }
  var monthC = diffValue / month;
  var weekC = diffValue / (7 * day);
  var dayC = diffValue / day;
  var hourC = diffValue / hour;
  var minC = diffValue / minute;
  if (monthC >= 1) {
    if (monthC <= 12)
      result = "" + parseInt(monthC) + "月前";
    else {
      result = "" + parseInt(monthC / 12) + "年前";
    }
  }
  else if (weekC >= 1) {
    result = "" + parseInt(weekC) + "周前";
  }
  else if (dayC >= 1) {
    result = "" + parseInt(dayC) + "天前";
  }
  else if (hourC >= 1) {
    result = "" + parseInt(hourC) + "小时前";
  }
  else if (minC >= 1) {
    result = "" + parseInt(minC) + "分钟前";
  } else {
    result = "刚刚";
  }

  return result;
};

module.exports = {
  formatTime,
  basePath,
  getDateDiff
}
index.js
login.js 中引入的 dist/base/index.js:
(可以不添加)
function getCtx (selector) {
    const pages = getCurrentPages();
    const ctx = pages[pages.length - 1];

    const componentCtx = ctx.selectComponent(selector);

    if (!componentCtx) {
        console.error('无法找到对应的组件,请按文档说明使用组件');
        return null;
    }
    return componentCtx;
}

function Toast(options) {
    const { selector = '#toast' } = options;
    const ctx = getCtx(selector);

    ctx.handleShow(options);
}

Toast.hide = function (selector = '#toast') {
    const ctx = getCtx(selector);

    ctx.handleHide();
};

function Message(options) {
    const { selector = '#message' } = options;
    const ctx = getCtx(selector);

    ctx.handleShow(options);
}

module.exports = {
    $Toast: Toast,
    $Message: Message
};
3.2 注册部分
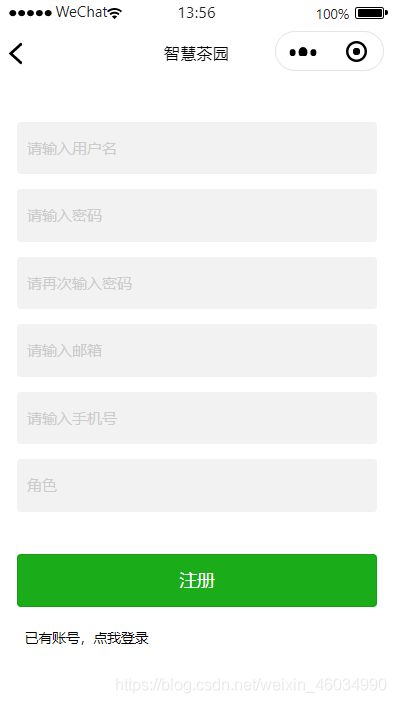
3.2.1 注册界面
3.2.2 注册代码
enroll.wxml
<form bindsubmit="regist">
	<view>
		<view class="first">
			<input id="username" placeholder="请输入用户名" placeholder-class="plas" class="inputs" type="text" bindinput="usernameInput" name="username">input>
		view>
		<view class="second">
			<input id="password" placeholder="请输入密码" placeholder-class="plas" class="inputs" type="password" bindinput="passwordInput" name="password">input>
		view>
		<view class="second">
			<input id="passwordAck" placeholder="请再次输入密码" placeholder-class="plas" class="inputs" type="password" bindinput="passwordInputAck">input>
		view>
		<view class="second">
			<input id="email" placeholder="请输入邮箱" placeholder-class="plas" class="inputs" type="email" bindinput="emailInput" name="email">input>
		view>
		<view class="second">
			<input id="phoneNumber" placeholder="请输入手机号" placeholder-class="plas" class="inputs" type="number" bindinput="phoneNumberInput" name="phone">input>
		view>
		<view class="second">
			<input id="role" placeholder="角色" placeholder-class="plas" class="inputs" type="number" bindinput="roleInput" name="role">input>
		view>

		<view>
			<button class="click" type="primary" form-type='submit'>注册button>
		view>
		<view class="cha" bindtap="signin"><text class="no">已有账号,点我登录text>view>
	view>
form>
enroll.wxss
/* pages/enroll/enroll.wxss */
page{
  left:10rpx;
  right:10rpx;
  background-color: white;
}
.first{
  width: 90%;
  height: 100rpx;
  margin-top: 80rpx;
  margin-left: 5%;
  margin-right: 5%;
  /* 排列方式 */
  display: flex;
  /* 纵向排列 */
  flex-direction: row;
  align-items: center;
  background-color: #f2f2f2;
  border-radius: 8rpx;
}
.plas{
  font-size: 30rpx;
  color: #ccc;
}
.inputs{
  /* 行高 */
  line-height: 100rpx;
  font-size: 30rpx;
  color: #000;
  margin:auto;
  margin-left: 20rpx;
  width: 100%;
}
.second{
  width: 90%;
  height: 100rpx;
  margin-top: 30rpx;
  margin-left: 5%;
  margin-right: 5%;
  /* 排列方式 */
  display: flex;
  /* 纵向排列 */
  flex-direction: row;
  align-items: center;
  background-color: #f2f2f2;
  border-radius: 8rpx;
}
.click{
  width: 90%;
  height: 100rpx;
  line-height: 100rpx;
  margin:auto;
  margin-top: 80rpx;
  background-color: #43CD80;
  border-radius: 8rpx;
  text-align: center;
  color: white;
  font-size: 33rpx;
}
.cha{
  width: 90%;
  height: 50rpx;
  margin: auto;
  margin-top: 30rpx;
  margin-left: 5%;
  margin-right: 5%;
}
.no{
  color: black;
  font-size: 28rpx;
  margin-left: 15rpx;
  font-family: PingFangSC-regular;
}
enroll.js
// pages/enroll/enroll.js
const app = getApp();
const util = require('../../utils/util.js');
const { $Toast } = require('../../dist/base/index');
Page({

  /**
   * 页面的初始数据
   */
  data: {
    // 定义变量用来存储input输入的值
    username:"",
    password:"",
    passwordAck:"",
    email:"",
    phoneNumber:"",
    role:""
  },
  signin:function(e){
    //关闭当前页面,返回上一页面或多级页面。
    wx.navigateBack({
      // 返回上 1 页
      delta: 1
    })
  },
  // 注册
  regist:function(e){
    var that = this;
    if(that.data.username == ''){
      wx.showModal({
        title: '提示',
        content: '请输入用户名',
        showCancel:false,
        success (res) {
        }
      })
    }else if(that.data.password == ''){
      wx.showModal({
        title: '提示',
        content: '请输入密码',
        showCancel:false,
        success (res) {
        }
      })
    }else if(that.data.passwordAck == ''){
      wx.showModal({
        title: '提示',
        content: '请再次输入密码',
        showCancel:false,
        success (res) {
        }
      })
    }else if(that.data.passwordAck != that.data.password){
      wx.showModal({
        title: '提示',
        content: '两次密码输入不一致',
        showCancel:false,
        success (res) {
        }
      })
    }else if(that.data.email == ''){
      wx.showModal({
        title: '提示',
        content: '请输入邮箱',
        showCancel:false,
        success (res) {
        }
      })
    }else if(that.data.phoneNumber == ''){
      wx.showModal({
        title: '提示',
        content: '请输入手机号',
        showCancel:false,
        success (res) {
        }
      })
    }else if(that.data.phoneNumber.length != 11){
      wx.showModal({
        title: '提示',
        content: '手机号位数不正确,请重新输入',
        showCancel:false,
        success (res) {
        }
      })
    }else if(that.data.phoneNumber.length != 11){
      wx.showModal({
        title: '提示',
        content: '手机号不合法',
        showCancel:false,
        success (res) {
        }
      })
    }else if(that.data.role == ''){
      wx.showModal({
        title: '提示',
        content: '请输入角色',
        showCancel:false,
        success (res) {
        }
      })
    }else{
      wx.request({
        url: util.basePath + '/app/register.php',
        method:"POST",
        data: {
          'username':e.detail.value.username,
          'password':e.detail.value.password,
          'email':e.detail.value.email,
          'phone':e.detail.value.phone,
          'role':e.detail.value.role,
        },
        header: {
          'content-type': 'application/x-www-form-urlencoded'
        },
        success (res) {
          console.log(res.data);
        }
      })
    }
  },
  // 每当 input 发生改变,触发这个方法
  usernameInput:function(e){
    // 获取 input 输入框的值
    this.data.username = e.detail.value;
  },
  passwordInput:function(e){
    // 获取 input 输入框的值
    this.data.password = e.detail.value;
  },
  passwordInputAck:function(e){
    // 获取 input 输入框的值
    this.data.passwordAck = e.detail.value;
  },
  emailInput:function(e){
    // 获取 input 输入框的值
    this.data.email = e.detail.value;
  },
  phoneNumberInput:function(e){
    // 获取 input 输入框的值
    this.data.phoneNumber = e.detail.value;
  },
  roleInput:function(e){
    // 获取 input 输入框的值
    this.data.role = e.detail.value;
  },
  /**
   * 生命周期函数--监听页面加载
   */
  onLoad: function (options) {

  },

  /**
   * 生命周期函数--监听页面初次渲染完成
   */
  onReady: function () {

  },

  /**
   * 生命周期函数--监听页面显示
   */
  onShow: function () {

  },

  /**
   * 生命周期函数--监听页面隐藏
   */
  onHide: function () {

  },

  /**
   * 生命周期函数--监听页面卸载
   */
  onUnload: function () {

  },

  /**
   * 页面相关事件处理函数--监听用户下拉动作
   */
  onPullDownRefresh: function () {

  },

  /**
   * 页面上拉触底事件的处理函数
   */
  onReachBottom: function () {

  },

  /**
   * 用户点击右上角分享
   */
  onShareAppMessage: function () {

  }
})
4.PHP后台代码
如果本地没有PHP环境,要先使用 phpStudy 一键搭建PHP开发环境
4.1 连接数据库部分
connect.php:
$server = "localhost";//主机
$db_username = "root";//你的数据库用户名
$db_password = "root";//你的数据库密码
$db_name = "tea_work";//你的数据库密码

$con = new mysqli($server, $db_username, $db_password,$db_name);//链接数据库

// 检测连接
if (!$con) {
    die("Connection failed: " . mysqli_connect_error());
}
//echo "连接成功";
?>
4.2 登录部分
login.php
header("Content-Type: text/html; charset=utf8");

$name=$_POST['username'];//post获取表单里的name
$password=md5($_POST['password']);//post获取表单里的password


include('connect.php');//链接数据库
$q="select * from `tb_user` where `username` = '$name' and `password` = '$password'";//向数据库查询表单传来的值的sql
$con->query('SET NAMES UTF8');
$result = $con->query($q);// 执行 sql

// 获取执行 sql 后的返回对象
$obj=$result->fetch_assoc();

if (mysqli_num_rows($result) > 0){

    // 管理员
    if($obj["role"] == '1'){
        echo"管理员登录成功";
    }else{
        echo"普通用户登录成功";
    }

}else{
    echo "用户名或密码错误";
}
$con->close();//关闭数据库

?>
4.3 注册部分
register.php:
header("Content-Type: text/html; charset=utf8");

$username=$_POST['username'];//post获取表单里的name
$password=md5($_POST['password']);//post获取表单里的password
$email=$_POST['email'];//post获取表单里的email
$phone=$_POST['phone'];//post获取表单里的phone
$role=$_POST['role'] ;//post获取表单里的role

include('connect.php');//链接数据库
$q="insert into tb_user(id,username,password,email,phone,role) values (null,'$username','$password','$email','$phone','$role')";//向数据库插入表单传来的值的sql
$reslut=$con->query($q);//执行sql

echo $q;
if (!$reslut){
    echo "注册失败";
}else{
    echo "注册成功";
}
$con->close()//关闭数据库
?>
补充:在小程序开发工具内进行本地调试(即请求url为127.0.0.1://xxx或localhost://xxx)时,如果出现如下报错信息:
http://127.0.0.1 不在以下 request 合法域名列表中,请参考文档:https://developers.weixin.qq.com/miniprogram/dev/framework/ability/network.html
解决方法:勾选如下选项即可。
补充注意
对于纯小白的新手,一定要先按照此教程顺序,从上到下依次执行,不要做任何修改,先跑通这个 demo,在这个过程中熟悉字段与属性的对应关系。
看到成功的效果后,再考虑在这个 demo 的基础上进行修改,添加或删除字段,注意:如果修改数据库字段,一定要在代码中进行全局搜索,找到对应字段的位置,进行相应的修改或删除。
