windows maskrcnn 环境搭建 keras
windows maskrcnn 环境配置
- 搭建步骤
- mask rcnn测试
搭建步骤
- 1 先看github项目的配置环境目录:github配置目录,当然可以查看github里面的安装教程
requirements.txt:

- 2 创建conda环境,并激活环境,后续就在这个环境下安装各种包
conda create -n maskrcnn python=3.6 #创建环境
activate maskrcnn #激活环境
- 3 安装必须依赖包
配置最重要的keras和tensorflow:
注意版本对应的问题:python+tensorflow+keras环境参考 TensorFlow和keras版本对应关系 tensorflow和CUDA版本对应
# 有显卡使用gpu版,没显卡就不要-gpu
# 这个版本配套的是CUDA9和cudnn7
conda install tensorflow-gpu==1.11.0
# 避免多余错误使用keras2.1.6
conda install keras-gpu==2.1.6
装好tensorflow和keras后numpy、scipy之类的包已经顺带装好了,接下来就是查漏补缺,根据requiremens补充:
conda install pillow
conda install cython
conda install matplotlib

#这个推荐pip安装 conda装的容易出问题阉割版opencv
pip install opencv-python

conda install ipython
有一个重点是imgaug这个包,requirements里面没有说安装shapely,不装这个是无法安装imgaug的:
conda install shapely
pip install imgaug
如果imgaug有问题的话可以参见 https://blog.csdn.net/hesongzefairy/article/details/104693782
最后,安装pycocotools工具: 直接使用pip 和git命令安装也可以(这也是github上面参考的方法,有可能出问题),推荐使用如下方法安装:
1、浏览cocoapi github项目:cocoapi
2、首先安装:Visual C++ 2015 build tools ,安装,进链接找到下图,点击here安装即可!

3、下载项目github项目,然后在anaconda的激活环境中,进到\PythonAPI目录执行下列命令:
# install pycocotools locally
python setup.py build_ext --inplace

# install pycocotools to the Python site-packages
python setup.py build_ext install
mask rcnn测试
- 权重文件下载
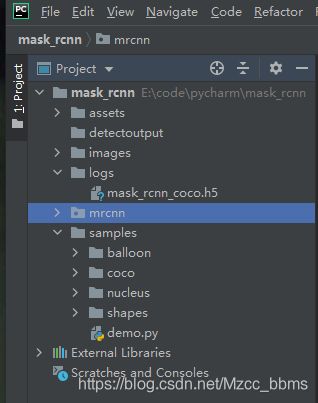
官方给出的下载地址:https://github.com/matterport/Mask_RCNN/releases,样例有一个做气球和coco数据集的,看名称就可以简单分辨,下载对应的就行,下载好的mask_rcnn_coco.h5文件放在项目下的logs文件夹内。 - 下载项目文件,使用pycharm打开,目录结构如下图:
- 运行demo
这里用Pycharm来复现,所以把demo文件直接转为py文件 demo.py,小改动:
import os
import sys
import random
import math
import numpy as np
import skimage.io
import matplotlib
import matplotlib.pyplot as plt
import cv2
import time
# Root directory of the project
ROOT_DIR = os.path.abspath("../")
# Import Mask RCNN
sys.path.append(ROOT_DIR) # To find local version of the library
from mrcnn import utils
import mrcnn.model as modellib
from mrcnn import visualize
# Import COCO config
sys.path.append(os.path.join(ROOT_DIR, "samples/coco/")) # To find local version
import coco
# Directory to save logs and trained model
MODEL_DIR = os.path.join(ROOT_DIR, "logs")
# Local path to trained weights file
COCO_MODEL_PATH = os.path.join(MODEL_DIR, "mask_rcnn_coco.h5")
# Download COCO trained weights from Releases if needed
if not os.path.exists(COCO_MODEL_PATH):
utils.download_trained_weights(COCO_MODEL_PATH)
# Directory of images to run detection on
IMAGE_DIR = os.path.join(ROOT_DIR, "images")
class InferenceConfig(coco.CocoConfig):
# Set batch size to 1 since we'll be running inference on
# one image at a time. Batch size = GPU_COUNT * IMAGES_PER_GPU
GPU_COUNT = 1
IMAGES_PER_GPU = 1
config = InferenceConfig()
config.display()
# Create model object in inference mode.
model = modellib.MaskRCNN(mode="inference", model_dir=MODEL_DIR, config=config)
# Load weights trained on MS-COCO
model.load_weights(COCO_MODEL_PATH, by_name=True)
# COCO Class names
# Index of the class in the list is its ID. For example, to get ID of
# the teddy bear class, use: class_names.index('teddy bear')
class_names = ['BG', 'person', 'bicycle', 'car', 'motorcycle', 'airplane',
'bus', 'train', 'truck', 'boat', 'traffic light',
'fire hydrant', 'stop sign', 'parking meter', 'bench', 'bird',
'cat', 'dog', 'horse', 'sheep', 'cow', 'elephant', 'bear',
'zebra', 'giraffe', 'backpack', 'umbrella', 'handbag', 'tie',
'suitcase', 'frisbee', 'skis', 'snowboard', 'sports ball',
'kite', 'baseball bat', 'baseball glove', 'skateboard',
'surfboard', 'tennis racket', 'bottle', 'wine glass', 'cup',
'fork', 'knife', 'spoon', 'bowl', 'banana', 'apple',
'sandwich', 'orange', 'broccoli', 'carrot', 'hot dog', 'pizza',
'donut', 'cake', 'chair', 'couch', 'potted plant', 'bed',
'dining table', 'toilet', 'tv', 'laptop', 'mouse', 'remote',
'keyboard', 'cell phone', 'microwave', 'oven', 'toaster',
'sink', 'refrigerator', 'book', 'clock', 'vase', 'scissors',
'teddy bear', 'hair drier', 'toothbrush']
#detect images
imagefiles = os.listdir(IMAGE_DIR)
print(imagefiles)
for file in imagefiles:
image = skimage.io.imread(os.path.join(IMAGE_DIR, file))
results = model.detect([image], verbose=1)
r = results[0]
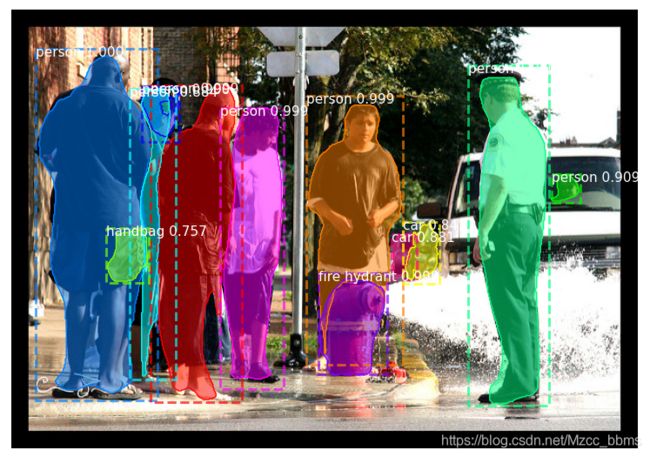
visualize.display_instances(image, r['rois'], r['masks'], r['class_ids'],
class_names, r['scores'])
注意: 如果出现这个错误,UserWarning: Matplotlib is currently using agg,which is a non-GUI backend, so cannot show the figure解决这个问题就需要用到之前说的 pycocotool 工具的路径(D:\Anaconda\Anoconda3\envs\mask_rcnn\Lib\site-packages\pycocotools),找到pycocotools文件夹修改其中的coco.py文件 ,将 matplotlib.use(‘Agg’) 改为 matplotlib.use(‘TkAgg’) 即可!
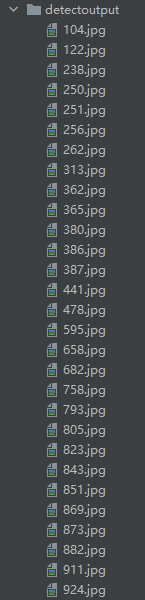
- 批量测试并保存测试结果
这时,需要到visualize.py文件中更改,在Mask_RCNN/mrcnn路径下找到该文件打开,更改display_instances类代码,在该类中添加一个参数count(也就是图片的名字),并加上 plt.savefig() 保存图片到指定路径下:
# add count by zcj
def display_instances(count, image, boxes, masks, class_ids, class_names,
                      scores=None, title="",
                      figsize=(16, 16), ax=None,
                      show_mask=True, show_bbox=True,
                      colors=None, captions=None):
	if auto_show:
	        plt.savefig("./test_results/%3s.jpg"%(str(count[:3]))) # 图片命名方式是取被测试图片的前3位命名
	        plt.show()
测试图片目录:

保存测试结果目录: