Vision Transformer学习(一):Embeddings部分
近年来,transformer在NLP领域大放异彩,几乎占据统治的地位,因此一些研究者也正在努力将tranformer应用在其他领域。在CV领域transformer的应用也越来越多,比较著名的VIT模型就是其中之一。
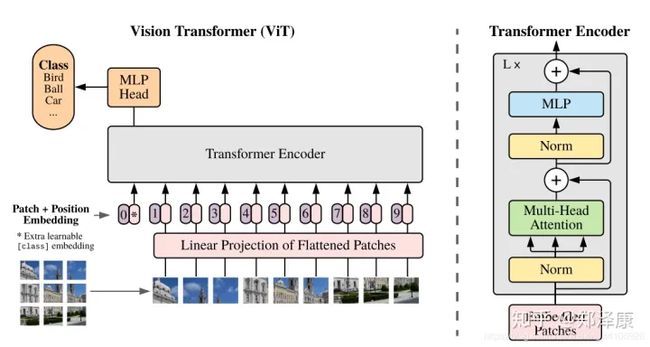
VIT模型就是对原始图片进行分块,展平成序列,输入进原始Transformer模型的编码器Encoder部分,最后接入一个全连接层对图片进行分类。
这是VIT模型结构图, 接下来我们将拆成几个小部分讲解。
1.对于标准的 Transformer 模块,要求输入的是 token(向量) 序列,即二维矩阵 [num_token, token_dim]。以 ViT-B/16 为例,每个 token 向量长度为 768。对于图像数据而言,其数据格式为 [channel, height,weight ] 是三维矩阵明显不是 Transformer 想要的。所以需要先通过一个 Embedding 层来对数据做个变换。如下图表示 Embedding 层的详细结构,首先将一张图片按给定大小分成一堆 Patches。以 ViT-B/16 为例,将输入图片 img_size(224*224) 按照 16*16 大小的 Patch 进行划分,划分后会得到 (224/16)= 14 个 Patches。接着通过线性映射将每个 Patch 映射到一维向量中,每个 Patche 数据 shape为 [16, 16, 3] 通过映射得到一个长度为 768 的向量 (后面都直接称为 token)。[16, 16,3]–>[768]。
class Embeddings(nn.Module):
    """Construct the embeddings from patch, position embeddings.
    """
    def __init__(self, config, img_size, in_channels=3):
        super(Embeddings, self).__init__()
        self.hybrid = None
        img_size = _pair(img_size)  #通过_pair后img_size为32×32

        if config.patches.get("grid") is not None:
            grid_size = config.patches["grid"]
            patch_size = (img_size[0] // 16 // grid_size[0], img_size[1] // 16 // grid_size[1])
            n_patches = (img_size[0] // 16) * (img_size[1] // 16)
            self.hybrid = True
        else:
            patch_size = _pair(config.patches["size"])
            n_patches = (img_size[0] // patch_size[0]) * (img_size[1] // patch_size[1])
            self.hybrid = False

        if self.hybrid:
            self.hybrid_model = ResNetV2(block_units=config.resnet.num_layers,
                                         width_factor=config.resnet.width_factor)
            in_channels = self.hybrid_model.width * 16
        self.patch_embeddings = Conv2d(in_channels=in_channels,
                                       out_channels=config.hidden_size,
                                       kernel_size=patch_size,
                                       stride=patch_size)
        self.position_embeddings = nn.Parameter(torch.zeros(1, n_patches+1, config.hidden_size))
        self.cls_token = nn.Parameter(torch.zeros(1, 1, config.hidden_size))

        self.dropout = Dropout(config.transformer["dropout_rate"])

    def forward(self, x):
        print(x.shape)
        B = x.shape[0]    #B=2
        cls_tokens = self.cls_token.expand(B, -1, -1)         #一个样本数据构建一个token
        print(cls_tokens.shape)
        if self.hybrid:
            x = self.hybrid_model(x)
        x = self.patch_embeddings(x)
        print(x.shape)
        x = x.flatten(2)                  #数据降维,保留0,1维度
        print(x.shape)
        x = x.transpose(-1, -2)
        print(x.shape)
        x = torch.cat((cls_tokens, x), dim=1)   #拼接
        print(x.shape)

        embeddings = x + self.position_embeddings
        print(embeddings.shape)
        embeddings = self.dropout(embeddings)
        print(embeddings.shape)
        return embeddings
(在具体实现的实现,由于笔记本电脑设备的落后,太大的图片无法运行,所有我将img_size改为32,batch_size改为2。)
具体看前向传播:
1、首先输入的x为(2(batch_size),3(channel),32(img_size),32(img_size))。B为x的第0维,也就是2。
print(x.shape)   #(2,3,32,32)
B = x.shape[0]  #B=2
2、这里有个cls_tokens解释一下。传统的Transformer采用Seq2Seq的形式,但在Vision Transformer中我们只模拟编码部分,缺少了解码部分,这就带来了一个不可避免的问题:我们采取谁作为最终分类头的输入?所以作者等人增加了一个可学习的cls_tokens,在Transformer中这个位置的输出用作分类,然后通过torch.cat的方式与原一维图片块向量进行拼接。cls_tokens的维度需要和x相同。
在Embeddings的类中定义了self.cls_token,其值为(1,1,768)
class Embeddings(nn.Module):

     def __init__(self, config, img_size, in_channels=3):
                ...........
                ...........
             self.cls_token = nn.Parameter(torch.zeros(1, 1, config.hidden_size))


    def forward(self, x):
                ...........
                ...........
             self.cls_token.expand(B, -1, -1)
经过 self.cls_token.expand在0维度的值改为B的值2,其他维度不变。所以cls_tokens变为(2,1,768)。
cls_tokens = self.cls_token.expand(B,-1,-1) #cls_tokens=(2,1,768)3、x通过self.patch_embedding,其中,self.patch_embedding也就是将x变成向量,具体的是通过一个二维卷积操作。
class Embeddings(nn.Module):
         ..............
         ..............

        self.patch_embeddings = Conv2d(in_channels=in_channels,
                                       out_channels=config.hidden_size,   #=768
                                       kernel_size=patch_size,
                                       stride=patch_size)
回归之前学习的卷积操作,输入x为(2(batch_size),3(in_channel),32(img_size),32(img_size),经过二维卷积之后输出为(batch_size,out_channel,h,w),即得到的值为(2,768,2,2)。
4、得到的x(2,768,2,2)经过flatten的维度转换为(2,768,4);transpose的维度调换(2,4,768);cls_tokens和x的维度拼接为(2,5,768)
        x = x.flatten(2)                  #数据降维,保留0,1维度
        print(x.shape)
        x = x.transpose(-1, -2)
        print(x.shape)
        x = torch.cat((cls_tokens, x), dim=1)   #拼接
        print(x.shape)
5、最后在x的向量的加上位置编码就获得了tansformer的输入。
        embeddings = x + self.position_embeddings
        print(embeddings.shape)
        embeddings = self.dropout(embeddings)
        print(embeddings.shape)
        return embeddings
其中,position_embeddings为,为(1,5,768).这样就能与x相加。最终输出为(2,5,768)
self.position_embeddings = nn.Parameter(torch.zeros(1, n_patches+1, config.hidden_size))以上就是Vision Transformer的embedding部分的代码讲解,其中最需要注意的是cls_tokens这个部分,需要理解清楚。


