python目标识别_OpenCV3-Python基于HOG和BOW的目标识别
实际应用中,我们通常需要确定某个图像区域是否包含所要识别的对象(即只处理已检测到对象的区域),如:人们总会在有人图像区域识别人脸。
常用目标检测和识别方法:
(1)梯度直方图(Histogram of Oriented Gradient)
(2)图像金字塔(image pyramid)
(3)滑动窗口(sliding window)
1. HOG描述符
HOG是一个特征描述符,因此HOG与SIFT、SURF和ORB属于同一类型。
不同的是,HOG不是基于颜色值而是基于梯度来计算直方图的。HOG所得到的特征描述符能够为特征匹配和目标检测提供非常重要的信息。
图像和视频处理中常常会进行目标检测,其内部机制相差不大,即:将图像划分为多个部分,然后计算各个部分的梯度。
如:对一辆车图像提取HOG特征。

将卡车图像分成小单元,每个小单元是16x16的像素块,每个单元都包含了视觉表示,该视觉表示按8个方向(N,NW,W,SW,S,SE,E和NE)所计算的颜色梯度。
每个单元的8个值就是直方图,因此,每个单元都会有唯一的标识,如下:

(1)HOG举例
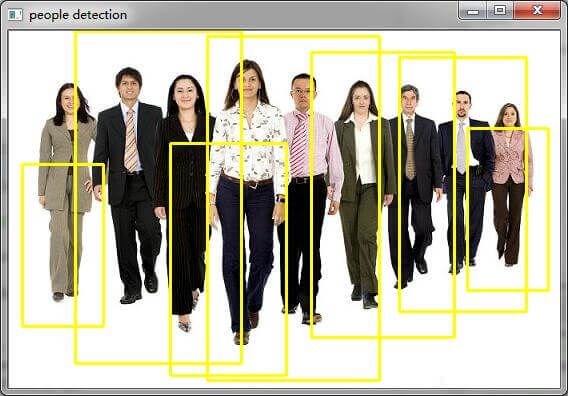
识别图像中的人体特征,并利用矩形标注出来。import cv2
import numpy as np
#判断矩形i是否完全包含在矩形o中
def is_inside(o, i):
ox, oy, ow, oh = o
ix, iy, iw, ih = i
return ox > ix and oy > iy and ox + ow < ix + iw and oy + oh < iy + ih
#对人体绘制颜色框
def draw_person(image, person):
x, y, w, h = person
cv2.rectangle(img, (x, y), (x + w, y + h), (0, 255, 255), 2)
img = cv2.imread("./people.jpg")
hog = cv2.HOGDescriptor() # 启动检测器对象
hog.setSVMDetector(cv2.HOGDescriptor_getDefaultPeopleDetector()) # 指定检测器类型为人体
found, w = hog.detectMultiScale(img) # 加载并检测图像
#丢弃某些完全被其它矩形包含在内的矩形
found_filtered = []
for ri, r in enumerate(found):
for qi, q in enumerate(found):
if ri != qi and is_inside(r, q):
break
else:
found_filtered.append(r)
#对不包含在内的有效矩形进行颜色框定
for person in found_filtered:
draw_person(img, person)
cv2.imshow("people detection", img)
cv2.waitKey(0)
cv2.destroyAllWindows()
(2)实验结果
2. 词袋(BOW)技术
以上例程可以得到简易原型,但实际检测中还远远不够。在一些企业应用中,需要处理非常具体的检测,如:车牌、书的封面或其它对象。此时,需要通过构建分类器来实现,那么如何构建分类器呢?
答案是:使用SVM和词袋(Bag-Of-Word,BOW)技术。
BOW实现步骤:
<1>取一个样本数据集
<2>对数据集中的每幅图像提取描述符(采用SIFT,SURF等方法)
<3>将每个描述符都添加到BOW训练中,并定义聚类中心的数量N
<4>将描述符通过Kmeans算法聚类到K个簇中
<5>将图像的关键点信息重新放到词包中,根据落在每个类中关键点的数量来得到图像的直方图
<6>将测试图像进行同样处理,计算测试图像与训练图像特征之间的距离,并将距离较小的图像作为检索的结果
(1)BOW举例import cv2
import numpy as np
from os.path import join
#
# based on :
# http://gilscvblog.wordpress.com/2013/08/23/bag-of-words-models-for-visual-categorization/
#
# for this sample, we'll use the left/right checkerboard shots from samples/cpp.
# admittedly, there's not much sense in training an svm on left vs right checkerboards,
# but it shows the general flow nicely.
#
# since this is using SIFT, you will need the https://github.com/Itseez/opencv_contrib repo
#
# please modify !
detect = cv2.xfeatures2d.SIFT_create()
extract = cv2.xfeatures2d.SIFT_create()
flann_params = dict(algorithm = 1, trees = 5) # flann enums are missing, FLANN_INDEX_KDTREE=1
matcher = cv2.FlannBasedMatcher(flann_params, {}) # need to pass empty dict (#1329)
## 1.a setup BOW
bow_train = cv2.BOWKMeansTrainer(8) # toy world, you want more.
bow_extract = cv2.BOWImgDescriptorExtractor( extract, matcher )
## 1.b add positives and negatives to the bowtrainer, use SIFT DescriptorExtractor
def feature_sift(fn):
im = cv2.imread(fn,0)
return extract.compute(im, detect.detect(im))[1]
images = ["bathory_album.jpg",
"beans.jpg",
"basil.jpg",
"bb.jpg"]
bow_train.add(feature_sift(images[0]))
bow_train.add(feature_sift(images[1]))
bow_train.add(feature_sift(images[2]))
bow_train.add(feature_sift(images[3]))
## 1.c kmeans cluster descriptors to vocabulary
voc = bow_train.cluster()
bow_extract.setVocabulary( voc )
#print ("bow vocab", np.shape(voc), voc)
## 2.a gather svm training data, use BOWImgDescriptorExtractor
def feature_bow(fn):
im = cv2.imread(fn,0)
return bow_extract.compute(im, detect.detect(im))
traindata, trainlabels = [],[]
traindata.extend(feature_bow(images[0]))
traindata.extend(feature_bow(images[1]))
traindata.extend(feature_bow(images[2]))
traindata.extend(feature_bow(images[3]))
trainlabels.append(1)
trainlabels.append(-1)
trainlabels.append(-1)
trainlabels.append(-1)
#print ("svm items", len(traindata), len(traindata[0]))
## 2.b create & train the svm
svm = cv2.ml.SVM_create()
svm.train(np.array(traindata), cv2.ml.ROW_SAMPLE, np.array(trainlabels))
## 2.c predict the remaining 2*2 images, use BOWImgDescriptorExtractor again
def predict(fn):
f = feature_bow(fn);
p = svm.predict(f)
print (fn, "\t", p[1][0][0])
predict("bathory_album.jpg")
(2)实验结果


根据实验结果,尽管由于样本数据量太小识别物体失败,但是检测方法一样。
注意:本站所有文章除特别说明外,均为原创,转载请务必以超链接方式并注明作者出处。