3在python中使用TensorRT
转载TensorRT
文章目录
- 1说明
- 2例子
1说明
2例子
首先samples/python/end_to_end_tensorflow_mnist中有model.py文件,这个是通过keras来生成训练模型的,中间不设计tensorrt
import tensorflow as tf
import numpy as np

def process_dataset():
    # Import the data
    (x_train, y_train),(x_test, y_test) = tf.keras.datasets.mnist.load_data()
    x_train, x_test = x_train / 255.0, x_test / 255.0

    # Reshape the data
    NUM_TRAIN = 60000
    NUM_TEST = 10000
    x_train = np.reshape(x_train, (NUM_TRAIN, 28, 28, 1))
    x_test = np.reshape(x_test, (NUM_TEST, 28, 28, 1))
    return x_train, y_train, x_test, y_test

def create_model():
    model = tf.keras.models.Sequential()
    model.add(tf.keras.layers.InputLayer(input_shape=[28,28, 1]))
    model.add(tf.keras.layers.Flatten())
    model.add(tf.keras.layers.Dense(512, activation=tf.nn.relu))
    model.add(tf.keras.layers.Dense(10, activation=tf.nn.softmax))
    model.compile(optimizer='adam', loss='sparse_categorical_crossentropy', metrics=['accuracy'])
    return model

def save(model, filename):
    # First freeze the graph and remove training nodes.
    output_names = model.output.op.name
    sess = tf.keras.backend.get_session()
    frozen_graph = tf.graph_util.convert_variables_to_constants(sess, sess.graph.as_graph_def(), [output_names])
    frozen_graph = tf.graph_util.remove_training_nodes(frozen_graph)
    # Save the model
    with open(filename, "wb") as ofile:
        ofile.write(frozen_graph.SerializeToString())

def main():
    x_train, y_train, x_test, y_test = process_dataset()
    model = create_model()
    # Train the model on the data
    model.fit(x_train, y_train, epochs = 5, verbose = 1)
    # Evaluate the model on test data
    model.evaluate(x_test, y_test)
    save(model, filename="models/lenet5.pb")

if __name__ == '__main__':
    main()
就是一个简单的从tensorflow读取数据集,进行训练然后保存冻结模型的过程,中间不涉及tensorRT。之后用convert-to-uff转为uff文件

这是sample.py进行推理的py文件
from random import randint
from PIL import Image
import numpy as np

import pycuda.driver as cuda
# This import causes pycuda to automatically manage CUDA context creation and cleanup.
import pycuda.autoinit

import tensorrt as trt

import sys, os
sys.path.insert(1, os.path.join(sys.path[0], ".."))
import common

# You can set the logger severity higher to suppress messages (or lower to display more messages).
TRT_LOGGER = trt.Logger(trt.Logger.WARNING)

class ModelData(object):
    MODEL_FILE = "lenet5.uff"
    INPUT_NAME ="input_1"
    INPUT_SHAPE = (1, 28, 28)
    OUTPUT_NAME = "dense_1/Softmax"
    # 告诉模型名称input名称大小output名称

def build_engine(model_file):
    # For more information on TRT basics, refer to the introductory samples.
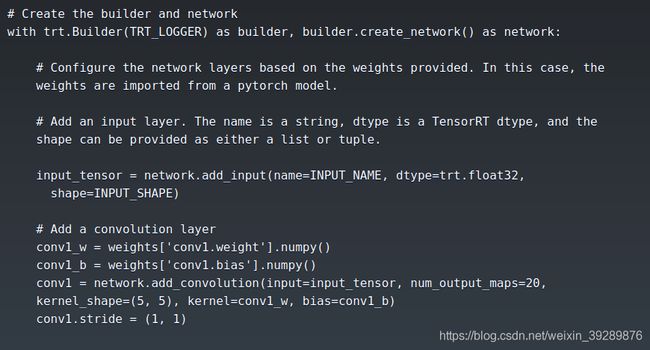
    with trt.Builder(TRT_LOGGER) as builder, builder.create_network() as network, trt.UffParser() as parser:
        builder.max_workspace_size = common.GiB(1)
        # Parse the Uff Network
        parser.register_input(ModelData.INPUT_NAME, ModelData.INPUT_SHAPE)
        parser.register_output(ModelData.OUTPUT_NAME)
        parser.parse(model_file, network)
        # Build and return an engine.
        return builder.build_cuda_engine(network)

# Loads a test case into the provided pagelocked_buffer.
def load_normalized_test_case(data_paths, pagelocked_buffer, case_num=randint(0, 9)):
    [test_case_path] = common.locate_files(data_paths, [str(case_num) + ".pgm"])
    # Flatten the image into a 1D array, normalize, and copy to pagelocked memory.
    img = np.array(Image.open(test_case_path)).ravel()
    np.copyto(pagelocked_buffer, 1.0 - img / 255.0)
    return case_num

def main():
    data_paths, _ = common.find_sample_data(description="Runs an MNIST network using a UFF model file", subfolder="mnist")
    model_path = os.environ.get("MODEL_PATH") or os.path.join(os.path.dirname(__file__), "models")
    model_file = os.path.join(model_path, ModelData.MODEL_FILE)

    with build_engine(model_file) as engine:
        # Build an engine, allocate buffers and create a stream.
        # For more information on buffer allocation, refer to the introductory samples.
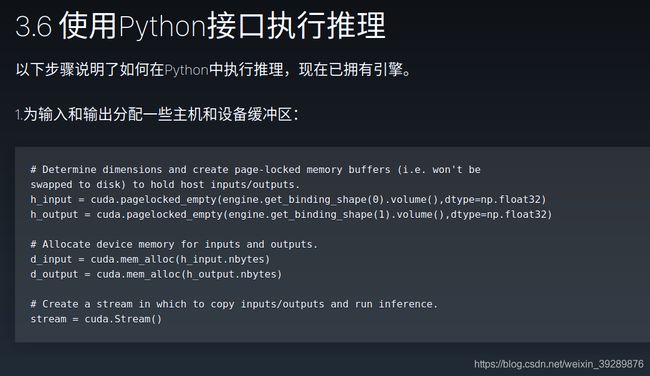
        inputs, outputs, bindings, stream = common.allocate_buffers(engine)
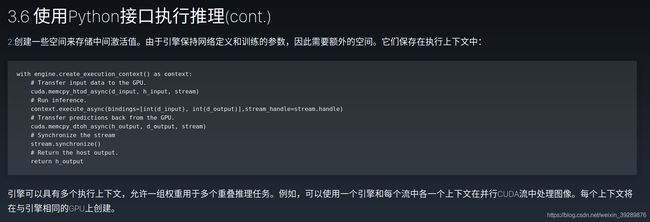
        with engine.create_execution_context() as context:
            case_num = load_normalized_test_case(data_paths, pagelocked_buffer=inputs[0].host)
            # For more information on performing inference, refer to the introductory samples.
            # The common.do_inference function will return a list of outputs - we only have one in this case.
            [output] = common.do_inference(context, bindings=bindings, inputs=inputs, outputs=outputs, stream=stream)
            pred = np.argmax(output)
            print("Test Case: " + str(case_num))
            print("Prediction: " + str(pred))

if __name__ == '__main__':
    main()


