Pix2pix网络的基本实现
Pix2pix Gan
主要用于图像之间的转换,又称图像翻译《Image-to-Image Translation with Conditional Adversarial Networks》
普通的GAN接受的G部分的输入是随机向量,输出的是图像。D部分接受的输入是图像(生成的或是真实的),输出是对或者错。这样G和D练手就能输出真实图像。
Pix2pixgan本质上是一个cGAN,图片x作为此cGAN的条件需要输入到G和D中。
G的输入是x(x是需要转换的图片),输出是生成的图片G(x)
D则需要分辨出{x,G(x)} 和{x, y}
对于图像翻译任务来说,可以不添加随机输入z,添加z可以带来多样性。(论文中并没有输入z,训练过程中z其实会被忽略,并没有带来多样性的结果)
同时输入和输出之间会共享许多信息,例如共享轮廓信息。
如果使用普通的卷积神经网络,那么会导致每一层都承载保存着所有的信息,这样神经网络很容易出错,比如丢失一些抽象的轮廓信息。
模型构成
普通的Encoder-Decoder线性模型

U-Net模型

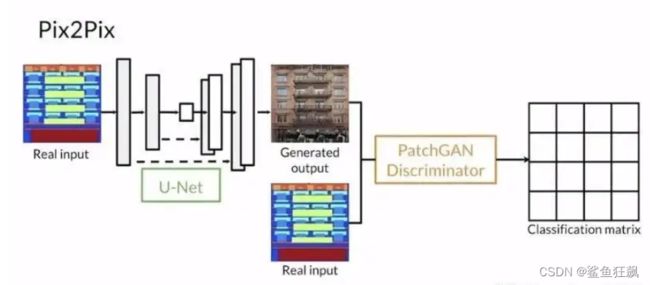
U-Net也是Encoder-Decoder模型,是变形的Encoder-Decoder模型。
所谓的U-Net是将第i层拼接到第n-i层,这样做是因为第i层和第n-i层的图像大小是一致的,可以认为他们承载着类似的信息。
这里使用的U-Net模型是Encoder-Decoder变形过后简易化的U-Net
 判别器D的设计
D的输入应该发生一些变化,因为除了要生成真实图像之外,还要保证生成的图像和输入图像是匹配的。D中要输入成对的图像,依旧类似于conditional GAN。
Pix2Pix中的D在论文中被实现为Patch-D,所谓Patch,是指无论生成的图像有多大,将其切分为多个固定大小的Patch输入进D去判断。
这样的好处是:D的输入变小,计算量小,训练速度大。
损失函数
D网络损失函数:
输入真实的成对图像希望判定为1.
输入生成图像与原图像希望判定为0.
G网络损失函数:
输入生成图像与原图像希望判定为1.
数据预处理
从论文中所给数据集地址获取数据集
glob模块提供了函数用于从目录通配符搜索中生成文件列表
这里注意glob得到的文件列表有可能是乱序的,需要用sorted进行重新排序。
sorted() 作为 Python 内置函数之一,其功能是对序列(列表、元组、字典、集合、还包括字符串)进行排序。
imgs_path = sorted(glob.glob('-/*.jpg'))
struct_path = sorted(glob.glob('-/*.png'))
定义图片格式,转换为tensor类型,将图片设置为256 * 256像素大小,并标准化
transforms = transforms.Compose([
    transforms.ToTensor(),
    transforms.Resize((256, 256)),
    transforms.Normalize(mean=0.5, std=0.5)
])
重写Dataset方法,初始化init获取图片地址以及结构图地址
getitem方法中获取单个图片并格式化,不加convert(‘RGB’)有可能将图片解析成单通道的黑白照片
class MyData(Dataset):
    def __init__(self, img_dir, struct_dir) -> None:
        super().__init__()
        self.img_dir = img_dir
        self.struct_dir = struct_dir
    def __getitem__(self, index):
        imgs_path = self.img_dir[index]
        struct_path = self.struct_dir[index]
        pil_img = Image.open(imgs_path)
        pil_img = pil_img.convert('RGB')
        pil_img = transforms(pil_img)
        pil_struct = Image.open(struct_path)
        pil_struct = pil_struct.convert('RGB')
        pil_struct = transforms(pil_struct)
        return pil_struct, pil_img
    def __len__(self):
        return len(self.img_dir)
最后从数据集加载数据
dataset = MyData(imgs_path, struct_path)
dataloader = DataLoader(dataset, batch_size=16, shuffle=True)
生成器
下采样模块
class DownSample(nn.Module):
    def __init__(self, in_channels, out_channels) -> None:
        super().__init__()
        self.conv_relu = nn.Sequential(
            nn.Conv2d(in_channels, out_channels, kernel_size=3, padding=1, stride=2),
            # inplace 原地操作
            nn.LeakyReLU(inplace=True)
        )
        self.bn = nn.BatchNorm2d(out_channels)
    # is_bn 是否采用bn层
    def forward(self, x, is_bn=True):
        x = self.conv_relu(x)
        if is_bn:
            x = self.bn(x)
        return x
上采样模块
class UpSample(nn.Module):
    def __init__(self, in_channels, out_channels) -> None:
        super().__init__()
        self.upconv_relu = nn.Sequential(
            nn.ConvTranspose2d(in_channels, out_channels, kernel_size=4, stride=2, padding=1),
            # inplace 原地操作
            nn.LeakyReLU(inplace=True)
        )
        self.bn = nn.BatchNorm2d(out_channels)
    def forward(self, x, is_drop=False):
        x = self.upconv_relu(x)
        x = self.bn(x)
        if is_drop:
            x = F.dropout(x)
        return x
生成器模块
class Generator(nn.Module):
    def __init__(self) -> None:
        super().__init__()
        self.down1 = DownSample(3, 64)    #[64, 128, 128]
        self.down2 = DownSample(64, 128)  #[128, 64, 64]
        self.down3 = DownSample(128, 256) #[256, 32, 32]
        self.down4 = DownSample(256, 512) #[512, 16, 16]
        self.down5 = DownSample(512, 512) #[512, 8, 8]
        self.down6 = DownSample(512, 512) #[512, 4, 4]

        self.up1 = UpSample(512, 512) #[512, 8, 8]
        self.up2 = UpSample(1024, 512) #[512, 16, 16]
        self.up3 = UpSample(1024, 256) #[256, 32, 32]
        self.up4 = UpSample(512, 128) #[128, 64, 64]
        self.up5 = UpSample(256, 64) #[64, 128, 128]
        # [3, 256, 256]
        self.last = nn.ConvTranspose2d(128, 3, kernel_size=4, stride=2, padding=1)
    def forward(self, x):
        x1 = self.down1(x)
        x2 = self.down2(x1)
        x3 = self.down3(x2)
        x4 = self.down4(x3)
        x5 = self.down5(x4)
        x6 = self.down6(x5)

        x6 = self.up1(x6, is_drop = True)
        x6 = torch.cat([x6, x5], dim=1)

        x6 = self.up2(x6, is_drop = True)
        x6 = torch.cat([x6, x4], dim=1)

        x6 = self.up3(x6, is_drop = True)
        x6 = torch.cat([x6, x3], dim=1)

        x6 = self.up4(x6)
        x6 = torch.cat([x6, x2], dim=1)

        x6 = self.up5(x6)
        x6 = torch.cat([x6, x1], dim=1)

        x6 = torch.tanh(self.last(x6))

        return x6
判别器
class Discriminator(nn.Module):
    def __init__(self) -> None:
        super().__init__()
        self.down1 = DownSample(6, 64)# [64, 128, 128]
        self.down2 = DownSample(64, 128)#[128, 64, 64] 使用两次down 就已经接近70*70
        self.conv1 = nn.Conv2d(128, 256, kernel_size=3)
        self.bn = nn.BatchNorm2d(256)
        self.last = nn.Conv2d(256, 1, kernel_size=3)
    def forward(self, anno, img):
        x = torch.cat([anno, img], dim = 1)
        x = self.down1(x, is_bn = False)
        x = self.down2(x)
        x = self.conv1(x)
        x = F.leaky_relu(x)
        x = F.dropout(self.bn(x))
        x = self.last(x)
        x = torch.sigmoid(x)
        return x
损失、优化函数
betas = (beta1,beta2)
beta1:一阶矩估计的指数衰减率(如 0.9)。
beta2:二阶矩估计的指数衰减率(如 0.999)。该超参数在稀疏梯度(如在 NLP 或计算机视觉任务中)中应该设置为接近 1 的数。
d_optim = torch.optim.Adam(dis.parameters(), lr = 1e-4, betas=(0.5, 0.999))
g_optim = torch.optim.Adam(gen.parameters(), lr = 1e-4, betas=(0.5, 0.999))
# cgan损失函数
loss_fn = nn.BCELoss()
测试数据集
test_imgs_path = sorted(glob.glob("/home/ncubigdata1/HeXiNan/GAN/Pix2pix_GAN/paper_dataset/CMP_facade_DB_extended/extended/*.jpg"))
test_annos_path = sorted(glob.glob("/home/ncubigdata1/HeXiNan/GAN/Pix2pix_GAN/paper_dataset/CMP_facade_DB_extended/extended/*.png"))
test_dataset = MyData(test_imgs_path, test_annos_path)
test_dataloader = DataLoader(test_dataset, batch_size=16, shuffle=True)
annos_batch, imgs_batch = next(iter(test_dataloader))
annos_batch, imgs_batch = annos_batch.to(device), imgs_batch.to(device)
LAMBDA = 7 #L1损失的权重
训练模型
for epoch in range(300):
    D_epoch_loss = 0
    G_epoch_loss = 0
    count = len(dataloader)
    for step, (annos, imgs) in enumerate(dataloader):
        imgs = imgs.to(device)
        annos = annos.to(device)

        # 判别器训练
        d_optim.zero_grad()
        # 判别器输入annos和真实图片
        dis_real_output = dis(annos, imgs)
        d_real_loss = loss_fn(dis_real_output, torch.ones_like(dis_real_output,device=device))
        d_real_loss.backward()

        gen_output = gen(annos)
        dis_gen_output = dis(annos, gen_output.detach())
        d_fake_loss = loss_fn(dis_gen_output, torch.zeros_like(dis_gen_output, device=device))
        d_fake_loss.backward()

        dis_loss = d_real_loss + d_fake_loss
        d_optim.step()

        # 生成器训练
        dis_gen_out = dis(annos, gen_output)
        gen_loss_crossentroloss = loss_fn(dis_gen_out, torch.ones_like(dis_gen_out, device=device))

        gen_l1_loss = torch.mean(torch.abs(gen_output - imgs))

        gen_loss = gen_loss_crossentroloss + LAMBDA * gen_l1_loss

        gen_loss.backward()
        g_optim.step()
    print(epoch)
    generate_images(gen, annos_batch, imgs_batch)
测试数据
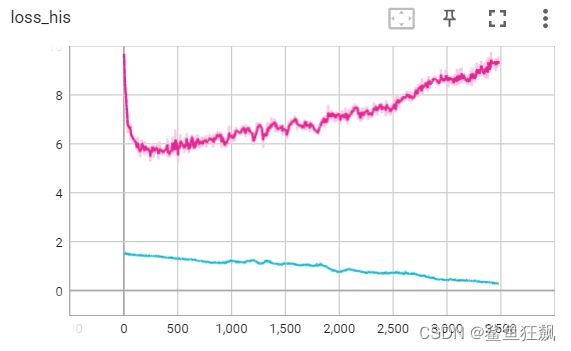
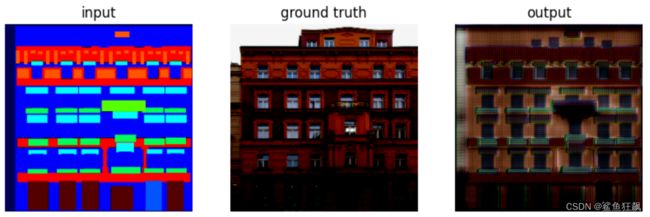
L1=7, d_optim lr = 1e-4,g_optim lr = 1e-4 会发现辨别器过强。
红色为生成器损失,蓝色为辨别器损失。
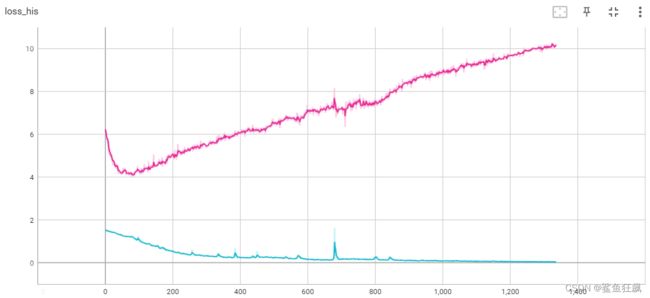

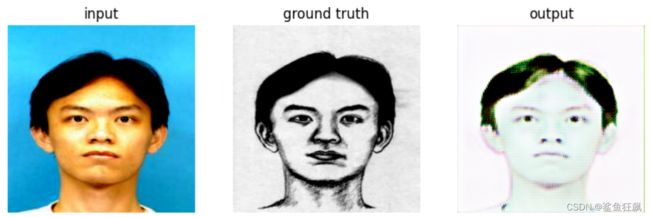
调整d_optim lr大小为1e-5
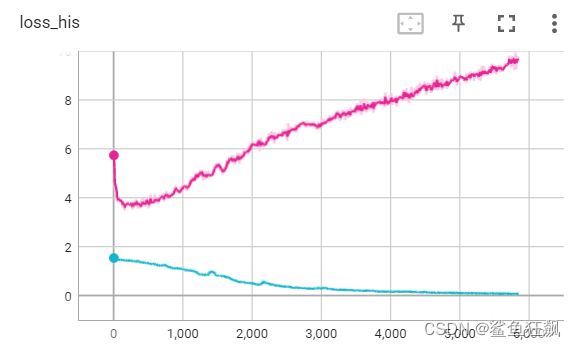
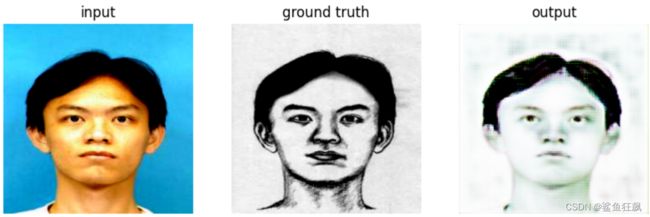
将强L1损失函数的权值,L1=12
