YOLOv3 pytorch版本 训练自己的数据集+加se/cbam注意力
\1)下载源代码(现在有cfg版本的代码已不再维护) https://github.com/ultralytics/yolov3 \2) 下载 yolov3-tiny 权重文件并将其放在/weights 文件夹中 https://pjreddie.com/media/files/yolov3-tiny.weights \3) 运行编辑软件如 vscode spyder 打开 detect.py
推理画不出框(图片中不能框选)的问题解决办法:
-
打开detect.py代码,在第32行加一句half = False
-
运行命令:python detect.py --cfg cfg/yolov3-tiny.cfg --weights weights/yolov3-tiny.weights
训练自己的数据集
数据集整理
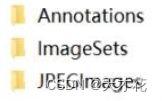
Annotations中放.xml文件;JPEGImages放.jpg格式图片;
在 yolov3代码根目录下创建一个 MakeTxt.py,将数据集分成训练集,测试集和验证集,其中比例可以在代码设置,代码参考:
YOLOV3训练自己的数据集(PyTorch版本)_mumumuyanyanyan的博客-CSDN博客_pytorch yolov3训练自己的数据集
运行成功后你会在 yolov3-master/data/imageSets 文件夹中得到 4 个 txt 文件:
在 yolov3代码根目录下创建一个voc_label.py,代码参考上个网址 ,其中:
-
将 classes 中改成自己的
-
将 data 文件夹中 JPEGimages 文件夹改名为 images 或者将代码中 images 改成 JPEGimages, 保证文件名与程序统一即可。【重点】
-
-
运行程序,成功后得到 labels 文件夹,以及在 data 目录下 train.txt, test.txt, val.txt,这里的 train.txt 与之前的区别在于,不仅仅得到文件 名,还有文件的具体路径
配置文件
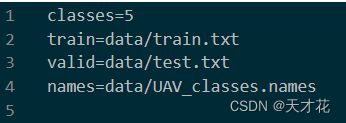
1) 在 data 目录下创建 UAV-05-2021.data内容如下:(最后一行最好有一行回车)
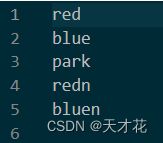
2) 在 data 目录下创建 uav-classes.names内容如下:(最后一行最好有一行回车)
3) 修改 cfg 文件中 yolov3-tiny.cfg
yolov3-tiny.cfg中有两个classes和两个在yolo层上面的filters都要改成自己的,filters=3x(n+5),例如:本文数据集classes=5;filters=3x(5+5)=30【重点】
4) 修改 train.py 中
3) 在文件夹目录下使用 cmd 命令
python train.py --data data/UAV-05-2021.data --cfg cfg/yolov3-tiny.cfg --epochs 100
在对total_ops进行赋值之前,先用global关键字将total_ops变成一个全局变量,这样设置之后,编译器就会看到total_ops已经在函数之外定义过了,所以就不会报错。
解决方法:按住ctrl点击鼠标,跳到划红线的.py,找到total_ops,在前面加一句global total_ops,代码如下 :
解决方法:yolov3-tiny.cfg中的参数没改完,有两个classes和两个在yolo层上面的filters都要改成自己的,filters=3x(n+5),例如:本文数据集classes=5;filters=3x(5+5)=30 再次运行:
python train.py --data data/UAV-05-2021.data --cfg cfg/yolov3-tiny.cfg --epochs 100 --device cpu
训练参数意义: 896 代表训练图片数量, 772 代表检测到的目标数量(在这里代指人); 参数 P 是(精确率) percision 的缩写表示预测正率; R 是召回率(recall)的缩写, 表示预测正确占实际正确的比例; mAP 是平均精确度(mean Average Precision) 的缩写; F1 表示 F-score 相当于 precision 和 recall 的调和平均, recall 和 precision 任何 一个数值减小, F-score 都会减小,反之,亦然。
参数详解参考: 机器学习:准确率(Precision)、召回率(Recall)、F值(F-Measure)、ROC曲线、PR曲线_nana-li的博客-CSDN博客_准确率计算公式
训练完成后生成根目录下的: results.png test_batch0.png train_batch0.png
并得到训练好的模型权重保存至 weights/best.pt last.pt
测试
1384张图,五类标签,测试集:训练集=2:8
先改test.py里的batch_size=1;num_workers=0
然后运行:
python test.py --data data/UAV-05-2021.data --cfg cfg/yolov3-tiny.cfg --weights weights/last.pt
YOLOv3 pytorch 版本加注意力se
Darknet中的forward函数不要改,其他参考【从零开始学习YOLOv3】7. 教你在YOLOv3模型中添加Attention机制 - pprp - 博客园
1.需要修改parse_config.py中的部分内容(supported改为如下):
supported = ['type', 'batch_normalize', 'filters', 'size',\
            'stride', 'pad', 'activation', 'layers', \
            'groups','from', 'mask', 'anchors', \
            'classes', 'num', 'jitter', 'ignore_thresh',\
            'truth_thresh', 'random',\
            'stride_x', 'stride_y',\
            'ratio', 'reduction', 'kernelsize']
2.将如下模块的代码,添加到models.py文件中:
class SELayer(nn.Module): def __init__(self, channel, reduction=16): super(SELayer, self).__init__() self.avg_pool = nn.AdaptiveAvgPool2d(1) self.fc = nn.Sequential( nn.Linear(channel, channel // reduction, bias=False), nn.ReLU(inplace=True), nn.Linear(channel // reduction, channel, bias=False), nn.Sigmoid() ) def forward(self, x): b, c, _, _ = x.size() y = self.avg_pool(x).view(b, c) y = self.fc(y).view(b, c, 1, 1) return x * y.expand_as(x)
3.设计cfg文件
以yolov3-tiny.cfg为baseline
还有有两个classes和两个在yolo层上面的filters都要改成自己的,filters=3x(n+5),例如:本文数据集classes=5;filters=3x(5+5)=30
4.模型构建
以上都是准备工作,我们还需要修改model.py文件中的模型加载部分,让其正常发挥作用。
在model.py中的create_modules函数中进行添加:
        elif mdef['type'] == 'se':
            modules.add_module(
                'se_module',
                SELayer(output_filters[-1], reduction=int(mdef['reduction'])))
不要修改Darknet中的forward部分的函数!!!
然后训练:
python train.py --data data/UAV-05-2021.data --cfg cfg/yolov3-tiny-se.cfg --epochs 100 --device cpu
测试:
python test.py --data data/UAV-05-2021.data --cfg cfg/yolov3-tiny-se.cfg --weights weights/last.pt
YOLOv3 pytorch 版本加注意力cbam
修改cfg文件、supported中的字段、class就按照网上的来,参考:【从零开始学习YOLOv3】7. 教你在YOLOv3模型中添加Attention机制 - pprp - 博客园
模型构建:(注意这里和网上教程不一样)
1.不要改Darknet中的forward部分的函数!!
2.在model.py中的create_modules函数中进行添加:
        elif mdef['type'] == 'cbam':
            modules.add_module(
                'cbam_module',
                SpatialAttention( kernel_size=int(mdef['kernelsize'])))
然后训练:
python train.py --data data/UAV-05-2021.data --cfg cfg/yolov3-tiny-cbam.cfg --epochs 100 --device cpu
结果就在根目录下面


