OpenCV图像处理——停车场车位识别
总目录
图像处理总目录←点击这里
十八、停车场车位识别
18.1、项目说明
唐宇迪老师的——OPENCV项目实战 学习
本项目的目的是设计一个停车场车位识别的系统,能够判断出当前停车场中哪些车位是空的。
任务共包含部分:
- 对图像预处理
- 从停车场的监控视频中提取图片
- 对图片进行一系列的预处理,去噪、识别图像中的车位、定位停车位的轮廓
- 提取每个停车位区域的图片并保存到指定的数据文件路径
- 训练神经网络模型,能够识别停车场中有哪些剩余车位
- 使用keras训练一个2分类的模型,卷积网络选择vgg,采用keras提供的api,并冻结前10层
- 从视频中取出每一帧,挨个训练,实现实时
着重介绍图像处理(神经网络是一个简单的二分类问题,有车和没车的一个判断)
18.2、图像预处理
18.2.1、读取图像
18.2.2、过滤背景
select_rgb_white_yellow 函数实现
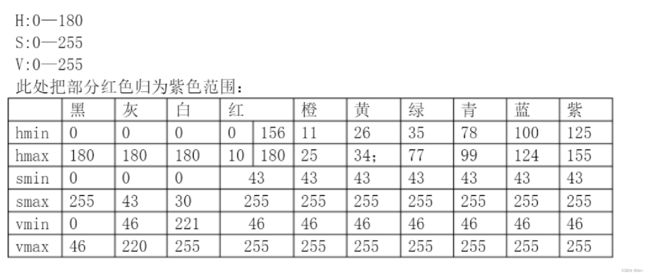
HSV各种颜色的取值范围

white_mask = cv2.inRange(image, lower, upper)
低于120,或者高于255的都处理为0(黑色)
将其与原始图像做与操作,这样的话,只有原始图像是255的像素点留下来了,把无关的操作过滤掉
cv2.bitwise_and(image, image, mask=white_mask)
18.2.3、灰度图
convert_gray_scale 函数实现
cv2.cvtColor(image, cv2.COLOR_RGB2GRAY)
18.2.4、边缘检测
detect_edges 函数实现
cv2.Canny(image, low_threshold, high_threshold)
18.2.5、裁剪区域
select_region 函数实现
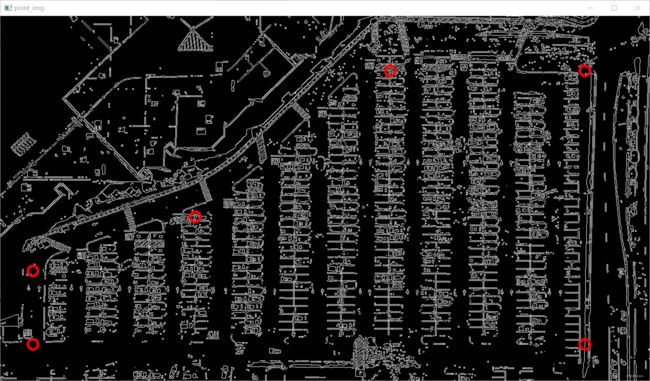
手动画点
rows, cols = image.shape[:2]
pt_1 = [cols * 0.05, rows * 0.90]
pt_2 = [cols * 0.05, rows * 0.70]
pt_3 = [cols * 0.30, rows * 0.55]
pt_4 = [cols * 0.6, rows * 0.15]
pt_5 = [cols * 0.90, rows * 0.15]
pt_6 = [cols * 0.90, rows * 0.90]
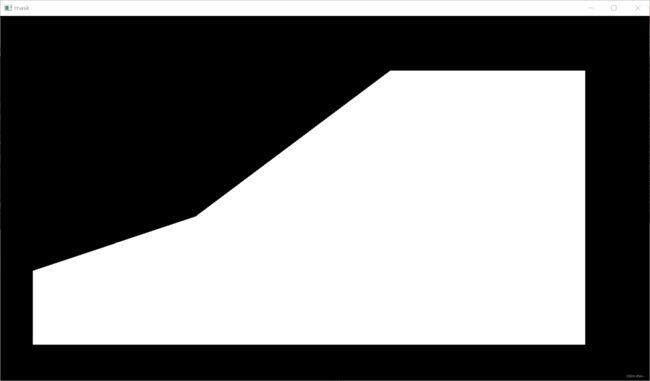
mask填充
为选定区域填充白色
mask = np.zeros_like(image)
cv2.fillPoly(mask, vertices, 255)
区域切割
cv2.bitwise_and(image, mask)
18.2.6、检测直线
hough_lines和draw_lines函数实现
通过 霍夫变换 (边缘检测后使用)后检测到停车位的方框直线
cv2.HoughLinesP(image, rho=0.1, theta=np.pi / 10, threshold=15, minLineLength=9, maxLineGap=4)
- rho距离精度
- theta角度精度
- threshod超过设定阈值才被检测出线段
- minLineLengh 线的最短长度,比这个短的都被忽略
- MaxLineCap 两条直线之间的最大间隔,小于此值,认为是一条直线
检测完之后进行画线操作
18.2.7、区域列车位划分
identify_blocks 函数 实现
过滤部分直线
一列一列的为一组,过滤掉不符合的
        for line in lines:
            for x1, y1, x2, y2 in line:
                if abs(y2 - y1) <= 1 and 25 <= abs(x2 - x1) <= 55:
                    cleaned.append((x1, y1, x2, y2))
直线x1排序
默认是打乱排序的
x1是每一列车位的最左边位置
sorted(cleaned, key=operator.itemgetter(0, 1))
分为n列
找到多个列,相当于每列是一排车
根据线之间的距离进行判断
for i in range(len(list1) - 1):
    distance = abs(list1[i + 1][0] - list1[i][0])
    if distance <= clus_dist:
        if not dIndex in clusters.keys(): clusters[dIndex] = []
        clusters[dIndex].append(list1[i])
        clusters[dIndex].append(list1[i + 1])
    else:
        dIndex += 1
坐标
通过循环,得到每一列的具体坐标(矩形框的四个坐标)
for key in clusters:
    all_list = clusters[key]
    cleaned = list(set(all_list))
    if len(cleaned) > 5:
        cleaned = sorted(cleaned, key=lambda tup: tup[1])
        avg_y1 = cleaned[0][1]
        avg_y2 = cleaned[-1][1]
        avg_x1 = 0
        avg_x2 = 0
        for tup in cleaned:
            avg_x1 += tup[0]
            avg_x2 += tup[2]
        avg_x1 = avg_x1 / len(cleaned)
        avg_x2 = avg_x2 / len(cleaned)
        rects[i] = (avg_x1, avg_y1, avg_x2, avg_y2)
        i += 1
画出车位
通过观察可以看出,右边的区域更符合条件(左边的第一列第二列划分不好)
18.2.8、区域每个车位划分
draw_parking 函数实现
注意第一列和最后一列是单排停车位
其余为双排停车位,分类讨论
for i in range(0, num_splits + 1):
    y = int(y1 + i * gap)
    cv2.line(new_image, (x1, y), (x2, y), color, thickness)
if key > 0 and key < len(rects) - 1:
    # 竖直线
    x = int((x1 + x2) / 2)
    cv2.line(new_image, (x, y1), (x, y2), color, thickness)
18.3、训练神经网络
判断车位上面有没有车
18.3.1、切割停车位图片
save_images_for_cnn 函数实现
得到每一个停车位上面的图片,判断是否有车
人工对车位进行分割: 分为有车和没车两种类型
18.3.2、训练模型
train.py文件进行模型训练
使用vgg16模型进行训练
model = applications.VGG16(weights='imagenet', include_top=False, input_shape=(img_width, img_height, 3))
数据量较少,对vgg原模型进行“冻”起来操作,只需要改自己的全连接层和输出层
# 冻起来操作:对前10层的网络结构不进行更改
for layer in model.layers[:10]:
    layer.trainable = False
18.3.3、基于视频的车位检测
predict_on_image 函数处理某一帧的情况
不同时间段的停车位情况
predict_on_video 函数处理视频


