商品评论获取与词云图可视化分析
商品评论获取解析与可视化词云图制作
本篇文章主要介绍如何手写爬虫爬取电商平台评论数据,以及对爬取到的内容进行解析,导入mysql数据库并进行词频统计,可视化制作词云图。
涉及的技术点如下:
- 电商网站页面分析
- python简单爬虫
- java语言的webCollector爬虫框架使用
- python与java分别进行json文件解析,其中java解析结合mapreduce
- pymysql操作mysql数据库实现爬取数据导入
- 对爬取到的数据进行清洗
- mapreduce统计词频
- hive统计词频
- wordcloud词云图制作
- echarts词云图制作
这里我列出了两种大致思路,只介绍具体实现思路以及技术细节,因为时间原因不能做到十分全面。读者可根据自身需求个性化选择每个流程的实现方式。
整体流程图如下

因为博主喜欢花花绿绿所以画的也是花花绿绿的。
下面就开始具体介绍啦!
电商网站页面分析
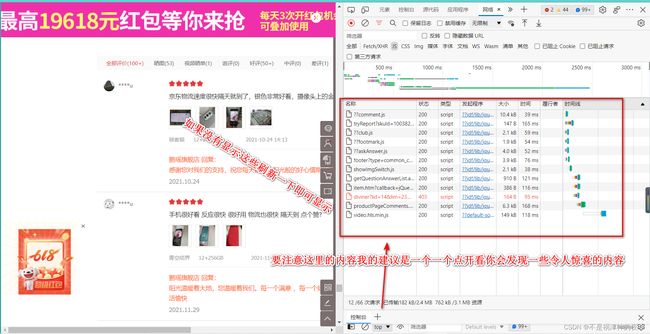
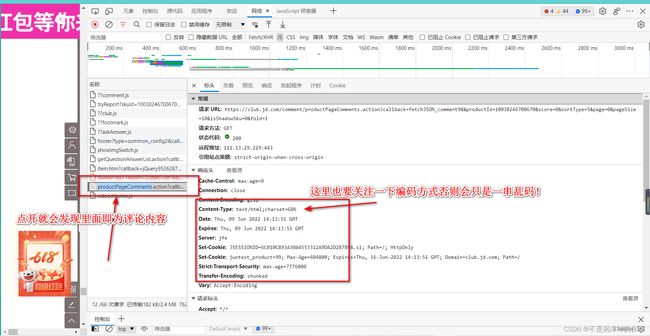
这里要注意的是我们对网站进行分析以确定爬虫如何进行涉及。我之前也做过这方面的一些尝试,那时对可视化比较感兴趣,当时做的是新冠肺炎疫情可视化的项目,因此学了一些。我看到要爬取数据第一想法就是去对应网页按F12打开开发者工具,查看里面的一些内容。这个网上也有不少介绍我就不细说了。如果从这里获取不到有用信息如某宝我就没有从中找到一些有用信息,这时候才会考虑直接去爬网页源码然后再从中解析来获取有用的信息。
下面上图!
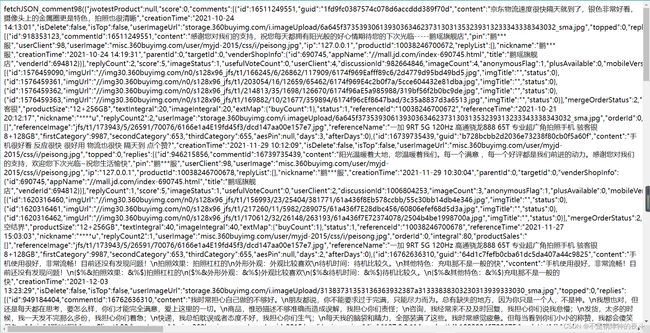
值得注意的是这里是最简单的一种情况即评论的信息以json存储很容易就可以得到,但在许多情况下并没有这么顺利,这样就需要对原网页进行解析,获取评论了,相对会复杂很对,用到html解析的知识,通过xpath来获取解析html获取评论复杂很多,大家可以参考其他优秀博客这里博主水平时间有限不过多解释
Python简单爬虫加json文件解析与mysql数据库存储
这个因为我集成在一起了而且本身内容不是很多。直接贴源码,我在代码中加注释大家直接看注释即可:
import json
import time

import pymysql
import requests

class MySpider:
    def __init__(self):
        self.urls1 = ["审核通不过具体地址请私信"
                     .format(i) for i in range(50)]
        self.urls2 = ["审核通不过具体地址请私信".format(i)
                      for i in range(50)] # url
        self.headers = {"User-Agent":"Mozilla/5.0 (Windows NT 10.0; Win64; x64) AppleWebKit/537.36 (KHTML, like Gecko) Chrome/101.0.4951.64 Safari/537.36 Edg/101.0.1210.53"} # 请求头这个最好加上不然很容易出现爬取不到内容的情况,如果出现不妨缓缓或者更换请求头
        self.fileName = []
        self.conn = pymysql.Connect(
            host='127.0.0.1',
            port=3360,  #这个是博主本地的mysql数据库,也可以不在这里连接大家随意按照自己需求更改
            user='root', # 这里的具体配置根据您的数据库来
            password='*******',
            database='my_db',
        )
        self.cursor = self.conn.cursor()
        self.fileListName = "dataNameList.txt" # 将爬取的文件名存在一个文件里这样在解析的时候不再需要重新爬取并不必要

    def parse_url(self):
		# 爬取网站数据
        i = 0
        urls = self.urls1+self.urls2
        for url  in urls:
            response = requests.get(url,headers=self.headers)
            time.sleep(2)
            filename = "E:\SpiderData\commentWithoutProcessing"+str(i)+".json"
            i += 1
            with open(self.fileListName,'a') as f:
                f.write(filename+";")
            with open(filename,'w') as f:
                text = response.text.split(')')[0]  # 将非json部分过滤掉
                text = text.split('(')[1]
                f.write(text)
            print("########数据获取结束######")
    def parse_data(self):
    # 对爬取的数据进行解析
        with open(self.fileListName,'r') as f:
            nameAll = f.read()
            self.fileName = nameAll.split(';')
        i = 0
        # 存储地址可指定
        filenames = ["E:\SpiderData\commentWithoutProcessing{}.json".format(i) for i in range(100)]
        sql = """create table comments(
                    ID bigint,
                    Contents Text,
                    Score int ,
                    Type int)ENGINE=innodb DEFAULT CHARSET=utf8"""
        self.cursor.execute(sql)
        for filename in filenames:
            if i<50:
                type = 1
            else:
                type = 2
            i += 1
            with open(filename,'r') as f:
                try: # 这里加入try-except来处理文件解析失败的异常亲测会出现异常
                # 大家可以试试这与我对爬取到的文件的处理方式有关,我的处理方式会出现一些文件只剩一般导致json解析失败因此加入这样的异常处理,如果大家有更好的想法我将不胜感激!!!
                    data = json.loads(f.read())
                    print("开始解析" + filename + "文件,存入数据库...........")
                    # sql = 'insert into "comments"("ID","Contents","Score") values (,%(Contents)s,%(Score)s)'
                    for info in data['comments']:
                        id = int(info['id'])
                        content = info['content']
                        score = int(info['score'])
                        information = (id, content, score,type)
                        sql = "INSERT INTO `comments`(`ID`,`Contents`,`Score`,`Type`) VALUES (%s,%s,%s,%s)"

                        rows = self.cursor.execute(sql, information)
                        self.conn.commit()

                    print(filename + "解析结束......")
                except:
                    print("解析失败!"+filename)
        self.conn.close()


if __name__ == "__main__":
    spider = MySpider()
这里展示一下结果:
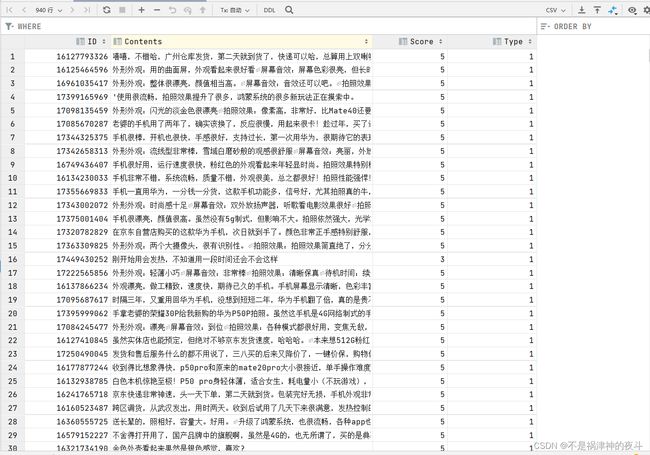
这里还涉及利用pymysql操作mysql的知识,这里的坑也很多,mysql经常崩溃,博主也修改了很久,要注意mysql的引号是反过来的·!!!大家可以查找相关资料
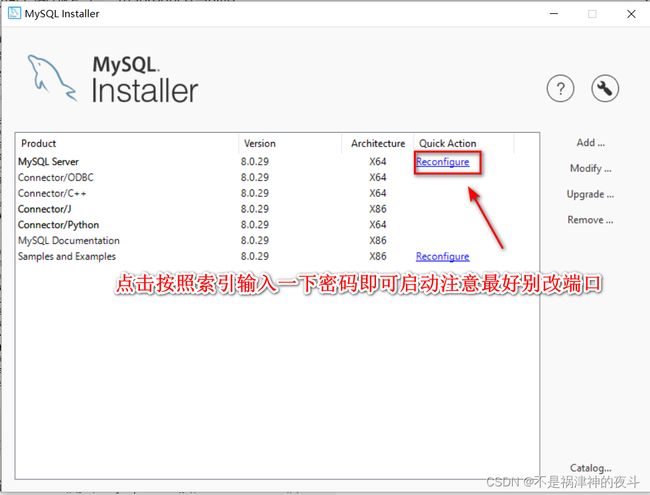
这里如果是windows的话关机后mysql会关闭,要重新开启有个笨方法:
博主水平不高,这个代码应该不难理解,大家可以以这个为基础进行修改完善。还有就是博主亲测是能爬取数据的如果您尝试不行可以试着修改请求头,同时博主水平有限如果有任何错误还望批评指正!!不胜感激。
java语言的webCollector爬虫框架使用
这个框架我还是第一次使用之前从来没有尝试过!
如果大家使用maven的话可以通过导入依赖:
		cn.edu.hfut.dmic.webcollector
 		WebCollector
 		2.73-alpha
引用一些关于这个爬虫框架组件的简单介绍:
- Crawler
对应一个完整的爬虫,封装了整个采集流程及所有的插件槽位。Crawler提供了一些基类,通过继承这些基类可实现爬虫的定制。- DBManager
数据管理器,提供了爬虫数据管理的基础接口。DBManager可自动实现高并发环境下URL去重,而不需要用户考虑去重业务。可通过插件形式实现基于不同数据库的数据管理器,如伯克利DB或RocksDB。- Visitor
用于定制用户对每个页面需要执行的操作,包括页面抽取和新链接发现。- Fetcher
抓取调度器。负责爬虫并发采集任务的调度,可利用有限的内存实现对上亿页面的高并发采集。- Requester
负责发送HTTP请求并接收响应。用户可定制各种Requester插件以实现不同的Http请求,包括Http头定制、代理定制等。- Plugin
上述大部分组件都提供了插件化功能。即用户可以定制自己的DBManager、Requester等,以实现高定制化的爬虫。
具体内容请查看GitHub 的 webCollector 主页
我拜读了他的一部分源码发现自己还有许多许多知识要学。下面贴出该部分的代码!这里的代码不是我自己写的,是拿老师给的代码进行简单修改得到的。不过这个爬虫使用的大致框架为如此,十分崇拜这个爬虫框架的编写者!!!
package my.webcollector;

import java.io.*;
import okhttp3.Request;
import cn.edu.hfut.dmic.webcollector.model.CrawlDatum;
import cn.edu.hfut.dmic.webcollector.model.CrawlDatums;
import cn.edu.hfut.dmic.webcollector.model.Page;
import cn.edu.hfut.dmic.webcollector.plugin.berkeley.BreadthCrawler;
import cn.edu.hfut.dmic.webcollector.plugin.net.OkHttpRequester;

public class JDCommentCrawler extends BreadthCrawler {
    public JDCommentCrawler(String crawlPath) {
        // 第二个参数表示不需要自动探测URL
        super(crawlPath, false);

        // 设置线程数为1
        setThreads(1);

        // 添加种子(评论API对应的URL,这里翻页10次)
        for (int pageIndex = 0; pageIndex < 100; pageIndex++) {
            String seedUrl = String
                    .format("具体地址请私信",
                            pageIndex);
            // 在添加种子的同时,记录对应的页号
            addSeedAndReturn(seedUrl).meta("pageIndex", pageIndex);
        }
    }

    @Override
    public void visit(Page page, CrawlDatums crawlDatums) {
        // 模拟人访问网页的速度
        try {
            Thread.sleep(3000);
        } catch (InterruptedException e) {
            e.printStackTrace();
        }
        // 获取之前保存的页号信息
        int pageIndex = page.metaAsInt("pageIndex");

        String body = page.html();
        // 保存当前访问的productPageComments页面信息
        JDCommentCrawler.createFile(body, "D:\\BigDataWordCloud\\src\\htmlTexts\\10038246700670-page"
                + pageIndex + ".html");
    }

    /**
     * 将字符串保存到文件
     */
    public static boolean createFile(String content, String filePath) {
        // 标记文件生成是否成功
        boolean flag = true;
        try {
            // 保证创建一个新文件
            File file = new File(filePath);
            if (!file.getParentFile().exists()) { // 如果父目录不存在,创建父目录
                file.getParentFile().mkdirs();
            }
            if (file.exists()) { // 如果已存在,删除旧文件
                file.delete();
            }
            file.createNewFile();
            // 将格式化后的字符串写入文件
            Writer write = new OutputStreamWriter(new FileOutputStream(file),
                    "UTF-8");
            write.write(content);
            write.flush();
            write.close();
        } catch (Exception e) {
            flag = false;
            e.printStackTrace();
        }
        return flag;
    }

    /**
     * 模拟普通用户使用浏览器访问
     */
    public static class MyRequester extends OkHttpRequester {
        String userAgent = "Mozilla/5.0 (Windows NT 10.0; Win64; x64) AppleWebKit/537.36 (KHTML, like Gecko) Chrome/102.0.5005.63 Safari/537.36 Edg/102.0.1245.33";
        // 每次发送请求前都会执行这个方法来构建请求
        @Override
        public Request.Builder createRequestBuilder(CrawlDatum crawlDatum) {
            // 这里使用的是OkHttp中的Request.Builder
            // 可以参考OkHttp的文档来修改请求头
            return super.createRequestBuilder(crawlDatum)
                    .removeHeader("User-Agent") //移除默认的UserAgent
                    .addHeader("Referer", "https://item.jd.com/")
                    .addHeader("User-Agent", userAgent);

        }
    }

    public static void main(String[] args) throws Exception {
        // 实例化一个评论爬虫,并设置临时文件夹为crawl
        JDCommentCrawler crawler = new JDCommentCrawler("crawl");
        // 抓取1层
        crawler.setRequester(new MyRequester()); // 设置请求头
        crawler.start(1);
    }
}
这样就可以爬到结果如果内容为空可以修改请求头。
利用mapreduce解析大量文件
这里是指对刚刚利用webcollector爬取到的html文件进行json解析,得到有用数据,python爬取的刚刚已经处理过。
这里的具体流程见下图:

这里给出代码mapreduce的框架固定也比较容易理解但它真正运行起来还是要看您的环境搭建,所以谨慎尝试。
import org.apache.hadoop.fs.Path;
import org.apache.hadoop.io.Text;
import org.apache.hadoop.mapreduce.Job;
import org.apache.hadoop.mapreduce.Mapper;
import org.apache.hadoop.mapreduce.Reducer;
import org.apache.hadoop.mapreduce.lib.input.FileInputFormat;
import org.apache.hadoop.mapreduce.lib.output.FileOutputFormat;
import com.alibaba.fastjson.JSONArray;
import com.alibaba.fastjson.JSONObject;

import java.io.IOException;

public class MRDataClean4JDComments {
    public static void main(String[] args) {
        try {
            Job job = Job.getInstance();
            job.setJobName("MRDataClean4JDComments");
            job.setJarByClass(MRDataClean4JDComments.class);
            job.setMapperClass(doMapper.class);
            // job.setReducerClass(doReducer.class);
            job.setOutputKeyClass(Text.class);
            job.setOutputValueClass(Text.class);
            Path in = new Path("hdfs://:8020/input/newHTML");
            Path out = new Path("hdfs://hadoop102:8020/out/newOutput");
            FileInputFormat.addInputPath(job, in);
            FileOutputFormat.setOutputPath(job, out);
            try {
                System.exit(job.waitForCompletion(true) ? 0 : 1);
            } catch (InterruptedException e) {
                e.printStackTrace();
            } catch (ClassNotFoundException e) {
                e.printStackTrace();
            }

        } catch (IOException e) {
            e.printStackTrace();
        }
    }

    public static class doMapper extends Mapper<Object, Text, Text, Text> {
        @Override
        protected void map(Object key, Text value, Mapper<Object, Text, Text, Text>.Context context) throws IOException, InterruptedException {
            String initJsonString = value.toString();
            JSONObject initJson = JSONObject.parseObject(initJsonString);
            if (!initJsonString.contains("productCommentSummary") && !initJsonString.contains("comments")) {
                // 过滤掉不符合要求的,这里其实打开文件就会发现文件只有一行
                return;
            }
            JSONObject myjson = initJson.getJSONObject("ten");
            JSONObject productCommentSummary = myjson.getJSONObject("productCommentSummary");
            String productId = productCommentSummary.get("productId").toString();
            String commentCount = productCommentSummary.get("commentCount").toString();
            String goodCount = productCommentSummary.get("goodCount").toString();
            String generalCount = productCommentSummary.get("generalCount").toString();
            String poorCount = productCommentSummary.get("poorCount").toString();
            String goodRateShow = productCommentSummary.get("goodRateShow").toString();
            String generalRateShow = productCommentSummary.get("generalRateShow").toString();
            String poorRateShow = productCommentSummary.get("poorRateShow").toString();
            /* comments 包括十条评论 */
            JSONArray comments = myjson.getJSONArray("comments");
            for (int i = 0; i < comments.size(); i++) {
                JSONObject comment = comments.getJSONObject(i);
                String guid = comment.getString("guid");
                String content = comment.getString("content").replace('\n', ' ');
                String creationTime = comment.getString("creationTime");
                String score = comment.getString("score");
                String nickname = comment.getString("nickname");
                String userLevelName = comment.getString("userLevelName");
                String userClientShow = comment.getString("userClientShow");
                String isMobile = comment.getString("isMobile");
                String days = comment.getString("days");
                StringBuilder sb = new StringBuilder();

                sb.append(productId);
                sb.append("\t");
                sb.append(commentCount);
                sb.append("\t");
                sb.append(goodCount);
                sb.append("\t");
                sb.append(generalCount);
                sb.append("\t");
                sb.append(poorCount);
                sb.append("\t");
                sb.append(goodRateShow);
                sb.append("\t");
                sb.append(generalRateShow);
                sb.append("\t");
                sb.append(poorRateShow);
                sb.append("\t");
                sb.append(guid);
                sb.append("\t");
                sb.append(content);
                sb.append("\t");
                sb.append(creationTime);
                sb.append("\t");
                sb.append(score);
                sb.append("\t");
                sb.append(nickname);
                sb.append("\t");
                sb.append(userLevelName);
                sb.append("\t");
                sb.append(userClientShow);
                sb.append("\t");
                sb.append(isMobile);
                sb.append("\t");
                sb.append(days);
                String result = sb.toString();
                context.write(new Text(result), new Text(""));
            }
        }
    }
}
原理其实很简单,这个直接对文件进行分片,然后处理,由于这里只需要对不同切片进行处理不需要整合后到reduce再进行处理因此reduce部分可以缺省但不代表没有只是交给一个大的系统默认的reduce进行操作即可!
这里没有运行结果博主没跑通。
java文本分词
java对json解析和分词我用的都不是很惯,我感觉一点都没有python简介效率高,可能是我个人的偏见。这里也可以在Hadoop上进行但我强烈不建议,在本地进行即可,当然如果您不嫌麻烦也可以尝试。这里因为时间原因我先埋个坑,暂时就不介绍了!!
Python文本分词
python文本分词中文的比较流行的是jieba包,只需安装一下即可。他的使用也很常规没什么特别的内容,下面直接上代码:
from typing import List, Any

import pymysql
import jieba


def judge(x):
    if len(x) == 1 or x[0] in [',', '。', '!', '?', '了', '啊', '啦', '呀',';']:
        return False
    return True


db = pymysql.Connect(
    host='127.0.0.1',
    port=3360,
    user='root',
    password='******',
    database='my_db',
)
cursor = db.cursor()
sql = 'SELECT Contents FROM comments' # 这里是因为我在上面python处理是将评论存储在mysql数据库中因此要访问数据库获取信息。
cursor.execute(sql)
filename = "result.txt"
# 清洗停用词
stopWordsFileName = "stopwords.txt"
f_stop_words_list: list[Any] = []
with open(stopWordsFileName,'r',encoding='utf-8') as f:
    f_stop_text = f.read()
    f_stop_words_list = f_stop_text.split('\n')
with open(filename, 'w',encoding='utf-8') as f:
    for i in range(1000):
        contents = cursor.fetchone()[0]
        seg_list = jieba.cut(contents)
        """line = " ".join(
            seg_list 这样的话单个语气词以及分隔符都放进去了,对其进行清理获取关键词汇,不过清晰的还不够干净
        )"""
        my_wordList = []
        for myword in seg_list:
            if judge(myword) and myword not in f_stop_words_list:
                my_wordList.append(myword)
        line = " ".join(my_wordList)
        f.write(line)
这里涉及对评论内容的清洗,包括去除语气词、标点以及停用词(这个概念参考链接停用词介绍
具体如何清洗看注释即可!!

这是未清洗绘制出的词云图很容易发现语气词等一些无关紧要的词占了大部分,影响效果

这是清洗以后的词云图明显效果好很多!。
mapreduce统计词频
这个词频统计就很简单因为前面已经得到了相应的文本文件类似下图:
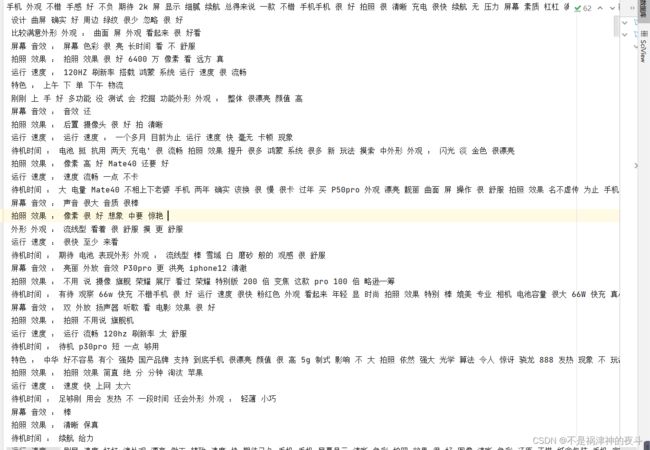
然后将其上传至hdfs利用wordcount程序统计即可十分简单!wordcount程序我想大家接触过mapreduce都实现过就不过多介绍请参考mapreduce官方教程含wordcount使用

下面重点介绍hive统计词频。
hive统计词频
hive是一个建立在Hadoop上的开源数据仓库软件,可以将存储在Hadoop文件中的结构化、半结构化数据文件映射为一张数据库表,基于表提供了一种类似SQL的查询模型,称为hive查询语言(HQL),用于访问和分析存储在Hadoop文件中的大型数据集。它十分的好用而且安装配置十分的方便。
hive统计词频流程图:

用到的创建表的指令
create table words(string line);
用到的导入文件的指令
load data inpath ‘/comments/newtry.txt’ into table words;
用到的统计词频的语句:
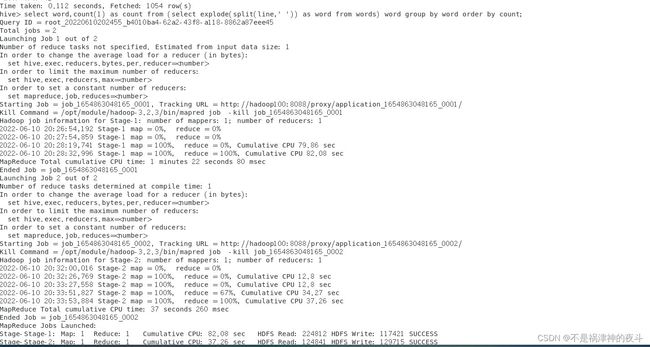
select word,count(1) as count from (select explode(split(line,’ ')) as word from words) word group by word order by count;
用到的导出至新表的语句:
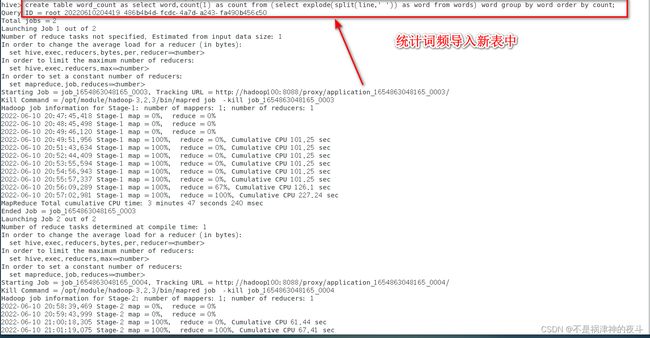
create table word_count as select word,count(1) as count from (select explode(split(line,’ ')) as word from words) word group by word order by count;
导出表至hdfs中:
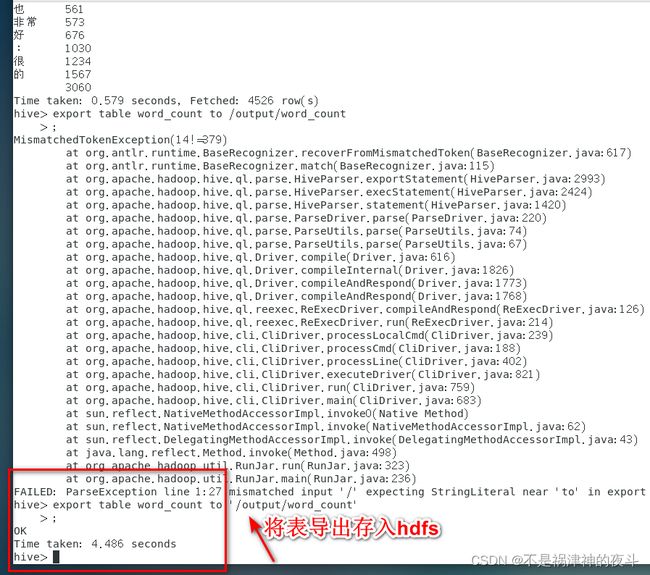
export table word_count to ‘/path’;

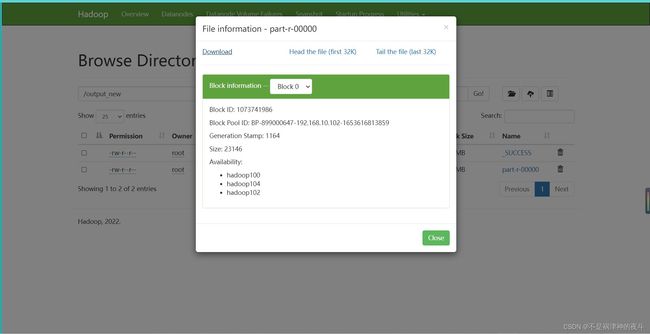
这样就可以啦!
以上就是两种实现词频统计的方式下面就是绘制词云图。
Python利用wordcloud绘制词云图:
wordcloud是python用来绘制词云图的一个包,这里选的原文件是之前用mapreduce处理的结果注意区分,如果是hive导出结果需要一点点更改注释会给出!
直接上代码:
import wordcloud
import matplotlib.pyplot as plt
from imageio import imread

filename = "part-r-00000.txt"
word_dic = {}
with open(filename,'r',encoding='utf-8') as f:
    for line in f.readlines(): # hive导出文件这里需要改一下
        info = line.strip('\n').split('\t') # 之前数据没清洗干净这里再清洗一下
        if info[0][0] not in ['.','-',',','+','*','&','!','/',';','?']:
            word_dic[info[0]] = float(info[1])

wordCloud = wordcloud.WordCloud(font_path="STKAITI.TTF",height=1000,width=2000,mode="RGBA",background_color='white',
                    ).fit_words(word_dic)
plt.imshow(wordCloud)
plt.axis('off')
plt.savefig('wordcloud_huawei.png')
还是一如既往的简洁,这也是我喜欢python的原因。不过这里字体有要求如果你需要对应字体请记得添加相应的ttf文件可以参照下图找你的ttf文件,点进去里面都是拷贝过来即可。


java实现词云图制作tomcat+Echarts
准备工作下载安装tomcat链接关于具体如何配置我就不细说了。
在IDEA环境配置参考链接非常的费事哭死,我没有成功最后还是用了eclipse。
这个的配置过程相当的繁琐,我也无法十分细说。这里关键在于将爬取的数据导入mysql数据库,这里给出代码:
这是主类
import java.io.*;
import java.math.BigInteger;


public class Main {
    public static void main(String[] args) {
        DBUtil db = new DBUtil();

        //更新操作(增加数据)
        //Object[] obj = {null, "乔布斯", "2243736958", "Apple", "root"};
        //int i = db.update("insert into teacher values(?,?,?,?,?)", obj);
        //System.out.println(i);
        //db.closeConnection();

        //查询操作
        String dir = "D:\\java_file\\WordCloud\\src\\main\\java\\1.txt";
        File file = new File(dir);
        try {
            BufferedReader br = new BufferedReader(new FileReader(file));
            Object[] obj = new Object[2];
            db.getConnection();
            while(true){
                try {
                    String line = br.readLine();
                    if(br.readLine() == null)
                    {
                        break;
                    }
                    else{
                        obj[0] = line.split("\u0001")[0];
                        obj[1] = Integer.parseInt(line.split("\u0001")[1]);
                        int i = db.update("insert into word_count values(?,?)", obj);
                        System.out.print(obj[1]+" ");
                    }
                } catch (IOException e) {
                    e.printStackTrace();
                }
            }
        } catch (FileNotFoundException e) {
            e.printStackTrace();
        }
    }
}
工具类:
import java.io.FileReader;
import java.io.IOException;
import java.sql.*;
import java.util.Properties;

/**
 * @author Peter Cheung
 * @user PerCheung
 * @date 2021/8/22 15:11
 */
public class DBUtil {
    //连接信息
    private static String driverName;
    private static String url;
    private static String username;
    private static String password;

    //注册驱动,使用静态块,只需注册一次
    static {
        //初始化连接信息
        Properties properties = new Properties();
        try {
            properties.load(new FileReader("src/main/db.properties"));
            driverName = properties.getProperty("driverName");
            url = properties.getProperty("url");
            username = properties.getProperty("username");
            password = properties.getProperty("password");
        } catch (IOException e) {
            e.printStackTrace();
        }
        //1、注册驱动
        try {
            //通过反射,注册驱动
            Class.forName(driverName);
        } catch (ClassNotFoundException e) {
            e.printStackTrace();
        }
    }

    //jdbc对象
    private Connection connection = null;
    private PreparedStatement preparedStatement = null;
    private ResultSet resultSet = null;

    //获取连接
    public void getConnection() {
        try {
            //2、建立连接
            connection = DriverManager.getConnection(url, username, password);
        } catch (SQLException e) {
            e.printStackTrace();
        }
    }
    //更新操作:增删改
    public int update(String sql, Object[] objs) {
        int i = 0;
        try {
            //3、创建sql对象
            preparedStatement = connection.prepareStatement(sql);
            for (int j = 0; j < objs.length; j++) {
                preparedStatement.setObject(j + 1, objs[j]);
            }
            //4、执行sql,返回改变的行数
            i = preparedStatement.executeUpdate();
        } catch (SQLException e) {
            e.printStackTrace();
        }
        return i;
    }

    //查询操作
    public ResultSet select(String sql, Object[] objs) {
        try {
            getConnection();
            //3、创建sql对象
            preparedStatement = connection.prepareStatement(sql);
            for (int j = 0; j < objs.length; j++) {
                preparedStatement.setObject(j + 1, objs[j]);
            }
            //4、执行sql,返回查询到的set集合
            resultSet = preparedStatement.executeQuery();
        } catch (SQLException e) {
            e.printStackTrace();
        }
        return resultSet;
    }

    //断开连接
    public void closeConnection() {
        //5、断开连接
        if (resultSet != null) {
            try {
                resultSet.close();
            } catch (SQLException e) {
                e.printStackTrace();
            }
        }
        if (preparedStatement != null) {
            try {
                preparedStatement.close();
            } catch (SQLException e) {
                e.printStackTrace();
            }
        }
        if (connection != null) {
            try {
                connection.close();
            } catch (SQLException e) {
                e.printStackTrace();
            }
        }
    }
}
配置文件db.properties
driverName=com.mysql.cj.jdbc.Driver
url=jdbc:mysql://127.0.0.1:3360/my_db?serverTimezone=Asia/Shanghai
username=root
password=****
大家根据自身情况设置
导入后博主会在文末附上链接里面有整个的源代码。
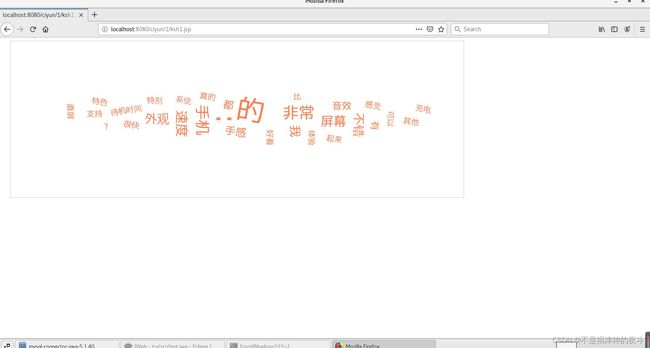
至此本篇博客的内容就讲完了,java要复杂很多很多,如果你想省时间可以用python,java的一些细节我没有具体说,有什么不明白的地方欢迎批评指正。
下面是我喜欢的一句话:
这世上缺的不是完美的人缺的是从心底里给出的真心、正义、无畏和同情!祝愿大家都能够热爱生活事事顺心!!!。
