大帅学习笔记——pytorch入门(3)张量操作
大帅出品,必属精品
记录学习pytorch的全过程,入门教程使用deeplizard的pytorch教程网站里包括视频和讲解博文,因为视频在YouTube上,这里贴出B站上的中文字幕课程视频。新人上路,希望大家多多指正。
1. pytorch.tensor 属性
在开始介绍各种属性之前,我们先创建一个tensor
import torch
dd = [4,1,28,28]
t = torch.tensor(dd)
这里我们有了一个名为 t 的tensor。之后介绍三个重要的属性。
dtype
dtype表示张量的数据类型pytorch支持的tensor的数据类型有:
| \ | 8 | 16 | 32 | 64 | |
|---|---|---|---|---|---|
| int | int | torch.int8 | torch.int16 | torch.int32 | torch.int64 |
| float | float | torch.float8 | torch.float16 | torch.float32 | torch.float64 |
那么如何设置属性呢
最简单的方法就是在创建张量的同时设置张量的属性
dd = [4,1,28,28]
t = torch.tensor(dd)
print(t.dtype)

>torch.int64 # 默认数据类型
或者
dd = [4.,1.,28.,28.]
t = torch.tensor(dd)
print(t.dtype)

>torch.float32 # 在创建数据时默认的浮点类型
同样可以
dd = [4.,1.,28.,28.]
t = torch.tensor(dd,dtype = torch.int32)
print(t.dtype)

>torch.int32 # 对数据类型进行设置
并且这里插入不同的四种创建方式所带来的不同,能力有限不能描述清楚,所以给出文档
>>> import torch
>>> import numpy as np

>>> data = np.array([1,2,3])

>>> t1 = torch.Tensor(data)
>>> t2  = torch.tensor(data)  # 最常用
>>> t3 = torch.as_tensor(data)
>>> t4 = torch.from_numpy(data)

>>> print(t1)
tensor([1., 2., 3.])
>>> print(t2)
tensor([1, 2, 3], dtype=torch.int32)
>>> print(t3)
tensor([1, 2, 3], dtype=torch.int32)
>>> print(t4)
tensor([1, 2, 3], dtype=torch.int32)
device
字面意思,查看和设置张量所在的设备,这里的设置主要是针对cuda进行的,例如device= torch.device('cuda:0')可以为张量设置专门的设备进行运算。并且pytorch不支持不同设备上的(cpu和gpu)的运算例如t6=t.cuda()会出现以下错误![]()

layout
torch.layout属性标识了torch.Tensor 在内存中的布局模式。 现在, 我们支持了两种内存布局模式 torch.strided (dense Tensors) 和尚处试验阶段的torch.sparse_coo (sparse COO Tensors, 一种经典的稀疏矩阵存储方式).
torch.strided 跨步存储代表了密集张量的存储布局方式,当然也是最常用最经典的一种布局方式。 每一个strided tensor都有一个与之相连的torch.Storage对象, 这个对象存储着tensor的数据. 这些Storage对象为tensor提供了一种多维的, 跨步的(strided)数据视图. 这一视图中的strides是一个interger整形列表:这个列表的主要作用是给出当前张量的各个维度的所占内存大小,严格的定义就是,strides中的第k个元素代表了在第k维度下,从一个元素跳转到下一个元素所需要跨越的内存大小。 跨步这个概念有助于提高多种张量运算的效率。
2. pytorch.tensor 特殊创建
在使用tensor的时候,经常会用到一些特殊形状、赋值的张量,以下就如何创建它们做出概述
对角张量
>>> print(torch.eye(3))
tensor([[1., 0., 0.],
        [0., 1., 0.],
        [0., 0., 1.]])
全零张量
>>> print(torch.zeros(3))
tensor([0., 0., 0.])

>>> print(torch.zeros(3,3))
tensor([[0., 0., 0.],
       [0., 0., 0.],
       [0., 0., 0.]])

>>> print(torch.zeros(3,3,3))
tensor([[[0., 0., 0.],
        [0., 0., 0.],
        [0., 0., 0.]],

       [[0., 0., 0.],
        [0., 0., 0.],
        [0., 0., 0.]],

       [[0., 0., 0.],
        [0., 0., 0.],
        [0., 0., 0.]]])
全一张量
>>> print(torch.ones(3))
tensor([1., 1., 1.])

>>> print(torch.ones(3,3))
tensor([[1., 1., 1.],
        [1., 1., 1.],
        [1., 1., 1.]])

>>> print(torch.ones(3,3,3))
tensor([[[1., 1., 1.],
         [1., 1., 1.],
         [1., 1., 1.]],

        [[1., 1., 1.],
         [1., 1., 1.],
         [1., 1., 1.]],

        [[1., 1., 1.],
         [1., 1., 1.],
         [1., 1., 1.]]])
任意形状的随机张量
>>> print(torch.rand([2,5]))
tensor([[0.9727, 0.2962, 0.4785, 0.9295, 0.1315],
      [0.4054, 0.5651, 0.2140, 0.5162, 0.7400]])
这些特殊方法创建的张量同样可以搭配第一部分提到的三种属性进行创建。
3. pytorch.tensor的操作
数据在某种程度上是一个抽象的概念,因此当我们想实际使用数据的概念来实现某些东西时,我们使用一种称为张量的特定数据结构,该结构可以在代码中有效地实现。张量具有数学和其他方面的属性,使我们能够进行工作。
pytorch中自带了很多关于tensor的操作,其中主要的四个高级操作分别是:
- 重塑操作
- 元素操作
- 还原操作
- 访问操作
重塑
reshape在之前的文章中有过具体阐述,这里不做展开,只补充一些点
例如当我们需要nx1维向量时,我们可以将原矩阵重塑
这样的操作可以有reshape(-1),同样我们可以调用numel()函数返回矩阵中元素的个数并且手动转换成nx1维向量,
>>> dd = [4,1,28,28]#\
>>> t = torch.tensor(dd,dtype=torch.int)
>>> t.numel()
4
这里着重介绍两个重要的操作squeeze()和unsqueeze()
- squeeze
用来给矩阵降维,将长度为 1 的轴删除 - unsqueeze
用来给矩阵增加一个长度为 1 的轴
>>> t.reshape(1,4)
tensor([[ 4,  1, 28, 28]], dtype=torch.int32)

>>> print(t.reshape([1,4]).shape)
torch.Size([1, 4])
之后分别调用squeeze()方法和unsqueeze()方法对张量进行操作
>>> print(t.reshape([1,4]).squeeze())
tensor([ 4,  1, 28, 28], dtype=torch.int32)
>>> print(t.reshape([1,4]).squeeze().shape)
torch.Size([4])
可以看到原本的1x4矩阵变成了长度为4的向量,减少了一根长度为一的轴
>>> print(t.reshape([1,4]).squeeze().unsqueeze(dim=0))
tensor([[ 4,  1, 28, 28]], dtype=torch.int32)
>>> print(t.reshape([1,4]).squeeze().unsqueeze(dim=0).shape)
torch.Size([1, 4])
再调用unsqueeze()方法后为原本的矩阵又增加了一个长度为1的轴成了二维矩阵。
再考虑第二个函数flatten()它的作用是把一个任意规模的矩阵化为1xn型的矩阵
>>> t = torch.ones(5,5)
>>> t.flatten()
tensor([1., 1., 1., 1., 1., 1., 1., 1., 1., 1., 1., 1., 1., 1., 1., 1., 1., 1.,
        1., 1., 1., 1., 1., 1., 1.])
拼接cat()
将两个张量按不同的方式组合起来
t1 = torch.tensor([
    [1,2],
    [3,4]
])
t2 = torch.tensor([
    [5,6],
    [7,8]
])
构建两个2x2矩阵

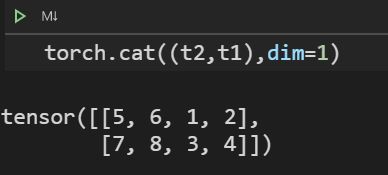
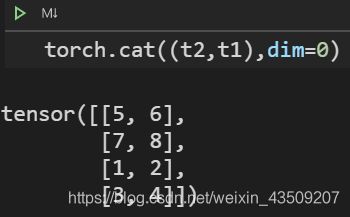
参数dim表示连接时所在的轴,当矩阵的维度增加时,可以调换不同的参数进行拼接
参考
[1]https://github.com/apachecn/pytorch-doc-zh/blob/master/docs/1.0/tensor_attributes.md