Hexo-Next 博客搭建
title: Hexo 搭配 GitHub 建立博客, 选用 nexT 主题
date: 2021-04-26 19:21:20
categories:
  - [兴趣, 网站, 博客]
tags:
  - Hexo
  - Git
password:
top: 100
typora-root-url: ..
整理网上的Next优化方法,外加写一份文章
感觉博客还行,不再羡慕别人的主题了
特效全开,跟开了吃鸡一样,电脑呼呼的
看了下建站时间,花了23天整,为了一个工具,感觉血亏
我的博客 机械细胞 (jxxb.top)
Hexo 博客搭建
Hexo是一款基于Node.js的静态博客框架,依赖少易于安装使用,可以方便的生成静态网页托管在GitHub上.
因为Hexo的创建者是台湾人,对中文的支持很友好,可以选择中文进行查看。
官网: hexo官网
安装 Git
pass
参考:
-
Git - Book (git-scm.com)
-
超详细Git 安装教程(Windows)eno_yang的博客-CSDN博客git安装
Git 代码备份
主要是一些为源文件备份的代码,用于git push
npm install -g hexo-cli
hexo init MyBlog
cd MyBlog
npm install
hexo generate
hexo server
.
git config --global user.name "yourname"
git config --global user.email "youremail"
git config user.name
git config user.email
ssh-keygen -t rsa -C "youremail"
ssh -T [email protected]
.
deploy:
  type: git
  repo:  #https://bitbucket.org/JohnSmith/johnsmith.bitbucket.io
  branch: [branch]
  message: [message]
npm install hexo-deployer-git --save
hexo clean
hexo generate
hexo deploy
.
git branch newbranch
git branch
git checkout newbranch
git add .
git commit -a
git status
git checkout source
git merge newbranch
git diff
git push -u origin source
git branch -D newbranch
.
git init
git add .
git commit -m "20210423手动push"
git branch -M source
git remote add origin https://github.com/Liuzh25/Liuzh25.github.io.git
git push -u origin source
git push origin source --force
.
git branch -a
git push origin --delete new
安装nodejs
pass
参考:
-
Node.js 中文网
安装hexo
选择准备安装的目录,打开git bash,输入
//全局安装
npm install -g hexo-cli
//查看一下版本
hexo -v
//初始化hexo, 即创建"myblog"文件夹并添加相关文件
hexo init myblog//创建文件夹
cd myblog //进入这个myblog文件夹
npm install//添加相关文件
hexo g//生成文件
hexo s//本地浏览打开hexo的服务,在浏览器输入localhost:4000就可以看到你生成的博客了。
GitHub创建个人仓库
创建一个和你用户名相同的仓库,后面加.github.io,只有这样,将来要部署到GitHub page的时候,才会被识别.

生成SSH添加到GitHub
ssh,简单来讲,就是一个秘钥,其中,id_rsa是你这台电脑的私人秘钥,不能给别人看的,id_rsa.pub是公共秘钥,可以随便给别人看。把这个公钥放在GitHub上,这样当你链接GitHub自己的账户时,它就会根据公钥匹配你的私钥,当能够相互匹配时,才能够顺利的通过git上传你的文件到GitHub上。
打开git bash,输入
git config --global user.name "yourname"
git config --global user.email "youremail"
这里的yourname输入你的GitHub用户名,youremail输入你GitHub的邮箱。这样GitHub才能知道你是不是对应它的账户。
检查一下你有没有输对
git config user.name
git config user.email
创建SSH,一路回车即可
ssh-keygen -t rsa -C "youremail"打开C:\Users\用户\.ssh\id_rsa.pub, 复制内容
在github的用户设置里,找到SSH and GPG keys,点击New SSH key
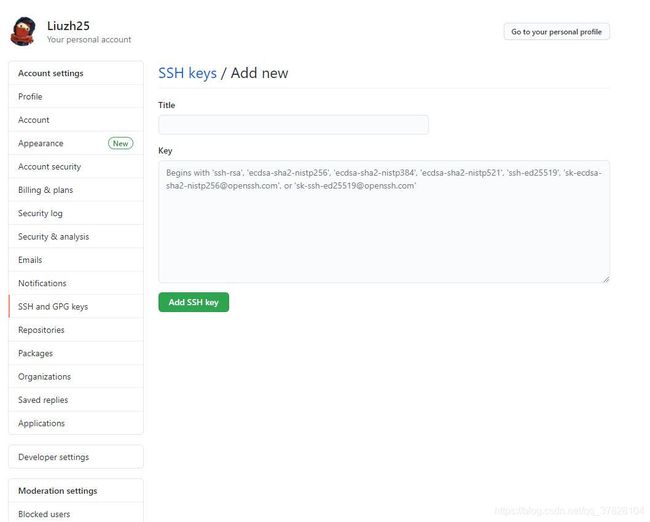
Title随意,将复制内容填入Key,点击New SSH key
查看是否成功
ssh -T git@github.com参考:
-
hexo史上最全搭建教程Fangzh的技术博客-CSDN博客hexo
将hexo部署到GitHub
打开myblog文件夹下的站点配置文件_config.yml
找到代码并修改
deploy:
  type: git
  repo: https://github.com/YourgithubName/YourgithubName.github.io.git
  branch: master
repo: 仓库名,可直接在你创建的仓库复制,有三种,复制后粘贴即可

branch:准备部署的分支,一般使用main,可随意填写
如下为我的配置
# Deployment
## Docs: https://hexo.io/docs/one-command-deployment
deploy:
  type: git
  repo: [email protected]:Liuzh25/Liuzh25.github.io.git,main
安装deploy-git ,也就是部署的命令,这样你才能用命令部署到GitHub
npm install hexo-deployer-git --save部署命令
hexo clean
hexo generate
hexo deploy
其中 hexo clean清除了你之前生成的东西,也可以不加。 hexo generate 顾名思义,生成静态文章,可以用 hexo g缩写 hexo deploy 部署文章,可以用hexo d缩写
注意第一次deploy时可能要你输入username和password。
等待
进入 http://yourname.github.io ,如果显示为空白,而不是404,说明你已经部署成功,请等待1-4小时
设置个人域名(了解)
注册一个阿里云账户,在阿里云上买一个域名
实名认证
在域名控制台点解析进去
添加如下

即将www.jxxb.top和jxxb.top均指向yourname.github.io
不推荐指向IP地址
然后,修改github仓库设置如下

最后一步
hexo clean
hexo g
hexo d
写文章
Hexo支持makedown语言,这是一种轻量级的标记语言,类似于html,为你的文章添加文字格式及图片,音频,链接等,文件名后缀.md
语法可在Markdown 中文网或者Markdown 教程 | 菜鸟教程查看
推荐使用Typora文本编辑器
在git bash输入下列代码
hexo new abc即在\myblog\source\_posts文件夹下创建abc.md文件并预先输入信息
使用文本编辑器或者记事本打开编辑即可
编辑完毕,部署至网页
hexo clean
hexo g
hexo d
参考:
-
Markdown 中文网
-
Typora官网
安装NexT
安装「主题」
在 /myblog 启动Git bash
git clone https://github.com/theme-next/hexo-theme-next themes/next
启用「主题」
编辑 站点配置文件 _config.yml (位于根目录)
theme: next将Hexo 站点配置文件(/_config.yml)与 NexT主题配置文件(/themes/next/_config.yml)备份
将主题配置文件独立出来
hexo-next的更新不够人性化,且 Hexo 站点配置文件(/_config.yml)与 NexT主题配置文件(/themes/next/_config.yml)的割裂使得配置时体验也不算太好
因此现在有四种配置方法,参考官方文档DATA-FILES.md
-
直接在Hexo 站点配置文件和NexT主题配置文件内编写
优点: 当在本地预览(
hexo s)时,更改后可实时查看,不需要再操作git bash(退出本地预览并再次进入) -
NexT主题配置文件内
override: false(默认),从站点配置文件和主题配置文件中复制你需要更改的条目至/myblog/source/_data/next.yml,如果没有就新建,通常是没有的.缺点: 某些插件只能从站点配置文件读取选项
-
NexT主题配置文件内
override: false改为true,将主题配置文件中全部内容复制到next.yml,在Hexo 站点配置文件和next.yml内编写 -
确认
next.yml文件不存在,存在要删除或改名,然后将站点配置文件和主题配置文件中复制的你需要更改的条目,即方法2的内容向右移两个空格,在这些参数最上方添加一行theme_config:,放置于站点配置文件末尾.如下# Deployment ## Docs: https://hexo.io/docs/one-command-deployment deploy: type: git repo: [email protected]:Liuzh25/Liuzh25.github.io.git,main theme_config: # 自定义文件 custom_file_path: #head: source/_data/head.swig #header: source/_data/header.swig #sidebar: source/_data/sidebar.swig #postMeta: source/_data/post-meta.swig #postBodyEnd: source/_data/post-body-end.swig #footer: source/_data/footer.swig #bodyEnd: source/_data/body-end.swig #variable: source/_data/variables.styl #mixin: source/_data/mixins.styl style: source/_data/styles.styl # --------------------------------------------------------------- # 网站信息设置 # --------------------------------------------------------------- # 头像 favicon: small: /uploads/favicon-16x16-next.png medium: /uploads/favicon-32x32-next.png推荐使用方法2或4,这里我使用的方法2,并且只将主题配置文件复制到
next.yml
参考:
-
hexo-theme-next/DATA-FILES.md at master · theme-next/hexo-theme-next
编辑站点配置文件
编辑下列代码如下所示
# Site
title: 机械细胞
subtitle: 三十功名尘与土,八千里路云和月
description: 三十功名尘与土,八千里路云和月
keywords: 个人,博客
author: 谨礼
language: zh-CN
timezone: Asia/Shanghai

# URL
## Set your site url here. For example, if you use GitHub Page, set url as 'https://username.github.io/project'
url: https://www.jxxb.top
参考:
-
Hexo+NexT(二):Hexo站点配置详解_Guide2IT-CSDN博客
-
hexo config.yml站点配置文件说明猫狗记-CSDN博客
博客个性化初试
GitHub Corners「图标角」
粘贴代码到themes/next/layout/_layout.swig文件中(放在的下面),并把href改为你的github地址,将style="fill:#151513; color:#fff改为你喜欢的颜色.
最新版本NexT主题支持GitHub Corners
编辑 主题配置文件 _config.yml(复制到next.yml,方法2)
# GitHub corner.
github_banner:
  enable: true
  permalink: https://github.com/Liuzh25
  title: 欢迎访问我的GitHub主页
编辑后发现在网页右上角,且颜色为黑白色,准备更改
按F12后如下图

用红圈内按键指向GitHub Corners,显示如下

点击mian.css:1180,打开mian.css,复制如下代码
.github-corner svg {
  border: 0;
  color: #fff;
  fill: #222;
  position: absolute;
  right: 0;
  top: 0;
  z-index: 1000;
}
打开GitHub Corners (tholman.com),对比代码,会发现右边和左边的区别是
- right: 0;
+ left: 0;
+ transform: scale(-1, 1);编辑/myblog/source/_data/styles.styl文件添加下列代码
.github-corner svg {
  border: 0;
  color: #fff;
  fill: #FD6C6C;
  position: absolute;
  left: 0;
  transform: scale(-1, 1);
  top: 0;
  z-index: 1000;
}将主题配置文件内style代码注释#去掉.(复制到next.yml,方法2)
custom_file_path:
  #head: source/_data/head.swig
  #header: source/_data/header.swig
  #sidebar: source/_data/sidebar.swig
  #postMeta: source/_data/post-meta.swig
  #postBodyEnd: source/_data/post-body-end.swig
  #footer: source/_data/footer.swig
  #bodyEnd: source/_data/body-end.swig
  #variable: source/_data/variables.styl
  #mixin: source/_data/mixins.styl
  style: source/_data/styles.styl


参考:
-
GitHub Corners (tholman.com)
-
科学上最令人舒服的十种颜色(RGB)
-
Color Hex Color Codes
图标角延伸知识
使用F12找到对应的css文件,并在/_data/styles.styl文件内重写,用于个性化自己的网站
参考:
-
基于Hexo搭建个人博客——进阶篇(从入门到入土) | ookamiAntD's Blog
编辑NexT主题配置文件
设置「网站标签图标」和「页脚」
在/myblog/source下创建文件夹,将16x16及32x32的任意图像格式文件放入,并在代码内填写路径
亦可以使用链接
图标的使用方法请阅读下一条
编辑 主题配置文件 _config.yml(复制到next.yml,方法2)
# ---------------------------------------------------------------
# 网站信息设置
# ---------------------------------------------------------------

# 头像
favicon:
  small: /uploads/favicon-16x16-next.png
  medium: /uploads/favicon-32x32-next.png
  #apple_touch_icon: /images/apple-touch-icon-next.png
  #safari_pinned_tab: /images/logo.svg
  #android_manifest: /images/manifest.json
  #ms_browserconfig: /images/browserconfig.xml

# 页脚
footer:
  # 指定网站设置的日期,如果没有定义,则使用当前时间.
  since: 2021

  # 图标,位于时间和版权信息之间.
  icon:
    name: fab fa-ravelry
    # 如果你想要动画图标,设置它为true.
    animated: true
    # 改变图标的颜色,使用十六进制代码.
    color: "#dada1"
  # 如果没有定义,将在Hexo主配置中使用' author '.
  copyright: 机械细胞

  # 控制(由 Hexo 强力驱动)是否显示
  powered: false

#版权信息
creative_commons:
  license: by-nc-sa
  sidebar: true
  post: true
  language: deed.zh
图标的选用
NexT 默认使用 Font Awesome 库作为 icon 库,美中不足的是,有一些中国的社交网站的图标在 Font Awesome 库中并没有提供,包括我们熟悉的哔哩哔哩、豆瓣、简书等等。所以如果想使用这些图标,就需要我们使用本地图标进行手动添加。
首先,在 阿里巴巴矢量图标库 之类的网站找到你需要的图标,下载 SVG 格式文件。在/myblog/source新建文件夹,并放入.
编辑 source/_data/styles.styl文件,编辑代码
示例代码
.fa-ravelry {
  background: url(iconfont/ravelry.svg);
  background-position: 50% 75%;
  background-repeat: no-repeat;
  height: 1rem;
  width: 1rem;
}
//
.fa-home{
  background: url(/iconfont/home-orange.svg);
  background-position: 50% 75%;
  background-repeat: no-repeat;
  height: 1rem;
  width: 1rem;
}
//
.fa-about{
  background: url(/iconfont/about-purple.svg);
  background-position: 50% 75%;
  background-repeat: no-repeat;
  height: 1rem;
  width: 1rem;
}
//
.fa-commonweal{
  background: url(/iconfont/commonweal-green.svg);
  background-position: 50% 75%;
  background-repeat: no-repeat;
  height: 1rem;
  width: 1rem;
}
//
.fa-archive{
  background: url(/iconfont/archive-blue.svg);
  background-position: 50% 75%;
  background-repeat: no-repeat;
  height: 1rem;
  width: 1rem;
}
//
.fa-tags{
  background: url(/iconfont/tags.svg);
  background-position: 50% 75%;
  background-repeat: no-repeat;
  height: 1rem;
  width: 1rem;
}
//
.fa-categories{
  background: url(/iconfont/categories.svg);
  background-position: 50% 75%;
  background-repeat: no-repeat;
  height: 1rem;
  width: 1rem;
}
//
.fa-github{
  background: url(/iconfont/github.svg);
  background-position: 50% 75%;
  background-repeat: no-repeat;
  height: 1rem;
  width: 1rem;
}
//
.fa-email{
  background: url(/iconfont/email.svg);
  background-position: 50% 75%;
  background-repeat: no-repeat;
  height: 1rem;
  width: 1rem;
}
//
.fa-qq{
  background: url(/iconfont/qq.svg);
  background-position: 50% 75%;
  background-repeat: no-repeat;
  height: 1rem;
  width: 1rem;
}
//
.fa-baidu{
  background: url(/iconfont/baidu.svg);
  background-position: 50% 75%;
  background-repeat: no-repeat;
  height: 1rem;
  width: 1rem;
}
//
.fa-qqduihua{
  background: url(/iconfont/qqduihua.svg);
  background-position: 50% 75%;
  background-repeat: no-repeat;
  height: 1rem;
  width: 1rem;
}
//
.fa-zhihu{
  background: url(/iconfont/zhihu.svg);
  background-position: 50% 75%;
  background-repeat: no-repeat;
  height: 1rem;
  width: 1rem;
}
//
.fa-bilibili{
  background: url(/iconfont/bilibili.svg);
  background-position: 50% 75%;
  background-repeat: no-repeat;
  height: 1rem;
  width: 1rem;
}
//
.fa-csdn{
  background: url(/iconfont/csdn.svg);
  background-position: 50% 75%;
  background-repeat: no-repeat;
  height: 1rem;
  width: 1rem;
}
//
.fa-gitee{
  background: url(/iconfont/gitee.svg);
  background-position: 50% 75%;
  background-repeat: no-repeat;
  height: 1rem;
  width: 1rem;
}
//
.fa-leetcode{
  background: url(/iconfont/leetcode.svg);
  background-position: 50% 75%;
  background-repeat: no-repeat;
  height: 1rem;
  width: 1rem;
}
//
.fa-link{
  background: url(/iconfont/link.svg);
  background-position: 50% 75%;
  background-repeat: no-repeat;
  height: 1rem;
  width: 1rem;
}
//
.fa-video{
  background: url(/iconfont/video.svg);
  background-position: 50% 75%;
  background-repeat: no-repeat;
  height: 1rem;
  width: 1rem;
}
//
.fa-music{
  background: url(/iconfont/music.svg);
  background-position: 50% 75%;
  background-repeat: no-repeat;
  height: 1rem;
  width: 1rem;
}
//
.fa-photo{
  background: url(/iconfont/photo.svg);
  background-position: 50% 75%;
  background-repeat: no-repeat;
  height: 1rem;
  width: 1rem;
}
//
.fa-book{
  background: url(/iconfont/book.svg);
  background-position: 50% 75%;
  background-repeat: no-repeat;
  height: 1rem;
  width: 1rem;
}将主题配置文件内custom_file_path:style代码注释#去掉.(如果你之前没有这么做)
最后一步,引用.
name: fab fa-ravelryFont Awesome 的图标引用方式有fa,fab,fad,far,fal等,每种类型可能有相应图标,也可能没有所以如果出现图标叠加,请换引用方式或者图标名,推荐更改图标名.fa-xxx,其中,fa-不能省略,可能出错,我暂时不会改
参考:
-
阿里巴巴矢量图标库
-
Hexo + NexT 通过自定义样式添加 Bilibili 图标_R先生一天不学习就浑身难受-CSDN博客
-
Hexo博客之优雅使用阿里iconfont图标_小康博客-CSDN博客
-
Hexo-使用阿里iconfont图标
设置「布局风格」
编辑 主题配置文件 _config.yml(复制到next.yml,方法2)
将你需用启用的scheme前面注释 # 去除即可。
# ---------------------------------------------------------------
# 布局设置
# ---------------------------------------------------------------

# 布局
#scheme: Muse
#scheme: Mist
#scheme: Pisces
scheme: Gemini
添加「菜单项」
fab后面的图标是我自己下载并添加的,参考条目8
badges控制的是归档,标签,分类旁边是否显示统计数
若要添加自定义菜单项,直接插入,并在/themes/next/languages/zh_CN中添加对应代码
编辑 主题配置文件 _config.yml(复制到next.yml,方法2)
# ---------------------------------------------------------------
# 菜单设置
# ---------------------------------------------------------------

# 菜单
# 格式: `Key: /link/ || icon`
menu:
  home: / || fab fa-home
  tags: /tags/ || fab fa-tags
  categories: /categories/ || fab fa-categories
  archives: /archives/ || fab fa-archive
  videos: /videos/ || fab fa-video
  music: /music/ || fab fa-music
  photos: /photos/ || fab fa-photo
  books: /videos/ || fab fa-book
  #schedule: /schedule/ || fab fa-calendar
  #sitemap: /sitemap.xml || fab fa-sitemap
  commonweal: /404/ || fab fa-commonweal
  about: /about/ || fab fa-about

# 启用/禁用菜单图标/项目徽章.
menu_settings:
  icons: true
badges: true编辑zh-CN.yml
menu:
  home: 首页
  archives: 归档
  categories: 分类
  tags: 标签
  music: 音乐
  videos: 视频
  books: 图书
  photos: 照片
  about: 关于
  search: 搜索
  schedule: 日程表
  sitemap: 站点地图
  commonweal: 公益 404
设置「侧栏」
-
侧栏位置
-
侧栏头像
-
添加社交链接
-
添加友链
-
侧边栏目录设置
编辑 主题配置文件 _config.yml(复制到next.yml,方法2)
# ---------------------------------------------------------------
# 侧边栏设置
# ---------------------------------------------------------------

sidebar:
  # 侧栏位置.
  position: left
  #position: right

  # 自定义侧栏宽度,默认如下:Muse | Mist: 320  Pisces | Gemini: 240
  #width: 300

  # 侧栏顶部填充像素.
  padding: 18
  # 侧栏与菜单栏和文档的像素偏移
  offset: 12

# 侧栏头像
avatar:
  url: /uploads/avatar.jpeg
  # 头像显示圆形.
  rounded: true
  # 鼠标放置时头像旋转.
  rotated: true

# 日志/分类/标签在侧边栏.
site_state: false

# 社交链接
# 格式: `关键字: 链接 || 图标名`
social:
  GitHub: https://github.com/Liuzh25 || fa fa-github
  E-Mail: [email protected] || fa fa-email
  QQ: tencent://message/?uin=1095652242 || fa fa-qq
  QQ对话: tencent://Message/?Uin=786189861&websiteName=www.oicqzone.com&Menu=yes || fa fa-qqduihua
  CSDN: https://blog.csdn.net/qq_37828104 || fa fa-csdn
  码云: https://gitee.com/Liuzh25 || fab fa-gitee
  力扣: https://leetcode-cn.com/u/liuzh25/ || fab fa-leetcode
  哔哩哔哩: https://space.bilibili.com/500942397 || fab fa-bilibili
  知乎: https://www.zhihu.com/people/jin-li-22-85 || fa fa-zhihu
  百度: http://www.baidu.com || fab fa-baidu

# `enable` 控制是否显示图标 ,`icons_only` 控制是否隐藏关键字, `transition` 暂时不懂.
social_icons:
  enable: true
  icons_only: false
  transition: false

# 友情链接
links_settings:
  icon: fab fa-link
  title: 友情链接
  # 链接排列方式
  #layout: block
  layout: inline

links:
  野生程序员: http://www.yscxy.net/
  又见苍岚: https://www.zywvvd.com/
  小丁的个人博客: https://tding.top/
  Moorez: http://shenzekun.cn/
  橘子味雪糕: https://www.liuxianl.com/

# 侧边栏目录
toc:
  enable: fasle
  # 自动添加列表号到toc.
  number: false
  # 标题过长换行.
  wrap: false
  # 所有目录全部显示.
  expand_all: false
  # 最大标题深度.
  max_depth: 6
添加「打赏」和「字数统计」
字数统计功能依赖于 https://github.com/theme-next/hexo-symbols-count-time
npm install hexo-symbols-count-time编辑 主题配置文件 _config.yml(复制到next.yml,方法2)
# ---------------------------------------------------------------
# 站点设置
# ---------------------------------------------------------------

# 自动摘录描述在主页作为序言文本.
excerpt_description: true

# 显示阅读全文.
read_more_btn: true

# 文章数据显示
post_meta:
  item_text: true # 标题显示
  created_at: true # 创建时间
  updated_at: # 更新时间
    enable: true
    another_day: true
  categories: true # 分类显示

# 字数统计
symbols_count_time:
  separated_meta: true
  item_text_post: true
  item_text_total: true

# 标签,使用图标代替符号#
tag_icon: true

# 打赏
reward_settings:
  enable: true
  animation: false
  #comment: 赞赏一杯咖啡

reward:
  alipay: /uploads/alipay.jpg
  wechatpay: /uploads/wechatpay.jpg
  #paypal: /images/paypal.png
  #bitcoin: /images/bitcoin.png

# 通过Telegram Channel、Twitter等订阅
# 格式: `Key: permalink || icon` (Font Awesome)
follow_me:
  #Twitter: https://twitter.com/username || fab fa-twitter
  #Telegram: https://t.me/channel_name || fab fa-telegram
  WeChat:  /uploads/wechat-qcode.jpg || fab fa-weixin
  #RSS: /atom.xml || fa fa-rss

# 相关热门文章链接
related_posts:
  enable: false
  title: # Custom header, leave empty to use the default one
  display_in_home: false
  params:
    maxCount: 5
    #PPMixingRate: 0.0
    #isDate: false
    #isImage: false
    #isExcerpt: false

# 文章编辑
post_edit:
  enable: true
  url: https://github.com/Liuzh25/Liuzh25.github.io/tree/source # 查看源链接
  #url: https://github.com/user-name/repo-name/edit/branch-name/subdirectory-name # 编辑链接分支

# 显示前一篇文章和下一篇文章
post_navigation: left
#post_navigation: right
#post_navigation: false
设置「谷歌日历」和「标签云」
谷歌日历设置失败
编辑 主题配置文件 _config.yml(复制到next.yml,方法2)
# ---------------------------------------------------------------
# 自定义页面设置
# ---------------------------------------------------------------

# 标签页标签云设置.
tagcloud:
  min: 12 # 字体最小 in px
  max: 30 # 字体最大 in px
  start: "#ccc" # 开始颜色 (hex, rgba, hsla or color keywords)
  end: "#111" # 结束颜色 (hex, rgba, hsla or color keywords)
  amount: 200 # 标签最大数量

# 谷歌日历
calendar:
  calendar_id: # [email protected]
  api_key: # bGl1emhncTE5OTVAZ21haWwuY29t
  orderBy: startTime
  offsetMax: 24 # Time Range
  offsetMin: 4 # Time Range
  showDeleted: false
  singleEvents: true
  maxResults: 250
自定义「logo,代码块,阅读进度条,书签」等
编辑 主题配置文件 _config.yml(复制到next.yml,方法2)
# ---------------------------------------------------------------
# 杂项布局设置
# ---------------------------------------------------------------

# 设置文章/页面的文本对齐方式.
text_align:
  # 取值: start | end | left | right | center | justify | justify-all | match-parent
  desktop: justify
  mobile: justify

# 缩小设备上的padding / margin缩进.
mobile_layout_economy: false

# Android Chrome header panel color ($brand-bg / $headband-bg => $black-deep).
android_chrome_color: "#222"

# 自定义Logo (不支持 scheme Mist)
custom_logo: /uploads/custom-logo.jpg

codeblock:
  # 代码高亮主题
  # 取值范围: normal | night | night eighties | night blue | night bright | solarized | solarized dark | galactic
  highlight_theme: normal
  # 代码块复制按钮
  copy_button:
    enable: true
    # 显示文本复制结果.
    show_result: true
    # 取值: default | flat | mac
    style: mac

back2top:
  enable: true
  # 在侧边栏显示返回顶部.
  sidebar: false
  # 返回顶部箭头显示百分比.
  scrollpercent: true

# 阅读进度条
reading_progress:
  enable: true
  # 取值: top | bottom
  position: top
  color: "#FD6C6C"
  height: 3px

# 书签支持
bookmark:
  enable: true
  # 自定义书签的颜色.
  color: "#64CEAA"
  # If auto, 关闭页面或单击书签图标时保存阅读进度.
  # If manual, 只需点击书签图标来保存.
  save: auto

# GitHub corner.
github_banner:
  enable: true
  permalink: https://github.com/Liuzh25
  title: 欢迎访问我的GitHub主页
设置「字符间空格,图片缩放」
编辑 主题配置文件 _config.yml(复制到next.yml,方法2)
# ---------------------------------------------------------------
# 第三方插件和服务设置
# ---------------------------------------------------------------

# 盘古支持,自动在中文和英文、数字、符号之间添加空格.
# For more information: https://github.com/vinta/pangu.js
pangu: true

# 图片缩放.
# For more information: https://github.com/francoischalifour/medium-zoom
mediumzoom: true

# 懒加载图像.
# For more information: https://github.com/ApoorvSaxena/lozad.js
lazyload: true

# 快速加载页面.
# Dependencies: https://github.com/theme-next/theme-next-pjax
pjax: true
添加「评论」
多评论支持在设置多个评论系统为true时启动
不推荐gittalk评论系统,仅说下如何设置
github设置内开发人员设置OAuth Apps
Application name: 应用名称,随意 Homepage URL: 网站URL,对应自己博客地址 Application description :描述,随意 Authorization callback URL:# 网站URL,博客地址就好 点击注册,页面会出现其中Client ID和Client Secret在后面的配置中需要用到,到时复制粘贴即可:
编辑 主题配置文件 _config.yml(复制到next.yml,方法2)
# ---------------------------------------------------------------
# 评论设置
# ---------------------------------------------------------------

# 多评论系统支持
comments:
  # 取值: tabs | buttons
  style: tabs
  # 选择默认显示的评论系统.
  # 取值: changyan | disqus | disqusjs | gitalk | livere | valine
  active: gitalk
  # If true, 记住访客选择的评论系统.
  storage: true
  # 懒加载所有评论系统.
  lazyload: true
  # 修改文本或命令的任何navs.
  nav:
    #disqus:
    #  text: Load Disqus
    #  order: -1
    #gitalk:
    #  order: -2

# 畅言
changyan:
  enable: false
  appid: cyvs0PiIk
  appkey: a868a79f4480491e7870339ebcbcd8b7
  #post_meta_order: 0

# Valine
# For more information: https://valine.js.org, https://github.com/xCss/Valine
valine:
  enable: false
  appid: S0ExOBWoQQYlRlqOT9dAhkTP-gzGzoHsz
  appkey: 7EKLluWPKYoO83sAWtUnwu0H
  notify: false # 邮件通知
  verify: false # 验证码
  placeholder: Just go go # 评论框占位符
  avatar: mm # 个人风格
  guest_info: nick,mail,link # Custom comment header
  pageSize: 10 # Pagination size
  language: # Language, available values: en, zh-cn
  visitor: true # 文章阅读统计
  comment_count: true # If false, 评论计数将只显示在发布页面,而不是主页
  recordIP: true # 是否记录评论者IP
  serverURLs: # When the custom domain name is enabled, fill it in here (it will be detected automatically by default, no need to fill in)
  #post_meta_order: 0

# Gitalk评论系统
# For more information: https://gitalk.github.io, https://github.com/gitalk/gitalk
gitalk:
  enable: true
  github_id: Liuzh25 # GitHub用户名
  repo: Liuzh25.github.io # 仓库名
  client_id: 415feb380f28706a3d9e # GitHub Application Client ID
  client_secret: 8e23474fec2292126310cebde51d90df21869e9e # GitHub Application Client Secret
  admin_user: Liuzh25 # GitHub的回购所有者和合作者,只有这些人可以初始化GitHub问题
  distraction_free_mode: true # 专注模式
  # Gitalk的显示语言取决于用户的浏览器或系统环境
  # 如果你想让每个访问你网站的人都看到统一的语言,你可以设置一个强制语言值
  # 取值: en | es-ES | fr | ru | zh-CN | zh-TW
  language: zh-CN
参考:
-
GitTalk评论配置_Madridcrls7的博客-CSDN博客
设置「百度统计分析」
-
登录 百度统计,以站长身份注册,进入管理-代码管理-代码获取页面
-
复制 hm.js? 后面那串统计脚本 id.
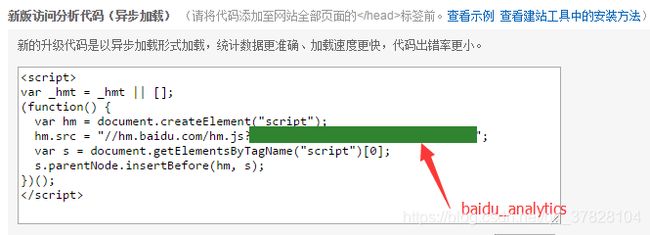
编辑 主题配置文件 _config.yml(复制到next.yml,方法2)
# ---------------------------------------------------------------
# 统计和分析
# ---------------------------------------------------------------

# Baidu Analytics
baidu_analytics: 2f80625c255f4d995edcdcf2ad0a5201
参考:
-
百度统计——领先的中文网站分析平台 (baidu.com)
添加「本地搜索」
编辑 主题配置文件 _config.yml(复制到next.yml,方法2)
# ---------------------------------------------------------------
# 搜索服务
# ---------------------------------------------------------------

# 本地搜索
local_search:
  enable: true
  # If auto, 则通过更改输入触发搜索.
  # If manual, 按下输入键或搜索按钮触发搜索.
  trigger: auto
  # 每篇文章显示前n个结果,设置为-1显示所有结果
  top_n_per_article: 1
  # 将html字符串转换为可读字符串.
  unescape: false
  # P在页面加载时预加载搜索数据.
  preload: false
设置「动画」
设置顶部加载动画
git clone https://github.com/theme-next/theme-next-pace source/lib/pace设置背景动画
git clone https://github.com/theme-next/theme-next-three source/lib/three编辑 主题配置文件 _config.yml(复制到next.yml,方法2)
# ---------------------------------------------------------------
# 动画设置
# ---------------------------------------------------------------

# Progress bar in the top during page loading.
# Dependencies: https://github.com/theme-next/theme-next-pace
# For more information: https://github.com/HubSpot/pace
pace:
  enable: true
  # Themes list:
  # big-counter | bounce | barber-shop | center-atom | center-circle | center-radar | center-simple
  # corner-indicator | fill-left | flat-top | flash | loading-bar | mac-osx | material | minimal
  theme: bounce

# JavaScript 3D library.
# Dependencies: https://github.com/theme-next/theme-next-three
three:
  enable: false
  three_waves: true
  canvas_lines: false
  canvas_sphere: false
博客配置进阶
添加「页面」
-
新建页面
在Hexo 站点目录下。使用
hexo new page新建一个页面,命名,例如hexo new page link -
设置页面类型
在index.md中添加一行type,例如
--- title: link date: 2021-04-27 09:57:29 type: "link" comments: false --- -
修改菜单项
编辑 主题配置文件 _config.yml,在菜单中添加链接.(复制到
next.yml,方法2) -
为
categories,archives,tags,about,commonweal等菜单添加页面
设置「腾讯公益404页面」
腾讯公益404页面,寻找丢失儿童,让大家一起关注此项公益事业!
新建 404.html 页面,放到 /myblog/source 目录下,内容如下:
404
实现「鼠标点击效果」和添加「鼠标跟随粒子特效」
编辑 主题配置文件 _config.yml,添加动态配置项,并取消 body-end.swig 的注释(复制到next.yml,方法2)
我将其放在了动画效果下面
# 鼠标点击效果
cursor_effect:
  enabled: true
  type: fireworks  # fireworks:礼花 | explosion:爆炸 | love:浮出爱心 | text:浮出文字
fairyDustCursor: true # 鼠标跟随粒子特效新建body-end.swig ,添加如下代码:
{# 鼠标点击特效 #}
{% if theme.cursor_effect.enabled and not is_index %}
  {% if theme.cursor_effect.fairyDustCursor %}

  {% endif %}
  {% if theme.cursor_effect.type == "fireworks" %}

  {% elseif theme.cursor_effect.type == "explosion" %}


  {% elseif theme.cursor_effect.type == "love" %}

  {% elseif theme.cursor_effect.type == "text" %}

  {% endif %}
{% endif %}
将以下5个 JS 文件复制到目录 /myblog/source/js/cursor/下
fireworks.js
示例代码
class Circle {
  constructor({ origin, speed, color, angle, context }) {
    this.origin = origin
    this.position = { ...this.origin }
    this.color = color
    this.speed = speed
    this.angle = angle
    this.context = context
    this.renderCount = 0
  }

  draw() {
    this.context.fillStyle = this.color
    this.context.beginPath()
    this.context.arc(this.position.x, this.position.y, 2, 0, Math.PI * 2)
    this.context.fill()
  }

  move() {
    this.position.x = (Math.sin(this.angle) * this.speed) + this.position.x
    this.position.y = (Math.cos(this.angle) * this.speed) + this.position.y + (this.renderCount * 0.3)
    this.renderCount++
  }
}

class Boom {
  constructor ({ origin, context, circleCount = 16, area }) {
    this.origin = origin
    this.context = context
    this.circleCount = circleCount
    this.area = area
    this.stop = false
    this.circles = []
  }

  randomArray(range) {
    const length = range.length
    const randomIndex = Math.floor(length * Math.random())
    return range[randomIndex]
  }

  randomColor() {
    const range = ['8', '9', 'A', 'B', 'C', 'D', 'E', 'F']
    return '#' + this.randomArray(range) + this.randomArray(range) + this.randomArray(range) + this.randomArray(range) + this.randomArray(range) + this.randomArray(range)
  }

  randomRange(start, end) {
    return (end - start) * Math.random() + start
  }

  init() {
    for(let i = 0; i < this.circleCount; i++) {
      const circle = new Circle({
        context: this.context,
        origin: this.origin,
        color: this.randomColor(),
        angle: this.randomRange(Math.PI - 1, Math.PI + 1),
        speed: this.randomRange(1, 6)
      })
      this.circles.push(circle)
    }
  }

  move() {
    this.circles.forEach((circle, index) => {
      if (circle.position.x > this.area.width || circle.position.y > this.area.height) {
        return this.circles.splice(index, 1)
      }
      circle.move()
    })
    if (this.circles.length == 0) {
      this.stop = true
    }
  }

  draw() {
    this.circles.forEach(circle => circle.draw())
  }
}

class CursorSpecialEffects {
  constructor() {
    this.computerCanvas = document.createElement('canvas')
    this.renderCanvas = document.createElement('canvas')

    this.computerContext = this.computerCanvas.getContext('2d')
    this.renderContext = this.renderCanvas.getContext('2d')

    this.globalWidth = window.innerWidth
    this.globalHeight = window.innerHeight

    this.booms = []
    this.running = false
  }

  handleMouseDown(e) {
    const boom = new Boom({
      origin: { x: e.clientX, y: e.clientY },
      context: this.computerContext,
      area: {
        width: this.globalWidth,
        height: this.globalHeight
      }
    })
    boom.init()
    this.booms.push(boom)
    this.running || this.run()
  }

  handlePageHide() {
    this.booms = []
    this.running = false
  }

  init() {
    const style = this.renderCanvas.style
    style.position = 'fixed'
    style.top = style.left = 0
    style.zIndex = '999999999999999999999999999999999999999999'
    style.pointerEvents = 'none'

    style.width = this.renderCanvas.width = this.computerCanvas.width = this.globalWidth
    style.height = this.renderCanvas.height = this.computerCanvas.height = this.globalHeight

    document.body.append(this.renderCanvas)

    window.addEventListener('mousedown', this.handleMouseDown.bind(this))
    window.addEventListener('pagehide', this.handlePageHide.bind(this))
  }

  run() {
    this.running = true
    if (this.booms.length == 0) {
      return this.running = false
    }

    requestAnimationFrame(this.run.bind(this))

    this.computerContext.clearRect(0, 0, this.globalWidth, this.globalHeight)
    this.renderContext.clearRect(0, 0, this.globalWidth, this.globalHeight)

    this.booms.forEach((boom, index) => {
      if (boom.stop) {
        return this.booms.splice(index, 1)
      }
      boom.move()
      boom.draw()
    })
    this.renderContext.drawImage(this.computerCanvas, 0, 0, this.globalWidth, this.globalHeight)
  }
}

const cursorSpecialEffects = new CursorSpecialEffects()
cursorSpecialEffects.init()
explosion.min.js
示例代码
"use strict";function updateCoords(e){pointerX=(e.clientX||e.touches[0].clientX)-canvasEl.getBoundingClientRect().left,pointerY=e.clientY||e.touches[0].clientY-canvasEl.getBoundingClientRect().top}function setParticuleDirection(e){var t=anime.random(0,360)*Math.PI/180,a=anime.random(50,180),n=[-1,1][anime.random(0,1)]*a;return{x:e.x+n*Math.cos(t),y:e.y+n*Math.sin(t)}}function createParticule(e,t){var a={};return a.x=e,a.y=t,a.color=colors[anime.random(0,colors.length-1)],a.radius=anime.random(16,32),a.endPos=setParticuleDirection(a),a.draw=function(){ctx.beginPath(),ctx.arc(a.x,a.y,a.radius,0,2*Math.PI,!0),ctx.fillStyle=a.color,ctx.fill()},a}function createCircle(e,t){var a={};return a.x=e,a.y=t,a.color="#F00",a.radius=0.1,a.alpha=0.5,a.lineWidth=6,a.draw=function(){ctx.globalAlpha=a.alpha,ctx.beginPath(),ctx.arc(a.x,a.y,a.radius,0,2*Math.PI,!0),ctx.lineWidth=a.lineWidth,ctx.strokeStyle=a.color,ctx.stroke(),ctx.globalAlpha=1},a}function renderParticule(e){for(var t=0;t
love.min.js
示例代码
!function(e,t,a){function n(){c(".heart{width: 10px;height: 10px;position: fixed;background: #f00;transform: rotate(45deg);-webkit-transform: rotate(45deg);-moz-transform: rotate(45deg);}.heart:after,.heart:before{content: '';width: inherit;height: inherit;background: inherit;border-radius: 50%;-webkit-border-radius: 50%;-moz-border-radius: 50%;position: fixed;}.heart:after{top: -5px;}.heart:before{left: -5px;}"),o(),r()}function r(){for(var e=0;e
text.js
示例代码
var a_idx = 0;
jQuery(document).ready(function($) {
  $("body").click(function(e) {
    var a = new Array("富强", "民主", "文明", "和谐", "自由", "平等", "公正" ,"法治", "爱国", "敬业", "诚信", "友善");
    var $i = $("").text(a[a_idx]);
    var x = e.pageX,
      y = e.pageY;
    $i.css({
      "z-index": 99999,
      "top": y - 28,
      "left": x - a[a_idx].length * 8,
      "position": "absolute",
      "color": "#ff7a45"
    });
    $("body").append($i);
    $i.animate({
      "top": y - 180,
      "opacity": 0
    }, 1500, function() {
      $i.remove();
    });
    a_idx = (a_idx + 1) % a.length;
  });
});
fairyDustCursor.js
示例代码
/*!
 * Fairy Dust Cursor.js
 * - 90's cursors collection
 * -- https://github.com/tholman/90s-cursor-effects
 * -- http://codepen.io/tholman/full/jWmZxZ/
 */

(function fairyDustCursor() {

  var possibleColors = ["#D61C59", "#E7D84B", "#1B8798"]
  var width = window.innerWidth;
  var height = window.innerHeight;
  var cursor = {x: width/2, y: width/2};
  var particles = [];

  function init() {
    bindEvents();
    loop();
  }

  // Bind events that are needed
  function bindEvents() {
    document.addEventListener('mousemove', onMouseMove);
    document.addEventListener('touchmove', onTouchMove);
    document.addEventListener('touchstart', onTouchMove);

    window.addEventListener('resize', onWindowResize);
  }

  function onWindowResize(e) {
    width = window.innerWidth;
    height = window.innerHeight;
  }

  function onTouchMove(e) {
    if( e.touches.length > 0 ) {
      for( var i = 0; i < e.touches.length; i++ ) {
        addParticle( e.touches[i].clientX, e.touches[i].clientY, possibleColors[Math.floor(Math.random()*possibleColors.length)]);
      }
    }
  }

  function onMouseMove(e) {
    cursor.x = e.clientX;
    cursor.y = e.clientY;

    addParticle( cursor.x, cursor.y, possibleColors[Math.floor(Math.random()*possibleColors.length)]);
  }

  function addParticle(x, y, color) {
    var particle = new Particle();
    particle.init(x, y, color);
    particles.push(particle);
  }

  function updateParticles() {

    // Updated
    for( var i = 0; i < particles.length; i++ ) {
      particles[i].update();
    }

    // Remove dead particles
    for( var i = particles.length -1; i >= 0; i-- ) {
      if( particles[i].lifeSpan < 0 ) {
        particles[i].die();
        particles.splice(i, 1);
      }
    }

  }

  function loop() {
    requestAnimationFrame(loop);
    updateParticles();
  }

  /**
   * Particles
   */

  function Particle() {

    this.character = "*";
    this.lifeSpan = 120; //ms
    this.initialStyles ={
      "position": "fixed",
      "top": "0", //必须加
      "display": "block",
      "pointerEvents": "none",
      "z-index": "10000000",
      "fontSize": "20px",
      "will-change": "transform"
    };

    // Init, and set properties
    this.init = function(x, y, color) {

      this.velocity = {
        x:  (Math.random() < 0.5 ? -1 : 1) * (Math.random() / 2),
        y: 1
      };

      this.position = {x: x - 10, y: y - 20};
      this.initialStyles.color = color;
      console.log(color);

      this.element = document.createElement('span');
      this.element.innerHTML = this.character;
      applyProperties(this.element, this.initialStyles);
      this.update();

      document.body.appendChild(this.element);
    };

    this.update = function() {
      this.position.x += this.velocity.x;
      this.position.y += this.velocity.y;
      this.lifeSpan--;

      this.element.style.transform = "translate3d(" + this.position.x + "px," + this.position.y + "px,0) scale(" + (this.lifeSpan / 120) + ")";
    }

    this.die = function() {
      this.element.parentNode.removeChild(this.element);
    }

  }

  /**
   * Utils
   */

  // Applies css `properties` to an element.
  function applyProperties( target, properties ) {
    for( var key in properties ) {
      target.style[ key ] = properties[ key ];
    }
  }

  init();
})();
若http://localhost:4000/无效果,关闭本地预览, hexo clean ,hexo s.
参考:
-
给Hexo(next主题)博客加上stackexchange愚人节鼠标跟随特效
-
Hexo博客+Next主题鼠标点击特效
修改「文章内链接文本样式」
编辑/myblog/source/_data/styles.styl,添加
// 文章内链接文本样式
if hexo-config("post_body_a.enable")
  .post-body
    a{
      color: convert(hexo-config("post_body_a.normal_color"));
      border-bottom: none;
      &:hover {
        color: convert(hexo-config("post_body_a.hover_color"));
        text-decoration: underline;
		}
    }
编辑 主题配置文件 _config.yml,添加动态配置项(复制到next.yml,方法2)
# 文章内链接文本样式
post_body_a:
  enable: true
  normal_color: "#0593d3"
  hover_color: "#0477ab"
参考:
-
修改文章内链接样式 | hexo_好好编程的博客-CSDN博客
修改「小代码块自定义样式」
编辑/myblog/source/_data/styles.styl,添加.
// 小代码块的自定义样式
code {
    color: #ff7600;
    background: #fbf7f8;
    margin: 2px;
}
.highlight, code {
    border: 1px solid #d6d6d6;
}
添加「文章加密访问」
编辑 主题配置文件 _config.yml,取消 head.swig 的注释(复制到next.yml,方法2)
新建head.swig文件,填入下列代码
在文章标题添加password,如下
title: Hexo 搭配 GitHub 建立博客, 选用 nexT 主题
date: 2021-04-26 19:21:20
categories:
- [兴趣, 网站, 博客]
tags:
- Hexo
- Git
password: 123
设置「文章置顶」
修改 hero-generator-index 插件,把文件:node_modules/hexo-generator-index/lib/generator.js 内的代码替换为:
'use strict';
var pagination = require('hexo-pagination');
module.exports = function(locals){
  var config = this.config;
  var posts = locals.posts;
    posts.data = posts.data.sort(function(a, b) {
        if(a.top && b.top) { // 两篇文章top都有定义
            if(a.top == b.top) return b.date - a.date; // 若top值一样则按照文章日期降序排
            else return b.top - a.top; // 否则按照top值降序排
        }
        else if(a.top && !b.top) { // 以下是只有一篇文章top有定义,那么将有top的排在前面(这里用异或操作居然不行233)
            return -1;
        }
        else if(!a.top && b.top) {
            return 1;
        }
        else return b.date - a.date; // 都没定义按照文章日期降序排
    });
  var paginationDir = config.pagination_dir || 'page';
  return pagination('', posts, {
    perPage: config.index_generator.per_page,
    layout: ['index', 'archive'],
    format: paginationDir + '/%d/',
    data: {
      __index: true
    }
  });
};在文章标题添加top,如下
title: Hexo 搭配 GitHub 建立博客, 选用 nexT 主题
date: 2021-04-26 19:21:20
categories:
- [兴趣, 网站, 博客]
tags:
- Hexo
- Git
password:
top: 100
添加「侧栏已运行时间」
编辑 主题配置文件 _config.yml,取消 sidebar.swig 的注释(复制到next.yml,方法2)
新建sidebar.swig文件,填入下列代码
在_data/styles.styl中添加
// 自定义的侧栏时间样式
#days {
    display: block;
    color: #19caad;
    font-size: 14px;
    margin-left: 15px;
}最后,修改BirthDay=new Date("01/10/2017 12:34:56");, color: #fffa74;, margin-top: 15px;等等
添加「萌萌的宠物」
在git bash输入
npm install -save hexo-helper-live2d在 hexo 的 _config.yml中添加参数(必须是站点配置文件)
live2d:
  enable: true
  scriptFrom: local
  pluginRootPath: live2dw/
  pluginJsPath: lib/
  pluginModelPath: assets/
  model:
    use: live2d-widget-model-wanko
  display:
    position: right
    width: 150
    height: 300
  mobile:
    show: true
添加「“本文结束”标记」
编辑 主题配置文件 _config.yml,添加动态配置项,并取消 post-body-end.swig 的注释(复制到next.yml,方法2)
# 文章末尾添加“本文结束”标记
passage_end_tag:
enabled: true新建post-body-end.swig文件,填入下列代码
    {% if theme.passage_end_tag.enabled and not is_index %}
        -------------本文结束感谢您的阅读-------------
    {% endif %}
添加「APlayer音乐播放器」
download
点击访问Aplayer源码:GitHub Aplayer。下载到本地,解压后将dist文件夹复制到/mybolg/source文件夹下并重命名为aplayer。
music.js
新建/mybolg/source/dist/music.js文件,添加内容:
const ap = new APlayer({
    container: document.getElementById('aplayer'),
    listFolded: false,
    listMaxHeight: 90,
    lrcType: 3,
    audio: [
      {
        name: "暗涌",
        artist: '王菲',
        url: 'http://www.ytmp3.cn/down/52980.mp3',
        cover: 'http://p1.music.126.net/w8RFsMH8VJfPsBmVudYGsA==/109951163020569833.jpg?param=130y130',
		lrc: 'lrc.lrc'
      },
      {
        name: 'Wonderful U',
        artist: 'AGA',
        url: 'http://www.ytmp3.cn/down/51181.mp3',
        cover: 'http://p1.music.126.net/Blb_Gi0AJTWIEBLr189F4A==/18791753232142320.jpg?param=130y130',
      },
      {
        name: '浮夸',
        artist: '陈奕迅',
        url: 'http://www.ytmp3.cn/down/49639.mp3',
        cover: 'http://p1.music.126.net/Bl1hEdJbMSj5YJsTqUjr-w==/109951163520311175.jpg?param=130y130',
      }
    ]
});
源码参数解释APlayer 中文文档
audio对应的便是音频文件,所以音乐播放器需要播放的音乐是需要自己进行相关信息(如歌曲链接、歌词、封面等)的配置。这里放一个mp3音乐外链网站:http://up.mcyt.net/ ,搜索对应的音乐,然后复制url和右击封面图片链接粘贴到对应的位置上就行了。
编辑body-end.swig,将下列代码填入
参考:
-
hexo4.0 - Next7.2.4 主题优化配置_xiaohu的博客-CSDN博客
-
APlayer 中文文档
引用jquery
发现动态标签页没法使用了,查了一下,需要引用jquery.
编辑body-end.swig,在首行添加代码
{# 引用JQ #}
动态标签页
新建/myblog/source/js/src/dytitle.js,填入下列代码
var OriginTitile = document.title;
var titleTime;
document.addEventListener('visibilitychange', function () {
    if (document.hidden) {
        $('[rel="shortcut icon"]').attr('href', "/TEP.png");
        document.title = '程序已暂停';
        clearTimeout(titleTime);
    }
    else {
        $('[rel="shortcut icon"]').attr('href', "/favicon.png");
        document.title = '程序运行中 ' + OriginTitile;
        titleTime = setTimeout(function () {
            document.title = OriginTitile;
        }, 2000);
    }
});编辑body-end.swig,追加代码
雪花特效
编辑 主题配置文件 _config.yml,添加动态配置项(复制到next.yml,方法2)
# 雪花飘落特效
snow:
  enabled: true
  #type: hexo
  #type: circle
type: sakura编辑body-end.swig,添加代码
{% if theme.snow.enabled and not is_index %}
{% if theme.snow.type == "hexo" %}
{% elseif theme.snow.type == "circle" %}}
{% elseif theme.snow.type == "sakura" %}}
{% endif %}编辑 主题配置文件 _config.yml,添加动态配置项(复制到next.yml,方法2)
#心知天气
weather_widget:
  enabled: true
参考:
-
站点配置更新 | Don Lex
-
心知天气
打字特效
编辑 主题配置文件 _config.yml,添加动态配置项(复制到next.yml,方法2)
# 打字特效
typing_effect:
  enabled: true
  colorful: true  # 礼花特效
shake: true # 震动特效编辑body-end.swig ,添加如下代码:
{% if theme.typing_effect.enabled and not is_index %}
{% endif %}新建/myblog/source/js/src/activate-power-mode.min.js,添加下列代码
示例代码
(function webpackUniversalModuleDefinition(root, factory) {
	if(typeof exports === 'object' && typeof module === 'object')
		module.exports = factory();
	else if(typeof define === 'function' && define.amd)
		define([], factory);
	else if(typeof exports === 'object')
		exports["POWERMODE"] = factory();
	else
		root["POWERMODE"] = factory();
})(this, function() {
return /******/ (function(modules) { // webpackBootstrap
/******/ 	// The module cache
/******/ 	var installedModules = {};

/******/ 	// The require function
/******/ 	function __webpack_require__(moduleId) {

/******/ 		// Check if module is in cache
/******/ 		if(installedModules[moduleId])
/******/ 			return installedModules[moduleId].exports;

/******/ 		// Create a new module (and put it into the cache)
/******/ 		var module = installedModules[moduleId] = {
/******/ 			exports: {},
/******/ 			id: moduleId,
/******/ 			loaded: false
/******/ 		};

/******/ 		// Execute the module function
/******/ 		modules[moduleId].call(module.exports, module, module.exports, __webpack_require__);

/******/ 		// Flag the module as loaded
/******/ 		module.loaded = true;

/******/ 		// Return the exports of the module
/******/ 		return module.exports;
/******/ 	}


/******/ 	// expose the modules object (__webpack_modules__)
/******/ 	__webpack_require__.m = modules;

/******/ 	// expose the module cache
/******/ 	__webpack_require__.c = installedModules;

/******/ 	// __webpack_public_path__
/******/ 	__webpack_require__.p = "";

/******/ 	// Load entry module and return exports
/******/ 	return __webpack_require__(0);
/******/ })
/************************************************************************/
/******/ ([
/* 0 */
/***/ (function(module, exports, __webpack_require__) {

	'use strict';

	var canvas = document.createElement('canvas');
	canvas.width = window.innerWidth;
	canvas.height = window.innerHeight;
	canvas.style.cssText = 'position:fixed;top:0;left:0;pointer-events:none;z-index:999999';
	window.addEventListener('resize', function () {
	    canvas.width = window.innerWidth;
	    canvas.height = window.innerHeight;
	});
	document.body.appendChild(canvas);
	var context = canvas.getContext('2d');
	var particles = [];
	var particlePointer = 0;
	var rendering = false;

	POWERMODE.shake = true;

	function getRandom(min, max) {
	    return Math.random() * (max - min) + min;
	}

	function getColor(el) {
	    if (POWERMODE.colorful) {
	        var u = getRandom(0, 360);
	        return 'hsla(' + getRandom(u - 10, u + 10) + ', 100%, ' + getRandom(50, 80) + '%, ' + 1 + ')';
	    } else {
	        return window.getComputedStyle(el).color;
	    }
	}

	function getCaret() {
	    var el = document.activeElement;
	    var bcr;
	    if (el.tagName === 'TEXTAREA' ||
	        (el.tagName === 'INPUT' && el.getAttribute('type') === 'text')) {
	        var offset = __webpack_require__(1)(el, el.selectionEnd);
	        bcr = el.getBoundingClientRect();
	        return {
	            x: offset.left + bcr.left,
	            y: offset.top + bcr.top,
	            color: getColor(el)
	        };
	    }
	    var selection = window.getSelection();
	    if (selection.rangeCount) {
	        var range = selection.getRangeAt(0);
	        var startNode = range.startContainer;
	        if (startNode.nodeType === document.TEXT_NODE) {
	            startNode = startNode.parentNode;
	        }
	        bcr = range.getBoundingClientRect();
	        return {
	            x: bcr.left,
	            y: bcr.top,
	            color: getColor(startNode)
	        };
	    }
	    return { x: 0, y: 0, color: 'transparent' };
	}

	function createParticle(x, y, color) {
	    return {
	        x: x,
	        y: y,
	        alpha: 1,
	        color: color,
	        velocity: {
	            x: -1 + Math.random() * 2,
	            y: -3.5 + Math.random() * 2
	        }
	    };
	}

	function POWERMODE() {
	    { // spawn particles
	        var caret = getCaret();
	        var numParticles = 5 + Math.round(Math.random() * 10);
	        while (numParticles--) {
	            particles[particlePointer] = createParticle(caret.x, caret.y, caret.color);
	            particlePointer = (particlePointer + 1) % 500;
	        }
	    }
	    { // shake screen
	        if (POWERMODE.shake) {
	            var intensity = 1 + 2 * Math.random();
	            var x = intensity * (Math.random() > 0.5 ? -1 : 1);
	            var y = intensity * (Math.random() > 0.5 ? -1 : 1);
	            document.body.style.marginLeft = x + 'px';
	            document.body.style.marginTop = y + 'px';
	            setTimeout(function() {
	                document.body.style.marginLeft = '';
	                document.body.style.marginTop = '';
	            }, 75);
	        }
	    }
	    if(!rendering){
	        requestAnimationFrame(loop);
	    }
	};
	POWERMODE.colorful = false;

	function loop() {
	    rendering = true;
	    context.clearRect(0, 0, canvas.width, canvas.height);
	    var rendered = false;
	    var rect = canvas.getBoundingClientRect();
	    for (var i = 0; i < particles.length; ++i) {
	        var particle = particles[i];
	        if (particle.alpha <= 0.1) continue;
	        particle.velocity.y += 0.075;
	        particle.x += particle.velocity.x;
	        particle.y += particle.velocity.y;
	        particle.alpha *= 0.96;
	        context.globalAlpha = particle.alpha;
	        context.fillStyle = particle.color;
	        context.fillRect(
	            Math.round(particle.x - 1.5) - rect.left,
	            Math.round(particle.y - 1.5) - rect.top,
	            3, 3
	        );
	        rendered = true;
	    }
	    if(rendered){
	        requestAnimationFrame(loop);
	    }else{
	        rendering = false;
	    }
	}

	module.exports = POWERMODE;


/***/ }),
/* 1 */
/***/ (function(module, exports) {

	/* jshint browser: true */

	(function () {

	// The properties that we copy into a mirrored div.
	// Note that some browsers, such as Firefox,
	// do not concatenate properties, i.e. padding-top, bottom etc. -> padding,
	// so we have to do every single property specifically.
	var properties = [
	  'direction',  // RTL support
	  'boxSizing',
	  'width',  // on Chrome and IE, exclude the scrollbar, so the mirror div wraps exactly as the textarea does
	  'height',
	  'overflowX',
	  'overflowY',  // copy the scrollbar for IE

	  'borderTopWidth',
	  'borderRightWidth',
	  'borderBottomWidth',
	  'borderLeftWidth',
	  'borderStyle',

	  'paddingTop',
	  'paddingRight',
	  'paddingBottom',
	  'paddingLeft',

	  // https://developer.mozilla.org/en-US/docs/Web/CSS/font
	  'fontStyle',
	  'fontVariant',
	  'fontWeight',
	  'fontStretch',
	  'fontSize',
	  'fontSizeAdjust',
	  'lineHeight',
	  'fontFamily',

	  'textAlign',
	  'textTransform',
	  'textIndent',
	  'textDecoration',  // might not make a difference, but better be safe

	  'letterSpacing',
	  'wordSpacing',

	  'tabSize',
	  'MozTabSize'

	];

	var isFirefox = window.mozInnerScreenX != null;

	function getCaretCoordinates(element, position, options) {

	  var debug = options && options.debug || false;
	  if (debug) {
	    var el = document.querySelector('#input-textarea-caret-position-mirror-div');
	    if ( el ) { el.parentNode.removeChild(el); }
	  }

	  // mirrored div
	  var div = document.createElement('div');
	  div.id = 'input-textarea-caret-position-mirror-div';
	  document.body.appendChild(div);

	  var style = div.style;
	  var computed = window.getComputedStyle? getComputedStyle(element) : element.currentStyle;  // currentStyle for IE < 9

	  // default textarea styles
	  style.whiteSpace = 'pre-wrap';
	  if (element.nodeName !== 'INPUT')
	    style.wordWrap = 'break-word';  // only for textarea-s

	  // position off-screen
	  style.position = 'absolute';  // required to return coordinates properly
	  if (!debug)
	    style.visibility = 'hidden';  // not 'display: none' because we want rendering

	  // transfer the element's properties to the div
	  properties.forEach(function (prop) {
	    style[prop] = computed[prop];
	  });

	  if (isFirefox) {
	    // Firefox lies about the overflow property for textareas: https://bugzilla.mozilla.org/show_bug.cgi?id=984275
	    if (element.scrollHeight > parseInt(computed.height))
	      style.overflowY = 'scroll';
	  } else {
	    style.overflow = 'hidden';  // for Chrome to not render a scrollbar; IE keeps overflowY = 'scroll'
	  }

	  div.textContent = element.value.substring(0, position);
	  // the second special handling for input type="text" vs textarea: spaces need to be replaced with non-breaking spaces - http://stackoverflow.com/a/13402035/1269037
	  if (element.nodeName === 'INPUT')
	    div.textContent = div.textContent.replace(/\s/g, "\u00a0");

	  var span = document.createElement('span');
	  // Wrapping must be replicated *exactly*, including when a long word gets
	  // onto the next line, with whitespace at the end of the line before (#7).
	  // The  *only* reliable way to do that is to copy the *entire* rest of the
	  // textarea's content into the  created at the caret position.
	  // for inputs, just '.' would be enough, but why bother?
	  span.textContent = element.value.substring(position) || '.';  // || because a completely empty faux span doesn't render at all
	  div.appendChild(span);

	  var coordinates = {
	    top: span.offsetTop + parseInt(computed['borderTopWidth']),
	    left: span.offsetLeft + parseInt(computed['borderLeftWidth'])
	  };

	  if (debug) {
	    span.style.backgroundColor = '#aaa';
	  } else {
	    document.body.removeChild(div);
	  }

	  return coordinates;
	}

	if (typeof module != "undefined" && typeof module.exports != "undefined") {
	  module.exports = getCaretCoordinates;
	} else {
	  window.getCaretCoordinates = getCaretCoordinates;
	}

	}());

/***/ })
/******/ ])
});
;
参考
-
activate-power-mode
新建文章后自动打开
新建/myblog/scripts文件夹,在文件夹里新建任意名称.js文件,填入下列代码
var spawn = require('child_process').exec;

// Hexo 3 用户复制这段
hexo.on('new', function(data){
  spawn('start  "D:\Typora\Typora.exe" ' + data.path);
});
参考
-
Hexo 添加文章时自动打开编辑器 | 苏寅 Blog (suyin-blog.club)
-
Open markdown file after running hexo new? · Issue #1007 · hexojs/hexo (github.com)
标签云
使用命令行进行安装
npm install hexo-tag-cloud@^2.0.* --save 编辑/_data/sidebar.swig,在合适的位置填入代码
{% if site.tags.length > 1 and theme.tag_cloud.enabled and not is_index %}
{% endif %}编辑 主题配置文件 _config.yml,添加动态配置项(复制到next.yml,方法2)
# 标签云
tag_cloud:
  enabled: true
  textFont: Trebuchet MS, Helvetica
  textColor: '#333'
  textHeight: 25
  outlineColor: '#E2E1D1'
  maxSpeed: 0.5
  pauseOnSelected: true # true 意味着当选中对应 tag 时,停止转动
参考
-
站点配置更新 | Don Lex
-
Hexo博客Next主题建立标签云hexo-tag-cloud及效果展示_AomanHao的博客-CSDN博客
-
hexo-tag-cloud中文文档
自动备份 Hexo 博客源文件
同样,在 Hexo 根目录的 scripts 文件夹下新建一个 js 文件,文件名随意取,,填入下列代码
require('shelljs/global');

try {
	hexo.on('deployAfter', function() {//当deploy完成后执行备份
		run();
	});
} catch (e) {
	console.log("产生了一个错误<( ̄3 ̄)> !,错误详情为:" + e.toString());
}

function run() {
	if (!which('git')) {
		echo('Sorry, this script requires git');
		exit(1);
	} else {
		echo("======================Auto Backup Begin===========================");
		cd('D:/Code/MyBlog');    //此处修改为Hexo根目录路径
		if (exec('git add --all').code !== 0) {
			echo('Error: Git add failed');
			exit(1);

		}
		if (exec('git commit -am "Form auto backup script\'s commit"').code !== 0) {
			echo('Error: Git commit failed');
			exit(1);

		}
		if (exec('git push origin source').code !== 0) {
			echo('Error: Git push failed');
			exit(1);

		}
		echo("==================Auto Backup Complete============================")
	}
}
注意,修改代码Hexo根目录路径与分支名
接着,在命令行输入,安装 shelljs 模块
npm install --save shelljs
关闭畅言统计
看着不爽
找到changyan.js,找到if post.comments,更改为if post.comments and theme.changyan.comment
随后编辑 主题配置文件 _config.yml(复制到next.yml,方法2)
# 畅言
changyan:
  enable: true
  appid: cyvs0PiIk
  appkey: a868a79f4480491e7870339ebcbcd8b7
  comment: false
  #post_meta_order: 0
其实不加也行
Tag Plugins
{% cq %}世间所有的相遇,都是久别重逢{% endcq %}
参考
-
Tag Plugins | Hexo
-
内置标签 - NexT 使用文档 (iissnan.com)
-
Hexo-NexT Tag 插件的使用 | 小丁的个人博客 (tding.top)
首字下沉
编辑style.styl,添加
// 首字下沉
.post-body>p:first-child::first-letter{
  float: left;
/* height: 32px;*/
  margin-top: 14px;
  margin-right: 6px;
  color: #555;
  font-size: 42px;
  line-height: 28px;
  font-style: normal;
  font-weight: 400;
  +mobile(){
    margin-top: 10px;
    margin-right: 4px;
    font-size: 26px;
    line-height: 20px;
  }
}
总结
-
/myblog/source文件
-
编辑themes/next/languages/zh-CN.yml
-
站点配置文件 _config.yml
-
编辑changyan.js
-
设置「文章置顶」
-
npm install hexo-symbols-count-time
-
npm install -save hexo-helper-live2d
参考
-
img 403的解决办法
-
又见苍岚
-
Hexo -13- 利用 Markdown 语法画 flowchart 流程图 | 又见苍岚 (zywvvd.com)
-
Hexo -10- 使用PicGo配合七牛云图床实现Markdown图像无痛管理 | 又见苍岚 (zywvvd.com)
-
Hexo-NexT 增加 canvas 粒子时钟 | 小丁的个人博客 (tding.top)
-
HTML5 Canvas实现会跳舞的时间动画 | HTML5资源教程 (html5tricks.com)
-
Hexo 加入豆瓣读书页面 | 小丁的个人博客 (tding.top)
-
Hexo-NexT 实现相册 | 小丁的个人博客 (tding.top)
-
Hexo NexT主题美化2.0 | Leaface (liaofuzhan.com)
-
hexo史上最全搭建教程Fangzh的技术博客-CSDN博客hexo
-
Archive | ookamiAntD's Blog (yangbingdong.com)
-
【搜索优化】Hexo-next百度和谷歌搜索优化 | Ehcoo
-
打造个性超赞博客 Hexo + NexT + GitHub Pages 的超深度优化 | reuixiy (io-oi.me)
-
Setting Up Image Storage | imgix Documentation
问题
-
无法更换天气位置
-
在文章标题下添加热门链接
-
侧栏的滚动条隐藏
-
长代码折叠
使用
	示例代码
	```python
	//这里是示例代码
	print("hello world")
	```
效果展示
示例代码
-
启用谷歌日历
-
无法更换音乐位置
-
无法隐藏歌词
-
为博客添加一个首页