2021.08.28-MMsegmentation0.16.0+Cuda10.1+Ubuntu16.04+Pytorch1.8环境安装
个人在目标检测方向的学习比较深入,但在深度学习的图像处理中,语义分割也是一个很重要的方向,所以也想一探究竟,熟悉一下基本流程和工作原理。
现打算在LINUX系统Ubuntu16.04上安装mmsegmentation框架,因为之前主要使用mmdetection框架做一些目标检测的工程和网络研究,对mmlab更熟悉一些,而且框架核心都要依赖mmcv,所以选择该框架。
目前已经安装好了mmsegmentation框架(通过测试),为了以后方便使用,现记录一下安装过程,因为第一次是完全按照官网提示安装的,没有通过测试,所以简要记录主要流程,具体细节可以结合官网安装文件查询:mmsegmentation/docs/get_started.md
需要安装的内容和要求:

我的命令行完整指令:
 conda create -n mmseg python=3.7

 conda activate mmseg

 #下面这条安装指令和官网不同,官网是还限定了pytorch的版本,我之前也是这么装,
 #但是后面有问题,就用经验方法,即如下命令行
 conda install pytorch torchvision cudatoolkit=10.1 -c pytorch

 pip install mmcv-full==1.3.7 -f https://download.openmmlab.com/mmcv/dist/cu10.1/torch1.8.1/index.html

 git clone https://github.com/open-mmlab/mmsegmentation.git

 cd mmsegmentation

 python setup.py develop

 python mmseg/utils/collect_env.py

如果上述指令顺利执行,则环境安装好了,具体不同根据个人系统选择cudatoolkit、mmcv-full版本
官网指令对比:
conda create -n open-mmlab python=3.7 -y
conda activate open-mmlab

conda install pytorch=1.6.0 torchvision cudatoolkit=10.1 -c pytorch
set PATH=full\path\to\your\cpp\compiler;%PATH%
pip install mmcv

git clone https://github.com/open-mmlab/mmsegmentation.git
cd mmsegmentation
pip install -e .  # or "python setup.py develop"

mklink /D data %DATA_ROOT%
根据官网步骤出现的安装问题:
我的系统配置和官网提示一致,所以可以直接输入指令安装,但是安装过程中还是出现了一点问题,主要如下,可稍加注意:
①:
conda install pytorch=1.6.0 torchvision cudatoolkit=10.1 -c pytorch
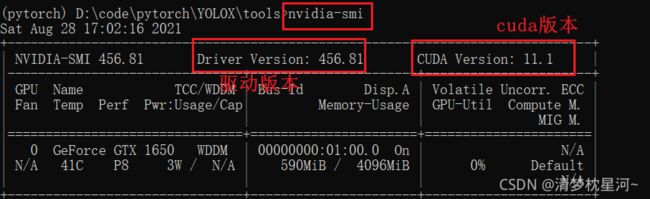
单独限定pytorch版本可能会出问题,根据cudatoolkit=10.1(你的cuda版本,nvidia-smi可查询,如下是我个人笔记本的,不是linux)来限定就好,最后只限定cuda版本,装的是pytorch1.8.1,有区别的。
我第一次按官网指示安装好环境后,运行环境代码报错如下:
undefined symbol: _ZN6caffe28TypeMeta21_typeMetaDataInstanceIN3c108BFloat16EEEPKNS_6deta
搜索原因是pytorch版本不匹配,所以我后面删除环境重新安装了一遍。
关于torch、torchvision和python的版本对应也有一定要求,网址:https://pypi.org/project/torchvision/#description

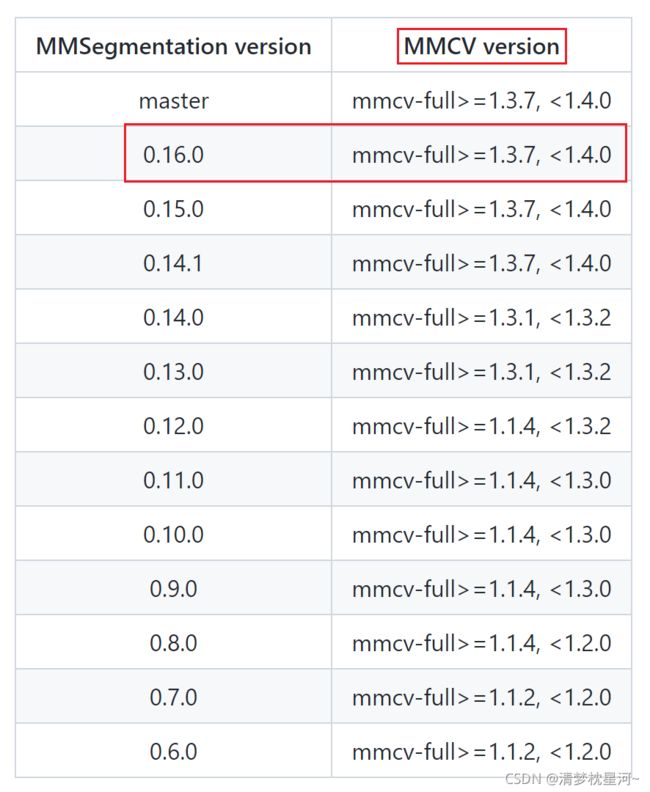
下面是安装MMCV的,没试下面官网的,按个人经验用的以前的指令,找到合适的mmcv版本加以限定就可以,我装的最新的0.16.0,mmcv版本至少1.3.7,在1.4.0以下
②:
pip install mmcv-full -f https://download.openmmlab.com/mmcv/dist/cu101/torch1.6.0/index.html
我根据经验直接限定了mmcv版本,不过估计上面的没什么问题
pip install mmcv-full==1.3.7 -f https://download.openmmlab.com/mmcv/dist/cu10.1/torch1.8.1/index.html
mmcv版本查询网址:https://github.com/open-mmlab/mmcv

我运行最后一条环境查询的指令结果如下:
(mmseg) root@k8s-deploy-wqssem-1624892297649-8599c8f79f-4x694:/nfs/private/mmsegmentation# python mmseg/utils/collect_env.py
sys.platform: linux
Python: 3.7.11 (default, Jul 27 2021, 14:32:16) [GCC 7.5.0]
CUDA available: True
GPU 0: TITAN Xp
CUDA_HOME: /usr/local/cuda
NVCC: Cuda compilation tools, release 10.0, V10.0.130
GCC: gcc (Ubuntu 5.4.0-6ubuntu1~16.04.12) 5.4.0 20160609
PyTorch: 1.8.1
PyTorch compiling details: PyTorch built with:
  - GCC 7.3
  - C++ Version: 201402
  - Intel(R) oneAPI Math Kernel Library Version 2021.3-Product Build 20210617 for Intel(R) 64 architecture applications
  - Intel(R) MKL-DNN v1.7.0 (Git Hash 7aed236906b1f7a05c0917e5257a1af05e9ff683)
  - OpenMP 201511 (a.k.a. OpenMP 4.5)
  - NNPACK is enabled
  - CPU capability usage: AVX2
  - CUDA Runtime 10.1
  - NVCC architecture flags: -gencode;arch=compute_37,code=sm_37;-gencode;arch=compute_50,code=sm_50;-gencode;arch=compute_60,code=sm_60;-gencode;arch=compute_61,code=sm_61;-gencode;arch=compute_70,code=sm_70;-gencode;arch=compute_75,code=sm_75;-gencode;arch=compute_37,code=compute_37
  - CuDNN 7.6.3
  - Magma 2.5.2
  - Build settings: BLAS_INFO=mkl, BUILD_TYPE=Release, CUDA_VERSION=10.1, CUDNN_VERSION=7.6.3, CXX_COMPILER=/opt/rh/devtoolset-7/root/usr/bin/c++, CXX_FLAGS= -Wno-deprecated -fvisibility-inlines-hidden -DUSE_PTHREADPOOL -fopenmp -DNDEBUG -DUSE_KINETO -DUSE_FBGEMM -DUSE_QNNPACK -DUSE_PYTORCH_QNNPACK -DUSE_XNNPACK -O2 -fPIC -Wno-narrowing -Wall -Wextra -Werror=return-type -Wno-missing-field-initializers -Wno-type-limits -Wno-array-bounds -Wno-unknown-pragmas -Wno-sign-compare -Wno-unused-parameter -Wno-unused-variable -Wno-unused-function -Wno-unused-result -Wno-unused-local-typedefs -Wno-strict-overflow -Wno-strict-aliasing -Wno-error=deprecated-declarations -Wno-stringop-overflow -Wno-psabi -Wno-error=pedantic -Wno-error=redundant-decls -Wno-error=old-style-cast -fdiagnostics-color=always -faligned-new -Wno-unused-but-set-variable -Wno-maybe-uninitialized -fno-math-errno -fno-trapping-math -Werror=format -Wno-stringop-overflow, LAPACK_INFO=mkl, PERF_WITH_AVX=1, PERF_WITH_AVX2=1, PERF_WITH_AVX512=1, TORCH_VERSION=1.8.1, USE_CUDA=ON, USE_CUDNN=ON, USE_EXCEPTION_PTR=1, USE_GFLAGS=OFF, USE_GLOG=OFF, USE_MKL=ON, USE_MKLDNN=ON, USE_MPI=OFF, USE_NCCL=ON, USE_NNPACK=ON, USE_OPENMP=ON,

TorchVision: 0.9.1
OpenCV: 4.5.3
MMCV: 1.3.7
MMCV Compiler: GCC 5.4
MMCV CUDA Compiler: 10.0
MMSegmentation: 0.16.0+aa438f5
以上就是安装之后的环境配置版本信息。
验证环境是否可用的demo如下(checkpoint_file要去model zoo对应config_file下载相应的.pth文件,img可以用demo文件夹的demo.png,程序正常就可以看到成的result.jpg,里面都会分好类):
from mmseg.apis import inference_segmentor, init_segmentor
import mmcv

config_file = 'configs/pspnet/pspnet_r50-d8_512x1024_40k_cityscapes.py'
checkpoint_file = 'checkpoints/pspnet_r50-d8_512x1024_40k_cityscapes_20200605_003338-2966598c.pth'

# build the model from a config file and a checkpoint file
model = init_segmentor(config_file, checkpoint_file, device='cuda:0')

# test a single image and show the results
img = 'test.jpg'  # or img = mmcv.imread(img), which will only load it once
result = inference_segmentor(model, img)

model.show_result(img, result, out_file='result.jpg', opacity=0.5)