Ubuntu18.04 编译 ORB-SLAM2(./build.sh + ./build_ros.sh)完整流程,各种报错处理(踩坑总结)
文章目录
- 前言
-
- 系统版本
- 一、准备工作
-
- 1.确定是否安装了 C++11 或者 C++0x 编译器
- 2.安装 Pangolin 库
- 3.安装 OpenCV 库
- 4.安装 Eigen3 库
- 5.ROS环境
- 6.下载 ORB-SLAM2 源码
- 二、编译 ./build.sh
-
- 1.错误1
- 2.错误2
- 3.错误3
- 4.错误4
- 5. ./build.sh 编译成功
- 三、编译 ./build_ros.sh
-
- 1.错误1
- 2.错误2
- 3.错误3
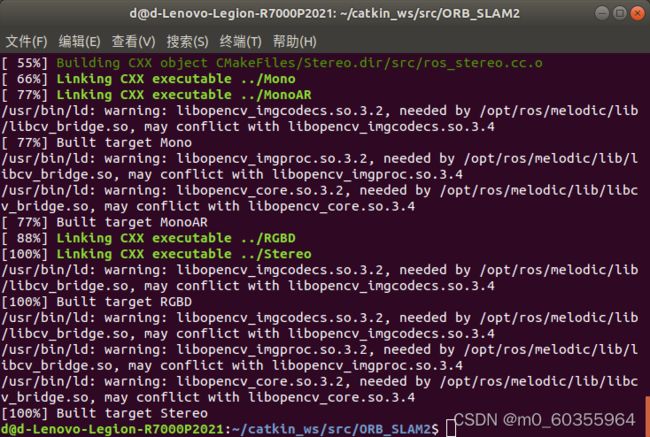
- 4 ./build_ros.sh 编译成功
前言
本文写于2022年4月12日,编译ORB-SLAM2花了我好长时间,在此记录一下。
ORB-SLAM2源码地址
系统版本
Ubuntu18.04 + ROS melodic
一、准备工作
参考https://github.com/raulmur/ORB_SLAM2
(以下有安装过的可以跳过)
1.确定是否安装了 C++11 或者 C++0x 编译器
没有安装的,可以用命令:
1.更新包列表
打开终端输入
sudo apt update
2.安装 build-essential 软件包
打开终端输入
sudo apt install build-essential
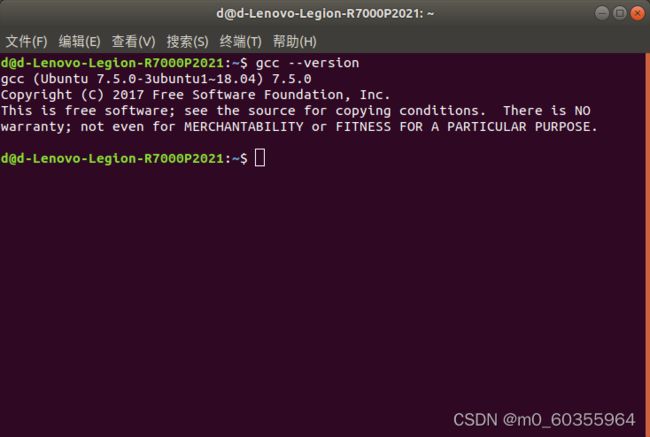
3.验证gcc编译器是否成功安装
打开终端输入
gcc --version
 (注:下面pangolin,opencv,eigen3的安装参考这篇博客)
2.安装 Pangolin 库
建议安装pangolin0.5版本,直接使用git clone https://github.com/stevenlovegrove/Pangolin.git下载源码,得到的pangolin是0.6版本的,可能会报错Pangolin could not be found because dependency Eigen3 could not be found.详见 二、编译 ./build.sh -> 2.错误2 。
1.下载pangolin0.5
链接: https://pan.baidu.com/s/1cGfqsVXw4pxYKyjGmN9Afw 提取码: kftv 复制这段内容后打开百度网盘手机App,操作更方便哦。
2.解压文件夹
下载得到 Pangolin_v0.5.zip 文件,打开终端输入
unzip Pangolin_v0.5.zip
3.编译 安装
打开终端输入
cd Pangolin
mkdir build && cd build
cmake -DCPP11_NO_BOOST=1 ..
make
sudo make install
3.安装 OpenCV 库
1.安装依赖项
打开终端输入
sudo apt-get install build-essential
sudo apt-get install libgtk2.0-dev
sudo apt-get install libvtk6-dev
sudo apt-get install libjpeg-dev
sudo apt-get install libtiff5-dev
sudo apt-get install libjasper-dev
此处报错
errorE: unable to locate libjasper-dev
打开终端输入
sudo add-apt-repository "deb http://security.ubuntu.com/ubuntu xenial-security main"
sudo apt update
sudo apt install libjasper1 libjasper-dev
成功的解决了问题,其中libjasper1 是 libjasper-dev 的依赖包
下面继续安装依赖项,打开终端输入
sudo apt-get install libopenexr-dev
sudo apt-get install libtbb-dev
2.下载 OpenCV 源码
1)下载链接 https://opencv.org/releases/
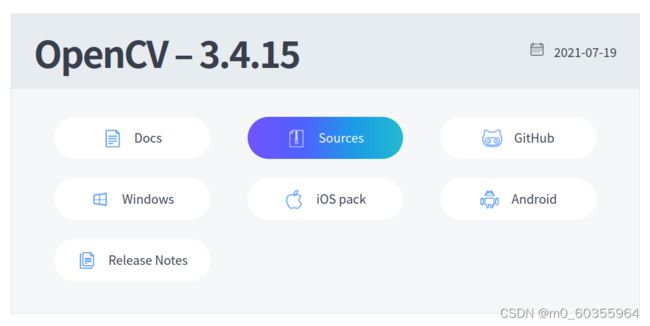 我下载的是 OpenCV-3.4.15 ,点击 Sources 进行下载,得到 opencv-3.4.15.zip 压缩文件
2)解压
打开 opencv-3.4.15.zip 所在的文件夹,打开终端输入
unzip opencv-3.4.15.zip
解压成功得到 opencv-3.4.15 文件夹,将它放到合适的地方
3)编译 安装
cd opencv-3.4.15
mkdir build && cd build
cmake ..
make -j4
sudo make install
4.安装 Eigen3 库
参考此篇博客
建议安装 Eigen3.2.1 版本,Eigen官方主页
1.下载 Eigen
 点击 other downloads ,找到 Eigen 3.2.1

点击 Source code (zip) 下载得到 eigen-3.2.1.zip 文件
2.解压
打开终端输入
unzip eigen-3.2.1.zip
得到 eigen-3.2.1 文件夹
3.安装
参考此篇博客
切换到 eigen-3.2.1 文件夹下,打开终端输入
mkdir build && cd build
cmake .. -DCMAKE_INSTALL_PREFIX=/usr
注:cmake ..默认安装到 /usr/local/include/eigen3 路径下,使用上述命令就可以将安装路径设置为 /usr/include/eigen3
sudo make install
5.ROS环境
如果没有安装 Ros Melodic ,参考Ubuntu18.04安装Ros Melodic 以及测试rviz
如果安装了 Ros Melodic ,没有创建ROS空间,参考此篇博客
6.下载 ORB-SLAM2 源码
将 ORB-SLAM2 源码下载到 ~/catkin_ws/src 目录下面
打开终端输入
git clone https://github.com/raulmur/ORB_SLAM2.git ORB_SLAM2
二、编译 ./build.sh
进入 ORB-SLAM2 文件夹
cd ORB_SLAM2
给 build.sh 文件权限
chmod +x build.sh
编译 build.sh 文件
./build.sh
报错
(注意:出现了对应的错误则修改,如果没有出现则不修改。每次改动后将 ORB_SLAM2 文件夹下面的 build 文件夹删掉,还有 ORB_SLAM2/Thirdparty/DBoW2 && g2o 文件夹下面的 build 文件夹删掉,之后再执行上面的指令重新编译看看是否有错)
1.错误1
/usr/local/include/sigslot/signal.hpp:109:79: error: ‘decay_t’ is not a member of ‘std’
/usr/local/include/sigslot/signal.hpp:109:79: note: suggested alternative: ‘decay’
 constexpr bool is_weak_ptr_compatible_v = detail::is_weak_ptr_compatible<std::decay_t<P>>::value;
                                                                               ^~~~~~~
                                                                               decay
/usr/local/include/sigslot/signal.hpp:109:87: error: template argument 1 is invalid
 constexpr bool is_weak_ptr_compatible_v = detail::is_weak_ptr_compatible<std::decay_t<P>>::value;
                                                                                       ^
/usr/local/include/sigslot/signal.hpp:109:92: error: ‘::value’ has not been declared
 constexpr bool is_weak_ptr_compatible_v = detail::is_weak_ptr_compatible<std::decay_t<P>>::value;
                                                                                            ^~~~~
/usr/local/include/sigslot/signal.hpp:109:92: note: suggested alternative: ‘valloc’
 constexpr bool is_weak_ptr_compatible_v = detail::is_weak_ptr_compatible<std::decay_t<P>>::value;
                                                                                            ^~~~~
                                                                                            valloc
 从github上面找到了解决方法,点我
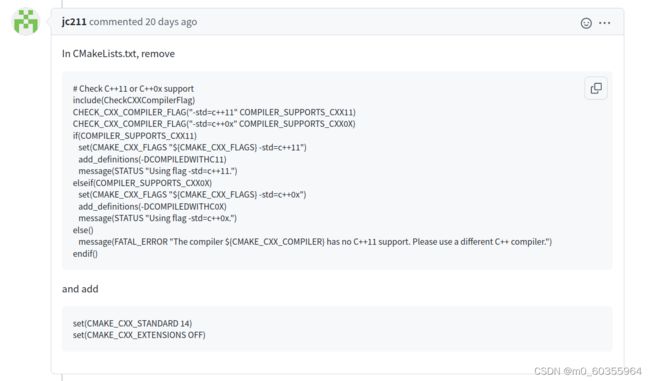 使用
使用#[[ ]]可以注释 CMakeLists.txt 里的多行文字,打开 ORB_SLAM2/CMakeLists.txt ,注释掉下面这段
 然后添加
然后添加
set(CMAKE_CXX_STANDARD 14)
set(CMAKE_CXX_EXTENSIONS OFF)
2.错误2
Build type: Debug
CMake Error at CMakeLists.txt:45 (find_package):
  Found package configuration file:

    /usr/local/lib/cmake/Pangolin/PangolinConfig.cmake

  but it set Pangolin_FOUND to FALSE so package "Pangolin" is considered to
  be NOT FOUND.  Reason given by package:

  Pangolin could not be found because dependency Eigen3 could not be found.
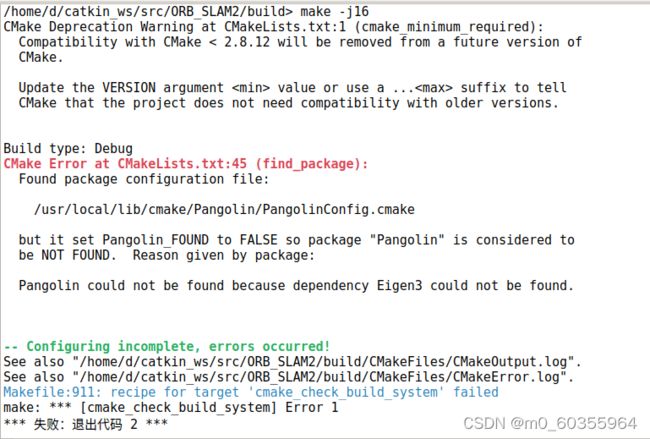 参考此篇博客
是因为之前从源码下载安装的 pangolin 是0.6版本,需要重新安装 0.5 版本的pangolin。
1.删除 /usr/local/include 下的 pangolin 文件夹
打开终端输入
cd /usr/local/include
sudo rm -r pangolin
2.删除 pangolin 原文件夹
切换到相应的文件夹下,删除 pangolin 文件夹即可
3.下载 pangolin 0.5 版本
链接: https://pan.baidu.com/s/1cGfqsVXw4pxYKyjGmN9Afw 提取码: kftv 复制这段内容后打开百度网盘手机App,操作更方便哦。
4.编译 安装
打开终端输入
cd Pangolin
mkdir build && cd build
cmake -DCPP11_NO_BOOST=1 ..
make
sudo make install
3.错误3
/home/d/catkin_ws/src/ORB_SLAM2/src/LoopClosing.cc:84:9: error: ‘usleep’ was not declared in this scope
#include 一般有以下几个文件(视情况而定)
Examples/Monocular/mono_euroc.cc
Examples/Monocular/mono_kitti.cc
Examples/Monocular/mono_tum.cc
Examples/RGB-D/rgbd_tum.cc
Examples/Stereo/stereo_euroc.cc
Examples/Stereo/stereo_kitti.cc
src/LocalMapping.cc
src/LoopClosing.cc
src/System.cc
src/Tracking.cc
src/Viewer.cc
4.错误4
出现下面错误
In file included from /home/d/catkin_ws/src/ORB_SLAM2/src/Optimizer.cc:25:0:
/home/d/catkin_ws/src/ORB_SLAM2/Thirdparty/g2o/g2o/solvers/linear_solver_eigen.h: In member function ‘bool g2o::LinearSolverEigen<MatrixType>::solve(const g2o::SparseBlockMatrix<MatrixType>&, double*, double*)’:
/home/d/catkin_ws/src/ORB_SLAM2/Thirdparty/g2o/g2o/solvers/linear_solver_eigen.h:114:7: error: ‘VectorXD’ has not been declared
       VectorXD::MapType xx(x, _sparseMatrix.cols());
       ^~~~~~~~
/home/d/catkin_ws/src/ORB_SLAM2/Thirdparty/g2o/g2o/solvers/linear_solver_eigen.h:115:7: error: ‘VectorXD’ has not been declared
       VectorXD::ConstMapType bb(b, _sparseMatrix.cols());
       ^~~~~~~~
/home/d/catkin_ws/src/ORB_SLAM2/Thirdparty/g2o/g2o/solvers/linear_solver_eigen.h:116:7: error: ‘xx’ was not declared in this scope
       xx = _cholesky.solve(bb);
       ^~
/home/d/catkin_ws/src/ORB_SLAM2/Thirdparty/g2o/g2o/solvers/linear_solver_eigen.h:116:7: note: suggested alternative: ‘x’
       xx = _cholesky.solve(bb);
       ^~
       x
/home/d/catkin_ws/src/ORB_SLAM2/Thirdparty/g2o/g2o/solvers/linear_solver_eigen.h:116:28: error: ‘bb’ was not declared in this scope
       xx = _cholesky.solve(bb);
                            ^~
/home/d/catkin_ws/src/ORB_SLAM2/Thirdparty/g2o/g2o/solvers/linear_solver_eigen.h:116:28: note: suggested alternative: ‘b’
       xx = _cholesky.solve(bb);
                            ^~
                            b

参考此篇博客

定位到 ORB_SLAM2/Thirdparty/g2o/g2o/solvers/linear_solver_eigen.h 文件
将typedef Eigen::PermutationMatrix变成typedef Eigen::PermutationMatrix如图:
 (最后这个错误卡了好久,做了此改动之后还是报同样的错误最后是将 二、编译 ./build.sh -> 1.错误1 的改动还原之后编译成功了,就很玄学)
5. ./build.sh 编译成功
三、编译 ./build_ros.sh
1.将该工程添加至 ROS_PACKAGE_PATH
打开终端输入
sudo gedit ~/.bashrc
在最后一行插入
export ROS_PACKAGE_PATH=${ROS_PACKAGE_PATH}:~/catkin_ws/src/ORB_SLAM2/Examples/ROS
注: ~/catkin_ws/src/ 为我 ORB_SLAM2 的路径,需要改成自己的文件路径
刷新 bash
source ~/.bashrc
检验 ROS path 是否被识别
echo $ROS_PACKAGE_PATH
2.编译
进入 ORB-SLAM2 文件夹
cd ORB_SLAM2
给 build_ros.sh 文件权限
chmod +x build_ros.sh
编译 build_ros.sh 文件
./build_ros.sh
报错
(注意:出现了对应的错误则修改,如果没有出现则不修改。每次改动后将 ORB_SLAM2/Examples/ROS/ORB_SLAM2/ 文件夹下面的 build 文件夹删掉,之后再执行上面的指令重新编译看看是否有错)
1.错误1
/usr/local/include/pangolin/gl/gl.h:40:10: fatal error: Eigen/Core: 没有那个文件或目录 #include <Eigen/Core>
 貌似 Pangolin 某个文件定位不到
1.删除 /usr/local/include 下的 pangolin 文件夹
打开终端输入
cd /usr/local/include
sudo rm -r pangolin
2.删除 pangolin 下的 build 文件夹
切换到相应的文件夹下,删除 build 文件夹即可
3.编译 安装
打开终端输入
cd Pangolin
mkdir build && cd build
cmake -DCPP11_NO_BOOST=1 ..
make
sudo make install
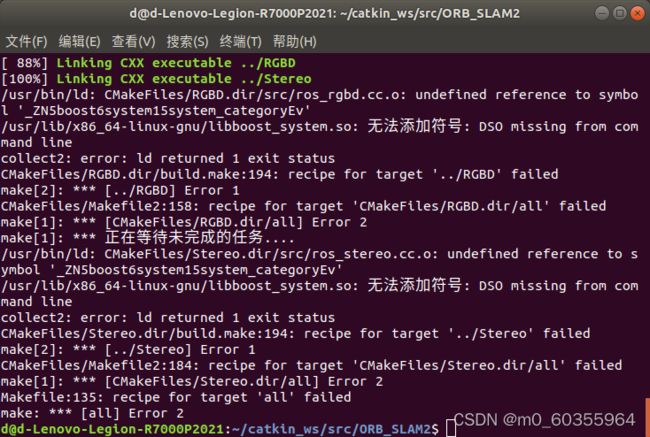
2.错误2
/usr/bin/ld: CMakeFiles/RGBD.dir/src/ros_rgbd.cc.o: undefined reference to symbol '_ZN5boost6system15system_categoryEv'
/usr/lib/x86_64-linux-gnu/libboost_system.so: 无法添加符号: DSO missing from command line
collect2: error: ld returned 1 exit status
CMakeFiles/RGBD.dir/build.make:194: recipe for target '../RGBD' failed
make[2]: *** [../RGBD] Error 1
CMakeFiles/Makefile2:158: recipe for target 'CMakeFiles/RGBD.dir/all' failed
make[1]: *** [CMakeFiles/RGBD.dir/all] Error 2
make[1]: *** 正在等待未完成的任务....
/usr/bin/ld: CMakeFiles/Stereo.dir/src/ros_stereo.cc.o: undefined reference to symbol '_ZN5boost6system15system_categoryEv'
/usr/lib/x86_64-linux-gnu/libboost_system.so: 无法添加符号: DSO missing from command line
collect2: error: ld returned 1 exit status
CMakeFiles/Stereo.dir/build.make:194: recipe for target '../Stereo' failed
make[2]: *** [../Stereo] Error 1
CMakeFiles/Makefile2:184: recipe for target 'CMakeFiles/Stereo.dir/all' failed
make[1]: *** [CMakeFiles/Stereo.dir/all] Error 2
Makefile:135: recipe for target 'all' failed
make: *** [all] Error 2
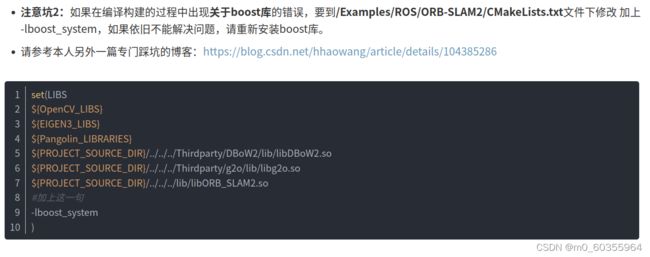 定位到到 ORB_SLAM2/Examples/ROS/ORB-SLAM2/CMakeLists.txt 文件加上
-lboost_system
3.错误3
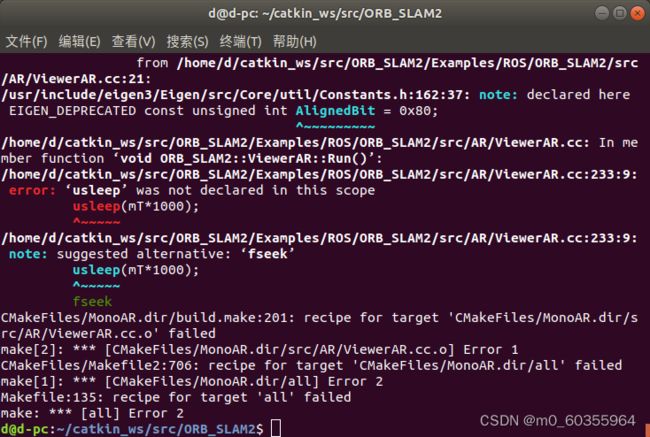
参考链接
在ORB_SLAM2/Examples/ROS/ORB_SLAM2/src/AR/ViewerAR.cc文件里添加头文件#include


