pytorch初学笔记(十):神经网络基本结构之最大池化的使用
目录
一、最大池化:下采样
1.1 参数介绍
1.2 公式
二、最大池化的作用和目的
三、代码实战
3.1 题目要求
3.2 池化的具体实现
3.2.1 步骤
3.2.2 报错及其原因
3.2.3 ceil_mode不同运行的结果不同
3.2.4 完整代码
3.3 tensorboard可视化
一、最大池化:下采样
官方文档:torch.nn — PyTorch 1.13 documentation
1.1 参数介绍
Parameters:
kernel_size 池化核 (Union[int, Tuple[int, int]]) – the size of the window to take a max over
stride (Union[int, Tuple[int, int]]) – the stride of the window. Default value is
kernel_sizepadding (Union[int, Tuple[int, int]]) – implicit zero padding to be added on both sides
dilation (Union[int, Tuple[int, int]]) – a parameter that controls the stride of elements in the window
return_indices (bool) – if
True, will return the max indices along with the outputs. Useful for torch.nn.MaxUnpool2d laterceil_mode (bool) – when True, will use ceil instead of floor to compute the output shape,是否对结果进行保留,默认为FALSE
注意:
1. stride的默认大小为池化核的大小
2. dilation:空洞卷积,如右图,进行卷积操作时会隔n个取一个。
3. ceil_mode:ceil为向上取整,floor为向下取整。
- ceil_mode=True,结果进行保留;
- ceil_mode=False,结果不进行保留
1.2 公式
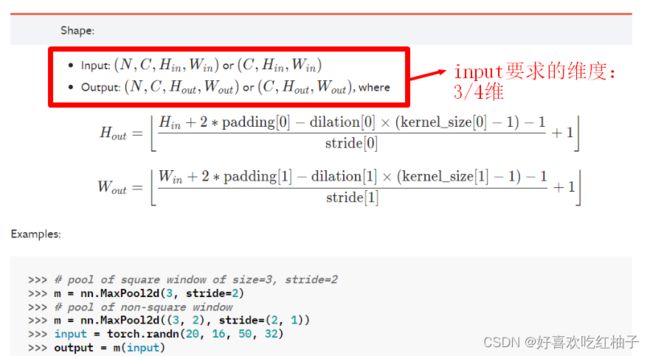
输入的input要求为四维或者三维,需要输入通道数以及长和宽。
因此当我们自定义输入一个input矩阵时,需要再使用torch.reshape方法将其转变成(N, C, H, W)的维度。
二、最大池化的作用和目的
作用:最大限度的保留图片特征,同时减少数据量。加速训练速度。
三、代码实战
3.1 题目要求
输入tensor矩阵为5*5,如下图所示,池化核为大小为3*3,经过池化后根据ceil_mode的不同应输出下图所示的两个矩阵,输出如下的采样结果。
3.2 池化的具体实现
3.2.1 步骤
- 输入tensor型变量input
- 按照池化函数所需的input尺寸reshape输入的大小:
input = torch.reshape(input, (-1,1, 5, 5)) - 自定义神经网络,完成池化操作
- 实例化神经网络,输出结果
3.2.2 报错及其原因
import torch
from torch.nn import MaxPool2d
#输入的矩阵
input = torch.tensor([
    [1,2,0,3,1],
    [0,1,2,3,1],
    [1,2,1,0,0],
    [5,2,3,1,1],
    [2,1,0,1,1]
])

input = torch.reshape(input,(1,5,5))
print(input.shape)

class Maweiyi(torch.nn.Module):
    def __init__(self):
        super(Maweiyi, self).__init__()
        # 设置池化
        self.maxpool1 = MaxPool2d(kernel_size=3,ceil_mode=False)

    def forward(self,input):
        output = self.maxpool1(input)
        return output

maweiyi = Maweiyi()
output = maweiyi(input)
print(output)
会出现如下报错:无法实现long型的数据。
解决:需要修改input的类型,设置tensor的dtype=float32 。
#输入的矩阵
input = torch.tensor([
    [1,2,0,3,1],
    [0,1,2,3,1],
    [1,2,1,0,0],
    [5,2,3,1,1],
    [2,1,0,1,1]
],dtype=torch.float32)
修改过后即可成功运行。
3.2.3 ceil_mode不同运行的结果不同
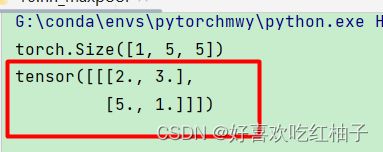
1. ceil_mode = True,保留最大采样过程中的所有结果,运行出的tensor大小为4*4
self.maxpool1 = MaxPool2d(kernel_size=3,ceil_mode=True)2. ceil_mode = False,不保留最大采样过程中的所有结果,运行出的tensor大小为1*1
self.maxpool1 = MaxPool2d(kernel_size=3,ceil_mode=False)3.2.4 完整代码
import torch
from torch.nn import MaxPool2d
#输入的矩阵
input = torch.tensor([
    [1,2,0,3,1],
    [0,1,2,3,1],
    [1,2,1,0,0],
    [5,2,3,1,1],
    [2,1,0,1,1]
],dtype=torch.float32)

input = torch.reshape(input,(1,5,5))
print(input.shape)

class Maweiyi(torch.nn.Module):
    def __init__(self):
        super(Maweiyi, self).__init__()
        # 设置池化
        self.maxpool1 = MaxPool2d(kernel_size=3,ceil_mode=True)

    def forward(self,input):
        output = self.maxpool1(input)
        return output

maweiyi = Maweiyi()
output = maweiyi(input)
print(output)
3.3 tensorboard可视化
import torch
import torchvision.datasets
from torch.nn import MaxPool2d
from torch.utils.data import DataLoader

dataset = torchvision.datasets.CIFAR10(root=".\CIFAR10",train=False,transform=torchvision.transforms.ToTensor(),download=True)
dataloader = DataLoader(dataset,batch_size=64)
from torch.utils.tensorboard import SummaryWriter

input = torch.tensor([
    [1, 2, 0, 3, 1],
    [0, 1, 2, 3, 1],
    [1, 2, 1, 0, 0],
    [5, 2, 3, 1, 1],
    [2, 1, 0, 1, 1]
], dtype=torch.float32)

input = torch.reshape(input, (-1,1, 5, 5))


class Maweiyi(torch.nn.Module):
    def __init__(self):
        super(Maweiyi, self).__init__()
        self.maxPool1 = MaxPool2d(kernel_size=3,ceil_mode=True)

    def forward(self, input):
        output = self.maxPool1(input)
        return output

writer = SummaryWriter("logs")
step = 0

maweiyi = Maweiyi()

for data in dataloader:
    imgs,labels=data
    writer.add_images("inputs",imgs,step)
    output = maweiyi(imgs)
    writer.add_images("output",output,step)
    step+=1

writer.close()
输出如下所示:
可以看到经过最大池化之后图片变为了马赛克形式,不太清晰,但是大体能保留原图像的特征。


