labelme json文件转换并制作语义分割数据集
项目场景:
【语义分割】用Pytorch deeplabv3+ 训练自己的数据
参考博文
PYTORCH 语义分割DEEPLABV3+ 训练自己的数据集 从数据准备到模型训练
关键在于数据集的制作:
-
在做实例分割或语义分割的时候,我们通常要用labelme进行标注,labelme标注的json文件与coco或voc数据集已经标注好的json文件的格式和内容有差异。如果要用这些数据集的信息,就要对json文件进行修改和转换。
参考这两篇博文:
语义分割数据集详解(PASCAL-VOC2012,Vocbenchmark,Cityscapes)
labelme json文件转换_【数据相关】目标检测中的数据标注及格式转换代码 -
我们需要的label应该是单通道的二值图或灰度图,但转换之后生成的却是三通道的RGB图像。

问题描述
RuntimeError: 1only batches of spatial targets supported (3D tensors) but got targets of size: : [1, 640, 959, 3]
原因分析:
损失函数 nn.CrossEntropyLoss()的输入应该是一个4维的张量(网络的输出)和一个三维的张量(target),而读取的数据集中的标签为RGB三通道的图片 [batch size,weight,height,RGB]。
需要将该四维张量的RGB图片输入转为单值的类别信息。
重新将标签制作为单值灰度图。
解决方案:
一、如果将labelme标注的标签转换生成了三通道的RGB图像,需要用下面的脚本重新将标签制作为单值灰度图
import os
import numpy as np
import matplotlib.pyplot as plt
from PIL import Image
import cv2


color2class_dict = {
        0: [64.0, 140.0, 214.0, 255.0],
        1: [2.0, 4.0, 244.0, 255.0],
        2: [210.0, 21.0, 28.0, 255],
        3: [9.0, 243.0, 25.0, 255.0]

    }   #自行设置类别对应的颜色字典
def get_keys1(value):   #按字典中的颜色对应关系分类
    p = 0
    for k, v in color2class_dict.items():
        if v == value:
            p = k
            break
    return p
def get_keys2(value):   #自行设置颜色范围
    if value[0] > 150:
        return 1
    elif value[1] > 150 and value[2] < 50:
        return 2
    elif value[1] < 50 and value[2] > 150:
        return 3
    else:
        return 0

def main(input_path, save_path, mode):
    get_keys = get_keys1 if mode == 0 else get_keys2
    img_list = os.listdir(input_path)
    for image in img_list:
        img_path = os.path.join(input_path, image)
        save_path_img = os.path.join(save_path, image.split(".")[0]+"_mask.png")
        img = plt.imread(img_path)*255.0
        img_label = np.zeros((img.shape[0], img.shape[1]))
        img_new_label = np.zeros((img.shape[0], img.shape[1]))
        for i in range(img.shape[0]):
            for j in range(img.shape[1]):
                value = list(img[i, j])
                img_label[i, j] = get_keys(value)
                img_new_label[i, j] = img_label[i, j]
        label0 = Image.fromarray(np.uint8(img_new_label))
        cv2.imwrite(save_path_img, img_label)
        print(image+" done")


input_path = ""
save_path = ""
mode = 0
main(input_path, save_path, mode)
二、利用labelme自带的脚本自动生成标签(推荐)
具体见文章开头提到的参考博文:
使用shell将生成的JSON文档转换成PNG、yaml和PNG_viz可视化格式

labelme_json_to_dataset <文件名>.json
批量处理
num=100
for ((i=1;i<num;i++))
do
  python json_to_dataset.py dataset/img$i.json -o output/img$i
done
标签自动生成
利用阈值分割的思想处理原图得到像素级标签。这里的“原图”是在实验室的光照、背景合适的理想环境下得到,后续考虑采用迁移学习的方法增强在实际应用场景下的鲁棒性。
from PIL import Image
import cv2
import numpy as np
import os


def auto_label(dirPic, width, height):
    file_list = os.listdir(dirPic + 'gray/')
    color = [255, 255, 255]
    print('start labelling!!!')
    for filename in file_list:
        path = ''
        path = dirPic + 'gray/' + filename
        path2 = dirPic + 'gray_512/' + filename
        try:
            image = cv2.imread(path)
            print(f'{filename} is on precessing.')

            # resize image
            width = 512
            height = 512
            dim = (width, height)
            gray = cv2.resize(image, dim, interpolation=cv2.INTER_AREA)

            # 单通道转换3通道
            # # gray_BGR = cv2.cvtColor(image, cv2.COLOR_GRAY2BGR)
            # image = np.expand_dims(gray, axis=2)
            # gray_BGR = np.concatenate((image, image, image), axis=-1)
            # print('BGR is ok!')

            # OTSU阈值分割
            ret, th = cv2.threshold(gray, 0, 255, cv2.THRESH_OTSU)
            print(f'ret = {ret}')

            # 开/闭运算
            kernel = np.ones((5, 5), np.uint8)
            kernel2 = np.ones((5, 5), np.uint8)
            opening2 = cv2.morphologyEx(th, cv2.MORPH_OPEN, kernel)
            closing2 = cv2.morphologyEx(opening2, cv2.MORPH_CLOSE, kernel2)

        except:
        # mac系统自带.DS_Store隐藏文件
            print('find .DS_Store!')
            continue

if __name__ == '__main__':
    dirPic = '/Users/Sigrid/Desktop/stones/dataset/'
    auto_label(dirPic, 512, 512)
从原图即可得到二值化后的标签样本:
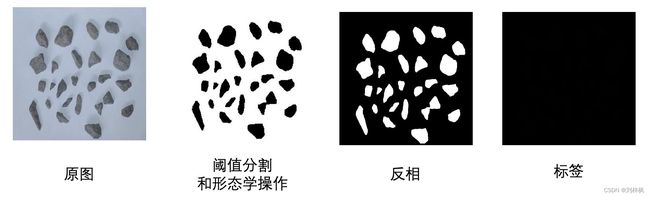
这里最终要求label.png的像素值在[0~255]中连续,因此0表示背景,即无类别;1表示二分类的对象,这里是stones。如果是多分类就再次基础上2, 3…
可以用PIL包可视化最终的标签结果:
from PIL import Image
imagePath = '/Users/Sigrid/Desktop/stones/dataset/0806_png/gray2/IMG_3709.png'
im = Image.open(imagePath)
im = Image.fromarray(np.uint8(im))
# im = Image.fromarray(np.uint8(im)*20)  # 可以看到灰色的标签对象
# 同时实现图像位深度24到8位转换
im.save(imagePath)
im.show()