Tensorflow和Tensorflow Object Detection API的安装(Windows系统下,手把手教你装)
Tensorflow和Tensorflow Object Detection API的安装(Windows系统下,手把手教你装))
-
- 写在前面
- 1. Anaconda安装
-
- 1. 下载与安装
- 2. 测试
- 3. 设置软件包下载服务器
- 4. 配置虚拟环境
- 2. Tensorflow的安装
- 3. Git的安装(选装)
- 4. TensorFlow Object Detection API框架安装
-
- 1. 下载和安装
- 2. 安装软件依赖包
- 3. 配置环境变量
- 4. COCO API 的安装
-
-
- 1. Visual C++ 2015 的安装
- 2. 下载cocoapi源代码
- 3. 安装
- 4. 验证:
-
- 5. 编译proto文件
- 6.案例测试
- 7.安装Labelimg
写在前面
1. 安装环境:
Windows10 64bit
2. 软件包:
- Tensorflow 1.13.1
- Tensorflow Object Detection API (r1.13.0)
- LabelImg
- Anaconda 64bit 最新版本
- Python 3.6
- COCO API
- Git
- IDE软件
看到这么多软件不要慌,下面将详细讲解安装步骤。
1. Anaconda安装
新手上路为了避免Tensorflow安装后无法运行,建议已安装过Anaconda软件和Python的同学,将电脑上的Anaconda和Python卸载干净后重新下载安装。所谓置之死地而后生,本人曾经安装了多次都没有成功,各种依赖包版本问题,最终选择了卸载。
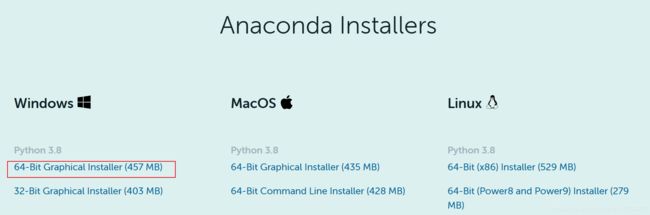
1. 下载与安装
- 请在官网下载最新版本的:Anaconda.https://www.anaconda.com/products/individual
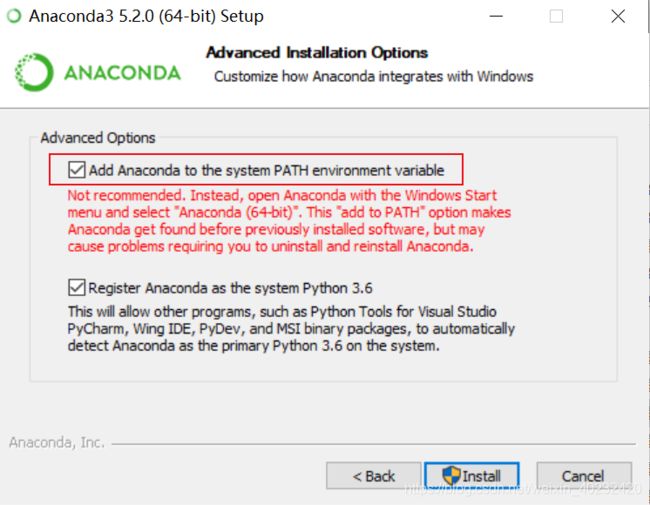
- 注意:选择64位版本,下载后进行安装,安装过程默认即可,需要注意的是Advanced Options时勾选第一项,如图:
2. 测试
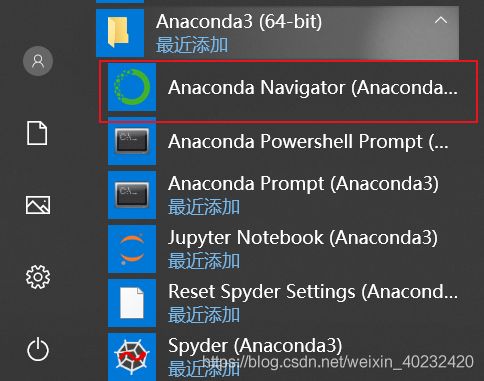
- 安装完成后,启动Anaconda Navigator,如图所示。打开过程可能较慢,请耐心等待···
- 按照图示,打开终端。

- 输入如下,若打印出字符则认定Anaconda和Python都安装完毕。
python
print("Hello,Anaconda")
3. 设置软件包下载服务器
为避免官方下载速度较慢,请打开Anaconda Prompt,按照如下代码更新国内的软件源。
conda config --add channels https://mirrors.tuna.tsinghua.edu.cn/anaconda/pkgs/free/
conda config --add channels https://mirrors.tuna.tsinghua.edu.cn/anaconda/cloud/conda-forge
conda config --add channels https://mirrors.tuna.tsinghua.edu.cn/anaconda/cloud/msys2/

# 设置搜索时显示通道地址
conda config --set show_channel_urls yes
其他源地址和配置方法,请参考该链接.
4. 配置虚拟环境
配置Anaconda里Tensorflow的虚拟环境,如图所示:

2. Tensorflow的安装
- 打开Anaconda Navigator,选择环境—tf_gpu绿色三角按钮—打开终端,如图所示:

- 输入如下代码,激活虚拟环境:
conda activate tf_gpu
- 输入安装命令:
conda install tensorflow-gpu=1.13.1
注意:一定要用“=1.13.1”,否则conda将安装最新版本的Tensorflow。之后conda会进行一系列的检查和配置,列出安装软件包列表,输入“y”后按,继续安装,静静等待下载和安装。
- 安装完成后进行测试:
4.1 win+r 打开终端,激活虚拟环境
4.2 输入如下代码:
python
import tensorflow as tf
print(tf.__version__)
4.3 打印出版本号即认为Tensorflow安装成功,请特别注意版本号是否为1.13.1。若之前曾安装过Tensorflow其他版本,没有卸载或者删除干净可能会显示之前的版本。

3. Git的安装(选装)
- 登录 Git官网下载Windows版本的Git,如图:

- 安装时一路默认
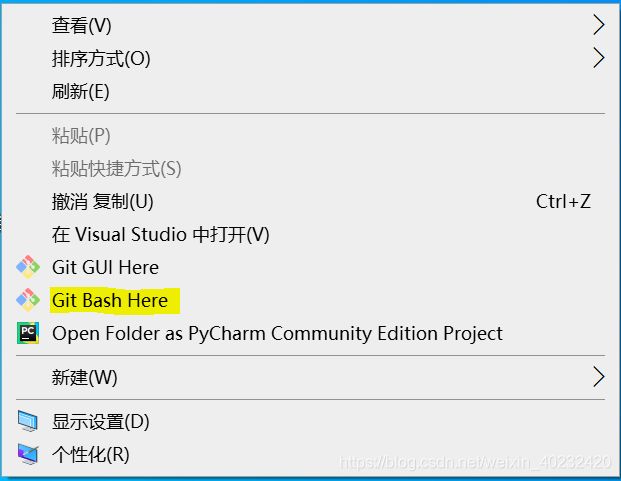
- 测试:任意文件夹右击,出现“Git Bash Here”选项,单击启动Git Bash可启动,说明安装成功。
4. TensorFlow Object Detection API框架安装
1. 下载和安装
- 建立一个用于Tensorflow训练的文件夹,命名为“tf_train”,可根据自己习惯命名。
- 在“tf_train”文件夹右键,单击Git Bash Here,启动Git Bash。
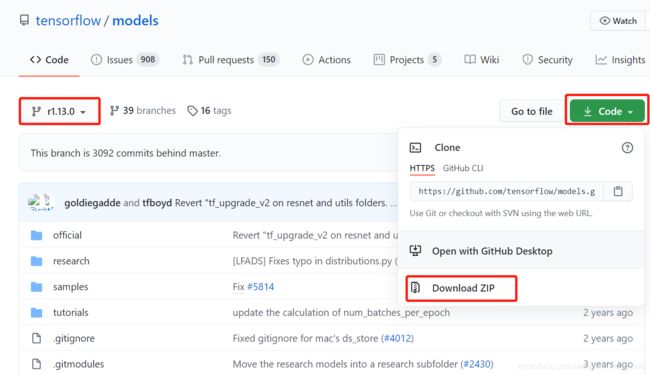
- 输入如下命令下载,如下载速度慢或失败,请直接到该链接下载,请注意分支号为1.13.0,如图所示。
git clone -b r1.13.0 https://github.com/tensorflow/models.git
2. 安装软件依赖包
- 启动Anaconda Navigator 选择环境-tf_gpu-单击绿色三角-打开终端。输入如下命令进行依赖包安装:
pip install matplotlib pillow lxml contextlib2 cython opencv-python
- 若下载速度慢,请切换至国内源,将命令改为:
pip install matplotlib pillow lxml contextlib2 cython opencv-python -i https://pypi.tuna.tsinghua.edu.cn/simple
3. 配置环境变量
- 找到Windows环境变量设置界面:右击“我的电脑”-属性-高级系统设置-环境变量
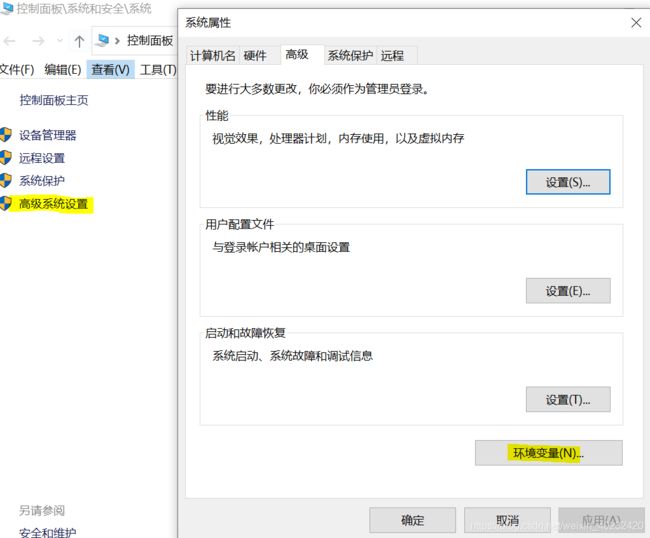
- 系统变量中单击新建:
变量名:PYTHONPATH
变量值:xxx\tf_train\models\research;xxx\tf_train\models\research\slim;xxx\tf_train\models\research\object_detection;
(xxx为tf_train的文件目录)

4. COCO API 的安装
1. Visual C++ 2015 的安装
在此链接下载并安装。
2. 下载cocoapi源代码
在tf_gpu里新建“addons”文件夹,在该文件夹下右键,点击“Git Bash Here”,输入如下命令:
git clone https://github.com/philferriere/cocoapi.git
3. 安装
windows 任务栏搜索:Prompt,找到Anaconda Promot,右键管理员运行。
输入命令激活环境:
conda activate tf_gpu
进入PythonAPI文件夹:
d:
cd xxx\tf_train\addons\cocoapi\PythonAPI
输入命令进行安装:
python setup.py install
4. 验证:
激活环境后,进入python后导入包,导入成功说明安装完成。
conda activate tf_gpu
python
import pycocotools
5. 编译proto文件
由于Tensorflow Object Detection API框架使用protobuf工具配置和训练参数。使用conda命令安装tensorflow时已经安装过,可以使用conda list 查看是否安装。
- 进入到 “tf_train\model\research” 文件夹,地址栏输入“cmd”,激活虚拟环境:
conda activate tf_gpu
- 输入如下命令进行编译:
for /f %i in ('dir /b object_detection\protos\*.proto') do protoc object_detection\protos\%i --python_out=.
6.案例测试
- 下载预训练模型:
下载链接: (https://www.csdn.net/).https://github.com/tensorflow/models/blob/master/research/object_detection/g3doc/tf1_detection_zoo.md.
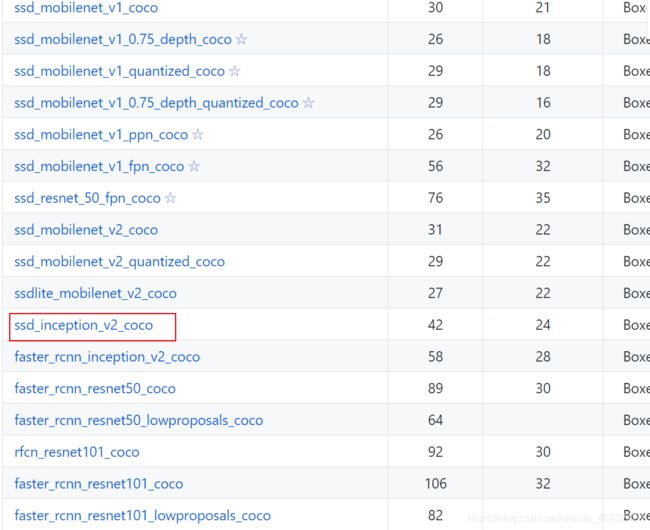
- 将下载的模型解压到“tf_train\model\research\object_detection”文件夹
- 下载object_detection_example_1.py,复制到object_detection文件夹。
链接:https://pan.baidu.com/s/19EL8nJ7VPIkONyaQ-bxl7Q
提取码:27ff - 修改“object_detection\utils”文件夹中 visualization_utils.py文件,将26行注释掉。
- 进入到“object_detection”文件夹,地址行输入“cmd”,激活环境:
conda activate tf_gpu
- 输入如下命令进行测试,出现小狗和海滩,并检测出物体,说明安装完成。
python object_detection_example_1.py
7.安装Labelimg
- labelimg可用于图片打标,先激活环境:
conda activate tf_gpu
- 使用pip安装labelimg,等待安装完成。
pip install labelimg
- 在虚拟环境输入:labelimg可进入软件界面,表示安装完成。