vue-cli打包之性能优化
常见的vue打包及性能优化方案:
最近在搞vue-cli打包以及性能优化,下面是我采用的几种方式,希望给各位小伙伴带来帮助。
1.配置路由懒加载
const router = [
	path: '/home/***(路由路径)',
    name: '路由名称',
    component: () => import('@/views/Home/***.vue'),
    meta: { title: '组件标题' }
]
该方式是通过 import()的方式实现路由的懒加载,不用在界面加载的时候一次性直接导入全部的路由。而是通过按需引入,使用哪个页面就加载哪个页面,可以很好的提高运行速度,减少首页加载的时间。
2.使用keep-alive缓存组件
<template>
  <div>
    <keep-alive>
      <component />
	</keep-alive>
  </div>
</template>
该方法是将组件通过缓存的方式对组件进行持久化,避免多次渲染,可以用于不经常改变的组件。
3.第三方插件按需引入
 import { Lazyload } from 'vant'
 import { Button } from 'element-ui';
 Vue.use(Lazyload, {})
 Vue.use(Button)
使啥用啥,不用全部导入
4.使用cdn加速
let cdn = {
  css: [
    //雪碧图样式
    "https://**/**/icon.css",
  ],
  js: [
    'https://cdn.bootcdn.net/ajax/libs/vue/3.2.33/vue.cjs.js',
    'https://cdn.bootcdn.net/ajax/libs/vuex/4.0.2/vuex.cjs.min.js',
    'https://cdn.bootcdn.net/ajax/libs/vue-router/4.0.14/vue-router.cjs.min.js',
    'https://cdn.bootcdn.net/ajax/libs/axios/0.26.1/axios.js',
    'https://cdn.bootcdn.net/ajax/libs/core-js/3.22.0/minified.js'
  ],
}
//判断是否是生产环境
const isProd = process.env.NODE_ENV === "production"
cdn = isProd ? cdn : {css:[],js:[]};

module.exports = {
	configureWebpack: {
		 // 采用cdn的方式,所以将以下这些文件配置不打包
    	externals:{
	       vue:"Vue",
	      'vue-router': 'VueRouter',
	       vuex: 'Vuex',
	       axios:'axios',
	      'core-js':'core-js',
	       vant:'vant'
    	},
	}
	chainWebpack:config => {
		 // 注入cdn
   		 config.plugin("html").tap(args => {
	        args[0].cdn = cdn
	        return args
     	 })
	}
}
然后在index.html中注入cdn
<!DOCTYPE html>
<html lang="zh-Hans">
  <head>
    <!-- 使用CDN的CSS文件 -->
    <% for (var i in htmlWebpackPlugin.options.cdn && htmlWebpackPlugin.options.cdn.css) { %>
      <link href="<%= htmlWebpackPlugin.options.cdn.css[i] %> " rel="stylesheet">
    <% } %>
  </head>
  <body>
    <noscript>
      <strong>We're sorry but app doesn't work properly without JavaScript enabled. Please enable it to continue.</strong>
    </noscript>
    <div id="app"></div>
    <!-- 使用CDN的JS文件 -->
    <% for (var i in htmlWebpackPlugin.options.cdn && htmlWebpackPlugin.options.cdn.js) { %>
    <script src="<%= htmlWebpackPlugin.options.cdn.js[i] %>" defer></script>
    <% } %>
  </body>
</html>
5.公共代码抽离
//vue.config.js
module.exports = {
	configureWebpack: {
		 optimization:{
	      splitChunks: {
	        cacheGroups: {
	          vendor: {
	            //第三方库抽离
	            chunks: "all",
	            test: /node_modules/,
	            name: "vendor",
	            minChunks: 1, //在分割之前,这个代码块最小应该被引用的次数
	            maxInitialRequests: 5,
	            minSize: 0, //大于0个字节
	            priority: 100 //权重
	          },
	          common: {
	            //公用模块抽离
	            chunks: "all",
	            test: /[\\/]src[\\/]utils[\\/]/,
	            name: "common",
	            minChunks: 1,
	            maxInitialRequests: 5,
	            minSize: 0, //大于0个字节
	            priority: 60
	          },
	          // styles: {
	          //   //样式抽离
	          //   name: "styles",
	          //   test: /\.(sa|sc|c)ss$/,
	          //   chunks: "all",
	          //   enforce: true
	          // },
	          runtimeChunk: {
	            name: "manifest"
	          }
        }
      }
    }
	}
}
6.去除console.log
首先需要下载一个插件terser-webpack-plugin
npm i terser-webpack-plugin -D
然后直接在vue.config.js里面使用
module.exports = {
	 chainWebpack:config => {
	 	if(process.env.NODE_ENV === "production"){
	      // 去除console.log输出
	      config.optimization
	      .minimizer('terser')
	      .tap(args => {
	        Object.assign(args[0].terserOptions.compress, {
	          // 生产模式去除console.log
	          pure_funcs: ['console.log']
	        })
	        return args
	      })
	    }
	 }
}
然后打包之后运行就可以知道效果了
//打包命令
npm run build
7.不知道哪些插件需要排除进行cdn引入的,可以使用这个命令打包生成打包报告
//package.json
{
	"scripts": {
    	"report": "vue-cli-service build --report --mode production"
 	 },
}
使用命令
npm run report
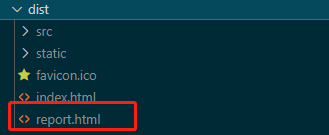
打包之后在dist文件夹里面会生成report.html文件

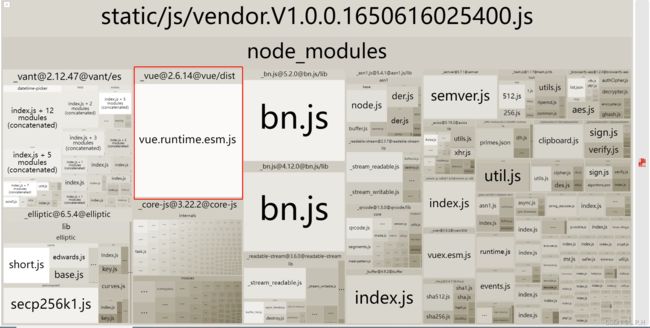
然后在浏览器打开这个html文件会显示这个

然后我们看到这个vue这么白,还这么大,说明他没有什么错综复杂的关系,因此可以使用cdn加速,打包时可以排除掉,排除方法见上面的方法4.cdn加速
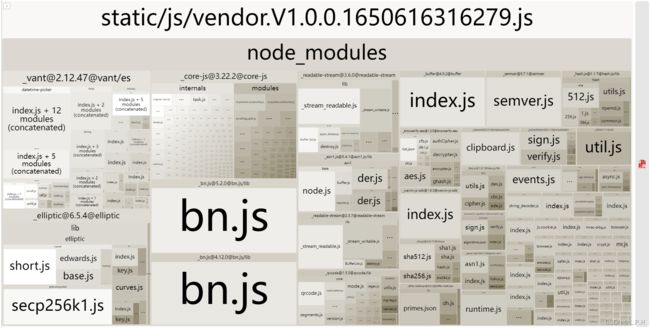
我们排除完之后再去看报告

发现vue已经没有了,而且包的体积也减少了不少。
还想要排除啥可以自己琢磨琢磨。
8.gzip压缩
下载插件 compression-webpack-plugin
npm i compression-webpack-plugin -D
配置vue.config.js
const CompressionPlugin = require('compression-webpack-plugin');
module.exports = {
	configureWebpack:config=>{
        if(process.env.NODE_ENV=='production'){
            return{
                plugins: [
                    new CompressionPlugin({
                        algorithm: 'gzip', // 使用gzip压缩
                        test: /\.js$|\.html$|\.css$/, // 匹配文件名
                        filename: '[path].gz[query]', // 压缩后的文件名(保持原文件名,后缀加.gz)
                        minRatio: 1, // 压缩率小于1才会压缩
                        threshold: 1024*10, // 对超过10k的数据压缩
                        deleteOriginalAssets: false, // 是否删除未压缩的源文件
                    }),
                ],
            }
        }
    }
}
不过我们前端开启gzip后,也需要配置下nginx的gzip开启,要不然是没法使用的
//找到nginx的这个文件 /usr/local/nginx/conf/nginx.conf 然后配置
server {
    listen 4300;
    server_name localhost;
    location / {
        root /home/static/web/wechat;
        index /index.html;
        try_files $uri $uri/ /index.html;
        gzip_static on; #开启压缩
    }
}
其实我们在打包的时候就可以看到gzip包的大小了

如上,小了将近三倍。
不过,一般我们就不要配置这个gzip压缩了,一般后端都是会给我们弄的,我们直接上传到服务器就可以了,会自动给我们压缩的,在浏览器上就是这样显示。
