20221031-20221106工作总结
20221031-20221106工作总结
目录
- 20221031-20221106工作总结
-
- 本周预定目标:
- 一、U2Net网络试训练
-
- 1.环境搭建:python3.7
- 2.数据集
- 3.准备工作
- 4.训练
- 5.问题记录
- 6.训练结果测试
-
- 1)气孔(Blowhole)
- 1)裂纹(Crack)
- 3)磨损(Fray)
- 7.评价指标
-
- Mean Absolute Error 平均绝对误差
- 二、Jupter Notebook报错修复
- 三、LabelImg的安装和使用
-
- 1.安装
- 2.使用
- 四、Yolov5开源项目调试
-
- 1.下载
- 2.环境配置
- 3.预测
- 4.问题记录
-
- 1)安装工程所需python包时运行`pip install -r requirements.txt`报错。
- 2)运行detect.py时如下报错1
- 3)运行detect.py时如下报错2
- 4)运行detect.py时如下报错3
- 5.结果
- 6.代码解释
- 五、Faster-RCNN开源项目调试
-
- 写在前面
-
-
- 1)测试(Test)
- 2)训练(Train)
-
- 1.网络浅析
- 2.代码调试
-
-
- 1.训练
- 2.预测
- 3.结果评价
-
- 3.问题汇总
-
-
- 1.训练代码报错
-
- 4.结果分析
- 本周工作总结
- 下周计划安排
本周预定目标:
1.U2Net网络训练磁瓦缺陷检测数据集并测试检测效果;
2.Yolov5开源项目调试;
3.Faster-RCNN开源项目调试。
一、U2Net网络试训练
网络下载地址:点击此处
1.环境搭建:python3.7
| package | 版本 |
|---|---|
| cudatoolkit | 11.3 |
| numpy | 1.21.6 |
| scikit-image | 0.19.2 |
| pytorch | 1.12.1 |
| torchvision | 0.13.1 |
| pillow | 9.0.1 |
| opencv-python | 3.4.10 |
| paddlepaddle | 2.3.2 |
| paddlenlp | 2.4.1 |
| gradio | 3.6 |
2.数据集
磁瓦缺陷数据集(显著性)由中国科学院自动所一课题组收集制作,收集了6种常见磁瓦缺陷的图像,并做了语义分割的标注。

3.准备工作
1、(不做也行)下载预训练模型 u2net.pth(176.3MB)提取码【pf9k】和 u2netp.pth(4.7MB) 提取码【8xsi】 分别保存到以下文件夹 ‘./saved_models/u2net/’ 和 ‘./saved_models/u2netp/’。
2、创建路径 ‘U-2-Net\train_data\b_c_F\im’ 和 ‘U-2-Net\train_data\b_c_F\gt’ 存放气孔(Blowhole)、裂纹(Crack)、磨损(Fary)缺陷原图和标注图。
| 缺陷类型 | 训练集 | 测试集 |
|---|---|---|
| 气孔 | 92 | 23 |
| 裂纹 | 44 | 13 |
| 磨损 | 24 | 8 |
| 累计 | 160 | 44 |
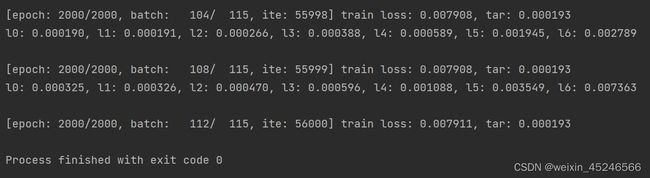
4.训练
运行训练程序u2net_train.py训练网络。
参数如下:
epoch_num =2000 #训练2000次
batch_size_train = 4
batch_size_val = 1
train_num = 0
val_num = 0
salobj_dataset = SalObjDataset(
    img_name_list=tra_img_name_list,
    lbl_name_list=tra_lbl_name_list,
    transform=transforms.Compose([
        RescaleT(320), #将原图缩放至320*320
        RandomCrop(288), #从320*320中截取288*288
        ToTensorLab(flag=3)]))
完成训练 (训练时间:十小时左右)
5.问题记录
1、error:The “freeze_support()” line can be omitted if the progra
解决方法:在下图for循环前面加if __name__ == '__main__':
if __name__ == '__main__': # error:The "freeze_support()" line can be omitted if the progra

    for epoch in range(0, epoch_num):
        net.train()
2、爆显存 error: RuntimeError: CUDA out of memory.
解决方法:batch_size_train = 4 #12改为4
3、报错:
报错:ValueError: At least one stride in the given numpy array is negative, and tensors with negative strides are not currently supported. (You can probably work around this by making a copy of your array with array.copy())
错误代码:
return {'imidx':torch.from_numpy(imidx), 'image': torch.from_numpy(tmpImg), 'label': torch.from_numpy(tmpLbl)}
做如下修改:
return {'imidx':torch.from_numpy(np.ascontiguousarray(imidx)), 'image': torch.from_numpy(np.ascontiguousarray(tmpImg)), 'label': torch.from_numpy(np.ascontiguousarray(tmpLbl))}
4、该代码要求训练图像为3通道rgb图像,本例使用数据集为1通道灰度图,编写如下代码将灰度图变为rgb图
for filename in glob.glob(r'D:\Users\JMan\PycharmProjects\U-2-Net\test_data\crack_test_images\*.jpg'):
    img=Image.open(filename).convert("RGB")
    img.save(filename)#原地保存
6.训练结果测试
使用训练图片测试,将测试图片存入文件夹:U-2-Net\test_data\test_images,测试结果保存至:U-2-Net\test_data\u2net_results
修改路径
image_dir = os.path.join(os.getcwd(), 'test_data', 'blowhole_test_images')
    prediction_dir = os.path.join(os.getcwd(), 'test_data', 'blowhole_' + model_name + '_results' + os.sep)
    model_dir = os.path.join(os.getcwd(), 'saved_models', model_name, model_name + '.pth')
运行测试程序u2net_test.py
从上到下依次为:原图、标注图片、检测结果。
1)气孔(Blowhole)

1)裂纹(Crack)
3)磨损(Fray)
7.评价指标
Mean Absolute Error 平均绝对误差
一般记做MAE,比较预测结果与真值之间的逐像素绝对值差异。

结果

二、Jupter Notebook报错修复
暂无
三、LabelImg的安装和使用
LabelImg 是一个可视化的图像标定工具。Faster R-CNN,YOLO,SSD等目标检测网络所需要的数据集,均需要借此工具标定图像中的目标。
1.安装
打开Anaconda Rrompt,这里创建一个新环境并进入,安装LabelImg:
conda create -n labelimg python=3.6
conda activate labelimg
pip install labelimg
安装好后,输入labelimg即可打开软件。
2.使用
在“Open Dir”中选择并打开待标注的图片所在的文件夹,然后在 “Change Save Dir”中设置标注文件所要保存到的文件夹;点击"Create RecBox"按钮选定区域,输入该图像区域的标签名称,输入后即可完成标注,此时会在标注文件所要保存到的文件夹中出现与对应图片的名称相同的标注文件。
tips:
1)可切换标注文件的格式,目前labelimg支持PascalVOC、YOLO、CreateML三种标注格式;
2)可以通过“Use default label”设置默认标注的标签名称。

更详细的使用方法:点击观看视频
四、Yolov5开源项目调试
1.下载
https://github.com/ultralytics/yolov5 可以选择版本,这里用到的是5.0版。
2.环境配置
conda create -n Yolo python=3.7
conda activate Yolo
进入Yolov5工程所在文件夹,安装工程所需python包
pip install -r requirements.txt
3.预测
1.pycharm打开该项目,加载刚创建的Yolo环境解释器。
2.下载权重文件yolov5s.pt 下载位置 存入路径……\yolov5-5.0
注:【Yolo的权重文件】权重文件保存的是训练好的网络各层的权值,也就是通过训练集训练出来的。训练好之后,应用时只要加载权值就可以,不再需要训练集了。
4.问题记录
1)安装工程所需python包时运行pip install -r requirements.txt报错。
Building wheel for pycocotools (pyproject.toml) ... error
  error: subprocess-exited-with-error

  × Building wheel for pycocotools (pyproject.toml) did not run successfully.
  │ exit code: 1
  ╰─> [16 lines of output]
      running bdist_wheel
      running build
      running build_py
      creating build
      creating build\lib.win-amd64-cpython-37
      creating build\lib.win-amd64-cpython-37\pycocotools
      copying pycocotools\coco.py -> build\lib.win-amd64-cpython-37\pycocotools
      copying pycocotools\cocoeval.py -> build\lib.win-amd64-cpython-37\pycocotools
      copying pycocotools\mask.py -> build\lib.win-amd64-cpython-37\pycocotools
      copying pycocotools\__init__.py -> build\lib.win-amd64-cpython-37\pycocotools
      running build_ext
      cythoning pycocotools/_mask.pyx to pycocotools\_mask.c
      building 'pycocotools._mask' extension
      C:\Users\JMan\AppData\Local\Temp\pip-build-env-d7srpkie\overlay\Lib\site-packages\Cython\Compiler\Main.py:369: FutureWarning: Cython directive 'language_level' not set, using 2 for now (Py2). This will change in a later release! File: C:\Users\JMan\AppData\Local\Temp\pip-install-67f9ffpj\pycocotools_8f127f6a96c24185977908a89de18cf8\pycocotools\_mask.pyx
        tree = Parsing.p_module(s, pxd, full_module_name)
      error: Microsoft Visual C++ 14.0 or greater is required. Get it with "Microsoft C++ Build Tools": https://visualstudio.microsoft.com/visual-cpp-build-tools/
      [end of output]

  note: This error originates from a subprocess, and is likely not a problem with pip.
  ERROR: Failed building wheel for pycocotools
Failed to build pycocotools
ERROR: Could not build wheels for pycocotools, which is required to install pyproject.toml-based projects
通过查找资料发现问题在于:error: Microsoft Visual C++ 14.0 or greater is required.
解决方法: Get it with "Microsoft C++ Build Tools",即安装c++生成工具。 下载地址 (不用下载整个vs )
选择使用c++的桌面开发

2)运行detect.py时如下报错1
AttributeError: Can't get attribute 'SPPF' on models.common' from 'D:\\Users\\JMan\\PycharmProjects\\yolov5\\yolov5-5.0\\models\\common.py'>
解决方法
在model/common.py中的class SPP(nn,Module)之前添加如下代码,并在该文件前声明import warnings
class SPPF(nn.Module):
    # Spatial Pyramid Pooling - Fast (SPPF) layer for YOLOv5 by Glenn Jocher
    def __init__(self, c1, c2, k=5):  # equivalent to SPP(k=(5, 9, 13))
        super().__init__()
        c_ = c1 // 2  # hidden channels
        self.CV1 = Conv(c1, c_, 1, 1)
        self.CV2 = Conv(c_ * 4, c2, 1, 1)
        self.m = nn.MaxPool2d(kernel_size=k, stride=1, padding=k // 2)
    def forward(self, x):
        x = self.CV1(x)
        with warnings.catch_warnings():
            warnings.simplefilter('ignore')  # suppress torch 1.9.0 max_pool2d() warning
            y1 = self.m(x)
            y2 = self.m(y1)
            return self.CV2(torch.cat([x, y1, y2, self.m(y2)], 1))
3)运行detect.py时如下报错2
AttributeError: ‘Upsample‘ object has no attribute ‘recompute_scale_factor‘
解决方法
点击报错信息中的提示文件进入upsample.py中报错位置,做如下替换。
def forward(self, input: Tensor) -> Tensor:
        return F.interpolate(input, self.size, self.scale_factor, self.mode, self.align_corners)
4)运行detect.py时如下报错3
RuntimeError: The size of tensor a (60) must match the size of tensor b (56) at non-singLeton dimension 3
问题原因: 猜测是5.0的工程下载了6.1的模型,所以不匹配。
解决方法 下载5.0版本yolov5s权重文件替换。
https://github.com/ultralytics/yolov5/releases/download/v5.0/yolov5s.pt
5.结果
预测结果位于…\yolov5-5.0\runs\detect\exp8


6.代码解释
if __name__ == '__main__':
    parser = argparse.ArgumentParser()
    parser.add_argument('--weights', nargs='+', type=str, default='yolov5s.pt', help='model.pt path(s)')
    parser.add_argument('--source', type=str, default='data/images', help='source')  # file/folder, 0 for webcam
    parser.add_argument('--img-size', type=int, default=640, help='inference size (pixels)')
    parser.add_argument('--conf-thres', type=float, default=0.25, help='object confidence threshold')
    parser.add_argument('--iou-thres', type=float, default=0.45, help='IOU threshold for NMS')
    parser.add_argument('--device', default='', help='cuda device, i.e. 0 or 0,1,2,3 or cpu')
    parser.add_argument('--view-img', action='store_true', help='display results')
    parser.add_argument('--save-txt', action='store_true', help='save results to *.txt')
    parser.add_argument('--save-conf', action='store_true', help='save confidences in --save-txt labels')
    parser.add_argument('--nosave', action='store_true', help='do not save images/videos')
    parser.add_argument('--classes', nargs='+', type=int, help='filter by class: --class 0, or --class 0 2 3')
    parser.add_argument('--agnostic-nms', action='store_true', help='class-agnostic NMS')
    parser.add_argument('--augment', action='store_true', help='augmented inference')
    parser.add_argument('--update', action='store_true', help='update all models')
    parser.add_argument('--project', default='runs/detect', help='save results to project/name')
    parser.add_argument('--name', default='exp', help='save results to project/name')
    parser.add_argument('--exist-ok', action='store_true', help='existing project/name ok, do not increment')
    opt = parser.parse_args()
    print(opt)
    check_requirements(exclude=('pycocotools', 'thop'))

    with torch.no_grad():
        if opt.update:  # update all models (to fix SourceChangeWarning)
            for opt.weights in ['yolov5s.pt', 'yolov5m.pt', 'yolov5l.pt', 'yolov5x.pt']:
                detect()
                strip_optimizer(opt.weights)
        else:
            detect()
'--weights'指定网络权重参数(default处),默认为yolov5s.pt,权重文件可提前下载放入顶层目录,如果没有程序会自动下载(慢且报错)下载位置;
'--source'待预测图片或视频,default指定相对路径,也可以实现实时检测;
五、Faster-RCNN开源项目调试
写在前面
学习一个模型应该从两方面入手:
1)测试(Test)
首先理清测试逻辑,即模型已经训练好了,扔进去一张图片,是如何一步步生成带有检测框和置信度的检测结果的。
2)训练(Train)
然后再看训练过程,检测和训练过程通常架构都是一样的,训练主要是加入了LOSS来学习各个地方的参数,所以这步主要就是搞清LOSS是如何运作的。
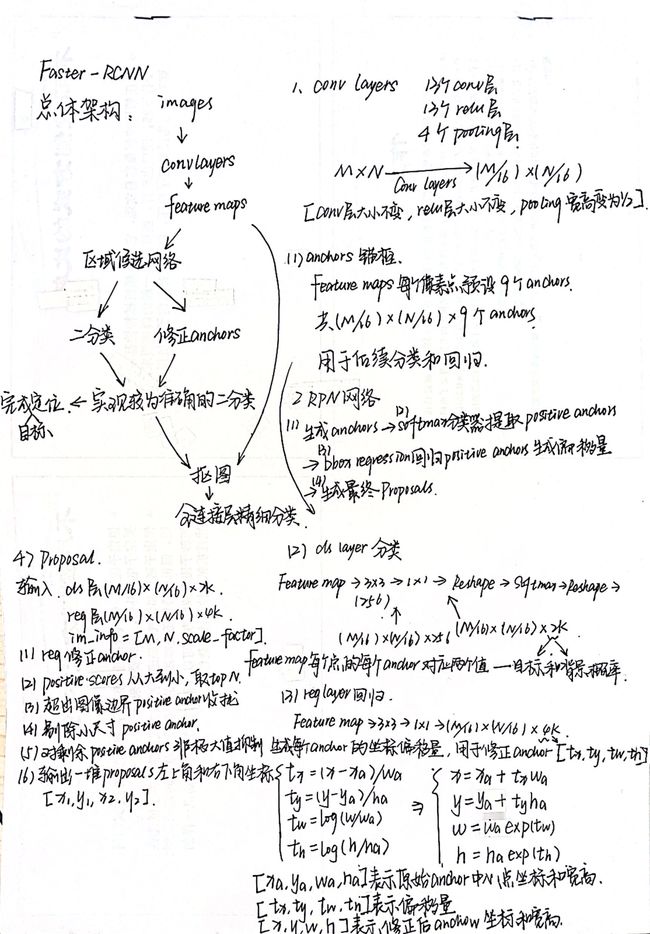
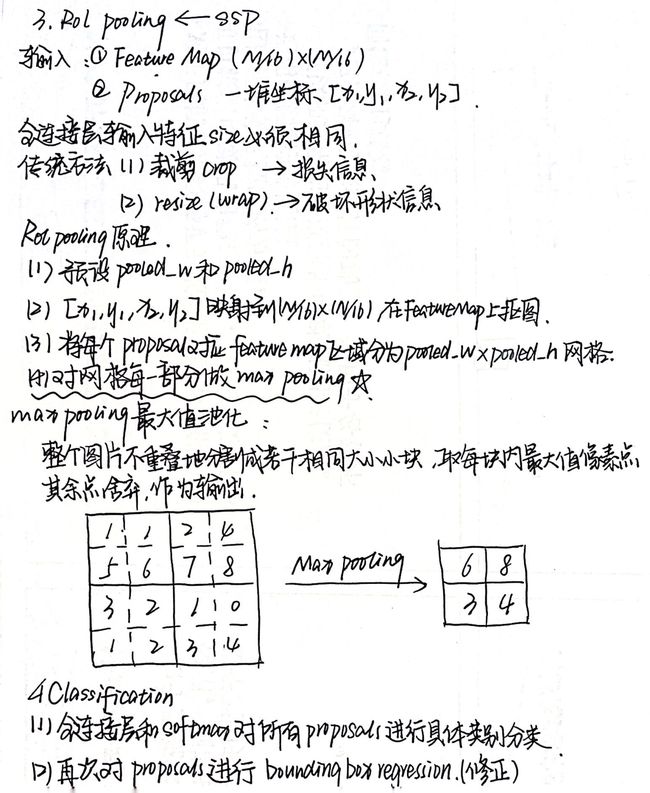
1.网络浅析
参考博客:https://blog.csdn.net/weixin_42310154/article/details/119889682
(贴学习手稿)
训练步骤
为了清晰描述整个训练过程,首先明确如下两个事实:
- RPN网络 = 特征提取conv层(下面简称共享conv层) + RPN特有层(3x3卷积、1x1卷积等)
- Faster RCNN网络 = 共享conv层 + Faster RCNN特有层(全连接层)

2.代码调试
  ├── backbone: 特征提取网络(分类网络),可以根据自己的要求选择
  ├── network_files: Faster R-CNN网络(包括Fast R-CNN以及RPN等模块)
  ├── train_utils: 训练验证相关模块(包括cocotools)
  ├── my_dataset.py: 自定义dataset用于读取VOC数据集
  ├── train_mobilenet.py: 以MobileNetV2做为backbone进行训练
  ├── train_resnet50_fpn.py: 以resnet50+FPN做为backbone进行训练
  ├── train_multi_GPU.py: 针对使用多GPU的用户使用
  ├── predict.py: 简易的预测脚本,使用训练好的权重进行预测测试
  ├── validation.py: 利用训练好的权重验证/测试数据的COCO指标,并生成record_mAP.txt文件
  └── pascal_voc_classes.json: pascal_voc标签文件
pascal_voc_classes.json: pascal_voc标签文件,针对东北大学缺陷检测数据集的标签文件如下(应该是只做二分类):
{
    "crazing": 1,
    "patches": 1,
    "inclusion": 1,
    "pitted_surface": 1,
    "rolled-in_scale": 1,
    "scratches": 1
}
原工程标签文件:
{
    "aeroplane": 1,
    "bicycle": 2,
    "bird": 3,
    "boat": 4,
    "bottle": 5,
    "bus": 6,
    "car": 7,
    "cat": 8,
    "chair": 9,
    "cow": 10,
    "diningtable": 11,
    "dog": 12,
    "horse": 13,
    "motorbike": 14,
    "person": 15,
    "pottedplant": 16,
    "sheep": 17,
    "sofa": 18,
    "train": 19,
    "tvmonitor": 20
}
标签为啥没有从0开始? 在目标检测当中,一般0是专门留给背景的。虽然说pascal_voc只有20个类别,其实实际训练过程中给出了21个类别,专门为背景设了一个类别。
下载预训练权重文件
下载预训练权重文件,放入文件夹backbone,修改文件名与训练网络调用格式一致。
MobileNetV2 backbone: https://download.pytorch.org/models/mobilenet_v2-b0353104.pth,在faster-rcnn中MobileNetV2预训练权重只有backbone权重,其中RPN和fast-rcnn部分的权重是没有的,所以训练效果也不是特别的好ResNet50+FPN backbone: https://download.pytorch.org/models/fasterrcnn_resnet50_fpn_coco-258fb6c6.pth,给的是完整的模型权重,不仅包括back_bone部分,还包括RPN和Fast-RCNN后半部分的权重。所以针对ResNet50+FPN给出的权重,可以针对自己的数据集进行较好的迁移学习,并且很快能得到一个比较理想的结果- 注意,下载的预训练权重记得要重命名,比如在
train_resnet50_fpn.py中读取的是fasterrcnn_resnet50_fpn_coco.pth文件, 不是fasterrcnn_resnet50_fpn_coco-258fb6c6.pth
数据集
原代码使用的是PASCAL_VOC2012数据集。
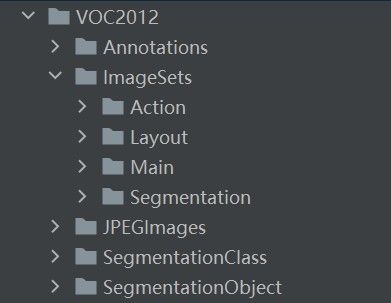
JPEGImages文件夹中存放的是数据集中的图像原图;
Annotations文件夹保存的是图像标注后的xml文件,记录了图像的大小,标注的位置、是否截断、检测难易程度等信息(labelimg标注可以获取);
ImageSets保存的是图像目录,目标检测使用到的主要是Main文件夹中的train、val和trainval,train存放训练集目录、val存放验证集目录,二者不交叉,trainval将训练集和验证集整合到一起(可以没有)。
更详细讲解:戳这里
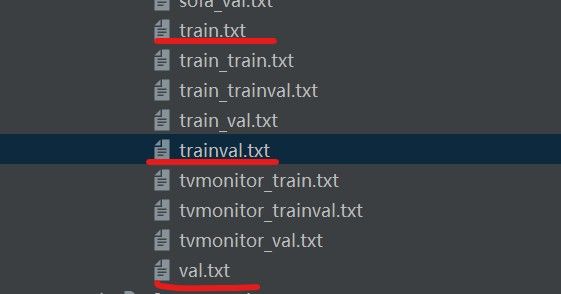
数据集的载入流程:以使用train.txt中的图像为例。 - 从
train.txt中读取图像名称; - 在
Annotations中找到对应图像的xml文件,获取图像大小,目标位置等信息; - 从
JPEGImages中找出该图像。
1.训练
train_res50_fpn.py
train_mobilenetv2.py
2.预测
predict.py
3.结果评价
validation.py
3.问题汇总
1.训练代码报错
ModuleNotFoundError: No module named 'lxml'
解决方法:
一定要在anaconda prompt进入程序所使用的环境中运行。
pip install lxml
pip install tushare
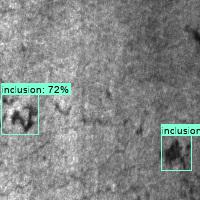
4.结果分析
训练程序正常运行,训练时间较长,这里直接导入官方提供的预训练权重文件进行预测。
本周工作总结
- 实现U2Net网络对磁瓦缺陷数据集的检测,并引入评价指标MAE;
- 初步认识Yolov5和Faster-RCNN网络,官方代码跑通;
- 《动手学深度学习》进展较慢。
下周计划安排
1.对东北大学数据集进行语义分割标注,投入U2Net网络做检测;
2.扩充显著性检测评价指标,进行代码实现;
3.深入学习Yolov5、Faster-RCNN和U2Net网络(各结构的代码)。