基于深度相机 RealSense D435i 的 ORB SLAM 2
转载自:https://www.jianshu.com/p/9e3d31ba35da
基于深度相机 RealSense D435i 的 ORB SLAM 2
isl_qdu
2020.08.08 10:41:57字数 2,436阅读 6,542
相比于上一篇文章,这里我们将官方给的 rosbag 数据包替换为来自深度相机的实时数据。之所以选择 Intel RealSense 这款深度相机,仅仅是因为它是最容易买到的。。。在京东上搜“深度相机”,符合要求的几乎都是这个系列的。具体到 D435i 这个型号,它可以提供深度和 RGB 图像,而且带有 IMU,未来如果我们继续做视觉+惯导的 SLAM 也够用了。
深度相机 RealSense D435i 简介
参考:https://www.intelrealsense.com/depth-camera-d435i/
Intel 官方给出了非常详细的介绍,尤其是产品手册,几乎涵盖了用户需要(以及不需要)了解的全部信息。
这里把其中关于 D435i 的关键信息摘录出来,方便以后查阅。
硬件信息
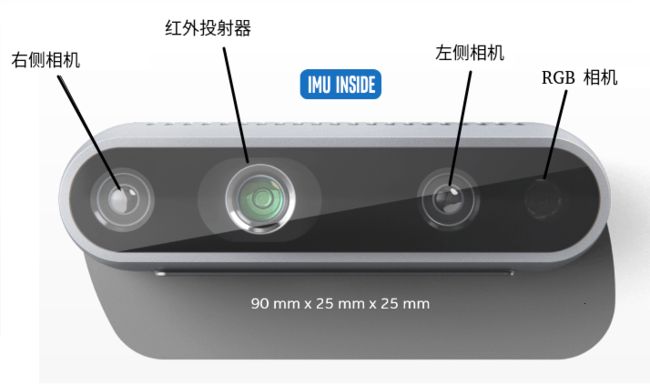
d435i.png
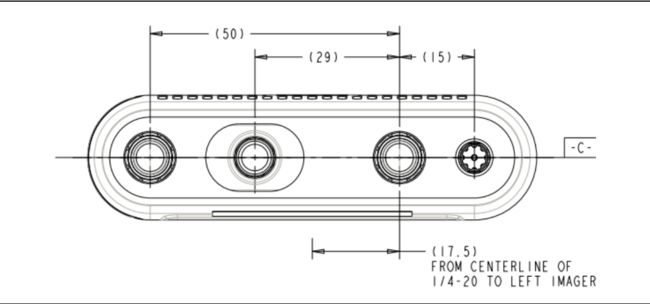
size.png
- 最高 1280×720 双目深度分辨率
- 最高 1920×1080 RGB 分辨率
- 最高 90 FPS 深度视频流。深度流与普通 RGB 视频流类似,只不过每个像素点的值不再是 RGB 或灰度值,而是物体相对于相机的距离。
- 只能对相同帧率的 RGB 与深度视频流做同步设置
- 双目 baseline 为 50 mm
- 深度探测范围 0.2 m ~ 10 m
- 深度坐标系以左侧相机为中心(上图中 centerline of 1/4-20 是指三脚架螺丝空的中心)
- 内含一个 6 自由度的 IMU,对应刚体在三维空间中 6 种运动方式:前后、左右、上下的平移,以及绕刚体三个轴的旋转 —— 绕前后方向轴旋转 roll, 绕左右方向轴旋转 pitch, 绕上下方向轴旋转 yaw
测距原理
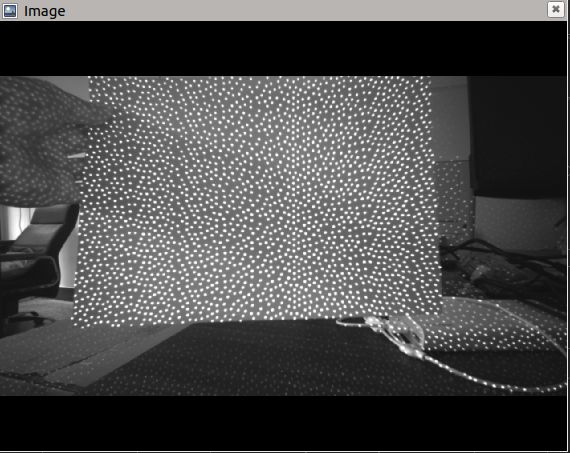
Interl RealSence D4×× 系列,包括 D435i,都是采用经典的双目视觉的方式测量深度。尽管具有红外投射器,但并不是采用红外反射测距。它的作用仅仅是投射不可见的固定的红外纹理样式,提高在纹理不明显的环境中(例如白墙)的深度计算精度,辅助双目视觉测距。左右两个相机将图像数据送入内置的深度处理器,在其中基于双目测距的原理计算每个像素的深度值。
下图显示的是红外投射在白纸上的纹理模式:
infrared.png
双目测距相机的参数
| Parameter | Camera Sensor Properties |
|---|---|
| Image Sensor | OmniVision OV9282 |
| Active Pixels | 1280 × 800 |
| Sensor Aspect Ratio | 8 :5 |
| Format | 10-bit RAW |
| F Number | f / 2.0 |
| Focal Length | 1.93 mm |
| Filter Type | IR Cut - D420, None - D430, D435/D435i |
| Focus | Fixed |
| Shutter Type | Global Shutter |
| Signal Interface | MIPI CSI -2, 2× Lanes |
| Horizontal Field of View | 91.2° |
| Vertical Field of View | 65.5° |
| Diagonal Field of View | 100.6° |
| Baseline | 50 mm |
| Depth FOV HD | H:87±3,V:58±1,D:95±3 |
| Depth FOV VGA | H:75±3,V:62±1,D:89±3 |
| Distortion | <=1.5% |
红外投射器参数
| Parameter | Properties |
|---|---|
| Projector | Infrared |
| Pattern Type | Static |
| Illuminating Component | Vertical-cavity surface-emitting laser(VCSEL) + optics |
| Laser Controller | PWM |
| Optical Power | 360 mW average, 4.25 W peak |
| Laser Wavelength | 850 nm ± 10 nm nominal @20° |
| Laser Compliance | Class 1, IEC 60825-1:2007 Edition 2, IEC 60825-1:2014 Edition 3 |
| Horizontal Field of Projection | 90°± 3° |
| Vertical Field of Projection | 63°±3° |
| Diagonal Field of Projection | 99°±3° |
RGB 相机参数
| Parameter | Camera Sensor Properties |
|---|---|
| Image Sensor | OmniVision OV2740 |
| Color Image Signal Processor | Discrete |
| Active Pixels | 1920 × 1080 |
| Sensor Aspect Ratio | 16:9 |
| Format | 10-bit RAW RGB |
| F Number | f/2.0 |
| Focal Length | 1.88mm |
| Filter Type | IR Cut Filter |
| Focus | Fixed |
| Shutter Type | Rolling Shutter |
| Signal Interface | MIPI CSI-2, 1 Lane |
| Horizontal Field of View | 69.4° |
| Vertical Field of View | 42.5° |
| Diagonal Field of View | 77° |
| Distortion | <=1.5% |
深度图像分辨率与支持的帧率
| Resolution | Frame Rate(FPS) |
|---|---|
| 1280 × 720 | 6,15, 30 |
| 848 × 480 | 6,15,30,60,90 |
| 640 × 480 | 6,15,30,60,90 |
| 640 × 360 | 6,15,30,60,90 |
| 480 × 270 | 6,15,30,60,90 |
| 424 × 240 | 6,15,30,60,90 |
RGB图像分辨率与支持的帧率
| Resolution | Frame Rate(FPS) |
|---|---|
| 1920 × 1080 | 6,15,30 |
| 1280 × 720 | 6,15,30 |
| 960 × 540 | 6,15,30,60 |
| 848 × 480 | 6,15,30,60 |
| 640 × 480 | 6,15,30,60 |
| 640 × 360 | 6,15,30,60 |
| 424 × 240 | 6,15,30,60 |
| 320 × 240 | 6,30,60 |
| 320 × 180 | 6,30,60 |
IMU 参数
| Parameter | Properties |
|---|---|
| Degrees of Freedom | 6 |
| Acceleration Range | ±4g |
| Accelerometer Sample Rate | 62.5, 250 (Hz) |
| Gyroscope Range | ±1000 deg/s |
| Gyroscope Sample Rate | 200, 400(HZ) |
| Sample Timestamp Accuracy | 50 usec |
软件开发套装
Intel RealSense SDK 2.0 是跨平台的开发套装,包含了基本的相机使用工具如 realsense-viewer,也为二次开发提供了丰富的接口,包括 ROS,python , Matlab, node.js, LabVIEW, OpenCV, PCL, .NET 等。
在 Linux 系统中,开发工具库有两种安装方式,一种是安装预编译的 debian 包,另一种是从源码编译。
如果 Linux 内核版本为 4.4, 4.8, 4.10, 4.13, 4.15, 4.18* 5.0* and 5.3*,并且没有用户自定义的模块,最好选择安装预编译的 debian 包,方便很多。
通过如下命令查看 ubuntu kernel 版本
uname -r
显示结果为 5.0.0-23-generic,满足上述版本要求。我们选择安装预编译的 debian 包。
Ubuntu 下的安装步骤可以参考 https://github.com/IntelRealSense/librealsense/blob/master/doc/distribution_linux.md
具体步骤摘录如下(针对 Ubuntu 18.04):
sudo apt-key adv --keyserver keys.gnupg.net --recv-key F6E65AC044F831AC80A06380C8B3A55A6F3EFCDE || sudo apt-key adv --keyserver hkp://keyserver.ubuntu.com:80 --recv-key F6E65AC044F831AC80A06380C8B3A55A6F3EFCDE
sudo add-apt-repository "deb http://realsense-hw-public.s3.amazonaws.com/Debian/apt-repo bionic main" -u
sudo apt-get install librealsense2-dkms
sudo apt-get install librealsense2-utils
sudo apt-get install librealsense2-dev
sudo apt-get install librealsense2-dbg
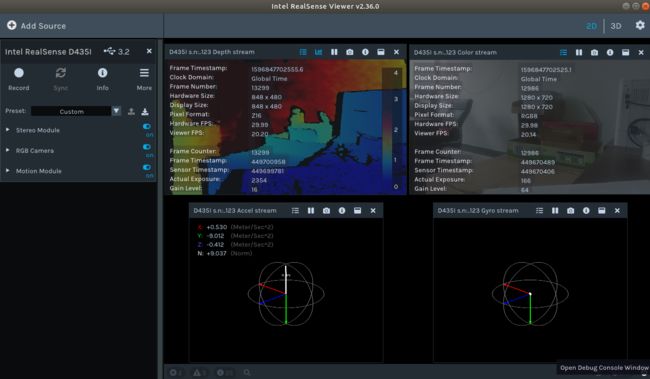
然后就可以运行 realsense-viewer 查看相机的深度和 RGB 图像,以及 IMU 中的测量,如下图所示:
realsense-viewer.png
另外还需要查看一下
modinfo uvcvideo | grep "version:"
确认包含 realsense 字样,例如 version: 1.1.2.realsense-1.3.14。
再查看一下 dkms
dkms status
返回结果中包含类似 librealsense2-dkms, 1.3.14, 5.0.0-23-generic, x86_64: installed。
如果以上都没问题,说明 RealSense SDK 2.0 安装成功!
如果上述返回结果有误,则可能影响后续的运行。根据我们的经验,realsense-dkms 会选择/lib/modules 中的第一个 kernel 安装,如果系统中存在多个 kernel,而当前运行的 kernel 不是 /lib/modules 中的第一个 kernel,就可能出问题。
相机自动标定
Intel RealSense D4×× 系列相机从 Firmware version 5.12.02.100 开始加入了自标定功能,大大提高了相机标定的自动化程度,不再需要拿着标定板摆拍了。
详细操作可以查看这里。
简要流程:
- 将相机朝着纹理比较丰富的环境,不一定是平面
- 打开 realsense_viewer
- 将 "Stereo Module" 中的 “Emitter Enabled” 设置为 “Laser”
- 在 “More” 下拉菜单中选择 "On-Chip Calibration"
- 选择 "Calibrate"
- 查看 "Health-Check" 的数值, 一般小于 0.25 是可以接受的。
- 如果新的标定参数比之前的好,就 “Apply New” 将新的参数烧入 Firmware 中。
安装 ROS 中的 realsense 相关库
在本文中,我们的最终目的是将相机的深度和 RGB 数据发布到 ros topic 上,然后通过 ORB SLAM 2 进行点云建图。
这里就需要用到 ROS 的 realsense 库 ros-$ROS_VER-realsense2-camera。需要注意的是,这个 ROS 库并不依赖于 RealSense SDK 2.0,两者是完全独立的。因此,如果只是想在 ROS 中使用 realsense,并不需要先安装上边的 RealSense SDK 2.0。
安装步骤参考 https://github.com/IntelRealSense/realsense-ros。
具体命令如下(前提:已安装 ROS melodic 版本):
sudo apt-get install ros-melodic-realsense2-camera
sudo apt-get install ros-melodic-realsense2-description
运行
包括两部分:
- 启动相机发布数据
- 启动 ORB SLAM2 程序
启动相机发布数据
在启动相机之前,我们需要设置一下 realsense2_camera rospack 中的 rs_camera.launch 的文件。
对于 ros launch 中各个参数的介绍可以参考这里。
在 rs_camera.launch 文件中确保以下两个参数为 true:
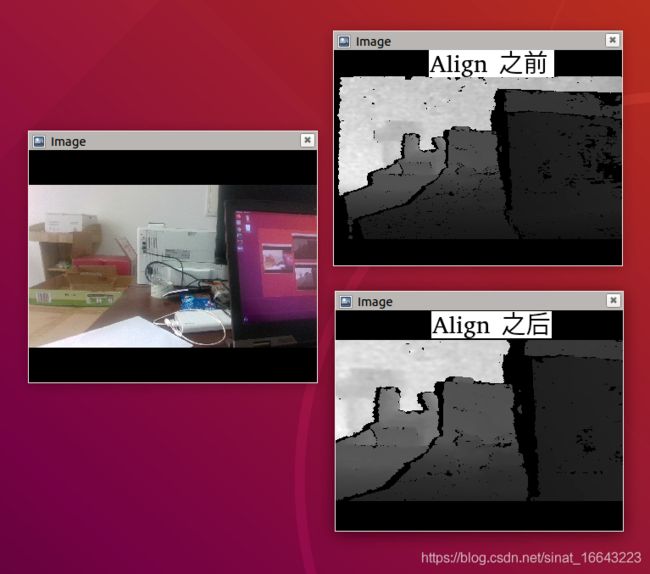
前者是让不同传感器数据(depth, RGB, IMU)实现时间同步,即具有相同的 timestamp;
后者会增加若干 rostopic,其中我们比较关心的是 /camera/aligned_depth_to_color/image_raw,这里的 depth 图像与 RGB 图像是对齐的,对比如下
然后就可以用如下命令启动相机了:
roslaunch realsense2_camera rs_camera.launch
部分 ros topic 如下:
/camera/accel/imu_info
/camera/accel/sample
/camera/aligned_depth_to_color/camera_info
/camera/aligned_depth_to_color/image_raw
/camera/aligned_depth_to_color/image_raw/compressed
/camera/aligned_depth_to_color/image_raw/compressed/parameter_descriptions
/camera/aligned_depth_to_color/image_raw/compressed/parameter_updates
/camera/aligned_depth_to_color/image_raw/compressedDepth
...
/camera/aligned_depth_to_infra1/camera_info
/camera/aligned_depth_to_infra1/image_raw
/camera/aligned_depth_to_infra1/image_raw/compressed
...
/camera/color/camera_info
/camera/color/image_raw
/camera/color/image_raw/compressed
/camera/color/image_raw/compressed/parameter_descriptions
/camera/color/image_raw/compressed/parameter_updates
...
/camera/depth/camera_info
/camera/depth/color/points
/camera/depth/image_rect_raw
/camera/depth/image_rect_raw/compressed
/camera/depth/image_rect_raw/compressed/parameter_descriptions
...
/camera/extrinsics/depth_to_color
/camera/extrinsics/depth_to_infra1
/camera/extrinsics/depth_to_infra2
/camera/gyro/imu_info
/camera/gyro/sample
/camera/infra1/camera_info
/camera/infra1/image_rect_raw
/camera/infra1/image_rect_raw/compressed
...
/camera/infra2/camera_info
/camera/infra2/image_rect_raw
/camera/infra2/image_rect_raw/compressed
/camera/infra2/image_rect_raw/compressed/parameter_descriptions
...
/tf
/tf_static
其中关键的是 /camera/color/image_raw 和 /camera/aligned_depth_to_color/image_raw 分别对应 RGB 图像和深度图像。基于这些数据,我们希望实现 ORB SLAM 2 + 点云建图的效果。
相比于采用 rosbag 数据包的 ORB SLAM 2,这里有以下几点修改:
- 修改 yaml 配置文件:里面包含了相机内参,可以通过 rostopic
/camera/color/camera_info获得。最终新的RealSense.ymal文件如下(每个相机的参数可能会有差别):
#--------------------------------------------------------------------------------------------
# Camera calibration and distortion parameters (OpenCV)
Camera.fx: 920.2216186523438
Camera.fy: 918.2052612304688
Camera.cx: 648.8403930664062
Camera.cy: 363.62689208984375

Camera.k1: 0.0
Camera.k2: 0.0
Camera.p1: 0.0
Camera.p2: 0.0
Camera.k3: 0.0

Camera.width: 1280
Camera.height: 720

#Camera frames per second
Camera.fps: 30.0

#IR projector baseline times fx (aprox.)
Camera.bf: 46.01

#Color order of the images (0: BGR, 1: RGB. It is ignored if images are grayscale)
Camera.RGB: 1

#Close/Far threshold. Baseline times.
ThDepth: 40.0

#Deptmap values factor,将深度像素值转化为实际距离,原来单位是 mm,转化成 m
DepthMapFactor: 1000.0


#ORB Parameters
#--------------------------------------------------------------------------------------------

#ORB Extractor: Number of features per image
ORBextractor.nFeatures: 1000

#ORB Extractor: Scale factor between levels in the scale pyramid
ORBextractor.scaleFactor: 1.2

#ORB Extractor: Number of levels in the scale pyramid
ORBextractor.nLevels: 8

#ORB Extractor: Fast threshold
#Image is divided in a grid. At each cell FAST are extracted imposing a minimum response.
#Firstly we impose iniThFAST. If no corners are detected we impose a lower value minThFAST
#You can lower these values if your images have low contrast
ORBextractor.iniThFAST: 20
ORBextractor.minThFAST: 7

#--------------------------------------------------------------------------------------------
#Viewer Parameters
#--------------------------------------------------------------------------------------------
Viewer.KeyFrameSize: 0.05
Viewer.KeyFrameLineWidth: 1
Viewer.GraphLineWidth: 0.9
Viewer.PointSize:2
Viewer.CameraSize: 0.08
Viewer.CameraLineWidth: 3
Viewer.ViewpointX: 0
Viewer.ViewpointY: -0.7
Viewer.ViewpointZ: -1.8
Viewer.ViewpointF: 500
修改 pointcloudmapping.cc文件
- 123 行附近修改如下:
voxel.setInputCloud( globalMap );
voxel.setLeafSize (0.02f, 0.02f, 0.02f); # 调节点云密度
voxel.filter( *tmp );
73 行附近修改如下:
p.y = - ( m - kf->cy) * p.z / kf->fy;   # 将原本颠倒的点云地图上下翻转,方便观察

p.r = color.ptr(m)[n*3];      # 修改颜色显示
p.g = color.ptr(m)[n*3+1];
p.b = color.ptr(m)[n*3+2];
做完以上修改,就可以按照前一篇文章中的步骤编译和运行 ORB SLAM 2 了,此时深度和 RGB 数据不再是来自 rosbag ,而是来自相机。
命令总结如下:
roscore

rosrun ORB_SLAM2 RGBD Vocabulary/ORBvoc.bin Examples/RGB-D/RealSense.yaml /camera/rgb/image_raw:=/camera/color/image_raw /camera/depth_registered/image_raw:=/camera/aligned_depth_to_color/image_raw
最终保存的点云地图效果如下:
总结
本文记录了基于深度相机 Intel RealSense D435i 实现 ORB SLAM 2 的过程,由于之前的文章(1,2)已经非常详细的记录了基于 rosbag 数据包的 ORB SLAM 2,本文的大部分内容是记录与深度相机相关的一些设置,方便自己以后查阅,也希望能帮到类似研究方向的其他读者。
作者:isl_qdu
链接:https://www.jianshu.com/p/9e3d31ba35da
来源:简书
著作权归作者所有。商业转载请联系作者获得授权,非商业转载请注明出处。
