利用python+opencv做图像分割
一、利用python+opencv做图像分割
参考链接
-
https://blog.csdn.net/wsp_1138886114/article/details/82917661 膨胀、腐蚀
-
https://blog.csdn.net/m0_38007695/article/details/82718107 图像增强,均值化
-
https://blog.csdn.net/weixin_42555985/article/details/93713477 图像分割
-
https://www.jb51.net/article/181366.htmPython
图像处理库PIL的ImageEnhance模块使用介绍
基于该博客的图像阈值分割 https://blog.csdn.net/weixin_42380114/article/details/103294631
关键代码:
    #转换数据类型
    img2=img.astype(np.int16)
    #拆分三通道
    B = img2[:, :, 0]
    G = img2[:, :, 1]
    R = img2[:, :, 2]
    m1 = (R - G)
    R[(m1 <= 18)] = 0
    G[(m1 <= 18)] = 0
    B[(m1 <= 18)] = 0
    #数据类型转换
    img2 = img2.astype(np.uint8)
因为矩阵相减如果小于0会翻转,所以需要进行数据类型的转换
通过读取原始图片进行彩色阈值分割,获取相应坐标,再写入低像素图片
完整代码:
import cv2
import numpy as np
import datetime
import glob
import re
import  os
if __name__ == '__main__':
    original_path=r''
    small_path=r''
    original  = sorted(glob.glob(original_path), key = os.path.getmtime)
    small = sorted(glob.glob(small_path),  key = os.path.getmtime)
    nowtime = datetime.datetime.now()
for ww in range(len(original)):

    img = cv2.imread(original[ww])
    small_img=cv2.imread(small[ww])
    print(original[ww])
    print(small[ww])
    # 原图
    result = img.copy()

    strs = "..."
    cv2.imwrite(strs,small_img)

    #转换数据类型
    img2=img.astype(np.int16)
    #拆分三通道
    B = img2[:, :, 0]
    G = img2[:, :, 1]
    R = img2[:, :, 2]

    m1 = (R - G)
    R[(m1 <= 18)] = 0
    G[(m1 <= 18)] = 0
    B[(m1 <= 18)] = 0

    #数据类型转换
    img2 = img2.astype(np.uint8)

    img=cv2.cvtColor(img2,cv2.COLOR_BGR2GRAY)

    #大于110被置为255
    ret, thresh1 = cv2.threshold(img, 110, 255, cv2.THRESH_BINARY)

    kernel = cv2.getStructuringElement(cv2.MORPH_RECT, (40, 40))
    # 膨胀
    img = cv2.dilate(thresh1, kernel, iterations=2)


    #双边滤波去噪+填充
    blur = cv2.bilateralFilter(img, 10, 80, 80)
    fill = blur.copy()
    h, w = blur.shape[: 2]
    mask = np.zeros((h + 2, w + 2), np.uint8)
    cv2.floodFill(fill, mask, (90, 90), 255);
    fill_INV = cv2.bitwise_not(fill)
    fill_out = blur | fill_INV


    extended = cv2.copyMakeBorder(img, 3, 3, 3, 3, cv2.BORDER_CONSTANT, value=[255, 255, 255])
    # 然后从白边上的任意点用黑色填充
    mh, mw = extended.shape[:2]
    mask = np.zeros([mh + 2, mw + 2], np.uint8)
    cv2.floodFill(extended, mask, (0, 0), (0, 0, 0), flags=cv2.FLOODFILL_FIXED_RANGE)


    # 检测轮廓
    contours, hierarchy = cv2.findContours(extended, cv2.RETR_EXTERNAL, cv2.CHAIN_APPROX_SIMPLE)

    result = cv2.imread(small[ww])
    for i, contour in enumerate(contours):
        x, y, w, h = cv2.boundingRect(contour)
        x1 = int(x * 0.4902)
        y1 = int(y * 0.4902)
        w1 = int(w * 0.4902)
        h1 = int(h * 0.4902)
        cv2.rectangle(result, (x1, y1), (x1 + w1, y1 + h1), (255, 0, 0), 2)

    cv2.namedWindow('th1', cv2.WINDOW_NORMAL)
    cv2.resizeWindow('th1', 700, 500)
    cv2.imshow('th1', result)
    cv2.waitKey(0)
    cv2.destroyAllWindows()
如果需要将框出的图像裁剪,可以使用PIL图形处理库,关键代码如下:
from PIL import Image
crop_img = Image.open("your original path")
out = crop_img.crop((x, y, x + w, y + h))
out.save("your crop path“, 'PNG')
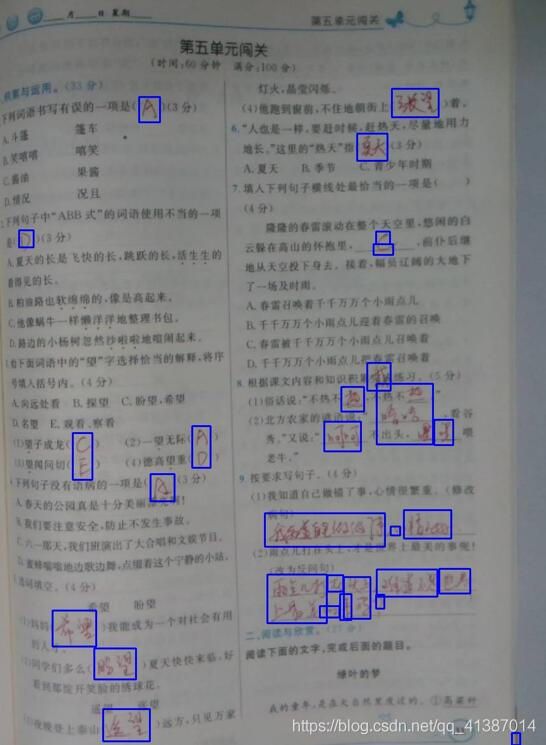
实际效果图如下:将手写字框出来
二、 数据采集
具体步骤:
1、通过相机或者python脚本,设置间隔3秒一次,连续拍照,拍照时候背景需要空白,并且拿个直尺对准两个角
2、将拍摄好的图片,导入扫描全能王,这个步骤可能会耗时1-2分钟
3、将图片同步到云端,PC端可以通过云端将图片下载下来
注意事项:导入图片需要按页码顺序导入,这样可以防止下载图片不会乱序