Pytorch学习
Pytorch学习
一、 tensor
tensor是pytorch最基本的数据结构,是pytorch中一个类(torch.Tensor),很多属性与方法和numpy中的数据相似。因此在numpy基础学习pytorch容易上手。
Tensors are a specialized data structure that are very similar to arrays and matrices. In PyTorch, we use tensors to encode the inputs and outputs of a model, as well as the model’s parameters.
Tensors are similar to NumPy’s ndarrays, except that tensors can run on GPUs or other hardware accelerators. In fact, tensors and NumPy arrays can often share the same underlying memory, eliminating the need to copy data (see Bridge with NumPy). Tensors are also optimized for automatic differentiation (we’ll see more about that later in the Autograd section). If you’re familiar with ndarrays, you’ll be right at home with the Tensor API. If not, follow along!
Tensors是特殊的数据结构,相似于数组(array)和矩阵(matrices)。在pytorch,使用tensor编码模型的输入、输出及模型参数;
Tensors相似与numpy的数组(ndarray),除了tensors能运行在GPU或其它硬件加速器上。实际上tensors和numpy array 能够经常共享相同的底层内存,这样消除了数据复制的需求。tensor也可用自动微分的优化。如果你对numpy ndarray熟悉,那么你蒋对Tensor API非常熟悉。
创建Tensors
Tensors can be initialized in various ways. Take a look at the following examples
tensor能通过多种方式创建,看看下面几个例子
1. directly from data
Tensors can be created directly from data. The data type is automatically inferred.
tensor通过列表直接创建,其类型自动获得
例如1.1
import torch
torch.tensor([1,2])
2. from numpy array
Tensors can be created from a numpy ndarray
例1.2
import torch
import numpy as np
data = np.array([1,2])
torch.tensor(data)
3. from other tensors
The new tensor retains the properties (shape, datatype) of the argument tensor, unless explicitly overridden.
例1.3
import torch
torch.ones_like(data)
torch.rand_like(data, dtype=torch.float)
4. with constant or random value
shape is a tuple of tensor dimensions. In the functions below, it determines the dimensionality of the output tensor.
例1.4
import torch
shape = (2,3,)
torch.ones(shape)
torch.zeros(shape)
torch.rand(shape)
Tensor的属性
Tensor attributes describe their shape, datatype, and the device on which they are stored.
有哪些属性?查看属性?改变或设置属性
有哪些属性
1. dtype:
dtype是torch一个类,torch提供了12种数据类型类: torch.float32 or torch.float(默认的),torch.float64 or torch.double, torch. int32, torch.bool, 每一个类型有相应的构造方法,如torch.Float32Tensor or torch.cuda.FloatTensor, torch.BoolTensor ort torch.cuda.BoolTensor, 有cuda表示在GPU上创建,没有cuda表示在cpu上创建。
2. shape
3. device
device是torch中一个类,说明Tensor存储的位置。Tensor默认存在cpu中。创建device对象
device也是torch的一个类,A torch.device is an object representing the device on which a torch.Tensor is or will be allocated.
a. 创建device对象
torch.device(“cuda”)
torch.device(“cuda:0”)
torch.device(“cpu”)
torch.device(1) # 表示在第2个GPU, ordinal只适合GPU
torch.device(“cuda”,0)
b. Tensors可以在定义时指明设备,默认是CPU
torch.tensor([1,2],device=“cuda:0”)
torch.tensor([1,2], device=torch.device(“cuda:0”))
也可以移动到指定设备
torch.tensor([1,2]).to(“cuda:0”)
torch.tensor([1,2]).cpu()
torch.tensor([1,2]).cuda()
If the device ordinal is not present, this object will always represent the current device for the device type, even after torch.cuda.set_device() is called; e.g., a torch.Tensor constructed with device ‘cuda’ is equivalent to ‘cuda:X’ where X is the result of torch.cuda.current_device().
4. requires_grad 和 grad_fn 和grad属性
每个Tensor在创建时可以指明requires_grad的属性,如为True,表示可以求导。默认为False。
也可以通过Tensor.requires_grad=True 改变其值
例
data = torch.randn(2,3, requires_grad=True)
data.requires_grad = False
由requires_grad为True的Tensor构建的函数具有grad_fn属性,grad_fn指向这个函数。
函数对象调用backward()后,Tensor的grad属性才不为none
5. .T, mT, mH
Tensor.T Returns a view of this tensor with its dimensions reversed.
If n is the number of dimensions in x, x.T is equivalent to x.permute(n-1, n-2, …, 0).
Tensor.H Returns a view of a matrix (2-D tensor) conjugated and transposed.
x.H is equivalent to x.transpose(0, 1).conj() for complex matrices and x.transpose(0, 1) for real matrices.
Tensor.mT Returns a view of this tensor with the last two dimensions transposed.
x.mT is equivalent to x.transpose(-2, -1).
Tensor.mH
Accessing this property is equivalent to calling adjoint().
Tensor 方法
Over 100 tensor operations, including arithmetic, linear algebra, matrix manipulation (transposing, indexing, slicing), sampling and more are comprehensively described here.
有100以上Tensor操作,包括算术的,线性代数,矩阵,抽样和更多的在这里介绍
By default, tensors are created on the CPU. We need to explicitly move tensors to the GPU using .to method (after checking for GPU availability). Keep in mind that copying large tensors across devices can be expensive in terms of time and memory!
默认,Tensor创建在cpu上。也也可以通过.to() 方法显示地移动Tensor到GPU上,但是必须是在检查GPU可得性后。记住在不同设备间复制大的Tensor在时间和内存上 开销很大。
例
if torch.cuda.is_available():
tensor = tensor.to(“cuda”)
Try out some of the operations from the list. If you’re familiar with the NumPy API, you’ll find the Tensor API a breeze to use.
1 算术运算
+,-,*,**,/,sum,abs, ceil, floor, max, min, argmin, argmax, 三角函数, 反三角函数,指数函数,对数函数,统计运算
2 关系运算
<==, all, any , where,
3 位运算
4 逻辑运算
3 代数运算
4 形状运算
torch.tensor_split(), Tensor.chunk(), sequeeze, unsequeeze, transpose, permute, Tensor.tile, Tensor.view,Tensor.reshape, Tensor.resize
4.1. Tensor.reshape(),view(), reshape_as(), view_as()
Returns a tensor with the same data and number of elements as self but with the specified shape. This method returns a view if shape is compatible with the current shape.
例
reshape 可以产生Tensor的视图或副本。若Tensor 是contiguous,则返回一个视图,否则返回一个副本
view产生一个视图,但前提条件是Tensor必须是contiguous的,否则产生错误
A single dimension may be -1, in which case it’s inferred from the remaining dimensions and the number of elements in input.
Basic slicing and indexing op, e.g. tensor[0, 2:, 1:7:2] returns a view of base tensor, see note below.
adjoint(), as_strided(), detach(), diagonal(), expand(), expand_as(),movedim(), narrow(), permute(), select(), squeeze(), transpose(), t()
T, H, mT, mH, real, imag
view_as_real()
unfold()
unsqueeze()
unbind()
split()
hsplit()
vsplit()
tensor_split()
split_with_sizes()
swapaxes()
swapdims()
chunk()
indices() (sparse tensor only)
values() (sparse tensor only)
4.2 Tensor.ravel,unsqueeze(),squeeze(),expand(), repeat(), tile()
Tensor.ravel:
Tensor.unfold: Returns a view of the original tensor which contains all slices of size size from self tensor in the dimension dimension
例
x = torch.arange(1., 8)
x.unfold(0, 2, 1), # 按照在第0dimension,2个数字,间隔1
例
x = torch.randn(2,5)
x.unfold(1,2,2)
Tensor.expand(): Returns a new view of the self tensor with singleton dimensions expanded to a larger size.-1 表示相应维度不变。只能对为1的维度进行操作。
Tensor.repeat(): Repeats this tensor along the specified dimensions.1 表示该维度不变,类似广播机制
Tensor.tile(): Constructs a tensor by repeating the elements of input. The dims argument specifies the number of repetitions in each dimension.If dims specifies fewer dimensions than input has, then ones are prepended to dims until all dimensions are specified. For example, if input has shape (8, 6, 4, 2) and dims is (2, 2), then dims is treated as (1, 1, 2, 2).Analogously, if input has fewer dimensions than dims specifies, then input is treated as if it were unsqueezed at dimension zero until it has as many dimensions as dims specifies
4.3 t(), transpose(), swapaxes(), swapdims(), movedim, moveaxis, narrow(), permute()
transpose(input, dim0, dim1): Returns a tensor that is a transposed version of input. The given dimensions dim0 and dim1 are swapped.
swapaxes(): This function is equivalent to NumPy’s swapaxes function.
swapdims(input, dim0, dim1):
movedim(input, source, destination): Moves the dimension(s) of input at the position(s) in source to the position(s) in destination.
moveaxis(input, source, destination):
例
torch.movedim(t, (1, 2), (0, 1))
Tensor.narrow(dimension, start, length):
例
``
x = torch.tensor([[1, 2, 3], [4, 5, 6], [7, 8, 9]])
x.narrow(0, 0, 2)
tensor([[ 1, 2, 3],
[ 4, 5, 6]])
x.narrow(1, 1, 2)
tensor([[ 2, 3],
[ 5, 6],
[ 8, 9]])
Tensor.permute(): Returns a view of the original tensor input with its dimensions permuted.
例
```cpp
>>> x = torch.randn(2, 3, 5)
>>> x.size()
torch.Size([2, 3, 5])
>>> torch.permute(x, (2, 0, 1)).size()
torch.Size([5, 2, 3])
4.4 Tensor分割、合并 split, torch.stack, torch.cat, torch.dstack,chunk,unbind
split(tensor, split_size_or_sections, dim=0): Splits the tensor into chunks. Each chunk is a view of the original tensor.
If split_size_or_sections is an integer type, then tensor will be split into equally sized chunks (if possible). Last chunk will be smaller if the tensor size along the given dimension dim is not divisible by split_size.
If split_size_or_sections is a list, then tensor will be split into len(split_size_or_sections) chunks with sizes in dim according to split_size_or_sections.
unbind()
hsplit()
vsplit()
tensor_split(): Splits a tensor into multiple sub-tensors, all of which are views of input, along dimension dim according to the indices or number of sections specified by indices_or_sections.
torch.stack
torch.cat, torch.concat: Concatenates the given sequence of seq tensors in the given dimension. All tensors must either have the same shape (except in the concatenating dimension) or be empty.
torch.dstack, torch.hstack: Concatenates a sequence of tensors along a new dimension.
torch.unbind(input, dim=0) : Removes a tensor dimension. Returns a tuple of all slices along a given dimension, already without it.
5 梯度相关计算
detach,backward, Tensor.retain_grad,Tensor.retains_grad, torch.Tensor.is_leaf
detach
返回一个新的Variable,从当前计算图中分离下来的,但是仍指向原变量的存放位置,不同之处只是requires_grad为false,得到的这个Variable永远不需要计算其梯度,不具有grad。
两个Variable具有相同的data,修改会反应在两个Variables
import torch

a = torch.tensor([1, 2, 3.], requires_grad=True)
print(a.grad)
out = a.sigmoid()

out.sum().backward()
print(a.grad)
返回:

(deeplearning) userdeMBP:pytorch user$ python test.py
None
tensor([0.1966, 0.1050, 0.0452])
当使用detach()但是没有进行更改时,并不会影响backward():

import torch

a = torch.tensor([1, 2, 3.], requires_grad=True)
print(a.grad)
out = a.sigmoid()
print(out)

#添加detach(),c的requires_grad为False
c = out.detach()
print(c)

#这时候没有对c进行更改,所以并不会影响backward()
out.sum().backward()
print(a.grad)
返回:

(deeplearning) userdeMBP:pytorch user$ python test.py
None
tensor([0.7311, 0.8808, 0.9526], grad_fn=<SigmoidBackward>)
tensor([0.7311, 0.8808, 0.9526])
tensor([0.1966, 0.1050, 0.0452])
如果这里使用的是c进行sum()操作并进行backward(),则会报错:

import torch

a = torch.tensor([1, 2, 3.], requires_grad=True)
print(a.grad)
out = a.sigmoid()
print(out)

#添加detach(),c的requires_grad为False
c = out.detach()
print(c)

#使用新生成的Variable进行反向传播
c.sum().backward()
print(a.grad)
返回:

(deeplearning) userdeMBP:pytorch user$ python test.py
None
tensor([0.7311, 0.8808, 0.9526], grad_fn=<SigmoidBackward>)
tensor([0.7311, 0.8808, 0.9526])
Traceback (most recent call last):
  File "test.py", line 13, in <module>
import torch

a = torch.tensor([1, 2, 3.], requires_grad=True)
print(a.grad)
out = a.sigmoid()
print(out)

#添加detach(),c的requires_grad为False
c = out.detach()
print(c)
c.zero_() #使用in place函数对其进行修改

#会发现c的修改同时会影响out的值
print(c)
print(out)

#这时候对c进行更改,所以会影响backward(),这时候就不能进行backward(),会报错
out.sum().backward()
print(a.grad)
返回:

(deeplearning) userdeMBP:pytorch user$ python test.py
None
tensor([0.7311, 0.8808, 0.9526], grad_fn=<SigmoidBackward>)
tensor([0.7311, 0.8808, 0.9526])
tensor([0., 0., 0.])
tensor([0., 0., 0.], grad_fn=<SigmoidBackward>)
Traceback (most recent call last):
  File "test.py", line 16, in <module>
    out.sum().backward()
torch.no_grad()
Context-manager that disabled gradient calculation.
x = torch.tensor([1.], requires_grad=True)
例
with torch.no_grad():
… y = x * 2
y.requires_grad
False
@torch.no_grad()
… def doubler(x):
… return x * 2
z = doubler(x)
z.requires_grad
torch.enable_grad
Context-manager that enables gradient calculation.
Enables gradient calculation, if it has been disabled via no_grad or set_grad_enabled.
>>> x = torch.tensor([1.], requires_grad=True)
>>> with torch.no_grad():
...   with torch.enable_grad():
...     y = x * 2
>>> y.requires_grad
True
>>> y.backward()
>>> x.grad
>>> @torch.enable_grad()
... def doubler(x):
...     return x * 2
>>> with torch.no_grad():
...     z = doubler(x)
>>> z.requires_grad
True

```python


##### torch.set_grad_enabled(mode)`
Context-manager that sets gradient calculation to on or off.
set_grad_enabled will enable or disable grads based on its argument mode. It can be used as a context-manager or as a function.


```python
>>> x = torch.tensor([1.], requires_grad=True)
>>> is_train = False
>>> with torch.set_grad_enabled(is_train):
...   y = x * 2
>>> y.requires_grad
False
>>> torch.set_grad_enabled(True)
>>> y = x * 2
>>> y.requires_grad
True
>>> torch.set_grad_enabled(False)
>>> y = x * 2
>>> y.requires_grad
False
torch.is_grad_enabled()
Returns True if grad mode is currently enabled.
torch.inference_mode(mode=True)
Context-manager that enables or disables inference mode
InferenceMode is a new context manager analogous to no_grad to be used when you are certain your operations will have no interactions with autograd (e.g., model training).
>>> import torch
>>> x = torch.ones(1, 2, 3, requires_grad=True)
>>> with torch.inference_mode():
... y = x * x
>>> y.requires_grad
False
>>> y._version
Traceback (most recent call last):
File "" , line 1, in <module>
RuntimeError: Inference tensors do not track version counter.
>>> @torch.inference_mode()
... def func(x):
... return x * x
>>> out = func(x)
>>> out.requires_grad
False
torch.is_inference_mode_enabled()
Returns True if inference mode is currently enabled.
6 其它计算
Tensor.tolist, Tensor.unique
7 存储机制
tensor 数据结构如下图所示,tensor 分为头信息区(Tensor)和存储区 (Storage),信息区主要保存着 Tensor 的形状(size)、步长(stride)、数据类型(type )等信息,而真正的数据则保存成连续的数组,存在存储区。
信息区占用内存较少,主要内存占用取决于 tensor 中元素数目,即存储区大小。由于数据动辄成千数万,所以采取这样的存储方式。
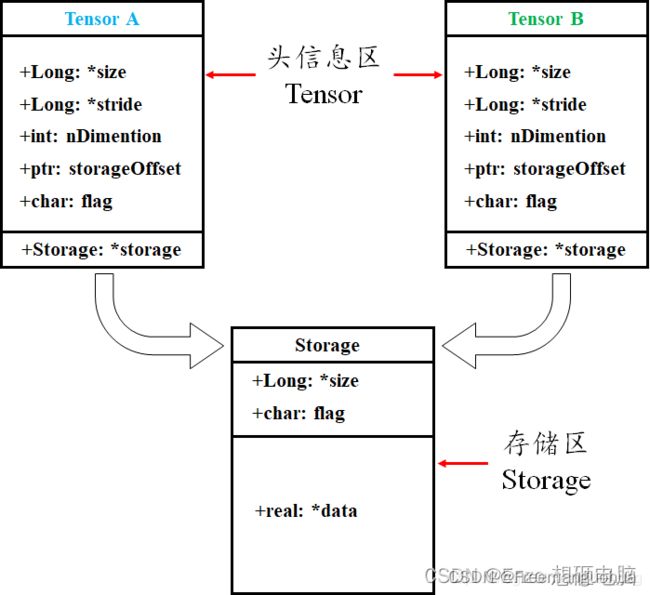
storage_offset() 表示 tensor 的第 0 个元素与真实存储区的第 0 个元素的偏移量
例
t = torch.arange(0,9)
tt = t[1:7]
ttt = tt [ 1:3]
tt.storage_offset() #1
ttt.storage_offset() #2
存储区:一般来说,一个 tensor 有着与之对应的 storage , storage 是在 data 之上封装的接口。不同 tensor 的头信息一般不同,但却可能使用相同的 storage。
a.storage() :查看 a 存储的数据内容
id(a):查看 a 的内存地址,包括头信息区和存储区
id(a.storage):查看 a 的存储区的内存地址
a.data_ptr():返回 a 首元素的内存地址
例
a = torch.arange(0,10)
b = a[3:]
c = b[2:]
a.storage()
b.storage()
c.storage() #都输出0,1,2,3,4,5,6,7,8,9,因为它们共享storage区
a.data_ptr()
b.data_ptr()
c.data_ptr() # c.data_ptr()-b.data_ptr() 为16, 相差2个字节
id(a.storage) == id(b.storage) == id(c.storage) #True ,共享存储区
绝大多数操作并不修改 tensor 的数据,只是修改了 tensor 的头信息,这种做法更节省内存,同时提升了处理速度。此外,有些操作会导致 tensor 不连续,这时需要调用 torch.contiguous 方法将其变成连续的数据,该方法会复制数据到新的内存,不在与原来的数据共享 storage。
高级索引一般不共享 storage ,而普通索引共享 storage ,是因为普通索引可以通过修改 tensor 的 offset 、stride 和 size 实现,不修改 storage 的数据,而高级索引则不行。
tensor 的连续性说的其实是 stride() 属性 和 size() 之间的关系
连续性条件:s t r i d e [ i ] = s t r i d e [ i + 1 ] ∗ s i z e [ i + 1 ] stride[i] = stride[i+1] * size[i+1]stride[i]=stride[i+1]∗size[i+1]
意思就是,第 i 维跳到下一个元素走的步数,是 i + 1 维走到下一维的步数,乘以 i + 1 维数的个数。
比如二维数组中 s t r i d e [ 0 ] = s t r i d e 1 ∗ s i z e 1 stride[0] = stride1 ∗ size1stride[0]=stride1∗size1 ,代表的就是第 0 维走到下一个数,需要走完这一行。
Tensor.t() 改变了连续性
判断Tensor连续性的Tensor.is_contiguous().
广播机制
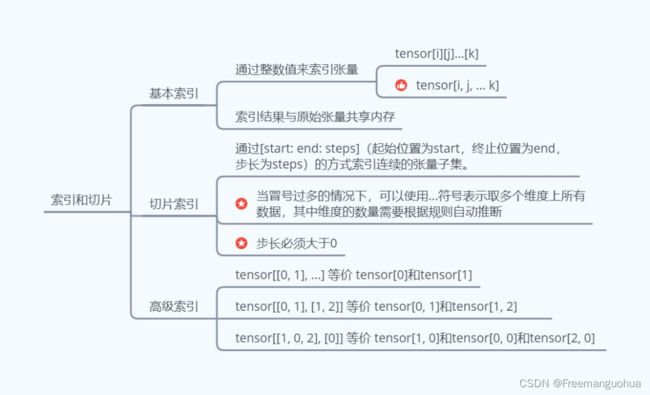
索引
普通的索引,切片,一起花式索引
take, select,gather
基本索引:
整数索引(list,numpy数组,tensor):
逻辑索引:
切片:
复合索引:
in-place操作
随机性与随机种子
Speaking of the random tensor, did you notice the call to torch.manual_seed() immediately preceding it? Initializing tensors, such as a model’s learning weights, with random values is common but there are times - especially in research settings - where you’ll want some assurance of the reproducibility of your results. Manually setting your random number generator’s seed is the way to do this. Let’s look more closely
[Tensors的随机性文档] (https://pytorch.org/docs/stable/notes/randomness.html)
二、torch.autograd
梯度机制
To freeze parts of your model, simply apply .requires_grad_(False) to the parameters that you don’t want updated. And as described above, since computations that use these parameters as inputs would not be recorded in the forward pass, they won’t have their .grad fields updated in the backward pass because they won’t be part of the backward graph in the first place, as desired.
Because this is such a common pattern, requires_grad can also be set at the module level with nn.Module.requires_grad_(). When applied to a module, .requires_grad_() takes effect on all of the module’s parameters (which have requires_grad=True by default).
梯度用法
Tensor.backward(gradient=None, retain_graph=None, create_graph=False, inputs=None)
gradient (Tensor or None) – Gradient w.r.t. the tensor. If it is a tensor, it will be automatically converted to a Tensor that does not require grad unless create_graph is True. None values can be specified for scalar Tensors or ones that don’t require grad. If a None value would be acceptable then this argument is optional.
retain_graph (bool, optional) – If False, the graph used to compute the grads will be freed. Note that in nearly all cases setting this option to True is not needed and often can be worked around in a much more efficient way. Defaults to the value of create_graph.
create_graph (bool, optional) – If True, graph of the derivative will be constructed, allowing to compute higher order derivative products. Defaults to False.
inputs (sequence of Tensor) – Inputs w.r.t. which the gradient will be accumulated into .grad. All other Tensors will be ignored. If not provided, the gradient is accumulated into all the leaf Tensors that were used to compute the attr::tensors.
利用torch.autograd计算单变量标量函数y=x^3+sin(x)在x分别为1,pi和5时的一阶导数和二
阶导数

"""
import torch as tc
import numpy as np

#%% 方法1:采用torch.autograd.grad
x  = tc.tensor([1, np.pi, 5],requires_grad=True)
y = x**3 +  tc.sin(x)
dy = 3*x**2 + tc.cos(x)
d2y = 6*x - tc.sin(x)

dydx = tc.autograd.grad(y, x,
                        grad_outputs=tc.ones(x.shape), #注意这里需要人为指定
                        create_graph=True,
                        retain_graph=True) # 为计算二阶导保持计算图
print(dydx) # 注意输出是一个tuple,取第一个元素
# (tensor([ 3.5403, 28.6088, 75.2837], grad_fn=),)
print(dy)
# tensor([ 3.5403, 28.6088, 75.2837], grad_fn=)

d2ydx2 = tc.autograd.grad(dydx[0],x,
                          grad_outputs=tc.ones(x.shape),
                          create_graph=False) # 默认会自动销毁计算图
print(d2ydx2)
# (tensor([ 5.1585, 18.8496, 30.9589]),)
print(d2y)
# tensor([ 5.1585, 18.8496, 30.9589], grad_fn=)

#%% 方法2:采用torch.autograd.backword
x  = tc.tensor([1, np.pi, 5],requires_grad=True)
y = x**3 +  tc.sin(x)
dy = 3*x**2 + tc.cos(x)
d2y = 6*x - tc.sin(x)

tc.autograd.backward(y, grad_tensors=tc.ones(x.shape),
           create_graph=True, retain_graph=False)
print(x.grad) #一阶导
# tensor([ 3.5403, 28.6088, 75.2837], grad_fn=)
tc.autograd.backward(x.grad, grad_tensors=tc.ones(x.shape),
           create_graph=False, retain_graph=False)

#采用backword的方法并且在求一阶导的时候设置了create_graph时,该结果是两次梯度的累加结果
print(x.grad)
# tensor([  8.6988,  47.4584, 106.2426], grad_fn=)
#:https://blog.csdn.net/ouening/article/details/108842909
梯度相关
torch.Tensor.is_leaf
torch.Tensor.retain_grad()
torch.Tensor.zero_grad()
通常使用model.zero_grad()和optimizer.zero_grad()
评估和训练模式
pytorch可以给我们提供两种方式来切换训练和评估(推断)的模式,分别是:model.train() 和 model.eval()。
一般用法是:在训练开始之前写上 model.trian() ,在测试时写上 model.eval() 。
在使用 pytorch 构建神经网络的时候,训练过程中会在程序上方添加一句model.train(),作用是 启用 batch normalization 和 dropout 。
如果模型中有BN层(Batch Normalization)和 Dropout ,需要在 训练时 添加 model.train()。
model.train() 是保证 BN 层能够用到 每一批数据 的均值和方差。对于 Dropout,model.train() 是 随机取一部分 网络连接来训练更新参数。
model.eval()的作用是 不启用 Batch Normalization 和 Dropout。
如果模型中有 BN 层(Batch Normalization)和 Dropout,在 测试时 添加 model.eval()。
model.eval() 是保证 BN 层能够用 全部训练数据 的均值和方差,即测试过程中要保证 BN 层的均值和方差不变。对于 Dropout,model.eval() 是利用到了 所有 网络连接,即不进行随机舍弃神经元。
You are responsible for calling model.eval() and model.train() if your model relies on modules such as torch.nn.Dropout and torch.nn.BatchNorm2d that may behave differently depending on training mode, for example, to avoid updating your BatchNorm running statistics on validation data.
It is recommended that you always use model.train() when training and model.eval() when evaluating your model (validation/testing) even if you aren’t sure your model has training-mode specific behavior, because a module you are using might be updated to behave differently in training and eval modes.
三、Dataset和DataLoader
四、transform
五、建立模型
torch.nn.Module 和torch.nn.Parameters
Except for Parameter, the classes we discuss in this video are all subclasses of torch.nn.Module. This is the PyTorch base class meant to encapsulate behaviors specific to PyTorch Models and their components.
One important behavior of torch.nn.Module is registering parameters. If a particular Module subclass has learning weights, these weights are expressed as instances of torch.nn.Parameter. The Parameter class is a subclass of torch.Tensor, with the special behavior that when they are assigned as attributes of a Module, they are added to the list of that modules parameters. These parameters may be accessed through the parameters() method on the Module class.
CLASS torch.nn.Module
Base class for all neural network modules.
Your models should also subclass this class.
属性
training (bool) – Boolean represents whether this module is in training or evaluation mode.
方法
-
add_module(name, module)
Adds a child module to the current module.
The module can be accessed as an attribute using the given name.
name (string) – name of the child module. The child module can be accessed from this module using the given name
module (Module) – child module to be added to the module. -
apply(fn)
Applies fn recursively to every submodule (as returned by .children()) as well as self. Typical use includes initializing the parameters of a model -
children()
Returns an iterator over immediate children modules. -
eval()
Sets the module in evaluation mode.
This has any effect only on certain modules. See documentations of particular modules for details of their behaviors in training/evaluation mode, if they are affected, e.g. Dropout, BatchNorm, etc.
This is equivalent with self.train(False).
- forward(*input)
Defines the computation performed at every call.
Should be overridden by all subclasses.
-
get_extra_state()
-
get_parameter(target)
Returns the parameter given by target if it exists, otherwise throws an error. -
get_submodule(target)
Returns the submodule given by target if it exists, otherwise throws an error -
load_state_dict(state_dict, strict=True)[SOURCE]
Copies parameters and buffers from state_dict into this module and its descendants. If strict is True, then the keys of state_dict must exactly match the keys returned by this module’s state_dict() function. -
modules()[SOURCE]
Returns an iterator over all modules in the network. -
named_children()
-
named_modules(memo=None, prefix=‘’, remove_duplicate=True)[SOURCE]
Returns an iterator over all modules in the network, yielding both the name of the module as well as the module itself. -
named_parameters(prefix=‘’, recurse=True)[SOURCE]
Returns an iterator over module parameters, yielding both the name of the parameter as well as the parameter itself. -
parameters(recurse=True)[SOURCE]
Returns an iterator over module parameters.
This is typically passed to an optimizer. -
register_forward_hook(hook)[SOURCE]
Registers a forward hook on the module.
The hook will be called every time after forward() has computed an output. It should have the following signature:
hook(module, input, output) -> None or modified output
-
register_full_backward_hook(hook)[SOURCE]
Registers a backward hook on the module.
The hook will be called every time the gradients with respect to module inputs are computed. The hook should have the following signature:
hook(module, grad_input, grad_output) -> tuple(Tensor) or None
return:
a handle that can be used to remove the added hook by calling handle.remove() -
register_parameter(name, param)[SOURCE]
Adds a parameter to the module.
The parameter can be accessed as an attribute using given name.
Parameters
name (string) – name of the parameter. The parameter can be accessed from this module using the given name
param (Parameter or None) – parameter to be added to the module. If None, then operations that run on parameters, such as cuda, are ignored. If None, the parameter is not included in the module’s
- state_dict(*args, destination=None, prefix=‘’, keep_vars=False)[SOURCE]
Returns a dictionary containing a whole state of the module.
Both parameters and persistent buffers (e.g. running averages) are included. Keys are corresponding parameter and buffer names. Parameters and buffers set to None are not included.
torch.nn.Parameters
A kind of Tensor that is to be considered a module parameter.
Parameters are Tensor subclasses, that have a very special property when used with Module s - when they’re assigned as Module attributes they are automatically added to the list of its parameters, and will appear e.g. in parameters() iterator. Assigning a Tensor doesn’t have such effect. This is because one might want to cache some temporary state, like last hidden state of the RNN, in the model. If there was no such class as Parameter, these temporaries would get registered too.
Parameters
data (Tensor) – parameter tensor.
requires_grad (bool, optional) – if the parameter requires gradient. See Locally disabling gradient computation for more details. Default: True
torch.nn.Sequential(*args)
What’s the difference between a Sequential and a torch.nn.ModuleList? A ModuleList is exactly what it sounds like–a list for storing Module s! On the other hand, the layers in a Sequential are connected in a cascading way.
model = nn.Sequential(
          nn.Conv2d(1,20,5),
          nn.ReLU(),
          nn.Conv2d(20,64,5),
          nn.ReLU()
        )

# Using Sequential with OrderedDict. This is functionally the
# same as the above code
model = nn.Sequential(OrderedDict([
          ('conv1', nn.Conv2d(1,20,5)),
          ('relu1', nn.ReLU()),
          ('conv2', nn.Conv2d(20,64,5)),
          ('relu2', nn.ReLU())
        ]))
   特有的方法
append(module)[SOURCE]
Appends a given module to the end.
Parameters
module (nn.Module) – module to append
torch.nn.ModuleList(modules=None)[SOURCE]
Holds submodules in a list.
ModuleList can be indexed like a regular Python list, but modules it contains are properly registered, and will be visible by all Module methods.
Parameters
modules (iterable, optional) – an iterable of modules to add
有append,extend和insert方法
torch.nn.ModuleDict(modules=None)[SOURCE]
Holds submodules in a dictionary.
ModuleDict can be indexed like a regular Python dictionary, but modules it contains are properly registered, and will be visible by all Module methods.
ModuleDict is an ordered dictionary that respects
torch.nn.ParameterList(values=None)[SOURCE]
Holds parameters in a list.
ParameterList can be used like a regular Python list, but Tensors that are Parameter are properly registered, and will be visible by all Module methods.
Note that the constructor, assigning an element of the list, the append() method and the extend() method will convert any Tensor into Parameter.
torch.nn.ParameterDict(parameters=None)[SOURCE]
Holds parameters in a dictionary.
ParameterDict can be indexed like a regular Python dictionary, but Parameters it contains are properly registered, and will be visible by all Module methods. Other objects are treated as would be done by a regular Python dictionary
ParameterDict is an ordered dictionary. update() with other unordered mapping types (e.g., Python’s plain dict) does not preserve the order of the merged mapping. On the other hand, OrderedDict or another ParameterDict will preserve their ordering.
Note that the constructor, assigning an element of the dictionary and the update() method will convert any Tensor into Parameter.
Parameters
values (iterable, optional) – a mapping (dictionary) of (string : Any) or an iterable of key-value pairs of type (string, Any)
Convolution Layers
1. torch.nn.Conv1d(in_channels, out_channels, kernel_size, stride=1, padding=0, dilation=1, groups=1, bias=True, padding_mode=‘zeros’, device=None, dtype=None
2. torch.nn.Conv2d(in_channels, out_channels, kernel_size, stride=1, padding=0, dilation=1, groups=1, bias=True, padding_mode=‘zeros’, device=None, dtype=None)
3. torch.nn.Conv3d(in_channels, out_channels, kernel_size, stride=1, padding=0, dilation=1, groups=1, bias=True, padding_mode=‘zeros’, device=None, dtype=None)
4. torch.nn.MaxPool1d(kernel_size, stride=None, padding=0, dilation=1, return_indices=False, ceil_mode=False)
torch.nn.AdaptiveMaxPool1d
torch.nn.FractionalMaxPool2d
torch.nn.LPPool1d(norm_type, kernel_size, stride=None, ceil_mode=False)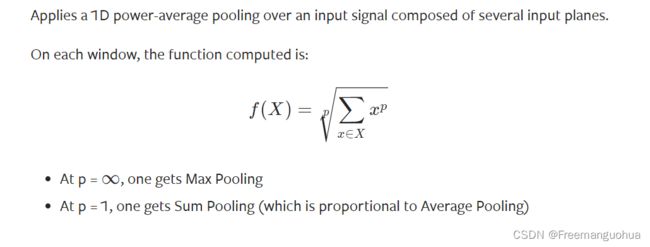
torch.nn.ReflectionPad1d(padding)
Non-linear Activations (weighted sum, nonlinearity)
torch.nn.ELU(alpha=1.0,lace=False )
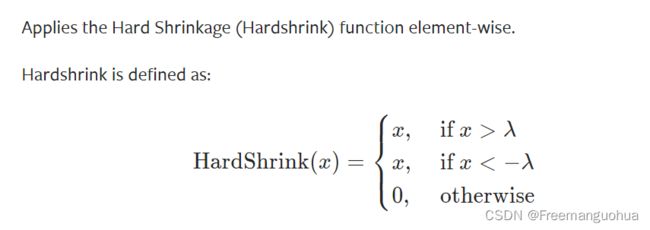
torch.nn.Hardshrink(lambd=0.5)
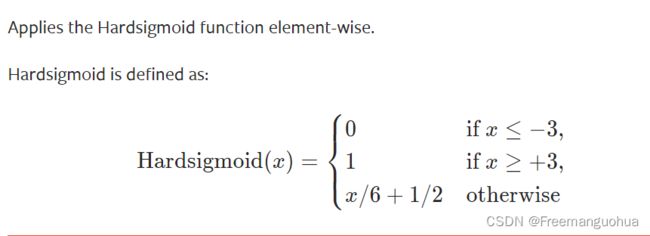
torch.nn.Hardsigmoid(inplace=False)
torch.nn.Hardtanh(min_val=- 1.0, max_val=1.0, inplace=False, min_value=None, max_value=None)
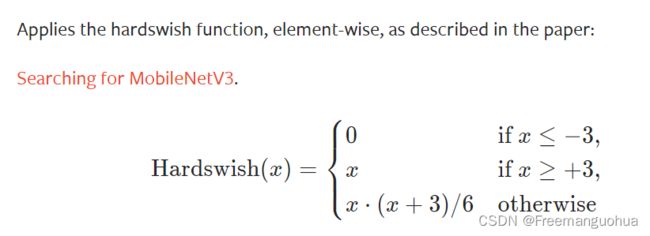
torch.nn.Hardswish(inplace=False)
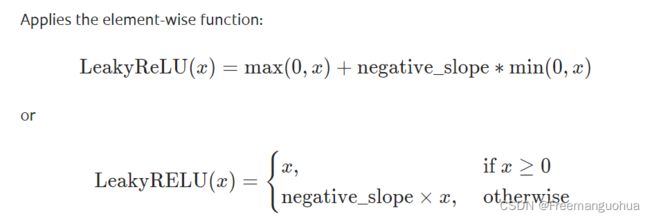
torch.nn.LeakyReLU(negative_slope=0.01, inplace=False)
torch.nn.LogSigmoid
torch.nn.MultiheadAttention(embed_dim, num_heads, dropout=0.0, bias=True, add_bias_kv=False, add_zero_attn=False, kdim=None, vdim=None, batch_first=False, device=None, dtype=None)
六 钩子
主要的作用是在不改变torch网络的情况下获取某一层的输出。可在module前向传播或反向传播时注册钩子。
每次前向传播执行结束后会执行钩子函数(hook)。前向传播的钩子函数具有如下形式:hook(module, input, output) -> None,modified output, 而反向传播则具有如下形式:hook(module, grad_input, grad_output) -> Tensor or None。
钩子函数不应修改输入和输出,并且在使用后应及时删除,以避免每次都运行钩子增加运行负载。钩子函数主要用在获取某些中间结果的情景,如中间某一层的输出或某一层的梯度。这些结果本应写在forward函数中,但如果在forward函数中专门加上这些处理,可能会使处理逻辑比较复杂,这时候使用钩子技术就更合适一些。下面考虑一种场景,有一个预训练好的模型,需要提取模型的某一层(不是最后一层)的输出作为特征进行分类,但又不希望修改其原有的模型定义文件,这时就可以利用钩子函数。下面给出实现的伪代码。
前向钩子:
import torch as t
import torch.nn as nn
import torch.nn.functional as F

class LeNet(nn.Module):
    def __init__(self):
        super(LeNet,self).__init__()
        self.conv1 = nn.Conv2d(1, 6, 5)
        self.conv2 = nn.Conv2d(6,16,5)
        self.fc1 = nn.Linear(16*5*5,120)
        self.fc2 = nn.Linear(120,84)
        self.fc3 = nn.Linear(84,10)

    def forward(self,x):
        x = F.max_pool2d(F.relu(self.conv1(x)),(2,2))
        x = F.max_pool2d(F.relu(self.conv2(x)),2)
        x = x.view(x.size()[0], -1)
        x = F.relu(self.fc1(x))
        x = F.relu(self.fc2(x))
        x = self.fc3(x)
        return x
def hook(module, inputdata, output):
    '''把这层的输出拷贝到features中'''
    print(output.data)

handle = net.conv2.register_forward_hook(hook)
net(img)
# 用完hook后删除
handle.remove()
例题2
import torch
import torch.nn as nn


class TestForHook(nn.Module):
    def __init__(self):
        super().__init__()

        self.linear_1 = nn.Linear(in_features=2, out_features=2)
        self.linear_2 = nn.Linear(in_features=2, out_features=1)
        self.relu = nn.ReLU()
        self.relu6 = nn.ReLU6()
        self.initialize()

    def forward(self, x):
        linear_1 = self.linear_1(x)
        linear_2 = self.linear_2(linear_1)
        relu = self.relu(linear_2)
        relu_6 = self.relu6(relu)
        layers_in = (x, linear_1, linear_2)
        layers_out = (linear_1, linear_2, relu)
        return relu_6, layers_in, layers_out

    def initialize(self):
        """ 定义特殊的初始化,用于验证是不是获取了权重"""
        self.linear_1.weight = torch.nn.Parameter(torch.FloatTensor([[1, 1], [1, 1]]))
        self.linear_1.bias = torch.nn.Parameter(torch.FloatTensor([1, 1]))
        self.linear_2.weight = torch.nn.Parameter(torch.FloatTensor([[1, 1]]))
        self.linear_2.bias = torch.nn.Parameter(torch.FloatTensor([1]))
        return True

# 1:定义用于获取网络各层输入输出tensor的容器
# 并定义module_name用于记录相应的module名字
module_name = []
features_in_hook = []
features_out_hook = []


# 2:hook函数负责将获取的输入输出添加到feature列表中
# 并提供相应的module名字
def hook(module, fea_in, fea_out):
    print("hooker working")
    module_name.append(module.__class__)
    features_in_hook.append(fea_in)
    features_out_hook.append(fea_out)
    return None

# 3:定义全部是1的输入
x = torch.FloatTensor([[0.1, 0.1], [0.1, 0.1]])

# 4:注册钩子可以对某些层单独进行
net = TestForHook()
net_chilren = net.children()
for child in net_chilren:
    if not isinstance(child, nn.ReLU6):
        child.register_forward_hook(hook=hook)

# 5:测试网络输出
out, features_in_forward, features_out_forward = net(x)
print("*"*5+"forward return features"+"*"*5)
print(features_in_forward)
print(features_out_forward)
print("*"*5+"forward return features"+"*"*5)


# 6:测试features_in是不是存储了输入
print("*"*5+"hook record features"+"*"*5)
print(features_in_hook)
print(features_out_hook)
print(module_name)
print("*"*5+"hook record features"+"*"*5)

# 7:测试forward返回的feautes_in是不是和hook记录的一致
print("sub result")
for forward_return, hook_record in zip(features_in_forward, features_in_hook):
    print(forward_return-hook_record[0])
Tensor.register_hook(hook)
供了基于tensor的注册函数,可以对指定 Tensor 的 grad 参数做一个修改与分析
register_full_backward_hook(hook)
def get_grad_hook(module,grad_in,grad_out):
    print(f'grad_in:{grad_in[0].size()}')#这里grad_in是一个元组(tensor(……),)
    print(f'grad_out:{grad_out[0].size()}')#这里fgrad_out也一个元组(tensor(……),)
#     print(f'{x} Done one!')
    grad_in_list.append(grad_in[0])
    grad_out_list.append(grad_out[0])

name_children = ['features.11',,'features']
for name_child,child in net.named_modules():
    if name_child in name_children:
        print(f'Find it:{name_child}')
        handle_grad = child.register_backward_hook(get_grad_hook)
        Hadle_grad.append(handle_grad)

for hand in Handle:
    hand.remove()
out = net(input)
out = F.softmax(out,1)
# softmax = nn.Softmax(1)
# out = softmax(out)
value, predicted = torch.max(out.data, 1)
loss = torch.mean(value)
print(out)

out[0,0].backward()

for handle_grad in Handle_grad:
    handle_grad.remove()
# print(value, predicted,loss)
新的改变
我们对Markdown编辑器进行了一些功能拓展与语法支持,除了标准的Markdown编辑器功能,我们增加了如下几点新功能,帮助你用它写博客:
- 全新的界面设计 ,将会带来全新的写作体验;
- 在创作中心设置你喜爱的代码高亮样式,Markdown 将代码片显示选择的高亮样式 进行展示;
- 增加了 图片拖拽 功能,你可以将本地的图片直接拖拽到编辑区域直接展示;
- 全新的 KaTeX数学公式 语法;
- 增加了支持甘特图的mermaid语法1 功能;
- 增加了 多屏幕编辑 Markdown文章功能;
- 增加了 焦点写作模式、预览模式、简洁写作模式、左右区域同步滚轮设置 等功能,功能按钮位于编辑区域与预览区域中间;
- 增加了 检查列表 功能。
功能快捷键
撤销:Ctrl/Command + Z
重做:Ctrl/Command + Y
加粗:Ctrl/Command + B
斜体:Ctrl/Command + I
标题:Ctrl/Command + Shift + H
无序列表:Ctrl/Command + Shift + U
有序列表:Ctrl/Command + Shift + O
检查列表:Ctrl/Command + Shift + C
插入代码:Ctrl/Command + Shift + K
插入链接:Ctrl/Command + Shift + L
插入图片:Ctrl/Command + Shift + G
查找:Ctrl/Command + F
替换:Ctrl/Command + G
合理的创建标题,有助于目录的生成
直接输入1次#,并按下space后,将生成1级标题。
输入2次#,并按下space后,将生成2级标题。
以此类推,我们支持6级标题。有助于使用TOC语法后生成一个完美的目录。
如何改变文本的样式
强调文本 强调文本
加粗文本 加粗文本
标记文本
删除文本
引用文本
H2O is是液体。
210 运算结果是 1024.
插入链接与图片
链接: link.
图片: ![]()
带尺寸的图片: ![]()
居中的图片: ![]()
居中并且带尺寸的图片: ![]()
当然,我们为了让用户更加便捷,我们增加了图片拖拽功能。
如何插入一段漂亮的代码片
去博客设置页面,选择一款你喜欢的代码片高亮样式,下面展示同样高亮的 代码片.
// An highlighted block
var foo = 'bar';
生成一个适合你的列表
- 项目
- 项目
- 项目
- 项目
- 项目1
- 项目2
- 项目3
- 计划任务
- 完成任务
创建一个表格
一个简单的表格是这么创建的:
| 项目 | Value |
|---|---|
| 电脑 | $1600 |
| 手机 | $12 |
| 导管 | $1 |
设定内容居中、居左、居右
使用:---------:居中
使用:----------居左
使用----------:居右
| 第一列 | 第二列 | 第三列 |
|---|---|---|
| 第一列文本居中 | 第二列文本居右 | 第三列文本居左 |
SmartyPants
SmartyPants将ASCII标点字符转换为“智能”印刷标点HTML实体。例如:
| TYPE | ASCII | HTML |
|---|---|---|
| Single backticks | 'Isn't this fun?' |
‘Isn’t this fun?’ |
| Quotes | "Isn't this fun?" |
“Isn’t this fun?” |
| Dashes | -- is en-dash, --- is em-dash |
– is en-dash, — is em-dash |
创建一个自定义列表
-
Markdown
- Text-to- HTML conversion tool Authors
- John
- Luke
如何创建一个注脚
一个具有注脚的文本。2
注释也是必不可少的
Markdown将文本转换为 HTML。
KaTeX数学公式
您可以使用渲染LaTeX数学表达式 KaTeX:
Gamma公式展示 Γ ( n ) = ( n − 1 ) ! ∀ n ∈ N \Gamma(n) = (n-1)!\quad\forall n\in\mathbb N Γ(n)=(n−1)!∀n∈N 是通过欧拉积分
Γ ( z ) = ∫ 0 ∞ t z − 1 e − t d t . \Gamma(z) = \int_0^\infty t^{z-1}e^{-t}dt\,. Γ(z)=∫0∞tz−1e−tdt.
你可以找到更多关于的信息 LaTeX 数学表达式here.
新的甘特图功能,丰富你的文章
- 关于 甘特图 语法,参考 这儿,
UML 图表
可以使用UML图表进行渲染。 Mermaid. 例如下面产生的一个序列图:
这将产生一个流程图。:
- 关于 Mermaid 语法,参考 这儿,
FLowchart流程图
我们依旧会支持flowchart的流程图:
- 关于 Flowchart流程图 语法,参考 这儿.
导出与导入
导出
如果你想尝试使用此编辑器, 你可以在此篇文章任意编辑。当你完成了一篇文章的写作, 在上方工具栏找到 文章导出 ,生成一个.md文件或者.html文件进行本地保存。
导入
如果你想加载一篇你写过的.md文件,在上方工具栏可以选择导入功能进行对应扩展名的文件导入,
继续你的创作。
mermaid语法说明 ↩︎
注脚的解释 ↩︎


