Maven高级学习笔记
Maven高级
-
-
-
-
- 1 分模块开发与设计
-
- 1.1 目标
- 1.2 ssm-pojo拆分
- 1.3 ssm_dao拆分
- 1.4 ssm_service拆分
- 1.5 ssm_controller拆分
- 1.6 小结
- 2 聚合和继承
-
- 2.1 聚合
- 2.2 继承
- 2.2.1 概述和示例
- 2.2.2 继承的资源
- 2.2.3 继承和聚合的区别
- 2.3 属性
-
- 2.3.1 自定义属性
- 2.3.2 内置属性
- 2.3.3 其他属性
- 2.4 版本管理
-
- 2.4.1 工程版本区分
- 2.4.2 工程版本号约定
- 2.5 资源配置
- 2.6 多环境开发配置
- 2.7 跳过测试
- 3 Maven私服
-
- 3.1 Nexus私服搭建
- 3.2 Nexus操作
-
- 3.2.1 仓库分类和手工资源上传
- 3.2.2 本地仓库访问私服
- 3.2.2 本地仓库访问私服
-
-
-
1 分模块开发与设计
1.1 目标
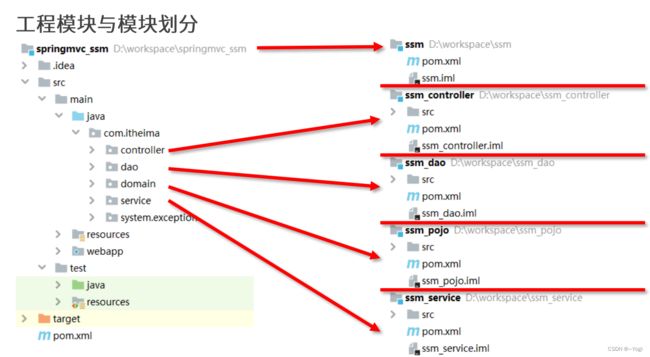
目标:将ssm项目拆分。
如上图所示,将ssm项目拆分成右侧几个模块。
1.2 ssm-pojo拆分
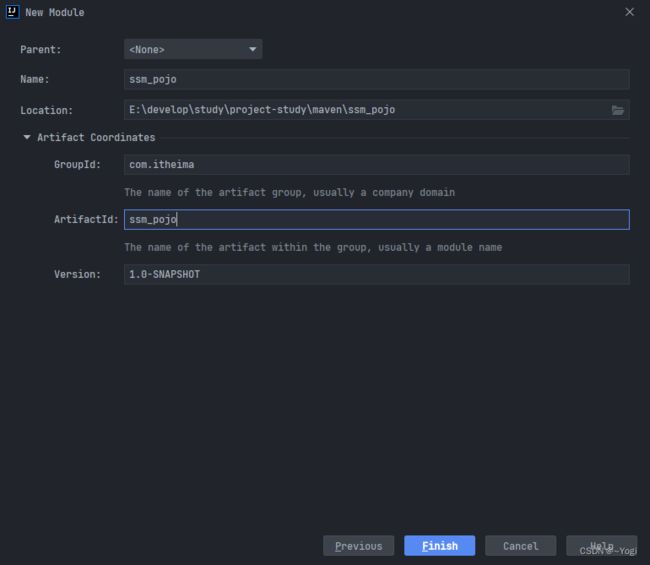
新建一个maven项目模块
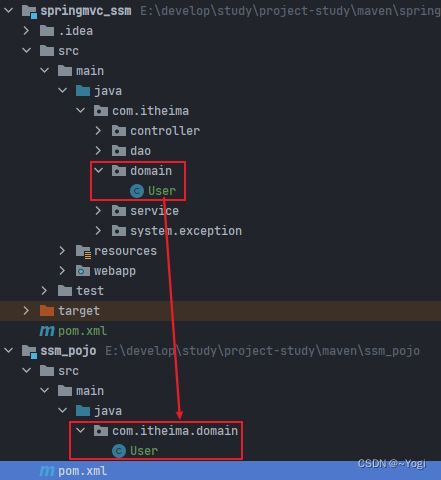
拷贝原始项目中对应的相关代码到该模块中,删除不必要的测试类和配置文件
这个模块的pom没有依赖任何资源
```xml

<project xmlns="http://maven.apache.org/POM/4.0.0"
         xmlns:xsi="http://www.w3.org/2001/XMLSchema-instance"
         xsi:schemaLocation="http://maven.apache.org/POM/4.0.0 http://maven.apache.org/xsd/maven-4.0.0.xsd">
    <modelVersion>4.0.0modelVersion>

    <groupId>com.itheimagroupId>
    <artifactId>ssm_pojoartifactId>
    <version>1.0-SNAPSHOTversion>

    <properties>
        <maven.compiler.source>11maven.compiler.source>
        <maven.compiler.target>11maven.compiler.target>
    properties>

project>
1.3 ssm_dao拆分
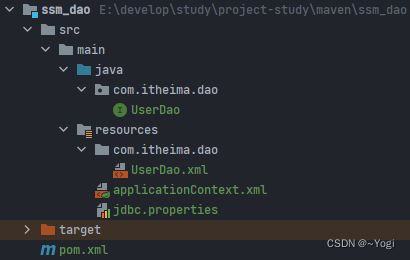
新建模块ssm_dao,拷贝原始项目中对应的相关代码到该模块中,删除不必要的测试类和非dao层的配置文件。
对于dao层的pom文件内容如下(即所需的资源):注意ssm_pojo资源的导入
<dependencies>

    <dependency>
        <groupId>com.itheimagroupId>
        <artifactId>ssm_pojoartifactId>
        <version>1.0-SNAPSHOTversion>
    dependency>

    <dependency>
        <groupId>org.springframeworkgroupId>
        <artifactId>spring-contextartifactId>
        <version>5.1.9.RELEASEversion>
    dependency>

    <dependency>
        <groupId>org.mybatisgroupId>
        <artifactId>mybatisartifactId>
        <version>3.5.3version>
    dependency>

    <dependency>
        <groupId>mysqlgroupId>
        <artifactId>mysql-connector-javaartifactId>
        <version>5.1.47version>
    dependency>

    <dependency>
        <groupId>org.springframeworkgroupId>
        <artifactId>spring-jdbcartifactId>
        <version>5.1.9.RELEASEversion>
    dependency>

    <dependency>
        <groupId>org.mybatisgroupId>
        <artifactId>mybatis-springartifactId>
        <version>2.0.3version>
    dependency>

    <dependency>
        <groupId>com.alibabagroupId>
        <artifactId>druidartifactId>
        <version>1.1.16version>
    dependency>

    <dependency>
        <groupId>com.github.pagehelpergroupId>
        <artifactId>pagehelperartifactId>
        <version>5.1.2version>
    dependency>
dependencies>
运行mvn compile发现构建失败,原因在于,导入了ssm_pojo的资源坐标,但是在本地仓库中没有这个资源,因此需要对ssm_pojo项目进行mvn install,将其安装到本地仓库,然后再对ssm_dao进行编译,通过。
对dao的配置文件applicationContext.xml进行修改,删去非dao层的代码:
<beans xmlns="http://www.springframework.org/schema/beans"
       xmlns:context="http://www.springframework.org/schema/context"
       xmlns:xsi="http://www.w3.org/2001/XMLSchema-instance"
       xsi:schemaLocation="http://www.springframework.org/schema/beans http://www.springframework.org/schema/beans/spring-beans.xsd
        http://www.springframework.org/schema/context http://www.springframework.org/schema/context/spring-context.xsd">

    <context:component-scan base-package="com.itheima"/>

    <context:property-placeholder location="classpath*:jdbc.properties"/>

    <bean id="dataSource" class="com.alibaba.druid.pool.DruidDataSource">
        <property name="driverClassName" value="${jdbc.driver}"/>
        <property name="url" value="${jdbc.url}"/>
        <property name="username" value="${jdbc.username}"/>
        <property name="password" value="${jdbc.password}"/>
    bean>

    <bean class="org.mybatis.spring.SqlSessionFactoryBean">
        <property name="dataSource" ref="dataSource"/>
        <property name="typeAliasesPackage" value="com.itheima.domain"/>

        <property name="plugins">
            <array>
                <bean class="com.github.pagehelper.PageInterceptor">
                    <property name="properties">
                        <props>
                            <prop key="helperDialect">mysqlprop>
                            <prop key="reasonable">trueprop>
                        props>
                    property>
                bean>
            array>
        property>
    bean>

    <bean class="org.mybatis.spring.mapper.MapperScannerConfigurer">
        <property name="basePackage" value="com.itheima.dao"/>
    bean>
beans>
1.4 ssm_service拆分
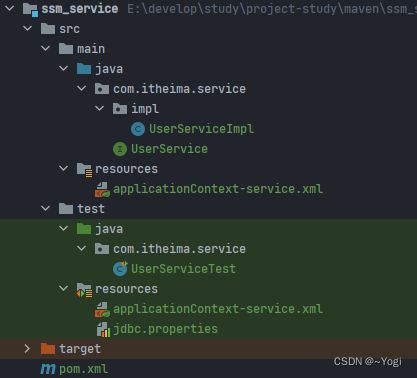
新建模块ssm_service,拷贝原始项目中对应的相关代码到该模块中,删除不必要的非service层的配置文件。注意保留测试类test。
对于service层的pom文件内容如下(即所需的资源):注意ssm_dao资源的导入,此外无需导入ssm_pojo的资源,因为他间接依赖了ssm_dao的ssm_pojo资源。对ssm_dao进行install命令。
<dependencies>

    <dependency>
        <groupId>com.itheimagroupId>
        <artifactId>ssm_daoartifactId>
        <version>1.0-SNAPSHOTversion>
    dependency>

    <dependency>
        <groupId>org.springframeworkgroupId>
        <artifactId>spring-contextartifactId>
        <version>5.1.9.RELEASEversion>
    dependency>

    <dependency>
        <groupId>junitgroupId>
        <artifactId>junitartifactId>
        <version>4.12version>
    dependency>

    <dependency>
        <groupId>org.springframeworkgroupId>
        <artifactId>spring-testartifactId>
        <version>5.1.9.RELEASEversion>
    dependency>
dependencies>
对ssm_service的配置文件applicationContext.xml进行修改,删去非service层的代码,此外将其修改为applicationContext-service.xml。同理将ssm_dao的配置文件名修改为applicationContext-dao.xml:
<beans xmlns="http://www.springframework.org/schema/beans"
       xmlns:context="http://www.springframework.org/schema/context"
       xmlns:tx="http://www.springframework.org/schema/tx"
       xmlns:xsi="http://www.w3.org/2001/XMLSchema-instance"
       xsi:schemaLocation="http://www.springframework.org/schema/beans http://www.springframework.org/schema/beans/spring-beans.xsd
        http://www.springframework.org/schema/context http://www.springframework.org/schema/context/spring-context.xsd
        http://www.springframework.org/schema/tx http://www.springframework.org/schema/tx/spring-tx.xsd">


    <context:component-scan base-package="com.itheima"/>


    <tx:annotation-driven transaction-manager="txManager"/>


    <bean id="txManager" class="org.springframework.jdbc.datasource.DataSourceTransactionManager">
        <property name="dataSource" ref="dataSource"/>
    bean>

beans>
修改单元测试引入的配置文件名,由单个文件修改为多个文件:
@RunWith(SpringJUnit4ClassRunner.class)
// 修改这里:要引入dao层的配置文件
@ContextConfiguration(locations = {"classpath:applicationContext-service.xml", "classpath:applicationContext-dao.xml"})
public class UserServiceTest {

    @Autowired
    private UserService userService;

    @Test
    public void testSave(){
        User user = new User();
        user.setUserName("Jock");
        user.setPassword("root");
        user.setRealName("Jockme");
        user.setGender(1);
        user.setBirthday(new Date(333333000000L));

        userService.save(user);
    }

    @Test
    public void testDelete(){
        User user = new User();
        userService.delete(2);
    }

    @Test
    public void testUpdate(){
        User user = new User();
        user.setUuid(1);
        user.setUserName("Jockme");
        user.setPassword("root");
        user.setRealName("JockIsMe");
        user.setGender(1);
        user.setBirthday(new Date(333333000000L));

        userService.update(user);
    }

    @Test
    public void testGet(){
        User user = userService.get(1);
        System.out.println(user);
    }

    @Test
    public void testGetAll(){
        PageInfo<User> all = userService.getAll(2, 2);
        System.out.println(all);
        System.out.println(all.getList().get(0));
        System.out.println(all.getList().get(1));
    }

    @Test
    public void testLogin(){
        User user = userService.login("Jockme", "root");
        System.out.println(user);
    }
}
运行mvn test进行用例测试,通过。最后执行mvn install,将service层代码安装到本地仓库中。
1.5 ssm_controller拆分
利用骨架webapp新建maven模块ssm_controller。拷贝原始项目中对应的相关代码到该模块中,删除不必要的非controller层的配置文件。
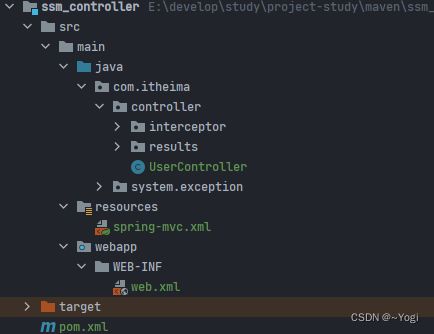
对于controller层的pom文件内容如下(即所需的资源):注意ssm_service资源的导入和间接依赖:
<dependencies>

  <dependency>
    <groupId>com.itheimagroupId>
    <artifactId>ssm_serviceartifactId>
    <version>1.0-SNAPSHOTversion>
  dependency>


  <dependency>
    <groupId>org.springframeworkgroupId>
    <artifactId>spring-webmvcartifactId>
    <version>5.1.9.RELEASEversion>
  dependency>

  <dependency>
    <groupId>com.fasterxml.jackson.coregroupId>
    <artifactId>jackson-databindartifactId>
    <version>2.9.0version>
  dependency>

  <dependency>
    <groupId>javax.servletgroupId>
    <artifactId>javax.servlet-apiartifactId>
    <version>3.1.0version>
    <scope>providedscope>
  dependency>
dependencies>

<build>

  <plugins>

    <plugin>
      <groupId>org.apache.tomcat.mavengroupId>
      <artifactId>tomcat7-maven-pluginartifactId>
      <version>2.1version>
      <configuration>
        <port>80port>
        <path>/path>
      configuration>
    plugin>
  plugins>
build>
修改web.xml中的加载spring环境的配置文件(dao层和service层),使用*进行通配
<context-param>
  <param-name>contextConfigLocationparam-name>
  <param-value>classpath*:applicationContext-*.xmlparam-value>
context-param>
配置tomcat服务器并使用postman测试:http://localhost:8080/user?userName=Mark&password=123456&realName=Hongyi&gender=1&birthday=2022/01/06
数据库中:
1.6 小结
分模块开发:
- 模块中仅包含当前模块对应的功能类与配置文件
- spring核心配置根据模块功能不同进行独立制作
- 当前模块所依赖的模块通过导入坐标的形式加入当前模块后才可以使用
- web.xml需要加载所有的spring核心配置文件
2 聚合和继承
2.1 聚合
聚合:多模块的构建维护。
image-20220122165852909
聚合作用:聚合用于快速构建maven工程,一次性构建多个项目或模块

示例

创建一个空模块ssm,该项目中只有一个pom文件
image-20220122170016494
打包类型定义为pom,并定义当前模块进行构建时关联的其他模块名称
pom
../ssm_dao ../ssm_pojo ../ssm_controller ../ssm_service注意:参与聚合操作的模块最终执行顺序与模块间的依赖关系有关,与配置顺序无关
image-20220122170202646
执行mvn install并观察:

各个模块的打包方式和打包顺序
image-20220122170222472
打包耗时
image-20220122170257939
2.2 继承
2.2.1 概述和示例
继承:模块依赖关系维护。
image-20220122180752810
继承作用:通过继承可以实现在子工程中沿用父工程的配置
maven中的继承与java中的继承相似,在子工程中配置继承关系

示例

在父工程ssm中声明依赖管理,将子工程所有的依赖都声明在此处。利用标签
在子工程中定义父工程
此时,子工程的依赖的版本号可以省略,例如:
com.itheima ssm_pojo同理,插件的管理也可以在父工程中声明:
子工程中插件的版本和相关配置就可以省略
2.2.2 继承的资源
以下资源,子工程都可以从父工程中继承:
image-20220122181446745
2.2.3 继承和聚合的区别
作用:
    聚合用于快速构建项目
    继承用于快速配置

相同点:
    聚合与继承的pom.xml文件打包方式均为pom,可以将两种关系制作到同一个pom文件中
    聚合与继承均属于设计型模块,并无实际的模块内容

不同点:
    聚合是在当前模块中配置关系,聚合可以感知到参与聚合的模块有哪些
继承是在子模块中配置关系,父模块无法感知哪些子模块继承了自己
2.3 属性
2.3.1 自定义属性
作用:等同于定义变量,方便统一维护
配置位置:父工程的pom文件
标签:
调用格式:${ }

示例

在父工程中的pom文件内:
2.3.2 内置属性
作用:使用maven内置属性,快速配置
例如,父工程和子工程的版本号一样,可以直接使用父工程的版本内置属性${version}:
com.itheima ssm_pojo ${version} com.itheima ssm_dao ${version} com.itheima ssm_service ${version}2.3.3 其他属性
其他的属性类别还有Setting属性、Java系统属性、环境变量属性,了解即可。
2.4 版本管理
2.4.1 工程版本区分
image-20220122183813865
SNAPSHOT快照版本
    项目开发过程中,为方便团队成员合作,解决模块间相互依赖和时时更新的问题,开发者对每个模块进行构建的时候,输出的临时性版本叫快照版本(测试阶段版本)
    快照版本会随着开发的进展不断更新
RELEASE发布版本
项目开发到进入阶段里程碑后,向团队外部发布较为稳定的版本,这种版本所对应的构件文件是稳定的,即便进行功能的后续开发,也不会改变当前发布版本内容,这种版本称为发布版本
2.4.2 工程版本号约定
约定规范:
    <主版本>.<次版本>.<增量版本>.<里程碑版本>
    主版本∶表示项目重大架构的变更,如∶spring5相较于spring4的迭代次版本∶表示有较大的功能增加和变化,或者全面系统地修复漏洞
    增量版本∶表示有重大漏洞的修复
    里程碑版本∶表明一个版本的里程碑(版本内部)。这样的版本同下一个正式版本相比,相对来说不是很稳定,有待更多的测试
范例:
    5.1.9.RELEASE
2.5 资源配置
资源配置多文件维护:
image-20220122184324524
配置文件引用pom属性:
作用:在任意配置文件中加载pom文件中定义的属性
调用格式:${ }

示例

例如jdbc.properties要读取父工程pom文件中的属性。首先在父工程pom文件中的标签中:
        ${project.basedir}/src/test/resources

        true
设置属性:
jdbc.driver=com.mysql.jdbc.Driver
引用pom文件中的属性
jdbc.url=${jdbc.url}
jdbc.username=root
jdbc.password=12345678
2.6 多环境开发配置
多环境兼容:
image-20220122185714834
配置方法

在父工程pom文件中:
mvn 指令 -P 环境id
范例:
mvn install -P dev_env
例如:新建一个maven配置,在开发环境执行install命令:
image-20220122202158001
执行后查看jdbc.properties文件:
image-20220122202241524
可见是按照开发环境的地址127.0.0.2进行项目安装的。
2.7 跳过测试
应用场景

整体模块功能未开发
模块中某个功能未开发完毕
单个功能更新调试导致其他功能失败
快速打包(因为测试需要耗费时间)
…

使用操作界面跳过测试
image-20220122202910416
3 Maven私服
分模块合作开发:
image-20220122210750754
3.1 Nexus私服搭建
Nexus是Sonatype公司的一款maven私服产品

下载地址∶https∶//help.sonatype.com/repomanager3/download

搭建步骤

服务器首先必须配置好java的环境
将下载好的压缩包解压缩至任意位置
image-20220122211139805
nexus服务所需内存等参数位于/bin/nexus.vmoptions中
image-20220122211252958
image-20220122211328647
nexus服务的端口等参数设置位于/etc/nexus-default.properties中
image-20220122211436743
image-20220122211501420
配置环境变量并刷新
vi /etc/profile
export NEXUS_HOME=/usr/local/nexus #nexus的目录
export RUN_AS_USER=root
source /etc/profile
进入nexus目录并运行
./bin/nexus start
访问配置好的端口网址即可
image-20220122211748769
停止服务运行
./bin/nexus stop
3.2 Nexus操作
3.2.1 仓库分类和手工资源上传
私服资源的获取:下图所示,我们要把快照版的资源放在一个仓库里,把发行版的资源放在一个仓库里,第三方公共资源放在一个仓库里,这样方便进行管理,势必要对仓库进行分类和分组。
image-20220122212618331
仓库分类

宿主仓库hosted:保存无法从中央仓库获取的资源
    自主研发
    第三方非开源项目
代理仓库proxy:代理远程仓库,通过nexus访问其他公共仓库,例如中央仓库
仓库组group:
    将若干仓库组成一个群组,简化配置
    仓库组不能保存资源,属于设计型仓库
nexus自带的仓库
操作实例

新建一个仓库,例如heima-release
image-20220122213829189
仓库类型选择宿主仓库maven2(hosted)
image-20220122213921292
创建好后,将其加入到maven-public仓库组中,方便管理
image-20220122214048929
将ssm_pojo打包好的jar文件上传至heima-release仓库中
image-20220122213802054
查看仓库里的ssm_pojo资源
image-20220122214226492
3.2.2 本地仓库访问私服
idea环境中的资源上传与下载:
image-20220123211946393
配置本地仓库访问私服的权限(setting.xml)
配置本地仓库资源的下载来源
配置当前项目ssm访问私服上传资源的保存位置(pom.xml)
执行命令
mvn deploy
image-20220123214655864
执行结果
ojo打包好的jar文件上传至heima-release仓库中
image-20220122213802054
查看仓库里的ssm_pojo资源
image-20220122214226492
3.2.2 本地仓库访问私服
idea环境中的资源上传与下载:
image-20220123211946393
配置本地仓库访问私服的权限(setting.xml)
配置本地仓库资源的下载来源
配置当前项目ssm访问私服上传资源的保存位置(pom.xml)
执行命令
mvn deploy
image-20220123214655864
执行结果
