几个图像处理库整理:OpenCV、PIL(pillow)、skimage和GDAL库
主要是图像处理的几个库对数据的读取方式存在差异,有的时候经常搞混,没有概念,所以大致整理一下,一是增强印象,二是整理便于查阅。
关于图像读取函数:
1、opencv库,python在引用opencv库时通过import cv2
import cv2
img = cv2.imread('./xxx.jpg')
我测试的一张图片结果:可见opencv读出的数据是numpy数组类型,数据shape维度是[H,W,C],列(高)和行(宽),读取顺序是BGR,size表示像素数量。主要处理三波段图像或灰度图。
ipdb> type(img)
<class 'numpy.ndarray'>
ipdb> img.shape
(1080, 1920, 3)#列(height)、行(width)和通道数
ipdb> img.size
6220800
ipdb> img
array([[[23, 23, 23],
        [11, 11, 11],
        [14, 14, 14],
        ...,
        [14, 14, 14],
        [11, 11, 11],
        [23, 23, 23]],

       [[10, 10, 10],
        [ 0,  0,  0],
        [ 1,  1,  1],
        ...,
        [ 1,  1,  1],
        [ 0,  0,  0],
        [10, 10, 10]],

       [[13, 13, 13],
        [ 1,  1,  1],
        [ 3,  3,  3],
        ...,
        [ 3,  3,  3],
        [ 1,  1,  1],
        [13, 13, 13]],

       ...,

       [[ 6,  6,  6],
        [ 0,  0,  0],
        [ 0,  0,  0],
        ...,
        [ 1,  1,  1],
        [ 0,  0,  0],
        [ 8,  8,  8]],

       [[ 6,  6,  6],
        [ 0,  0,  0],
        [ 0,  0,  0],
        ...,
        [ 0,  0,  0],
        [ 1,  1,  1],
        [ 8,  8,  8]],

       [[14, 14, 14],
        [ 7,  7,  7],
        [ 8,  8,  8],
        ...,
        [ 8,  8,  8],
        [ 8,  8,  8],
        [16, 16, 16]]], dtype=uint8)
一般要注意中文路径无法读取图片的问题,或换成无中文路径或采用可解析方法,一个查询到的解决办法:
import cv2
import numpy as np
def cv_imread(file_path):
    cv_img = cv2.imdecode(np.fromfile(file_path,dtype=np.uint8),-1)
    return cv_img

path = r'D:\\code\\测试\\test\\xxx.jpg'
img = cv_imread(path)
2、Pillow 是 PIL的对Python3支持的一个分支,对Python2兼容
from PIL import Image
img = Image.open('xxx.png')
img1=img.resize((550,260))#图片尺寸缩放w,h
image = np.array(img,dtype=np.float32)
"image = np.array(image)默认是uint8,这时PIL格式转化为numpy,数据维度变化"
print image.shape # out: (100, 200, 3)
"w和h换了,变成(h,w,c)了"
测试可见,读取通道顺序是RGB,数据尺寸是行(width)、列(height)表示,[W,H]
ipdb> img
<PIL.JpegImagePlugin.JpegImageFile image mode=RGB size=1920x1080 at 0x2852FFCBFC8>
ipdb> img.format
'JPEG'
ipdb> img.size
(1920, 1080)
"行(width)、列(height)"
ipdb> img.mode
'RGB'
ipdb> img.width
1920
ipdb> img.height
1080
ipdb>img.getpixel((0,0)) # out: (143, 198, 201)

ipdb> im.info
{'jfif': 257, 'jfif_version': (1, 1), 'dpi': (96, 96), 'jfif_unit': 1, 'jfif_density': (96, 96), 'exif': b'Exif\x00\x00MM\x00*\x00\x00\x00\x08\x00\x07\x01\x0e\x00\x02\x00\x00\x00\x1c\x00\x00\x00b\x011\x00\x02\x00\x00\x00#\x00\x00\x00~\x01;\x00\x02\x00\x00\x00\x10\x00\x00\x00\xa2\x82\x98\x00\x02\x00\x00\x00\x10\x00\x00\x00\xb2\x9c\x9b\x00\x01\x00\x00\x00\x14\x00\x00\x00\xc2\x9c\x9d\x00\x01\x00\x00\x00 \x00\x00\x00\xd6\x9c\x9f\x00\x01\x00\x00\x00\x14\x00\x00\x00\xf6\x00\x00\x00\x00\xe6\x9c\x88\xe7\x90\x83\xe7\x9a\x84\xe9\xab\x98\xe6\xb8\x85\xe5\x90\x88\xe6\x88\x90\xe5\xbd\xb1\xe5\x83\x8f\x00\xe7\x94\xb1Dynamic theme\xe5\xba\x94\xe7\x94\xa8\xe7\xa8\x8b\xe5\xba\x8f\xe5\xaf\xbc\xe5\x87\xba\x00\x00Prathamesh Jaju\x00Prathamesh Jaju\x00\x08g\x03t\x84v\xd8\x9a\x05n\x08T\x10bq_\xcfP\x00\x00P\x00r\x00a\x00t\x00h\x00a\x00m\x00e\x00s\x00h\x00 \x00J\x00a\x00j\x00u\x00\x00\x00\x08g\x03t\x84v\xd8\x9a\x05n\x08T\x10bq_\xcfP\x00\x00'}
像素表示:
1 (1-bit pixels, black and white, stored with one pixel per byte)
L (8-bit pixels, black and white)
P (8-bit pixels, mapped to any other mode using a color palette)
RGB (3x8-bit pixels, true color)
RGBA (4x8-bit pixels, true color with transparency mask)
CMYK (4x8-bit pixels, color separation)
YCbCr (3x8-bit pixels, color video format)
I (32-bit signed integer pixels)
F (32-bit floating point pixels)

PNG 和 JPG 图像模式不一致。其中 PNG 是四通道 RGBA 模式,即红色、绿色、蓝色、Alpha 透明色;JPG 是三通道 RGB 模式。因此要想实现图片格式的转换,就要将 PNG 转变为三通道 RGB 模式.
"png格式的img转化为jpg格式"
img2=img.convert('RGB')
img2.save('xxx.jpg')
Image.merge(mode, bands)
例如:
r,g,b = image.split()
"重新组合颜色通道,返回先的Image对象"
image_merge=Image.merge('RGB',(b,g,r))
"裁剪"
im_crop = img.crop(box)
"拷贝"
im_copy=img.copy()
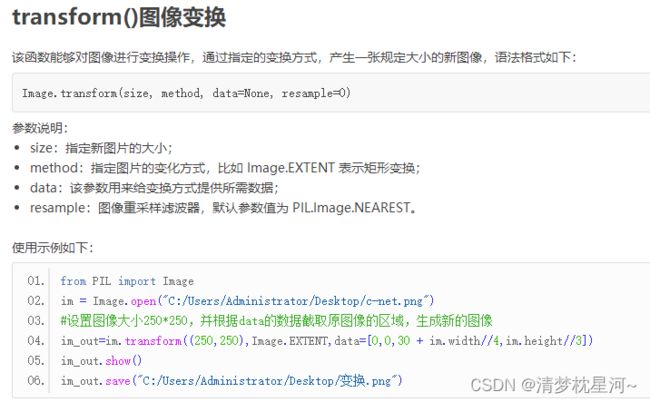
Image.transform(size, method, data=None, resample=0)
3、skimage 即scikit-image SciKit (toolkit for SciPy) ,是scipy.ndimage的扩展,由python语言编写的,将图片作为numpy数组进行处理,由scipy 社区开发和维护,提供了更多的图片处理功能。
"安装命令"
pip install scikit-image#或用conda
conda install scikit-image
img= io.imread('test.jpg',as_grey=False)
测试如下:数据格式是数组类型,数据维度[H,W,C],与opencv一致,读取顺序是RGB,与pillow一致
ipdb> img.shape
(1080, 1920, 3)
ipdb> img.size
6220800
ipdb> img.shape[0]
1080
ipdb> img.shape[1]
1920
ipdb> img
array([[[23, 23, 23],
        [11, 11, 11],
        [14, 14, 14],
        ...,
        [14, 14, 14],
        [11, 11, 11],
        [23, 23, 23]],

       [[10, 10, 10],
        [ 0,  0,  0],
        [ 1,  1,  1],
        ...,
        [ 1,  1,  1],
        [ 0,  0,  0],
        [10, 10, 10]],

       [[13, 13, 13],
        [ 1,  1,  1],
        [ 3,  3,  3],
        ...,
        [ 3,  3,  3],
        [ 1,  1,  1],
        [13, 13, 13]],

       ...,

       [[ 6,  6,  6],
        [ 0,  0,  0],
        [ 0,  0,  0],
        ...,
        [ 1,  1,  1],
        [ 0,  0,  0],
        [ 8,  8,  8]],

       [[ 6,  6,  6],
        [ 0,  0,  0],
        [ 0,  0,  0],
        ...,
        [ 0,  0,  0],
        [ 1,  1,  1],
        [ 8,  8,  8]],

       [[14, 14, 14],
        [ 7,  7,  7],
        [ 8,  8,  8],
        ...,
        [ 8,  8,  8],
        [ 8,  8,  8],
        [16, 16, 16]]], dtype=uint8)

"读为 灰度图 像素值是0-1"
img=io.imread('./xxx.jpg',as_gray=True)
ipdb> img
array([[0.09019608, 0.04313725, 0.05490196, ..., 0.05490196, 0.04313725,
        0.09019608],
       [0.03921569, 0.        , 0.00392157, ..., 0.00392157, 0.        ,
        0.03921569],
       [0.05098039, 0.00392157, 0.01176471, ..., 0.01176471, 0.00392157,
        0.05098039],
       ...,
       [0.02352941, 0.        , 0.        , ..., 0.00392157, 0.        ,
        0.03137255],
       [0.02352941, 0.        , 0.        , ..., 0.        , 0.00392157,
        0.03137255],
       [0.05490196, 0.02745098, 0.03137255, ..., 0.03137255, 0.03137255,
        0.0627451 ]])

ipdb> img.shape
(1080, 1920)
ipdb> img.size
2073600
4、GDAL库,GDAL是由开源地理空间基金会发布的一个栅格和矢量的地理空间数据转换库。GDAL库会创建一个栅格或矢量的抽象数据模型,通过这个抽象模型,我们可以借助程序来对栅格或矢量数据进行读取。
gdal主要是用来处理三个通道以上图像数据,主要是卫星影像数据,包含地理坐标系,坐标点等信息,功能比较丰富。
GDAL原生支持超过100种栅格数据类型,涵盖所有主流GIS与RS数据格式。
"安装"
conda install gdal
"导入"
from osgeo import gdal
支持常见的jpg、png、bmp等CV领域格式。能够完美的支持任意波段数量的数据,同时支持地理投影与地理坐标。
ReadAsArray返回的数据格式为numpy数组,以(C,H,W)形式存储,波段顺序在三波段与四波段时分别为(r,g,b)以及(r,g,b,nir),大于四波段则按照波长存储,例如(b,g,r,nir,swir1,tir,swir2)
dataset = gdal.Open('test.tif')
img = dataset.ReadAsArray()
del dataset
proj = dataset.GetProjection()
coord = dataset.GetGeoTransform()
需要按波段依次读取数据时
dataset = gdal.Open('test.tif')
width = dataset.RasterXSize
height = dataset.RasterYSize
band_count = dataset.RasterCount
img = None
for i in range(band_count):
    band = dataset.GetRasterBand(i + 1)
    _img = band.ReadAsArray().reshape(1, height, width)
    if i == 0:
        img = _img
    else:
        img.append(img, _img, axis=0)
del dataset

