Autoware.universe 和 carla simulator 联合仿真
Autoware.universe and carla simulator 联合仿真
1 .Autoware、 open_planner和carla安装
1.1 相关程序版本说明
ubuntu 版本:20.04
CUAD 版本:11.4.4
TensorRt 版本:8.2.5.1
ROS2 版本:galactic
Carla 版本:0.9.13
官方安装教程:
Installation - Autoware Documentation
源码安装官网教程
Source installation - Autoware Documentation
1.2 Autoware.universe + open_planner源码安装
1、clone相关autowarefoundation/autoware
cd /home/your dir/
mkdir carla-autoware-universe
git clone https://github.com/autowarefoundation/autoware.git
2、切换根autoware目录,安装依赖环境,/home/your dir/carla-autoware-universe为autoware的clone目录
cd /home/your dir/carla-autoware-universe/autoware
./setup-dev-env.sh
如果已经手动安装依赖环境可以跳过此步骤,安装依赖环境时间较长,一定确保网络稳定可靠,最好有网络环境
注意:/home/your dir/为你自己的安装路径
3、在根autoware目录下创建工作目录以及下载源码
mkdir src
vcs import src < autoware.repos
4、clone 相关open_planner源码,地址:https://github.com/ZATiTech/open_planner
cd /home/your dir/carla-autoware-universe/autoware/src/universe/external
git clone https://github.com:ZATiTech/open_planner.git
5、切换到根目录,安装ros依赖包
cd /home/your dir/carla-autoware-universe/autoware
source /opt/ros/galactic/setup.bash
rosdep update
rosdep install -y --from-paths src --ignore-src --rosdistro $ROS_DISTRO
若rosdep update更新失败,参考博文https://mp.csdn.net/mp_blog/creation/editor/127057560,更换源。若rosdep update未更新成功运行rosdep install -y --from-paths src --ignore-src --rosdistro $ROS_DISTRO命令,可能会出现缺少相关依赖包,则需要手动安装相关依赖包。如:
(1)缺少sensor-msgs-py
执行sudo apt install ros-galactic-sensor-msgs-py进行安装
(2)缺少tvm-vendor
执行sudo apt install ros-galactic-tvm-vendor进行安装
(3)其他缺少库,如tensorrt_cmake_module等,可以在https://github.com/tier4 网址进行下载,然后将下载包解压放到和需要本包文件的同级目录下,
如trtexec_vendor: Cannot locate rosdep definition for [tensorrt_cmake_module],需要将tensorrt_cmake_module放到和trtexec_vendor同级目录
(4)carla_pointcloud: Cannot locate rosdep definition for [velodyne_rawdata],由于velodyne_rawdata 包含在 velodyne_pointcloud,修改package.xml,
删除
6、编译执行
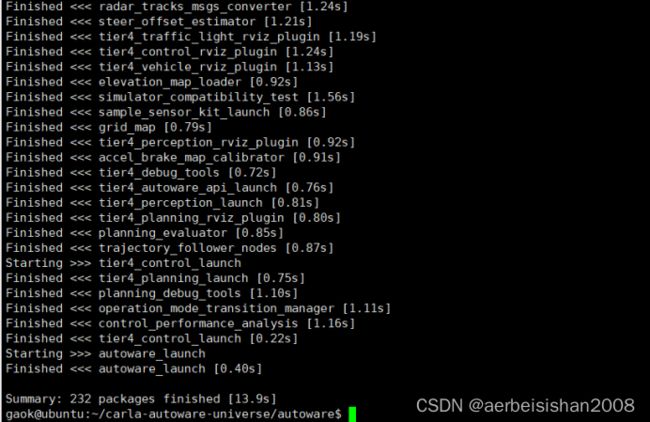
colcon build --symlink-install --cmake-args -DCMAKE_BUILD_TYPE=Release
等待安装完成。
1.3 相关包op_agent、op_bridge和scenario_runner安装
包地址为:hatem-darweesh (Hatem Darweesh) · GitHub
cd /home/your dir/carla-autoware-universe/
mkdir op_carla
cd op_carla
1、clone op_agent (ros2分支)
git clone -b ros2 https://github.com:hatem-darweesh/op_agent.git
2、clone op_bridge(ros2分支)
git clone -b ros2 https://github.com:hatem-darweesh/op_bridge.git
3、clone scenario_runner(openplanner_carla_bridge分支)
git clone -b openplanner_carla_bridge https://github.com:hatem-darweesh/scenario_runner.git
1.4 carla安装
参考官网https://carla.readthedocs.io/en/latest/start_quickstart/ 进行安装
cd /home/your dir/carla-autoware-universe/
下载二进制安装文件,tar命令进行解压,下载地址:https://github.com/carla-simulator/carla/blob/master/Docs/download.md 安装版本为CARLA 0.9.13
cd /home/your dir/carla-autoware-universe/CARLA_0.9.13
./CarlaUE4.sh
可以运行carla模拟器,相关运行实例可以参考官网说明文档。
1.5 环境变量设置
修改.bashrc环境变量
cd ~
vi .bashrc
增加如下环境配置:
#carla
export CARLA_ROOT=/home/your dir/carla-autoware-universe/CARLA_0.9.13
export SCENARIO_RUNNER_ROOT=/home/your dir/carla-autoware-universe/op_carla/scenario_runner
export LEADERBOARD_ROOT=/home/your dir/carla-autoware-universe/op_carla/op_bridge
export TEAM_CODE_ROOT=/home/your dir/carla-autoware-universe/op_carla/op_agent
export PYTHONPATH=$PYTHONPATH:${CARLA_ROOT}/PythonAPI
export PYTHONPATH=$PYTHONPATH:${CARLA_ROOT}/PythonAPI/util
export PYTHONPATH=$PYTHONPATH:${CARLA_ROOT}/PythonAPI/carla
export PYTHONPATH=$PYTHONPATH:${CARLA_ROOT}/PythonAPI/carla/agents
export PYTHONPATH=$PYTHONPATH:${CARLA_ROOT}/PythonAPI/carla/dist/carla-0.9.13-py3.7-linux-x86_64.egg
#cuda
export PATH=/usr/local/cuda/bin${PATH:+:${PATH}}
export LD_LIBRARY_PATH=/usr/local/cuda/lib64${LD_LIBRARY_PATH:+:${LD_LIBRARY_PATH}}
#ros2
source /opt/ros/galactic/setup.bash
2.执行文件修改
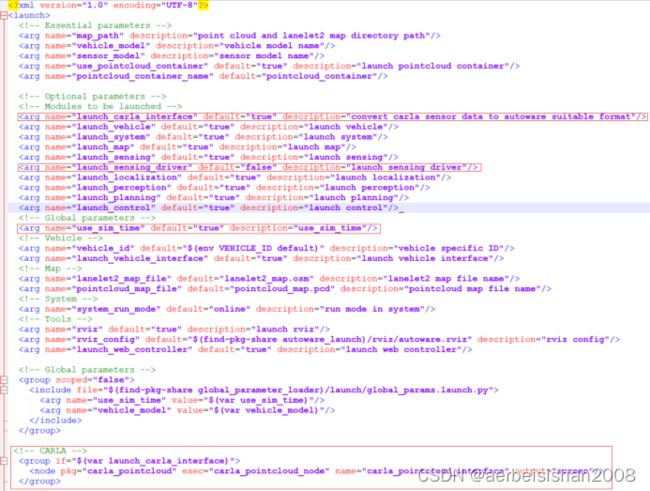
2.1 修改autoware.launch.xml文件
文件路径:/home/your dir/carla-autoware-universe/autoware/src/launcher/autoware_launch/autoware_launch/launch/autoware.launch.xml
cd /home/your dir/carla-autoware-universe/autoware/src/launcher/autoware_launch/autoware_launch/
vi autoware.launch.xml
修改内容如下红色框:
2.2 修改sensor_kit文件
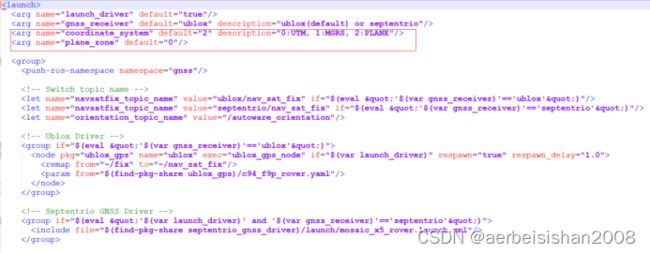
1、修改gnss.launch.xml
文件路径:/home/your dir/carla-autoware-universe/autoware/src/sensor_kit/sample_sensor_kit_launch/sample_sensor_kit_launch/launch/gnss.launch.xml
cd /home/your dir/carla-autoware-universe/autoware/src/sensor_kit/sample_sensor_kit_launch/sample_sensor_kit_launch/launch/
vi gnss.launch.xml
修改内容如下红色框:
2、修改sensors_calibration.yaml
文件路径:/home/your dir/carla-autoware-universe/autoware/src/sensor_kit/sample_sensor_kit_launch/sample_sensor_kit_description/config/sensors_calibration.yaml
cd /home/your dir/carla-autoware-universe/autoware/src/sensor_kit/sample_sensor_kit_launch/sample_sensor_kit_description/config/
vi sensors_calibration.yaml
修改内容如下:
base_link: sensor_kit_base_link: x: 0.0 y: 0.0 z: 1.6 roll: 0.0 pitch: 0.0 yaw: 0.0 velodyne_rear_base_link: x: 0.0 y: 0.0 z: 0.0 roll: 0.0 pitch: 0.0 yaw: 0.0
3、修改sensor_kit_calibration.yaml
文件路径:/home/your dir/carla-autoware-universe/autoware/src/sensor_kit/sample_sensor_kit_launch/sample_sensor_kit_description/config/sensor_kit_calibration.yaml
cd /home/your dir/carla-autoware-universe/autoware/src/sensor_kit/sample_sensor_kit_launch/sample_sensor_kit_description/config/
vi sensor_kit_calibration.yaml
修改内容如下:
sensor_kit_base_link: camera0/camera_link: x: 0.7 y: 0.0 z: 0.0 roll: 0.0 pitch: 0.0 yaw: 0.0 camera1/camera_link: x: 0.0 y: 0.0 z: 0.0 roll: 0.0 pitch: 0.0 yaw: 0.0 camera2/camera_link: x: 0.0 y: 0.0 z: 0.0 roll: 0.0 pitch: 0.0 yaw: 0.0 camera3/camera_link: x: 0.0 y: 0.0 z: 0.0 roll: 0.0 pitch: 0.0 yaw: 0.0 camera4/camera_link: x: 0.0 y: 0.0 z: 0.0 roll: 0.0 pitch: 0.0 yaw: 0.0 camera5/camera_link: x: 0.0 y: 0.0 z: 0.0 roll: 0.0 pitch: 0.0 yaw: 0.0 traffic_light_right_camera/camera_link: x: 0.0 y: 0.0 z: 0.0 roll: 0.0 pitch: 0.0 yaw: 0.0 traffic_light_left_camera/camera_link: x: 0.0 y: 0.0 z: 0.0 roll: 0.0 pitch: 0.0 yaw: 0.0 velodyne_top_base_link: x: 0.0 y: 0.0 z: 0.8 roll: 0.0 pitch: 0.0 yaw: 0.0 velodyne_left_base_link: x: -0.5 y: 0.0 z: 0.8 roll: 0.0 pitch: 0.0 yaw: 0.0 velodyne_right_base_link: x: 0.5 y: 0.0 z: 0.8 roll: 0.0 pitch: 0.0 yaw: 0.0 gnss_link: x: 0.0 y: 0.0 z: 0.8 roll: 0.0 pitch: 0.0 yaw: 0.0 tamagawa/imu_link: x: 0.0 y: 0.0 z: 0.8 roll: 0.0 pitch: 0.0 yaw: 0.0
2.3 修改执行脚本
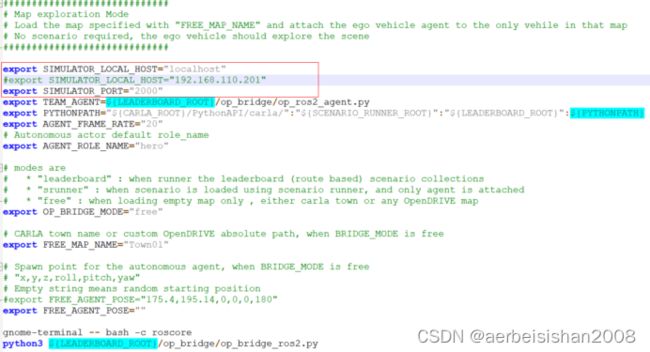
1、修改run_exploration_mode_ros2.sh
文件路径:/home/your dir/carla-autoware-universe/op_carla/op_bridge/op_scripts/run_exploration_mode_ros2.sh
cd /home/your dir/carla-autoware-universe/op_carla/op_bridge/op_scripts/
vi run_exploration_mode_ros2.sh
这里主要修改carla模拟器的IP和端口,依据自己模拟器的IP进行修改,本机执行可以不做修改,内容如下红色框。
2、修改start_ros2.sh
文件路径:/home/your dir/carla-autoware-universe/op_carla/op_agent/start_ros2.sh
cd /home/your dir/carla-autoware-universe/op_carla/
vi start_ros2.sh
这里主要修改autoware.launch.xml以及点云地图的路径,主要修改如下红色框:
相关点云地图的下载路径:autoware.universe和carla联合仿真的点云以及高清地图-Ubuntu文档类资源-CSDN下载
3.carla和autoware.universe联合仿真
1. Run carla
cd /home/your dir/carla-autoware-universe/CARLA_0.9.13
./CarlaUE4.sh
2. source evironment
cd /home/your dir/carla-autoware-universe/autoware
source ./install/setup.bash
3. run autoware.universe demo
cd /home/your dir/carla-autoware-universe/op_carla/op_bridge/op_scripts
./run_exploration_mode_ros2.sh
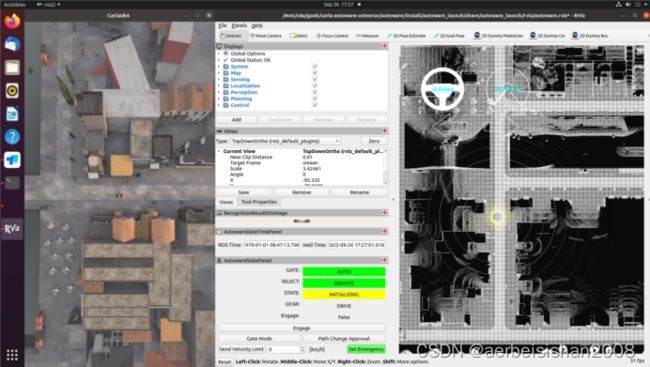
执行效果如下图:
Rviz2设置目的地进行车道路由规划,执行engage运行。

