HAProxy+Tengine 实现简单的 Web 架构
实验环境
实验一:
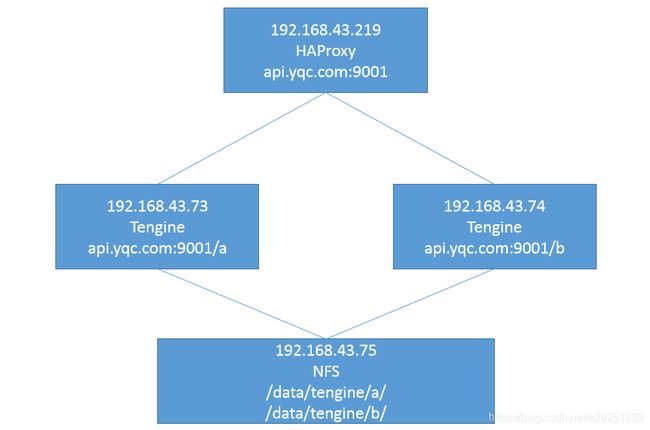
- 192.168.43.73和192.168.43.74编译安装Tengine,均可以代理站点api.yqc.com:9001;
- 192.168.43.75配置NFS存储,供73和74共享静态资源。
实验二:
- 192.168.43.219为Haproxy,为后端两台Tengine提供七层代理(api.yqc.com:9001);
- 192.168.43.73和192.168.43.74为Tengine服务器,经Haproxy代理转发后,73负责响应路径为/a的请求,74负责响应路径为/b的请求。
实验一
1.1:准备NFS
在192168.43.75上安装nfs,并进行相应配置:
~]# yum install nfs-utils -y

~]# mkdir /data/tengine -p

~]# vim /etc/exports
/data/tengine *(rw,no_root_squash)

~]# systemctl start nfs
~]# systemctl enable nfs
1.2:准备Tengine
1.2.1:编译安装Tengine
tengine是基于nginx开发的,官网下载地址:http://tengine.taobao.org/download.html
这里使用Tengine-2.3.0,在192.168.43.73和74上分别编译安装Tengine:
执行下方命令准备编译基础环境:
~]# yum install -y vim lrzsz tree screen psmisc lsof tcpdump wget ntpdate gcc gcc-c++ glibc glibc-devel pcre pcre-devel openssl openssl-devel systemd-devel net-tools iotop bc zip unzip zlib-devel bash-completion nfs-utils automake libxml2 libxml2-devel libxslt libxslt-devel perl perl-ExtUtils-Embed
下载解压tengine:
~]# cd /usr/local/src
src]# wget http://tengine.taobao.org/download/tengine-2.3.0.tar.gz
src]# tar zxvf tengine-2.3.0.tar.gz
src]# cd tengine-2.3.0/
进行编译安装:
#进行编译
tengine-2.3.0]# ./configure --prefix=/usr/local/tengine --user=tengine --group=tengine --with-http_ssl_module --with-http_v2_module --with-http_realip_module --with-http_stub_status_module --with-http_gzip_static_module --with-pcre --with-stream --with-stream_ssl_module --with-stream_realip_module --with-http_perl_module

#安装
tengine-2.3.0]# make && make install
添加tengine用户:
~]# useradd tengine -s /sbin/nologin -u 2001
创建nginx命令软链接:
~]# ln -sv /usr/local/tengine/sbin/nginx /usr/bin/nginx
验证:
~]# nginx -v
Tengine version: Tengine/2.3.0 (nginx/1.15.9)

~]# nginx
~]# ps -ef | grep nginx
root      19949      1  0 12:10 ?        00:00:00 nginx: master process nginx
tengine   19950  19949  0 12:10 ?        00:00:00 nginx: worker process

~]# lsof -i:80
COMMAND   PID    USER   FD   TYPE DEVICE SIZE/OFF NODE NAME
nginx   19949    root    6u  IPv4  58815      0t0  TCP *:http (LISTEN)
nginx   19950 tengine    6u  IPv4  58815      0t0  TCP *:http (LISTEN)
1.2.2:挂载NFS
为两台Tengine服务器分别安装nfs,用于挂载NFS存储:
~]# yum install nfs-utils -y

~]# showmount -e 192.168.43.75
Export list for 192.168.43.75:
/data/tengine *
挂载NFS存储:
~]# mkdir /data/tengine -p
~]# mount -t nfs 192.168.43.75:/data/tengine/ /data/tengine/
~]# df -TH
192.168.43.75:/data/tengine nfs4       52G  1.4G   50G   3% /data/tengine
配置开机挂载:
~]# vim /etc/fstab
192.168.43.75:/data/tengine /data/tengine nfs defaults,_netdev 0 0
#加上_netdev参数后,启动系统挂载分区时,会有一个超时时间,避免了无法访问网络存储而一直卡在挂载那里无法启动系统。
验证挂载参数:
~]# umount /data/tengine
~]# mount -a
~]# df -TH
192.168.43.75:/data/tengine nfs4       52G  1.4G   50G   3% /data/tengine
1.2.3:配置Tengine站点
此为模仿api调用,这里配置tengine监听在9001端口,server_name为api.yqc.com。
在两台Tengine上都进行如下配置:
~]# cd /usr/local/tengine/
tengine]# mkdir conf.d
tengine]# vim conf/nginx.conf
……
http {
    include       /usr/local/tengine/conf.d/*.conf;
    ……
}

tengine]# vim conf.d/api_yqc.conf
server {
    listen 9001;
    server_name api.yqc.com;
    location / {
        root /data/tengine;
    }
}

~]# nginx -t
~]# nginx -s reload

~]# vim /data/tengine/index.html
page api.yqc.com:9001
1.2.4:客户端访问测试
~]# vim /etc/hosts
192.168.43.73   api.yqc.com

~]# curl api.yqc.com:9001
page api.yqc.com:9001

~]# vim /etc/hosts
192.168.43.74   api.yqc.com

~]# curl api.yqc.com:9001
page api.yqc.com:9001
实验二
2.1:准备Haproxy
2.1.1:编译安装Hapoxy
192.168.43.219上操作
安装基础依赖包:
~]# yum install gcc gcc-c++ glibc glibc-devel pcre pcre-devel openssl openssl-devel systemd-devel net-tools vim iotop bc zip unzip zlib-devel lrzsz tree screen lsof tcpdump wget ntpdate -y
编译安装haproxy-1.8.20:
~]# cd /usr/local/src/
src]# ll haproxy-1.8.20.tar.gz
-rw-r--r--. 1 root root 2083917 Jun 17 17:00 haproxy-1.8.20.tar.gz

src]# tar zxvf haproxy-1.8.20.tar.gz
src]# cd haproxy-1.8.20/

#编译
haproxy-1.8.20]# make  ARCH=x86_64 TARGET=linux2628 USE_PCRE=1 USE_OPENSSL=1 USE_ZLIB=1 USE_SYSTEMD=1  USE_CPU_AFFINITY=1  PREFIX=/usr/local/haproxy

#USE_CPU_AFFINITY=1为开启haproxy进程与CPU核心绑定
#USE_SYSTEMD=1为支持使用-Ws参数(systemd-aware master-worker 模式)启动Haproxy,从而实现单主进程多子进程运行模式。

#安装
haproxy-1.8.20]# make install PREFIX=/usr/local/haproxy

haproxy-1.8.20]# cp haproxy  /usr/sbin/
准备启动脚本文件:
~]# vim /lib/systemd/system/haproxy.service
[Unit]
Description=HAProxy Load Balancer
After=syslog.target network.target

[Service]
ExecStartPre=/usr/sbin/haproxy -f /etc/haproxy/haproxy.cfg -f /etc/haproxy/conf -c -q
ExecStart=/usr/sbin/haproxy -Ws -f /etc/haproxy/haproxy.cfg -f /etc/haproxy/conf -p /run/haproxy.pid
ExecReload=/bin/kill -USR2 $MAINPID

[Install]
WantedBy=multi-user.target
验证版本:
~]# haproxy -v
HA-Proxy version 1.8.20 2019/04/25
Copyright 2000-2019 Willy Tarreau
2.1.2:根据代理转发要求,定义Haproxy配置文件
实验要求192.168.43.73负责响应路径为/a的请求,192.168.43.74负责响应路径为/b的请求,这里通过Haproxy的ACL中的path_beg,来匹配请求URL的开头,实现不同路径的请求调度。
~]# mkdir /etc/haproxy/conf -p
~]# vim /etc/haproxy/haproxy.cfg
global
maxconn 100000
chroot /usr/local/haproxy
#stats socket /var/lib/haproxy/haproxy.sock mode 600 level admin
uid 99
gid 99
daemon
nbproc 2
cpu-map 1 0
cpu-map 2 1
pidfile /usr/local/haproxy/run/haproxy.pid
log 127.0.0.1 local3 info

defaults
option http-keep-alive
option  forwardfor
maxconn 100000
mode http
timeout connect 300000ms
timeout client  300000ms
timeout server  300000ms

listen api
  bind 192.168.43.219:9001
  mode http
  acl a_request path_beg -i /a
  use_backend a_server if a_request
  acl b_request path_beg -i /b
  use_backend b_server if b_request

backend a_server
  server a1 192.168.43.73:9001 weight 1 check port 9001 inter 3s fall 3 rise 5

backend b_server
  server b1 192.168.43.74:9001 weight 1 check port 9001 inter 3s fall 3 rise 5
2.1.3:启动Haproxy
~]# systemctl daemon-reload
~]# systemctl start haproxy
~]# systemctl enable haproxy
~]# ps -ef | grep haproxy
root      37810      1  0 17:10 ?        00:00:00 /usr/sbin/haproxy -Ws -f /etc/haproxy/haproxy.cfg -f /etc/haproxy/conf -p /run/haproxy.pid
nobody    37813  37810  0 17:10 ?        00:00:00 /usr/sbin/haproxy -Ws -f /etc/haproxy/haproxy.cfg -f /etc/haproxy/conf -p /run/haproxy.pid
nobody    37814  37810  0 17:10 ?        00:00:00 /usr/sbin/haproxy -Ws -f /etc/haproxy/haproxy.cfg -f /etc/haproxy/conf -p /run/haproxy.pid
2.2:准备测试静态资源
准备/a和/b路径的静态资源,以验证配置结果(因为NFS是共享的,无法从访问结果上直观看出到底是哪台Tengine响应了请求,所以这里先把NFS的分区卸载,在两台Tengine本地分别创建/a和/b的访问页面):
192.168.43.73:
~]# umount /data/tengine
~]# mkdir /data/tengine/a
~]# vim /data/tengine/a/index.html
a page(192.168.43.73)
192.168.43.74:
~]# umount /data/tengine
~]# mkdir /data/tengine/b
~]# vim /data/tengine/b/index.html
b page(192.168.43.74)
2.3:客户端访问测试
~]# vim /etc/hosts
192.168.43.219  api.yqc.com

~]# curl api.yqc.com:9001/a/index.html
a page(192.168.43.73)
~]# curl api.yqc.com:9001/b/index.html
b page(192.168.43.74)