Ubuntu系统中Webot机器人配置
一、SolidWorks模型转URDF文件
1. 下载并安装sw2urdf插件
插件介绍:http://wiki.ros.org/sw_urdf_exporter
插件:https://github.com/ros/solidworks_urdf_exporter/releases (注意安装对应SolidWorks版本的插件)
插件安装:
1)下载exe文件双击安装;
2)SolidWorks软件主页 - 工具 - 插件 - 勾选 SW2URDF
3)打开SolidWorks模型 - 工具 - file - Export as URDF
2. 建立旋转轴和参考坐标系
根据构建机器人的需求,在需要添加驱动的位置构建机器人关机的参考坐标系和旋转轴(机械臂可以参考DH方法构建)。
注意:这里的旋转轴和坐标系只要方向对即可(旋转轴同轴,坐标系Z轴方向是对的),无需特别精细。
3.生成URDF文件
3.1 添加运动副
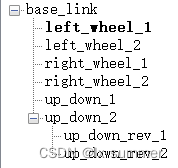
1)初始只有 base_link;
2)点击 base_link ,可以改动连杆的名字,参考坐标系,添加连杆零件(即相对于基坐标固定的零件),添加子连杆;
3)点击构建的子连杆,可以改动连杆的名字,运动副的名字(即joint),参考坐标系,旋转轴,设置运动副类型(continuous电机可无限旋转;revolute舵机可加限位;prismatic移动电机,fixed固定),添加连杆零件(即相对于此坐标固定的零件),添加子连杆。

3.2 生成urdf配置文件
1)点击 Preview and Export 进入配置界面;
2)确定关节属性,可以在此步骤进行改动,点击next;
3)确定连杆属性,包括惯性矩,可视化和碰撞体属性(确认加载即可,不需要改动);
4)点击 Export URDF and Meshes;
5)将生成的文件拷到相应的系统中。
3.3 显示URDF文件
在Ubuntu系统中,可以直接 launch 生成的功能包中的 display.launch 文件。
可能存在问题:
1)机器人整体散架:
可能原因:SolidWorks2018 中的模型不能相同,不只是名字,模型也要有差别(虽然很扯,但模型更改后就没问题了)。
二、URDF转PROTO文件
1. 安装 urdf2webots 插件
官网:https://pypi.org/project/urdf2webots/2.0.3/
GitHub:https://github.com/cyberbotics/urdf2webots
具体安装说明,推荐看官网
注意:不同版本的 Webots 对应不同版本的插件
安装方法1: pip (推荐)
# 最新版本插件
pip install urdf2webots
# 相应版本的插件,经测试 Webots2020a可用; 可能需要使用不同的 pip 版本,如 pip3
pip install urdf2webots==1.0.9
安装方法2: sources
# 最新版本插件,相应版本的插件可以在 releases 中查找
git clone https://github.com/cyberbotics/urdf2webots.git
cd urdf2webots
pip install -r requirements.txt
2. 使用urdf2webots 插件
参考:官网
使用方法1:(推荐)
# 可能需要使用不同的 python 版本,如 python3.5 - m
python -m urdf2webots.importer --input=someRobot.urdf [--output=outputFile] [--normal] [--box-collision] [--tool-slot=linkName] [--help]
使用方法2:
# 可能需要使用不同的 python 版本,如 python3.5
python
>> from urdf2webots.importer import convertUrdfFile
>> convertUrdfFile(input = 'MY_PATH/MY_URDF.urdf')
可能存在问题:
1)AttributeError: ‘_NamespacePath’ object has no attribute ‘sort’
解决方法:
pip3 install --upgrade pip
pip3 install --upgrade setuptools
3. 导入 proto 文件
1)将生成的 proto 文件放入对应世界的 proto 文件件中;
2)Webots软件主页 - 点击新增 - 添加 PROTO nodes (Current Project)。
三、Webots机器人控制器添加
向导 - 新增机器人控制器 - C++/Python - 确定控制器名称 - 完成。
四轮车控制器:
// File: car_controller.cpp
// Date:
// Description:
// Author: summer
// Modifications:
// You may need to add webots include files such as
// , , etc.
// and/or to add some other includes
#include 四、添加 ROS 控制器
本文参考文档均以超链接形式在文中给出。
以上内容根据自己理解和实践所写,如有错误,请批评指正。