深度学习与神经网络-吴恩达(Part1Week3)-单隐层神经网络编程实现(python)
一、神经网络的表示
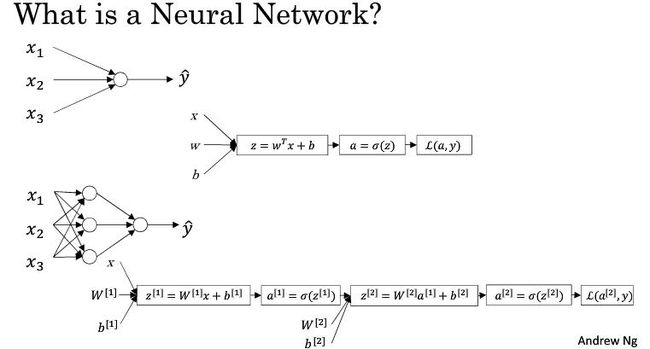
上一个教程中已经详细介绍了Logistic Regression模型,神经网络其实就是多个 Logistic Regression模型的组合,每个功能层(含有激活函数的层)中的每个神经元都对应一个Logistic Regression模型。在下面的例子中,神经网络只含有一个隐层,单个输入样本 x 经过第一层的线性处理和非线性映射,得到了z1和 a1,随后将 a1 作为第二层(输出层)的输入,依次计算 z2 和 a2 ,a2即为我们最终的输出,最后计算损失函数,这就是一个完整的正向传播过程。我们可以看到这里有两次激活函数的使用,两个激活函数可以相同也可以不同。
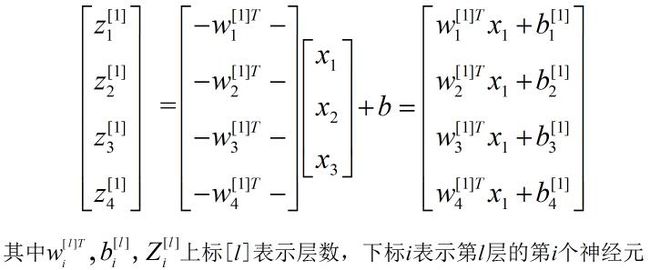
接下来通过另一个例子具体来表示单隐层的神经网络,依次分别计算各层各个神经元的输出:
从上面的例子中可以看出,我们针对某一层分别计算单个神经元的输出是非常低效的,在具体的编程中需要通过for循环来实现,那么我们尝试将上述方程组转堆叠到一起来计算:
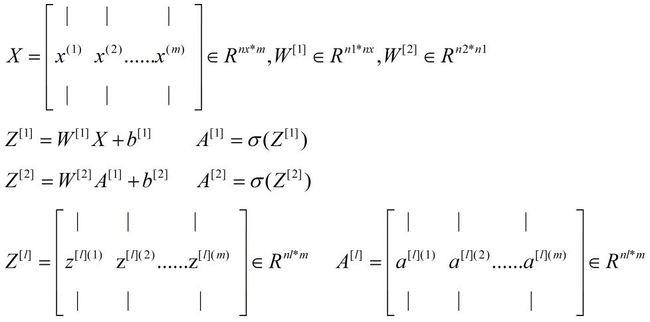
最终我们将单层的计算过程向量化(需要特别注意的是每个向量的shape,因为向量乘法对两个向量的shape有要求,不熟悉的可以顺着推导下),得到如下的表达形式:
二、向量化加速
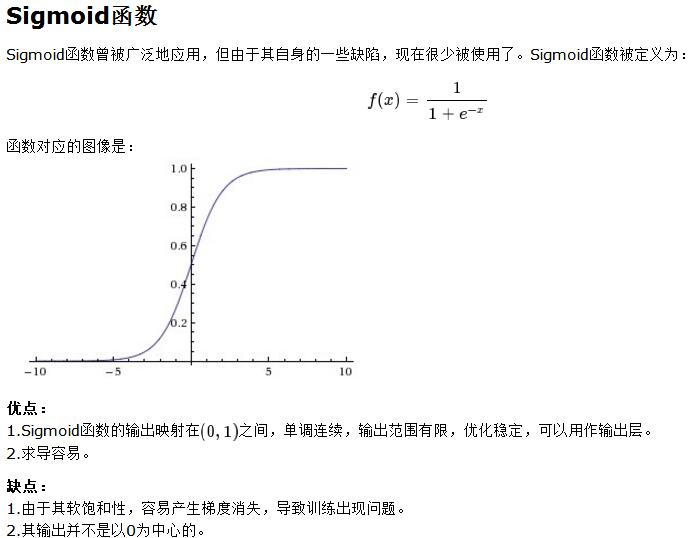
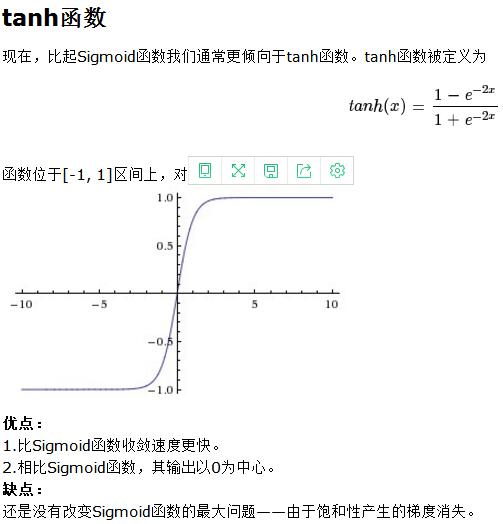
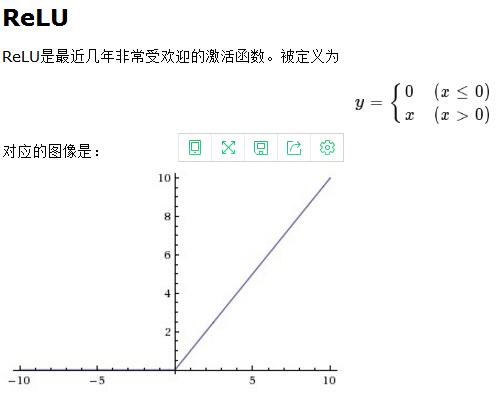
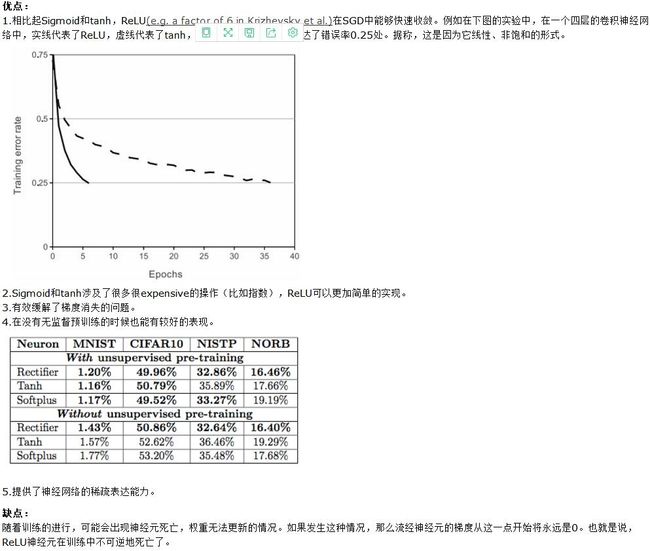
三、激活函数
五、随机初始化
这里所乘的0.01是一个经验参数(可以自己试验确定),只是用来将权重参数初始化成非常小非常小的随机值。因为如果你用的tanh或者sigmoid激活函数,当权重太大,所计算的激活函数值极有可能落在tanh或者sigmoid函数的平缓部分(接近饱和),这也意味着梯度下降法会非常慢,所以学习会很慢。
六、实现代码
import numpy as np
import matplotlib.pyplot as plt
import h5py
import scipy
from PIL import Image
from scipy import ndimage
from lr_utils import load_dataset

# Input data
train_set_x_orig, train_set_y, test_set_x_orig, test_set_y, classes = load_dataset()
train_num = train_set_x_orig.shape[0]
test_num = test_set_x_orig.shape[0]
pix_num = train_set_x_orig.shape[1]
chanel_num = train_set_x_orig.shape[3]
print('\n' + '---------------Input information---------------' + '\n')
print('train_set_x_orig.shape = ' + str(train_set_x_orig.shape))
print('train_set_y.shape = ' + str(train_set_y.shape))
print('test_set_x_orig.shape = ' + str(test_set_x_orig.shape))
print('test_set_y.shape = ' + str(test_set_y.shape))
print('train_num = ' + str(train_num))
print('test_num = ' + str(test_num))
print('pix_num = ' + str(pix_num))
print('chanel_num = ' + str(chanel_num))

# Reshape data
train_set_x_flat = train_set_x_orig.reshape(train_num,-1).T
test_set_x_flat = test_set_x_orig.reshape(test_num,-1).T
print('\n' + '---------------After reshaping---------------' + '\n')
print('train_set_x_flat = ' + str(train_set_x_flat.shape))
print('test_set_x_flat = ' + str(train_set_x_flat.shape))

# Standarize data
train_set_x = train_set_x_flat/255.0
test_set_x = test_set_x_flat/255.0
print('\n' + '---------------After Standaring---------------' + '\n')
print('Check for traindata = ' + str(train_set_x[0:5,0]))
print('Check for testdata = ' + str(test_set_x[0:5,0]))

def tanh(x):
    s = (np.exp(x)-np.exp(-x))/((np.exp(x)+np.exp(-x)))
    return s

def tanh_prime(x):
    s = 1 - np.power(tanh(x), 2)
    return s

def sigmoid(x):
    s = 1/(1+ np.exp(-x))
    return s

def sigmoid_prime(x):
    s = sigmoid(x)*(1 - sigmoid(x))
    return s

def relu(Z):
    s = np.maximum(0,Z)
    return s

def relu_prime(Z):
    s = Z
    s[Z <= 0] = 0
    s[Z>0]=1
    return s

def initial_weights(input, hidden, output, m):
    np.random.seed(3)
    w1 = np.random.randn(hidden,input)* 0.01
    b1 = np.zeros((hidden,1))
    w2 = np.random.randn(output,hidden)* 0.01
    b2 = np.zeros((output,1))
    return w1,b1,w2,b2

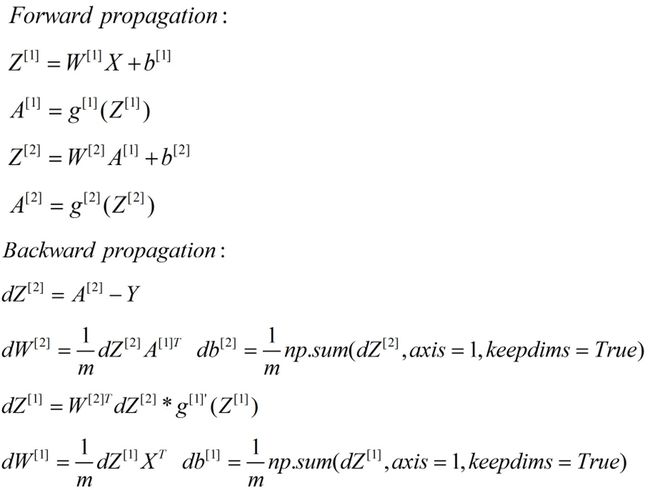
def train(X,y,hidden=20,learning_rate=0.01,itr_num=3000,isprint=True):
    h_i = X.shape[0]
    m = X.shape[1]
    h_o = y.shape[0]
    h_h = hidden
    w1,b1,w2,b2 = initial_weights(h_i, h_h, h_o, m)
    costs = []
    for i in range(itr_num):
        # Forward
        A1 = tanh(np.dot(w1, X) + b1)  # h_h * m
        A2 = sigmoid(np.dot(w2,A1) + b2)                 # h_o * m
        cost =  -(1.0/m)*np.sum(y*np.log(A2)+(1-y)*np.log(1-A2))

        # Backword
        dz2 = A2 - y
        dw2 = (1.0/m)*np.dot(dz2 , A1.T)
        db2 = (1.0/m)*np.sum(dz2, axis=1,keepdims=True)

        dz1 = np.dot(w2.T,dz2)*tanh_prime(np.dot(w1, X) + b1)  # h_h * m
        dw1 = (1.0/m)*np.dot(dz1, X.T)
        db1 = (1.0/m)*np.sum(dz1, axis=1,keepdims=True)

        # Update weights
        w1 = w1 - learning_rate*dw1
        b1 = b1 - learning_rate*db1
        w2 = w2 - learning_rate*dw2
        b2 = b2 - learning_rate*db2

        if isprint and  i % 100 ==0:
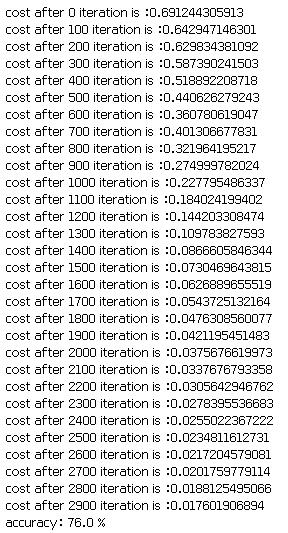
            print('cost after ' + str(i) + ' iteration is :' + str(cost))
        if i%100 ==0:
            costs.append(cost)
    d = {"w1":w1,"b1":b1,"w2":w2,"b2":b2,"costs":costs,"learning_rate":learning_rate}
    costs = np.squeeze(costs)
    plt.plot(costs)
    plt.ylabel('cost')
    plt.xlabel('Iteration(per hundreds)')
    plt.title("Learning rate=" + str(d["learning_rate"]))
    plt.show()
    return d

def predict(X,y,d):
    w1 = d["w1"]
    b1 =d["b1"]
    w2 =d["w2"]
    b2 =d["b2"]
    nx = X.shape[0]
    m = X.shape[1]
    Y_prediction = np.zeros((1,m))
    A1 = relu(np.dot(w1, X) + b1)
    prob = sigmoid(np.dot(w2,A1) + b2)
    for i in range(m):
        if prob[0,i] > 0.5:
            Y_prediction[0,i]  = 1
        else:
            Y_prediction[0,i] = 0
    print("accuracy: {} %".format(100 - np.mean(np.abs(Y_prediction - y)) * 100))
    return Y_prediction

model = train(train_set_x,train_set_y,hidden=20,learning_rate=0.01,itr_num=3000)
y = predict(test_set_x,test_set_y,model)