深度学习实例--服装识别
1. 说明
此实例一开始是在 TensorFlow 看到的,不过TensorFlow用高阶API实现,确实是两三行代码就实现了一个服装识别模型。本着学习的精神以让自己对训练神经网络的过程更加熟悉决定手撮一个模型,主要使用的是 Jupyter Notebook 及 IPython 的辅助开发。附上TensorFlow原址:
https://tensorflow.google.cn/tutorials/keras/basic_classification#evaluate_accuracy
最后扯一下,在这个过程中有时候数据的预处理这个还是比较讨人厌的,但这个工作对于一些熟悉 Python 数据处理的人自然是迎刃而解,所以如果要以这个例子来学习的话,我的建议是一些数据的处理等工作可以直接拿来用,涉及到模型实现的先自己来实现,再参照比较差异,这样可以专注于学习模型的建立。
下面给出 TensorFlow 低阶API 改写,主要是介绍 TensorFlow:
点我传送
2. 数据预处理
2.1 准备数据
数据在Github上有(不用就可以下载),分别是6W的训练集以及1W的测试集。
数据地址: https://github.com/zalandoresearch/fashion-mnist/tree/master/data/fashion
2.2 数据读取、处理及显示
def load_mnist(path, kind='train'):
    import os
    import gzip
    import numpy as np

    """Load MNIST data from `path`"""
    labels_path = os.path.join(path,
                               '%s-labels-idx1-ubyte.gz'
                               % kind)
    images_path = os.path.join(path,
                               '%s-images-idx3-ubyte.gz'
                               % kind)

    with gzip.open(labels_path, 'rb') as lbpath:
        labels = np.frombuffer(lbpath.read(), dtype=np.uint8,
                               offset=8)

    with gzip.open(images_path, 'rb') as imgpath:
        images = np.frombuffer(imgpath.read(), dtype=np.uint8,
                               offset=16).reshape(len(labels), 784)

    images = images / 255.0			//像素的取值为0-255为了防止算术溢出,也是必要的处理
    images = images.T
    labels = labels.reshape(labels.shape[0], 1).T
    temp = np.zeros((10, labels.shape[1]))
    temp[labels, np.arange(labels.shape[1])] = 1

    return images, temp
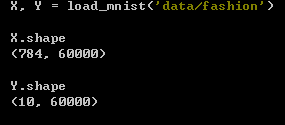
读取后的格式如下, 784 = 28*28为一张图片的数据, Y的取值范围为0,1,2,…,9即有10类时装,处理成仅有正确的标签一行为1其余为0.

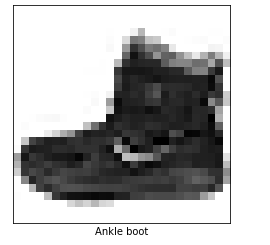
显示图片
class_names = ['T-shirt/top', 'Trouser', 'Pullover', 'Dress', 'Coat',
               'Sandal', 'Shirt', 'Sneaker', 'Bag', 'Ankle boot']

plt.imshow(X[:, 0].reshape(28, 28), cmap=plt.cm.binary)
plt.xticks([])
plt.yticks([])
plt.xlabel(class_names[np.argmax(Y[:, 0])])
plt.show()
确定了数据的格式以及正确性之后,便开始实现模型的部分了,大致分为三部分:
- 参数初始化
- 前向传播
- 反向传播
3. 参数初始化
参数初始化问题涉及到网络的规模, 这里取和 TensorFlow 一样的规模,两层神经网络(128, 10),这里使用 “he初始化方法” 参考代码如下:
def initialize_parameters(layers_dims):
    """
        参数:
        layers_dims -- 指示了每一层的大小

        返回:
        parameters -- 根据 layers_dims 初始化好的参数
    """
    parameters = {}
    L = len(layers_dims)

    for l in range(1, L):
        parameters['W' + str(l)] = np.random.randn(layers_dims[l], layers_dims[l-1]) * np.sqrt(2/layers_dims[l-1])
        parameters['b' + str(l)] = np.zeros((layers_dims[l], 1))

        assert(parameters['W' + str(l)].shape == (layers_dims[l], layers_dims[l-1]))
        assert(parameters['b' + str(l)].shape == (layers_dims[l], 1))

    return parameters
4.前向传播
前向传播时,对于每个神经元(结点)来说有两个运算步骤,一是线性运算,二是非线性(激活)运算。
4.1 线性前向传播
def linear_forward(W, b, A):
    """
        参数:
        W -- 当前层的参数W
        b -- 当前层的参数b
        A -- 前一层的输出

        返回:
        Z -- 当前层的线性输出
        cache -- 将当前层线性运算所使用到的参数存起来,以便反向传播到当前层时的计算。
    """
    Z = np.dot(W, A) + b

    assert(Z.shape == (W.shape[0], A.shape[1]))
    cache = (W, b, A)

    return Z, cache
4.2 激活-前向传播
不同层的结点使用不同的激活函数,这里隐藏层是 relu ,输出层是 softmax。由于激活传播用到了线性前向传播,所以就整合了在一起,如下:
def linear_activation_forward(A_prev, W, b, func = 'relu'):
    """
        参数:
        A_prev -- 前一层的输出
        W, b -- 当前层参数
        func -- 当前层使用的激活函数,默认为 relu

        返回:
        A -- 当前层的输出
        cache -- 当前层的线性传播缓存以激活缓存,以便反向传播时使用
    """
    Z, linear_cache = linear_forward(W, b, A_prev)

    if func == 'relu':
        A, activation_cache = relu(Z)
    elif func == 'softmax':
        A, activation_cache = softmax(Z)

    assert(A.shape == Z.shape)

    cache = (linear_cache, activation_cache)
    return A, cache
其中激活函数如下:
def relu(Z):
    A = np.maximum(0, Z)

    assert( A.shape == Z.shape )

    cache = Z
    return A, cache

def softmax(Z):

    T = np.exp(Z)
    A = T / np.sum(T, axis=0)

    assert (np.sum(A, axis=0).all() == 1)
    assert( A.shape == Z.shape)

    cache = Z
    return A, cache
4.3 前向传播
最后应将所有层的运算整合一起,形成前向传播得过程,如下:
def forward_propapgation(parameters, X):
    """
        参数:
        parameters -- 神经网络各层的参数
        X -- 训练集

        返回:
        AL -- 最后一层激活后的输出
        caches -- 记录了各层的 cache ,便于反向传播时使用
    """
    L = len(parameters) // 2
    A = X
    caches = []

    for l in range(1, L):
        A_prev = A
        A, cache = linear_activation_forward(A_prev, parameters["W" + str(l)], parameters['b' + str(l)], 'relu')

        caches.append(cache)

    AL, cache = linear_activation_forward(A, parameters["W" + str(L)], parameters['b' + str(L)], 'softmax')
    caches.append(cache)

    assert(AL.shape == (10, X.shape[1]))

    return AL, caches
4.4 计算损失( loss )
当前向传播完成后,我们会得到输出层(最后一层)的输出——AL,AL的格式与Y的格式一致,则我们容易计算损失如下:
def compute_cost(AL, Y):

    assert(AL.shape == Y.shape)

    m = Y.shape[1]
    J = -np.sum( Y * np.log(AL) ) / m

    return J
至此前向传播已经完成,如果使用 TensorFlow 的一些API也是仅需要实现前向传播的过程。
5. 反向传播
反向传播过程可以说是最难的部分, 这里要准确的推出导数公式。同样反向传播也分两部分,一是线性反向,而是非线性反向(激活)反向。
5.1 线性反向
线性反向比较简单,仅需注意导数的维度跟参数的维度保持一致便可。
def linear_backward(dZ, cache):
    """
        参数:
        dZ -- 当前层对Z的偏导
        cache -- 由前向传播时所缓存,包含了当前层计算导数所需要的参数

        输出:
        dA_prev -- 对前一层输出的导数
        dW -- 当前层对W的导数
        db -- 当前层对b的导数
    """
    W, b, A_prev = cache
    m = A_prev.shape[1]

    dW = np.dot(dZ, A_prev.T) / m
    db = np.sum(dZ, axis=1, keepdims=True) / m
    dA_prev = np.dot(W.T, dZ)

    assert(dW.shape == W.shape)
    assert(db.shape == b.shape)
    assert(dA_prev.shape == A_prev.shape)

    return dA_prev, dW, db
5.2 激活反向
与前向一样,由于对某层的激活反向求导完后紧跟着就是线性反向求导,所以有整合一起,因为有两个不同的激活函数,自然激活方向也会有两个,如下:
def linear_activation_backward(dA, cache, activation):
    """
        参数:
        dA -- 当前层对 A (即输出) 的导数
        cache -- 由前向传播过程中所缓存,包含了当前层的 线性cache 以及 激活cache ,分别有在线性和激活求导所需的参数
        activation -- 所使用的激活函数,确定导数公式

        输出:
        当前层的参数的导数以及前一层输出的导数
    """
    linear_cache, activation_cache = cache

    if activation == 'relu':
        dZ = relu_backward(dA, activation_cache)
    elif activation == 'softmax':
        dZ = softmax_backward(dA, activation_cache)

    dA_prev, dW, db = linear_backward(dZ, linear_cache)

    return dA_prev, dW, db
然后应该就是最困难的部分了——激活函数的求导,已经过 gradient-checking 验证了公式的正确性。
def relu_backward(dA, cache):

    Z = cache
    dZ = np.array(dA, copy=True)
    dZ[ Z < 0 ] = 0

    assert( dZ.shape == Z.shape)

    return dZ

def softmax_backward(dA, cache):
    Z = cache
    T = np.exp(Z)
    A = T / np.sum(T, axis=0)
    dZ = A*(1-A)*dA

    assert( dZ.shape == Z.shape)

    return dZ
对于输出层 dZ 的推导,有一点是值得说一下的,在推导的过程中用的是一种将特殊推广的一般的方法,类似于数学归纳法,虽然我们的分类是10类,但是我总是当做2类去求导,得出导数公式,然后再一般化。 最后的结果是 dZ = AL - Y,但为了将过程都表明清楚,就没有跳步。
5.3 反向传播
有了上面两步之后,工作开始变得简单,接下来就是将求导过程整合起来,形成反向传播,如下:
def backward_propagation(AL, Y, caches):
    """
        参数:
        AL -- 前向传播最后一层输出
        Y -- labels
        caches -- 由前向传播返回得, 包含各层反向传播所需的参数

        输出:
        grads -- 各层的导数
    """
    L = len(caches)
    grads = {}

    dAL = -(Y/AL - (1-Y)/(1-AL))			//最后一层的 dAL 是我们需预先推导出来的
    dA_prev, grads['dW' + str(L)], grads['db' + str(L)] = linear_activation_backward(dAL, caches[L-1], 'softmax')

    for l in reversed(range(L-1)):

        current_cache = caches[l]

        dA_prev, dW, db = linear_activation_backward(dA_prev, current_cache, 'relu')

        grads['dW' + str(l+1)] = dW
        grads['db' + str(l+1)] = db

    return grads
5.4 更新参数
至此反向传播已经完成,剩下的就是更新参数,更新参数需要确定的超参数有学习率,这里还没有用任何正规化技术,因为只有需要正规化的时候才会使用,而不会画蛇添足。参考如下:
def update_parameters(parameters, grads, learning_rate):

    L = len(parameters) // 2
    for l in range(L):
        parameters['W' + str(l+1)] = parameters['W' + str(l+1)] - learning_rate * grads['dW' + str(l+1)]
        parameters['b' + str(l+1)] = parameters['b' + str(l+1)] - learning_rate * grads['db' + str(l+1)]

    return parameters
5.5 Gradient Checking
在反向传播的最后一部分,附上 gradient checking (梯度检查) 的实现以及相关辅助方法(由于使用比较简单,就省去了注释):
def gradient_checking(X, Y, parameters, layers_dims, epsilon = 1e-7):


    #Compute gradient with formula
    AL, caches = forward_propapgation(parameters, X)
    grads = backward_propagation(AL, Y, caches)
    grad = gradients_to_vector(grads)

    #Compute gradient with gradient checking
    parameters_values = dictionary_to_vector(parameters)
    num_parameters = parameters_values.shape[0]
    J_plus = np.zeros((num_parameters, 1))
    J_minus = np.zeros((num_parameters, 1))
    gradapprox = np.zeros((num_parameters, 1))

    #Compute gradapprox
    for i in range(num_parameters):

        thetaplus = np.copy(parameters_values)
        thetaplus[i][0] += epsilon
        AL, caches = forward_propapgation(vector_to_dictionary(thetaplus, layers_dims) , X)
        J_plus[i] = compute_cost(AL, Y)

        thetaminus = np.copy(parameters_values)
        thetaminus[i][0] -= epsilon
        AL, caches = forward_propapgation(vector_to_dictionary(thetaminus, layers_dims), X)
        J_minus[i] = compute_cost(AL, Y)

        gradapprox[i] = (J_plus[i] - J_minus[i]) / (2 * epsilon)

    numerator = np.linalg.norm(gradapprox - grad)
    denominator = np.linalg.norm(gradapprox) + np.linalg.norm(grad)
    difference = numerator / denominator

    if difference > 2e-7:
        print ("\033[93m" + "There is a mistake in the backward propagation! difference = " + str(difference) + "\033[0m")
    else:
        print ("\033[92m" + "Your backward propagation works perfectly fine! difference = " + str(difference) + "\033[0m")

    return difference
def dictionary_to_vector(parameters):
    """
    Roll all our parameters dictionary into a single vector satisfying our specific required shape.
    """
    keys = []
    count = 0
    for key in parameters.keys():

        # flatten parameter
        new_vector = np.reshape(parameters[key], (-1,1))

        if count == 0:
            theta = new_vector
        else:
            theta = np.concatenate((theta, new_vector), axis=0)
        count = count + 1

    return theta

def vector_to_dictionary(theta, layers_dims):
    """
    Unroll all our parameters dictionary from a single vector satisfying our specific required shape.
    """
    parameters = {}
    L = len(layers_dims)
    p = q = 0

    for l in range(1, L):
        p = q
        q = p + layers_dims[l-1] * layers_dims[l]
        parameters['W' + str(l)] = theta[p:q].reshape(layers_dims[l], layers_dims[l-1])

        p = q
        q = p + layers_dims[l]

        parameters['b' + str(l)] = theta[p:q].reshape(layers_dims[l], 1)

        assert(parameters['W' + str(l)].shape == (layers_dims[l], layers_dims[l-1]))
        assert(parameters['b' + str(l)].shape == (layers_dims[l], 1))

    return parameters

def gradients_to_vector(gradients):
    """
    Roll all our gradients dictionary into a single vector satisfying our specific required shape.
    """

    count = 0
    L = len(gradients) // 2

    for l in range(1, L+1):
        new_vector_W = np.reshape(gradients['dW' + str(l)], (-1,1))
        new_vector_b = np.reshape(gradients['db' + str(l)], (-1,1))

        if count == 0:
            theta = new_vector_W
            theta = np.concatenate((theta, new_vector_b), axis=0)
        else:
            theta = np.concatenate((theta, new_vector_W), axis=0)
            theta = np.concatenate((theta, new_vector_b), axis=0)

        count = count + 1

    return theta
这里提一点,使用 gradient checking 时是非常慢的,所以要控制传入的数据的数量, 也因为只是用来测试我们的反向传播得正确性,所以我通常用10个样本去测试。
6. 训练模型、评估及调优
现在已正确的完成了下面的工作:
- 参数初始化
- 前向传播
- 反向传播
这个时候,如果网络的规模以及参数的特征是适当时,其实也是不怕说训练不出一个性能好的模型, 或许只是需要使用一些正规化技术以防止过度拟合的现象。但是仅仅是上述实现的模型,训练的速度是很慢的,下面会慢慢讲解。
给出一个完成的训练模型的方法的参考,其中有一些:
def model(X_train, Y_train, parameters, layers_dims,  learning_rate = 0.0005, num_epochs = 5 ):

    parameters = initialize_parameters(layers_dims)

    costs = []

    for i in range(num_epochs):

        AL, caches = forward_propapgation(parameters, mini_batch_X)

        J = compute_cost(AL,  mini_batch_Y)

        grads = backward_propagation(AL, mini_batch_Y, caches)

        parameters = update_parameters(parameters, grads, learning_rate)

        costs.append(J)

        print(J)

    plt.plot(costs)
    plt.ylabel('cost')
    plt.xlabel('epochs (per 100)')
    plt.title("Learning rate = " + str(learning_rate))
    plt.show()
    return parameters
调用上述模型去训练,使用默认的5次,测试代码如下:
layers_dims = [784, 128, 10]
import time
start = time.time()
parameters = model(X, Y, layers_dims)
end = time.time()
print('consume time :' + '{:.2}s'.format(end-start))
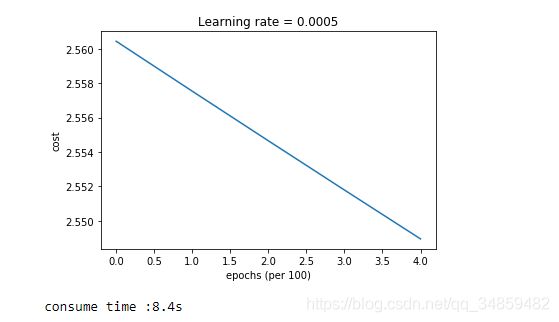
结果如下图(不用关注 xlabel):

可以发现,仅仅是训练 5 次就耗费了 8.4 s。关于模型性能的 Predict 方法,我已写好,但是为了连贯,predict 方法就放在后面给出。 上面训练过5次的模型对训练集的准确率为 15% ,测试集我就没有去尝试了。
好,现在我们运到训练速度过于缓慢的问题了,还记得我们的训练的大小是 6W ,所以这个时候应该想到的是使用小批量训练的方法——即将6W的训练集分成若干个较小的训练集(通常这些小训练集的大小是2的幂)。另外有一点需要提一下,就是可以发现当我们将 6W 个数据拿去训练时,损失必然是单调减 的,因为我们模型的性能是以损失的评估的。当使用小批量(mini-batch)训练时则是会出现一些波动,但是总体是下降的现象,(这个原因很简单,故这里不解释),波动的出现会导致训练的速度又开始下降,所以我想 mini-batch 总是和 Adam 优化算法同时出现的,虽然我没测试过单独仅使用 Adam 对模型训练是否有加速效果。这里提到的一些优化技术以及算法都是建立在上面实现的模型的基础上的,如果未曾听说过,这里也不会给出解释,一是因为不确定能不能说清楚,二是篇幅已经很大了。
综上所述,我将实现 mini-batch 以及 Adam(TensorFlow 中的优化方法也是如此)。由于 mini-batch 和 Adam 的实现没有什么难点,只要熟悉 Numpy 和知道公式就可以轻松实现, 所以接下来就直接贴代码了。
mini-batch
def random_mini_batches(X, Y, mini_batch_size = 512, seed = 1):
    m = X.shape[1]
    mini_batches = []
    np.random.seed(seed)

    permutation = np.random.permutation(m)

    shuffled_X = X[:, permutation]
    shuffled_Y = Y[:, permutation]

    num_complete_minibatches = m // mini_batch_size

    for i in range(num_complete_minibatches):
        mini_batch_X = shuffled_X[:, i*mini_batch_size : (i+1)*mini_batch_size]
        mini_batch_Y = shuffled_Y[:, i*mini_batch_size : (i+1)*mini_batch_size]

        mini_batch = (mini_batch_X, mini_batch_Y)
        mini_batches.append(mini_batch)

    if m % mini_batch_size != 0:
        mini_batch_X = shuffled_X[:, num_complete_minibatches*mini_batch_size:]
        mini_batch_Y = shuffled_Y[:, num_complete_minibatches*mini_batch_size:]

        mini_batch = (mini_batch_X, mini_batch_Y)
        mini_batches.append(mini_batch)

    return mini_batches
Adam
def initialize_adam(parameters):

    L = len(parameters) // 2
    v = {}
    s = {}

    for l in range(1, L+1):
        v['dW' + str(l)] = np.zeros(parameters['W' + str(l)].shape)
        v['db' + str(l)] = np.zeros(parameters['b' + str(l)].shape)
        s['dW' + str(l)] = np.zeros(parameters['W' + str(l)].shape)
        s['db' + str(l)] = np.zeros(parameters['b' + str(l)].shape)

    return v, s
def update_parameters_with_adam(parameters, grads, v, s, t, learning_rate,
                                beta1 = 0.9, beta2 = 0.999, epsilon = 1e-8):

    L = len(parameters) // 2
    v_corrected = {}
    s_corrected = {}

    for l in range(1, L+1):

        v['dW' + str(l)] = beta1 * v['dW' + str(l)] + (1 - beta1) * grads['dW' + str(l)]
        v['db' + str(l)] = beta1 * v['db' + str(l)] + (1 - beta1) * grads['db' + str(l)]

        v_corrected['dW' + str(l)] = v["dW" + str(l)] / ( 1 - beta1 ** t)
        v_corrected['db' + str(l)] = v["db" + str(l)] / ( 1 - beta1 ** t)

        s['dW' + str(l)] = beta1 * s['dW' + str(l)] + (1 - beta1) * (grads['dW' + str(l)] ** 2)
        s['db' + str(l)] = beta1 * s['db' + str(l)] + (1 - beta1) * (grads['db' + str(l)] ** 2)

        s_corrected['dW' + str(l)] = s["dW" + str(l)] / ( 1 - beta1 ** t)
        s_corrected['db' + str(l)] = s["db" + str(l)] / ( 1 - beta1 ** t)

        parameters['W' + str(l)] = parameters['W' + str(l)] - learning_rate * \
                                (v_corrected["dW" + str(l)] / (np.sqrt(s_corrected["dW" + str(l)]) + epsilon))

        parameters['b' + str(l)] = parameters['b' + str(l)] - learning_rate * \
                        (v_corrected["db" + str(l)] / (np.sqrt(s_corrected["db" + str(l)]) + epsilon))

    return parameters, v, s
最后新的模型方法:
def model(X_train, Y_train, parameters, layers_dims, optimizer, learning_rate = 0.0005, num_epochs = 5,
          mini_batch_size = 128, beta1 = 0.9, beta2 = 0.999, epsilon=1e-8, ):

    if parameters == False:
        parameters = initialize_parameters(layers_dims)

    costs = []
    seed = 0

    if optimizer == 'gd':
        pass
    else:
        v, s = initialize_adam(parameters)

    t = 0

    for i in range(num_epochs):
        seed = seed + 1
        mini_batches = random_mini_batches(X_train, Y_train, mini_batch_size, seed)

        for mini_batch in mini_batches:

            (mini_batch_X, mini_batch_Y) = mini_batch

            AL, caches = forward_propapgation(parameters, mini_batch_X)

            J = compute_cost(AL,  mini_batch_Y)

            grads = backward_propagation(AL, mini_batch_Y, caches)

            if optimizer == 'gd':
                parameters = update_parameters(parameters, grads, learning_rate)
            else:
                t = t+1
                parameters, v, s = update_parameters_with_adam(parameters, grads, v, s, t, learning_rate,
                                                               beta1, beta2, epsilon)

            costs.append(J)

        print(J)

    plt.plot(costs)
    plt.ylabel('cost')
    plt.xlabel('epochs (per 100)')
    plt.title("Learning rate = " + str(learning_rate))
    plt.show()
    return parameters
上述模型的效果意外的好呢(相对于没有调优的情况来说),也跟 TensorFlow 差不多一样。测试代码如下:
layers_dims = [784, 128, 10]
import time
start = time.time()
parameters = model(X, Y, False, layers_dims, optimizer='Adam')
end = time.time()
print('consume time :' + '{:.2}s'.format(end-start))
AL = predict(X, Y, parameters)
结果如下图:

我想应该是用了 18s? 自然是会比 Batch 慢一些的, 而且出现了意料之中的波动,另外准确率提升为 88%,顺便一提对测试集的准确率为 87% 。所以情况是我们确实大大提高的训练的速度,以及并没有出现过度拟合的现象,所以没有添加正规化技术。现在的问题是如何进一步提高性能,在不改变网络规模以及训练次数的条件下,好好想想吧,由于篇幅问题,这里就先结束了,下面还会给出一些可能会用到,但你也能自己实现的函数。
预测函数
def predict(X, Y, parameters):
    AL, _ = forward_propapgation(parameters, X)
    Y_predict = np.argmax(AL, axis=0)
    Y_True = np.argmax(Y, axis=0)
    numerator = np.sum( Y_predict == Y_True )
    denominator = Y.shape[1]

    accuracy = numerator*1.0 / denominator

    print('accuracy: ' + '{:2.0f}%'.format(accuracy*100) )

    return AL
7.结束
至此,一个实例算是结束了? 我认为应该学习的是清晰实现的步骤,明白接下来要做什么。其次对于一些容易出错的点,最好给出一些测试用例,不过你也知道这些测试用例讨厌得很,我就没有心思去设计了。最后根据实际情况来选择优化技术来优化模型。
