前言
在深究 React 的 setState 原理的时候,我们先要考虑一个问题:setState 是异步的吗?
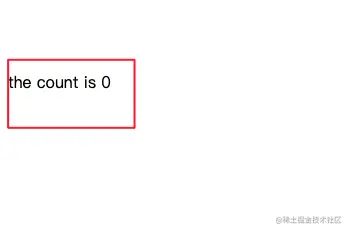
首先以 class component 为例,请看下述代码(demo-0)
class App extends React.Component {
state = {
count: 0
}
handleCountClick = () => {
this.setState({
count: this.state.count + 1
});
console.log(this.state.count);
}
render() {
return (
the count is {this.state.count}
)
}
}
ReactDOM.render(
count初始值为 0,当我们触发handleCountClick事件的时候,执行了count + 1操作,并打印了count,此时打印出的count是多少呢?答案不是 1 而是 0
类似的 function component 与 class component 原理一致。现在我们以 function component 为例,请看下述代码 (demo-1)
const App = function () {
const [count, setCount] = React.useState(0);
const handleCountClick = () => {
setCount((count) => {
return count + 1;
});
console.log(count);
}
return
the count is {count}
}
ReactDOM.render(
同样的,这里打印出的 count 也为 0
相信大家都知道这个看起来是异步的现象,但他真的是异步的吗?
为什么setState看起来是异步的
首先得思考一个问题:如何判断这个函数是否为异步?
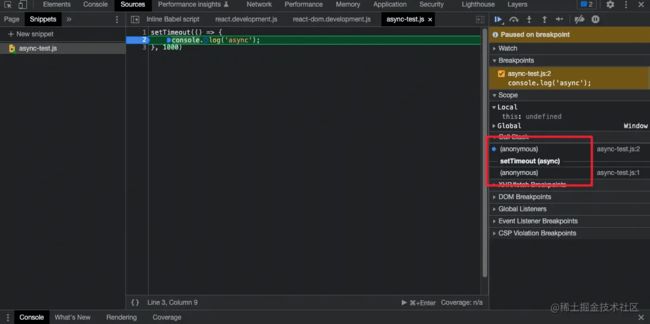
最直接的,我们写一个 setTimeout,打个 debugger 试试看
我们都知道 setTimeout 里的回调函数是异步的,也正如上图所示,chrome 会给 setTimeout 打上一个 async 的标签。
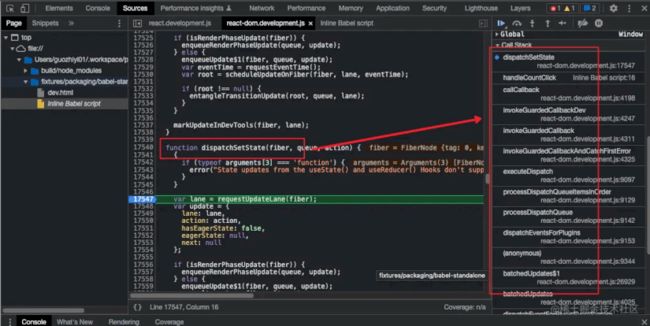
接下来我们 debugger setState 看看
React.useState 返回的第二个参数实际就是这个 dispatchSetState函数(下文细说)。但正如上图所示,这个函数并没有 async 标签,所以 setState 并不是异步的。
那么抛开这些概念来看,上文中 demo-1 的类似异步的现象是怎么发生的呢?
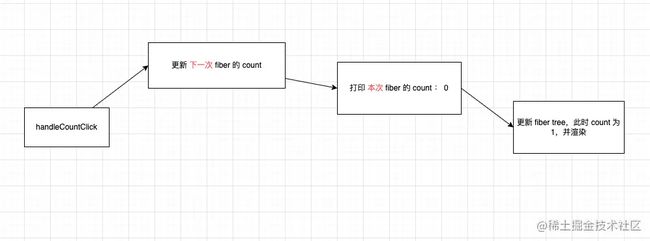
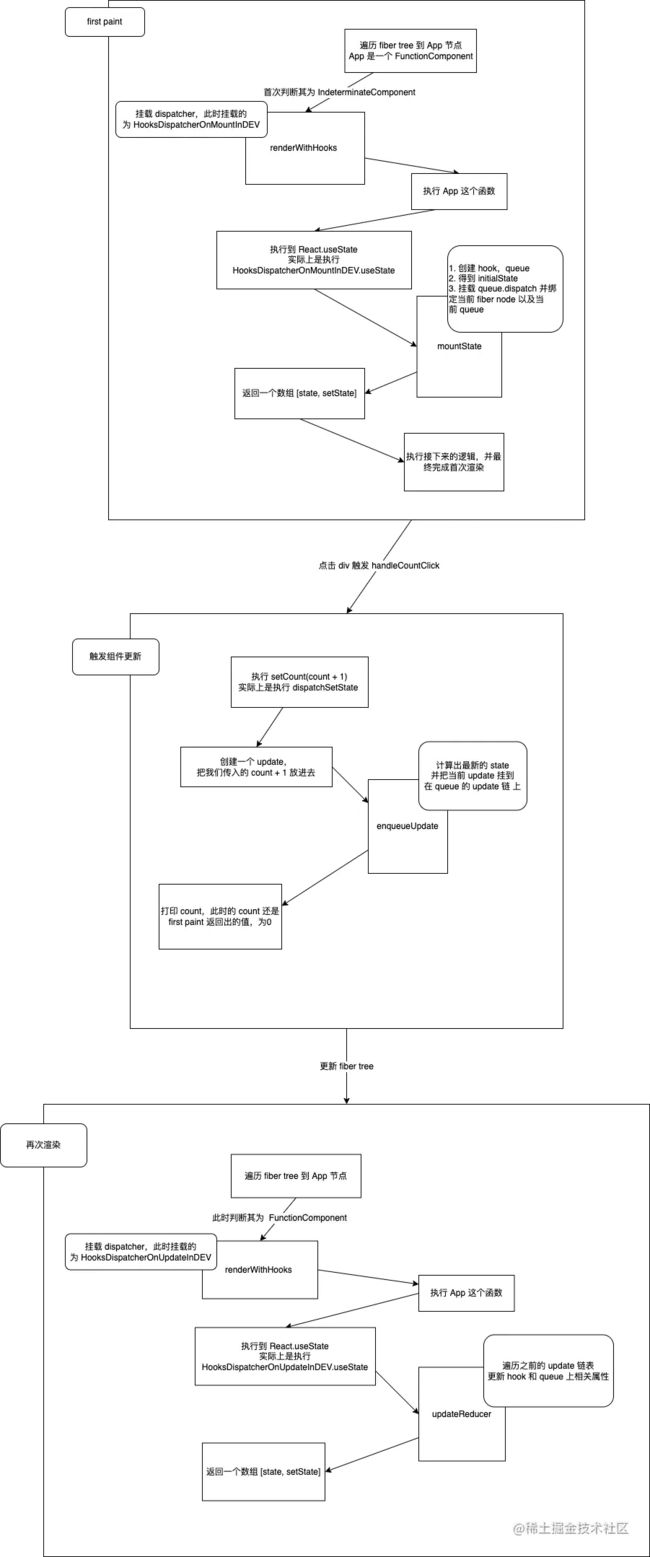
简单的来说,其步骤如下所示。基于此,我们接下来更深入的看看 React 在这个过程中做了什么
从first paint开始
first paint 就是『首次渲染』,为突出显示,就用英文代替。
这里先简单看一下App往下的 fiber tree 结构。每个 fiber node 还有一个return指向其 parent fiber node,这里就不细说了
我们都知道 React 渲染的时候,得遍历一遍 fiber tree,当走到 App 这个 fiber node 的时候发生了什么呢?
接下来我们看看详细的代码(这里的 workInProgress 就是整在处理的 fiber node,不关心的代码已删除)
首先要注意的是,虽然 App 是一个 FunctionComponent,但是在 first paint 的时候,React 判断其为 IndeterminateComponent。
 switch (workInProgress.tag) { // workInProgress.tag === 2
  case IndeterminateComponent:
    {
      return mountIndeterminateComponent(
        current,
        workInProgress,
        workInProgress.type,
        renderLanes
      );
    }
  // ...
  case FunctionComponent:
    { /** ... */}
}
接下来走进这个 mountIndeterminateComponent,里头有个关键的函数 renderWithHooks;而在 renderWithHooks 中,我们会根据组件处于不同的状态,给 ReactCurrentDispatcher.current 挂载不同的 dispatcher 。而在first paint 时,挂载的是HooksDispatcherOnMountInDEV
 function mountIndeterminateComponent(_current, workInProgress, Component, renderLanes) {
     value = renderWithHooks(
         null,
         workInProgress,
         Component,
         props,
         context,
         renderLanes
     );
 }
 function renderWithHooks() {
     // ...
     if (current !== null && current.memoizedState !== null) {
         // 此时 React 认为组件在更新
         ReactCurrentDispatcher.current = HooksDispatcherOnUpdateInDEV;
     } else if (hookTypesDev !== null) {
         // handle edge case,这里我们不关心
     } else {
         // 此时 React 认为组件为 first paint 阶段
         ReactCurrentDispatcher.current = HooksDispatcherOnMountInDEV;
     }
     // ...
     var children = Component(props, secondArg); // 调用我们的 Component
 }
这个 HooksDispatcherOnMountInDEV 里就是组件 first paint 的时候所用到的各种 hooks,相关参考视频讲解:进入学习
HooksDispatcherOnMountInDEV = {
    // ...
    useState: function (initialState) {
        currentHookNameInDev = 'useState';
        mountHookTypesDev();
        var prevDispatcher = ReactCurrentDispatcher$1.current;
        ReactCurrentDispatcher.current = InvalidNestedHooksDispatcherOnMountInDEV;
        try {
          return mountState(initialState);
        } finally {
          ReactCurrentDispatcher.current = prevDispatcher;
        }
    },
    // ...
}
接下里走进我们的 App(),我们会调用 React.useState,点进去看看,代码如下。这里的 dispatcher 就是上文挂载到 ReactCurrentDispatcher.current 的 HooksDispatcherOnMountInDEV
function useState(initialState) {
    var dispatcher = resolveDispatcher();
    return dispatcher.useState(initialState);
}
// ...
HooksDispatcherOnMountInDEV = {
    // ...
    useState: function (initialState) {
        currentHookNameInDev = 'useState';
        mountHookTypesDev();
        var prevDispatcher = ReactCurrentDispatcher$1.current;
        ReactCurrentDispatcher$1.current = InvalidNestedHooksDispatcherOnMountInDEV;
        try {
          return mountState(initialState);
        } finally {
          ReactCurrentDispatcher$1.current = prevDispatcher;
        }
    },
    // ...
}
这里会调用 mountState 函数
function mountState(initialState) {
    var hook = mountWorkInProgressHook();
    if (typeof initialState === 'function') {
      // $FlowFixMe: Flow doesn't like mixed types
      initialState = initialState();
    }
    hook.memoizedState = hook.baseState = initialState;
    var queue = {
      pending: null,
      interleaved: null,
      lanes: NoLanes,
      dispatch: null,
      lastRenderedReducer: basicStateReducer,
      lastRenderedState: initialState
    };
    hook.queue = queue;
    var dispatch = queue.dispatch = dispatchSetState.bind(null, currentlyRenderingFiber$1, queue);
    return [hook.memoizedState, dispatch];
}
这个函数做了这么几件事情:
执行 mountWorkInProgressHook 函数:
function mountWorkInProgressHook() {
   var hook = {
     memoizedState: null,
     baseState: null,
     baseQueue: null,
     queue: null,
     next: null
   };
   if (workInProgressHook === null) {
     // This is the first hook in the list
     currentlyRenderingFiber$1.memoizedState = workInProgressHook = hook;
   } else {
     // Append to the end of the list
     workInProgressHook = workInProgressHook.next = hook;
   }
   return workInProgressHook;
 }
- 创建一个
hook - 若无
hook链,则创建一个hook链;若有,则将新建的hook加至末尾 - 将新建的这个
hook挂载到workInProgressHook以及当前 fiber node 的memoizedState上 - 返回
workInProgressHook,也就是这个新建的hook
判断传入的 initialState 是否为一个函数,若是,则调用它并重新赋值给 initialState (在我们的demo-1里是『0』)
将 initialState 挂到 hook.memoizedState 以及 hook.baseState
给 hook 上添加一个 queue。这个 queue 有多个属性,其中queue.dispatch 挂载的是一个 dispatchSetState。这里要注意一下这一行代码
var dispatch = queue.dispatch = dispatchSetState.bind(null, currentlyRenderingFiber, queue);
Function.prototype.bind 的第一个参数都知道是绑 this 的,后面两个就是绑定了 dispatchSetState 所需要的第一个参数(当前fiber)和第二个参数(当前queue)。
这也是为什么虽然 dispatchSetState 本身需要三个参数,但我们使用的时候都是 setState(params),只用传一个参数的原因。
返回一个数组,也就是我们常见的 React.useState 返回的形式。此时这个 state 是 0 至此为止,React.useState 在 first paint 里做的事儿就完成了,接下来就是正常渲染,展示页面
触发组件更新
要触发组件更新,自然就是点击这个绑定了事件监听的 div,触发 setCount。回忆一下,这个 setCount 就是上文讲述的,暴露出来的 dispatchSetState。并且正如上文所述,我们传进去的参数实际上是 dispatchSetState 的第三个参数 action。(这个函数自然也涉及一些 React 执行优先级的判断,不在本文的讨论范围内就省略了)
function dispatchSetState(fiber, queue, action) {
    var update = {
      lane: lane,
      action: action,
      hasEagerState: false,
      eagerState: null,
      next: null
    };
    enqueueUpdate(fiber, queue, update);
}
dispatchSetState 做了这么几件事
创建一个 update,把我们传入的 action 放进去
进入 enqueueUpdate 函数:
- 若
queue上无update链,则在queue上以 刚创建的update为头节点构建update链 - 若
queue上有update链,则在该链的末尾添加这个 刚创建的update
function enqueueUpdate(fiber, queue, update, lane) {
  var pending = queue.pending;
  if (pending === null) {
    // This is the first update. Create a circular list.    update.next = update;
  } else {
    update.next = pending.next;
    pending.next = update;
  }
  queue.pending = update;
  var lastRenderedReducer = queue.lastRenderedReducer;
  var currentState = queue.lastRenderedState;
  var eagerState = lastRenderedReducer(currentState, action);
  update.hasEagerState = true;
  update.eagerState = eagerState;
}
- 根据
queue上的各个参数(reducer、上次计算出的 state)计算出eagerState,并挂载到当前update上
到此,我们实际上更新完 state了,这个新的 state 挂载到哪儿了呢?在 fiber.memoizedState.queue.pending 上。注意:
fiber即为当前的遍历到的 fiber node;pending是一个环状链表
此时我们打印进行打印,但这里打印的还是 first paint 里返回出来的 state,也就是 0
更新渲染fiber tree
现在我们更新完 state,要开始跟新 fiber tree 了,进行最后的渲染。逻辑在 performSyncWorkOnRoot 函数里,同样的,不关心的逻辑我们省略
function performSyncWorkOnRoot(root) {
    var exitStatus = renderRootSync(root, lanes);
}
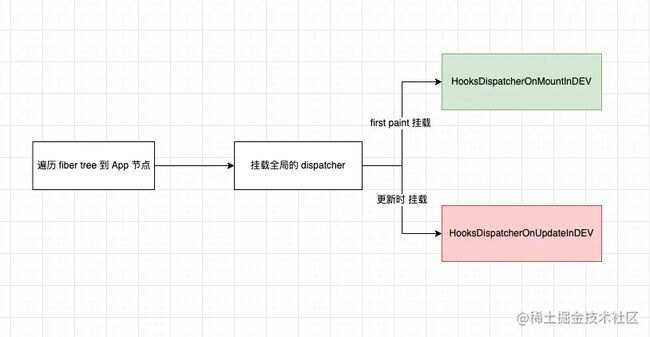
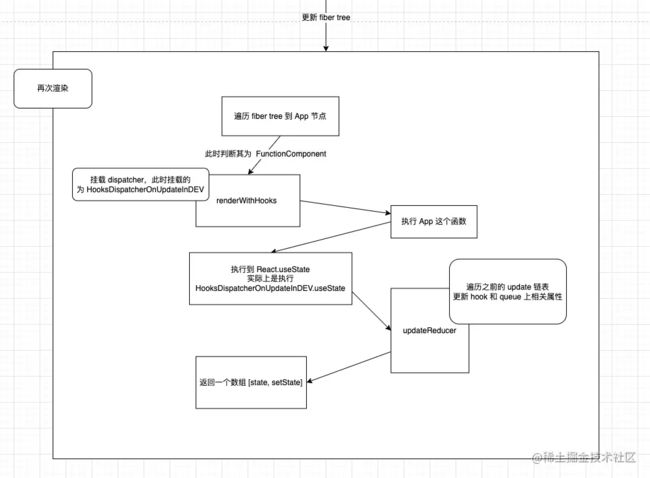
同样的我们先看一眼 fiber tree 更新过程中 与 useState 相关的整个流程图
首先我们走进 renderRootSync,这个函数作用是遍历一遍 fiber tree,当遍历的 App时,此时的类型为 FunctionComponent。还是我们前文所说的熟悉的步骤,走进 renderWithHooks。注意此时 React 认为该组件在更新了,所以给 dispatcher 挂载的就是 HooksDispatcherOnUpdateInDEV
function renderWithHooks(current, workInProgress, Component, props, secondArg, nextRenderLanes) {
    var children = Component(props, secondArg);
}
我们再次走进 App,这里又要再次调用 React.useState 了
const App = function () {
      const [count, setCount] = React.useState(0);
      const handleCountClick = () => {
        setCount(count + 1);
      }
      return
        the count is {count}

}
与之前不同的是,这次所使用的 dispatch 为 HooksDispatcherOnUpdateInDEV。那么这个 dispatch 下的 useState 具体做了什么呢?
useState: function (initialState) {
        currentHookNameInDev = 'useState';
        updateHookTypesDev();
        var prevDispatcher = ReactCurrentDispatcher$1.current;
        ReactCurrentDispatcher$1.current = InvalidNestedHooksDispatcherOnUpdateInDEV;
        try {
          return updateState(initialState);
        } finally {
          ReactCurrentDispatcher$1.current = prevDispatcher;
        }
}
可以看到大致都差不多,唯一不同的是,这里调用的是 updateState,而之前是 mountState。
function updateState(initialState) {
    return updateReducer(basicStateReducer);
}
function updateReducer(reducer, initialArg, init) {
  var first = baseQueue.next;
  var newState = current.baseState;
  do {
    // 遍历更新 newState
    update = update.next;
  } while (update !== null && update !== first);
  hook.memoizedState = newState;
  queue.lastRenderedState = newState;
  return [hook.memoizedState, dispatch];
}
这里又调用了 updateReducer,其中代码很多不一一展示,关键步骤就是:
- 遍历我们之前挂载到
fiber.memoizedState.queue.pending上的环状链表,并得到最后的newState - 更新
hook、queue上的相关属性,也就是将最新的这个state记录下来,这样下次更新的时候可以这次为基础再去更新 - 返回一个数组,形式为
[state, setState],此时这个state即为计算后的newState,其值为 1
接下来就走进 commitRootImpl 进行最后的渲染了,这不是本文的重点就不展开了,里头涉及 useEffect 等钩子函数的调用逻辑。
最后看一眼整个详细的流程图
写在最后
上文只是描述了一个最简单的 React.useState 使用场景,各位可以根据本文配合源码,进行以下两个尝试:
Q1. 多个 state 的时候有什么变化?例如以下场景时:
const App = () => {
    const [count, setCount] = React.useState(0);
    const [str, setStr] = React.useState('');
    // ...
}
A1. 将会构建一个上文所提到的 hook 链
Q2. 对同个 state 多次调用 setState 时有什么变化?例如以下场景:
const App = () => {
      const [count, setCount] = React.useState(0);
      const handleCountClick = () => {
        setCount(count + 1);
        setCount(count + 2);
      }
      return
        the count is {count}

}
A2. 将会构建一个上文所提到的 update 链
到此这篇关于react源码层探究setState作用的文章就介绍到这了,更多相关react setState内容请搜索脚本之家以前的文章或继续浏览下面的相关文章希望大家以后多多支持脚本之家!
