SpringMVC
SpringMVC+Spring+Mybatis(SSM~Demo)
SpringMVC+Spring+Mybatis 框架搭建
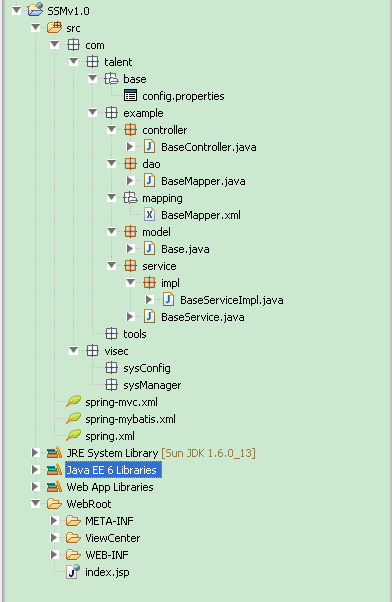
整个Demo的视图结构:

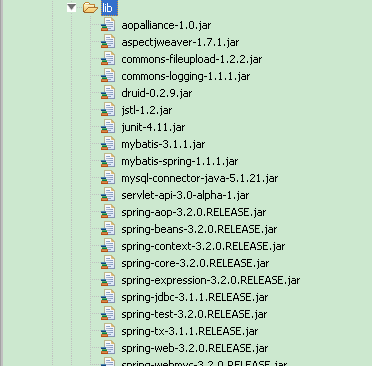
JAR:

下载地址:http://download.csdn.net/detail/li1669852599/8546059
首先,我是使用MyEclipse工具做的这个例子,整合了Sping 3 、Spring MVC 3 、MyBatis框架,演示数据库采用MySQL数据库。例子中主要操作包括对数据的添加(C)、查找(R)、更新(U)、删除(D)。我在这里采用的数据库连接池是来自阿里巴巴的Druid,至于Druid的强大之处,我在这里就不做过多的解释了,有兴趣的朋友们可以去网上谷歌或者百度一下哦!好了下面我就贴上这次这个演示例子的关键代码:
example目录下是一个基本案例:
BaseController.java
 View Code
BaseMapper.java
 View Code
BaseMapper.xml
 View Code
Base.java
 View Code
BaseServiceImpl.java
 View Code
BaseService.java
 View Code
接下来主要详述SpringMVC+Spring+Mybatis的配置文件
web.xml
<?xml version="1.0" encoding="UTF-8"?>

<web-app xmlns:xsi="http://www.w3.org/2001/XMLSchema-instance"

    xmlns="http://java.sun.com/xml/ns/javaee" xmlns:web="http://java.sun.com/xml/ns/javaee/web-app_2_5.xsd"

    xsi:schemaLocation="http://java.sun.com/xml/ns/javaee http://java.sun.com/xml/ns/javaee/web-app_3_0.xsd"

    version="3.0">

    <display-name></display-name>

    <context-param>

        <param-name>contextConfigLocation</param-name>

        <param-value>classpath:spring.xml;classpath:spring-mybatis.xml</param-value>

    </context-param>

    <filter>

        <description>字符集过滤器</description>

        <filter-name>encodingFilter</filter-name>

        <filter-class>org.springframework.web.filter.CharacterEncodingFilter</filter-class>

        <init-param>

            <description>字符集编码</description>

            <param-name>encoding</param-name>

            <param-value>UTF-8</param-value>

        </init-param>

    </filter>

    <filter-mapping>

        <filter-name>encodingFilter</filter-name>

        <url-pattern>/*</url-pattern>

    </filter-mapping>

    <listener>

        <description>spring监听器</description>

        <listener-class>org.springframework.web.context.ContextLoaderListener</listener-class>

    </listener>

    <listener>

        <listener-class>org.springframework.web.util.IntrospectorCleanupListener</listener-class>

    </listener>

    <servlet>

        <description>spring mvc servlet</description>

        <servlet-name>springMvc</servlet-name>

        <servlet-class>org.springframework.web.servlet.DispatcherServlet</servlet-class>

        <init-param>

            <description>spring mvc 配置文件</description>

            <param-name>contextConfigLocation</param-name>

            <param-value>classpath:spring-mvc.xml</param-value>

        </init-param>

        <load-on-startup>1</load-on-startup>

    </servlet>

    <servlet-mapping>

        <servlet-name>springMvc</servlet-name>

        <url-pattern>*.do</url-pattern>

    </servlet-mapping>

    <session-config>

        <session-timeout>15</session-timeout>

    </session-config>

    <welcome-file-list>

        <welcome-file>ViewCenter/TalentBaseExample/index.jsp</welcome-file>

    </welcome-file-list>

</web-app>
通过Web.xml加载SpringMVC+Spring+Mybatis的配置文件
首先是Spring.xml ,spring-mybatis.xml俩文件
Spring.xml
<?xml version="1.0" encoding="UTF-8"?>

<beans xmlns="http://www.springframework.org/schema/beans" xmlns:xsi="http://www.w3.org/2001/XMLSchema-instance" xmlns:context="http://www.springframework.org/schema/context" xsi:schemaLocation="

http://www.springframework.org/schema/beans

http://www.springframework.org/schema/beans/spring-beans-3.0.xsd

http://www.springframework.org/schema/context

http://www.springframework.org/schema/context/spring-context-3.0.xsd

">

    <!-- 引入属性文件 -->

    <context:property-placeholder location="classpath:com/talent/base/config.properties" />

    <!-- 自动扫描(自动注入) -->

    <context:component-scan base-package="com.talent.example.service..*" />

</beans>
spring-mybatis.xml
<?xml version="1.0" encoding="UTF-8"?>

<beans xmlns="http://www.springframework.org/schema/beans" xmlns:xsi="http://www.w3.org/2001/XMLSchema-instance" xmlns:tx="http://www.springframework.org/schema/tx" xmlns:aop="http://www.springframework.org/schema/aop" xsi:schemaLocation="

http://www.springframework.org/schema/beans

http://www.springframework.org/schema/beans/spring-beans-3.0.xsd

http://www.springframework.org/schema/tx

http://www.springframework.org/schema/tx/spring-tx-3.0.xsd

http://www.springframework.org/schema/aop

http://www.springframework.org/schema/aop/spring-aop-3.0.xsd">

    <!-- 配置数据源 -->

    <bean name="dataSource" class="com.alibaba.druid.pool.DruidDataSource" init-method="init" destroy-method="close">

        <property name="url" value="${jdbc_url}" />

        <property name="username" value="${jdbc_username}" />

        <property name="password" value="${jdbc_password}" />


        <!-- 初始化连接大小 -->

        <property name="initialSize" value="0" />

        <!-- 连接池最大使用连接数量 -->

        <property name="maxActive" value="20" />

        <!-- 连接池最大空闲 -->

        <property name="maxIdle" value="20" />

        <!-- 连接池最小空闲 -->

        <property name="minIdle" value="0" />

        <!-- 获取连接最大等待时间 -->

        <property name="maxWait" value="60000" />


        <!-- <property name="poolPreparedStatements" value="true" /> <property name="maxPoolPreparedStatementPerConnectionSize" value="33" /> -->


        <property name="validationQuery" value="${validationQuery}" />

        <property name="testOnBorrow" value="false" />

        <property name="testOnReturn" value="false" />

        <property name="testWhileIdle" value="true" />


        <!-- 配置间隔多久才进行一次检测,检测需要关闭的空闲连接,单位是毫秒 -->

        <property name="timeBetweenEvictionRunsMillis" value="60000" />

        <!-- 配置一个连接在池中最小生存的时间,单位是毫秒 -->

        <property name="minEvictableIdleTimeMillis" value="25200000" />


        <!-- 打开removeAbandoned功能 -->

        <property name="removeAbandoned" value="true" />

        <!-- 1800秒,也就是30分钟 -->

        <property name="removeAbandonedTimeout" value="1800" />

        <!-- 关闭abanded连接时输出错误日志 -->

        <property name="logAbandoned" value="true" />


        <!-- 监控数据库 -->

        <!-- <property name="filters" value="stat" /> -->

        <property name="filters" value="mergeStat" />

    </bean>


    <!-- MyBatis文件 -->

    <bean id="sqlSessionFactory" class="org.mybatis.spring.SqlSessionFactoryBean">

        <property name="dataSource" ref="dataSource" />

        <!-- 自动扫描entity目录, 省掉Configuration.xml里的手工配置 -->

        <property name="mapperLocations" value="classpath:com/talent/example/mapping/*.xml" />

    </bean>


    <bean class="org.mybatis.spring.mapper.MapperScannerConfigurer">

        <property name="basePackage" value="com.talent.example.dao" />

        <property name="sqlSessionFactoryBeanName" value="sqlSessionFactory" />

    </bean>


    <!-- 配置事务管理器 -->

    <bean id="transactionManager" class="org.springframework.jdbc.datasource.DataSourceTransactionManager">

        <property name="dataSource" ref="dataSource" />

    </bean>


    <!-- 注解方式配置事物 -->

    <!-- <tx:annotation-driven transaction-manager="transactionManager" /> -->


    <!-- 拦截器方式配置事物 -->

    <tx:advice id="transactionAdvice" transaction-manager="transactionManager">

        <tx:attributes>

            <tx:method name="add*" propagation="REQUIRED" />

            <tx:method name="append*" propagation="REQUIRED" />

            <tx:method name="insert*" propagation="REQUIRED" />

            <tx:method name="save*" propagation="REQUIRED" />

            <tx:method name="update*" propagation="REQUIRED" />

            <tx:method name="modify*" propagation="REQUIRED" />

            <tx:method name="edit*" propagation="REQUIRED" />

            <tx:method name="delete*" propagation="REQUIRED" />

            <tx:method name="remove*" propagation="REQUIRED" />

            <tx:method name="repair" propagation="REQUIRED" />

            <tx:method name="delAndRepair" propagation="REQUIRED" />


            <tx:method name="get*" propagation="SUPPORTS" />

            <tx:method name="find*" propagation="SUPPORTS" />

            <tx:method name="load*" propagation="SUPPORTS" />

            <tx:method name="search*" propagation="SUPPORTS" />

            <tx:method name="datagrid*" propagation="SUPPORTS" />


            <tx:method name="*" propagation="SUPPORTS" />

        </tx:attributes>

    </tx:advice>


    <aop:config>

        <aop:pointcut id="transactionPointcut" expression="execution(* com.talent.example.service..*Impl.*(..))" />

        <aop:advisor pointcut-ref="transactionPointcut" advice-ref="transactionAdvice" />

    </aop:config>


    <!-- 配置Druid监控Spring JDBC -->

    <bean id="druid-stat-interceptor" class="com.alibaba.druid.support.spring.stat.DruidStatInterceptor">

    </bean>

    <bean id="druid-stat-pointcut" class="org.springframework.aop.support.JdkRegexpMethodPointcut" scope="prototype">

        <property name="patterns">

            <list>

                <value>com.talent.example.service.*</value>

            </list>

        </property>

    </bean>


    <aop:config>

        <aop:advisor advice-ref="druid-stat-interceptor" pointcut-ref="druid-stat-pointcut" />

    </aop:config>

</beans>
其次呢是Spring-mvc.xml
<?xml version="1.0" encoding="UTF-8"?>

<beans xmlns="http://www.springframework.org/schema/beans" xmlns:mvc="http://www.springframework.org/schema/mvc" xmlns:xsi="http://www.w3.org/2001/XMLSchema-instance" xmlns:p="http://www.springframework.org/schema/p" xmlns:context="http://www.springframework.org/schema/context" xsi:schemaLocation="http://www.springframework.org/schema/beans

http://www.springframework.org/schema/beans/spring-beans-3.0.xsd

http://www.springframework.org/schema/context

http://www.springframework.org/schema/context/spring-context-3.0.xsd

http://www.springframework.org/schema/mvc

http://www.springframework.org/schema/mvc/spring-mvc-3.0.xsd">


    <!-- 自动扫描controller包下的所有类,使其认为spring mvc的控制器 -->

    <context:component-scan base-package="com.talent.example.controller" />


    <!-- 对模型视图名称的解析,即在模型视图名称添加前后缀 -->

    <bean class="org.springframework.web.servlet.view.InternalResourceViewResolver" p:prefix="/" p:suffix=".jsp" />


</beans>
以上就是几个关键位置的代码,我全部贴出来了。至于配置文件什么的,由于时间原因没有贴出。如果大家要是感兴趣的话,可以下载我的这个演示项目包,里面的东西都齐全着,导入到MyEclipse上面直接部署到服务器上面就可以运行。数据库就是里面的那个.sql文件。建个库然后将数据导入就是。哦,对了。导完数据后,记得别忘了到config.properties里面去把数据库的连接信息换成你自己哦!
