【毕业设计】深度学习图像分类算法研究与实现 - python OpenCV 卷积神经网络
文章目录
- 0 简介
- 1 常用的分类网络介绍
-
- 1.1 CNN
- 1.2 VGG
- 1.3 GoogleNet
- 2 图像分类部分代码实现
-
- 2.1 环境依赖
- 2.2 需要导入的包
- 2.3 参数设置(路径,图像尺寸,数据集分割比例)
- 2.4 从preprocessedFolder读取图片并返回numpy格式(便于在神经网络中训练)
- 2.5 数据预处理
- 2.6 训练分类模型
- 2.7 模型训练效果
- 2.8 模型性能评估
- 3 1000种图像分类
- 4 最后
0 简介
Hi,大家好,这里是丹成学长的毕设系列文章!
对毕设有任何疑问都可以问学长哦!
这两年开始,各个学校对毕设的要求越来越高,难度也越来越大… 毕业设计耗费时间,耗费精力,甚至有些题目即使是专业的老师或者硕士生也需要很长时间,所以一旦发现问题,一定要提前准备,避免到后面措手不及,草草了事。
为了大家能够顺利以及最少的精力通过毕设,学长分享优质毕业设计项目,今天要分享的新项目是
深度学习卷积神经网络图像分类
学长这里给一个题目综合评分(每项满分5分)
- 难度系数:4分
- 工作量:4分
- 创新点:3分
选题指导, 项目分享:
https://gitee.com/yaa-dc/BJH/blob/master/gg/cc/README.md
1 常用的分类网络介绍
1.1 CNN
传统CNN包含卷积层、全连接层等组件,并采用softmax多类别分类器和多类交叉熵损失函数。如下图:
![]()
-
卷积层(convolution layer): 执行卷积操作提取底层到高层的特征,发掘出图片局部关联性质和空间不变性质。
-
池化层(pooling layer): 执行降采样操作。通过取卷积输出特征图中局部区块的最大值(max-pooling)或者均值(avg-pooling)。降采样也是图像处理中常见的一种操作,可以过滤掉一些不重要的高频信息。
-
全连接层(fully-connected layer,或者fc layer): 输入层到隐藏层的神经元是全部连接的。
-
非线性变化: 卷积层、全连接层后面一般都会接非线性变化层,例如Sigmoid、Tanh、ReLu等来增强网络的表达能力,在CNN里最常使用的为ReLu激活函数。
-
Dropout : 在模型训练阶段随机让一些隐层节点权重不工作,提高网络的泛化能力,一定程度上防止过拟合
在CNN的训练过程总,由于每一层的参数都是不断更新的,会导致下一次输入分布发生变化,这样就需要在训练过程中花费时间去设计参数。在后续提出的BN算法中,由于每一层都做了归一化处理,使得每一层的分布相对稳定,而且实验证明该算法加速了模型的收敛过程,所以被广泛应用到较深的模型中。
1.2 VGG
VGG 模型是由牛津大学提出的(19层网络),该模型的特点是加宽加深了网络结构,核心是五组卷积操作,每两组之间做Max-Pooling空间降维。同一组内采用多次连续的3X3卷积,卷积核的数目由较浅组的64增多到最深组的512,同一组内的卷积核数目是一样的。卷积之后接两层全连接层,之后是分类层。该模型由于每组内卷积层的不同主要分为 11、13、16、19 这几种模型
增加网络深度和宽度,也就意味着巨量的参数,而巨量参数容易产生过拟合,也会大大增加计算量。
1.3 GoogleNet
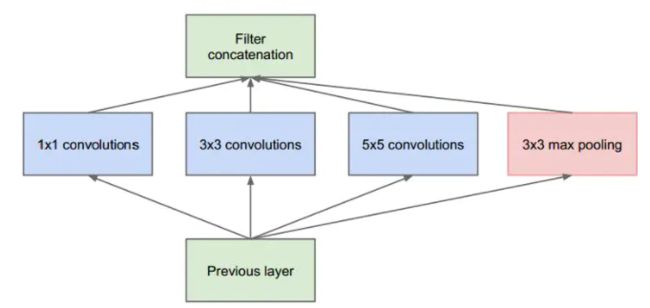
GoogleNet模型由多组Inception模块组成,模型设计借鉴了NIN的一些思想.
NIN模型特点:
-
- 引入了多层感知卷积网络(Multi-Layer Perceptron Convolution, MLPconv)代替一层线性卷积网络。MLPconv是一个微小的多层卷积网络,即在线性卷积后面增加若干层1x1的卷积,这样可以提取出高度非线性特征。
- 2)设计最后一层卷积层包含类别维度大小的特征图,然后采用全局均值池化(Avg-Pooling)替代全连接层,得到类别维度大小的向量,再进行分类。这种替代全连接层的方式有利于减少参数。
Inception 结构的主要思路是怎样用密集成分来近似最优的局部稀疏结构。
2 图像分类部分代码实现
2.1 环境依赖
python 3.7
jupyter-notebook : 6.0.3
cudatoolkit 10.0.130
cudnn 7.6.5
tensorflow-gpu 2.0.0
scikit-learn 0.22.1
numpy
cv2
matplotlib
2.2 需要导入的包
  import os
  import cv2
  import numpy as np
  import pandas as pd
  import tensorflow as tf
  from tensorflow import keras
  from tensorflow.keras import layers,models
  from tensorflow.keras.models import Sequential
  from tensorflow.keras.optimizers import Adam
  from tensorflow.keras.callbacks import Callback
  from tensorflow.keras.utils import to_categorical
  from tensorflow.keras.applications import VGG19
  from tensorflow.keras.models import load_model
  import matplotlib.pyplot as plt
  from sklearn.preprocessing import label_binarize
  tf.compat.v1.disable_eager_execution()
  os.environ['CUDA_VISIBLE_DEVICES'] = '0' #使用GPU
2.3 参数设置(路径,图像尺寸,数据集分割比例)
 preprocessedFolder = '.\\ClassificationData\\' #预处理文件夹
 outModelFileName=".\\outModelFileName\\"
 ImageWidth = 512
 ImageHeight = 320
 ImageNumChannels = 3
 TrainingPercent = 70  #训练集比例
 ValidationPercent = 15 #验证集比例
2.4 从preprocessedFolder读取图片并返回numpy格式(便于在神经网络中训练)
def read_dl_classifier_data_set(preprocessedFolder):
  num = 0  # 图片的总数量
  cnt_class = 0  #图片所属的类别
  label_list = []  # 存放每个图像的label,图像的类别
  img_list = []   #存放图片数据
  for directory in os.listdir(preprocessedFolder):
      tmp_dir = preprocessedFolder + directory
      cnt_class += 1
      for image in os.listdir(tmp_dir):
          num += 1
          tmp_img_filepath = tmp_dir + '\\' + image
          im = cv2.imread(tmp_img_filepath)  # numpy.ndarray
          im = cv2.resize(im, (ImageWidth, ImageHeight))  # 重新设置图片的大小
          img_list.append(im)
          label_list.append(cnt_class)  # 在标签中添加类别
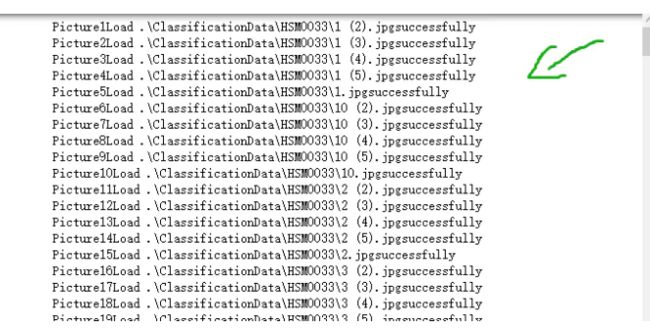
          print("Picture " + str(num) + "Load "+tmp_img_filepath+"successfully")
print("共有" + str(num) + "张图片")
print("all"+str(num)+"picturs belong to "+str(cnt_class)+"classes")
return np.array(img_list),np.array(label_list)

all_data,all_label=read_dl_classifier_data_set(preprocessedFolder)
2.5 数据预处理
图像数据压缩, 标签数据进行独立热编码one-hot
def preprocess_dl_Image(all_data,all_label):
      all_data = all_data.astype("float32")/255  #把图像灰度值压缩到0--1.0便于神经网络训练
      all_label = to_categorical(all_label)  #对标签数据进行独立热编码
      return all_data,all_label

all_data,all_label = preprocess_dl_Image(all_data,all_label) #处理后的数据
对数据及进行划分(训练集:验证集:测试集 = 0.7:0.15:0.15)
def split_dl_classifier_data_set(all_data,all_label,TrainingPercent,ValidationPercent):
      s = np.arange(all_data.shape[0])
      np.random.shuffle(s)  #随机打乱顺序
      all_data = all_data[s] #打乱后的图像数据
      all_label = all_label[s] #打乱后的标签数据
      all_len = all_data.shape[0]
      train_len = int(all_len*TrainingPercent/100)  #训练集长度
      valadation_len = int(all_len*ValidationPercent/100)#验证集长度
      temp_len=train_len+valadation_len
      train_data,train_label = all_data[0:train_len,:,:,:],all_label[0:train_len,:] #训练集
      valadation_data,valadation_label = all_data[train_len:temp_len, : , : , : ],all_label[train_len:temp_len, : ] #验证集
      test_data,test_label = all_data[temp_len:, : , : , : ],all_label[temp_len:, : ] #测试集
      return train_data,train_label,valadation_data,valadation_label,test_data,test_label

train_data,train_label,valadation_data,valadation_label,test_data,test_label=split_dl_classifier_data_set(all_data,all_label,TrainingPercent,ValidationPercent)
2.6 训练分类模型
- 使用迁移学习(基于VGG19)
- epochs = 30
- batch_size = 16
- 使用 keras.callbacks.EarlyStopping 提前结束训练
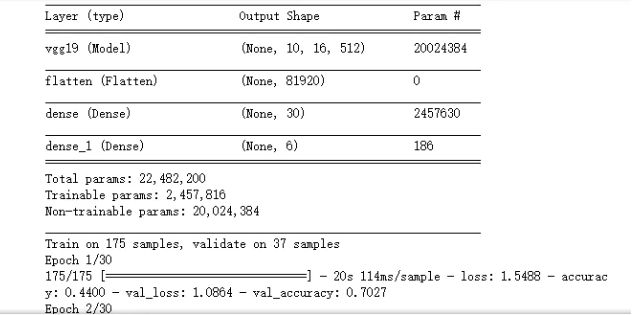
def train_classifier(train_data,train_label,valadation_data,valadation_label,lr=1e-4):
      conv_base = VGG19(weights='imagenet',
              include_top=False,
              input_shape=(ImageHeight, ImageWidth, 3) )
      model = models.Sequential()
      model.add(conv_base)
      model.add(layers.Flatten())
      model.add(layers.Dense(30, activation='relu'))
      model.add(layers.Dense(6, activation='softmax')) #Dense: 全连接层。activation: 激励函数,‘linear’一般用在回归任务的输出层,而‘softmax’一般用在分类任务的输出层
      conv_base.trainable=False
      model.compile(
      loss='categorical_crossentropy',#loss: 拟合损失方法,这里用到了多分类损失函数交叉熵
      optimizer=Adam(lr=lr),#optimizer: 优化器,梯度下降的优化方法 #rmsprop
      metrics=['accuracy'])
      model.summary() #每个层中的输出形状和参数。
      early_stoping =tf.keras.callbacks.EarlyStopping(monitor="val_loss",min_delta=0,patience=5,verbose=0,baseline=None,restore_best_weights=True)
      history = model.fit(
      train_data, train_label,
      batch_size=16, #更新梯度的批数据的大小 iteration = epochs / batch_size,
      epochs=30,  # 迭代次数
      validation_data=(valadation_data, valadation_label),  # 验证集
      callbacks=[early_stoping])
      return model,history
model,history = train_classifier(train_data,train_label,valadation_data,valadation_label,)
2.7 模型训练效果
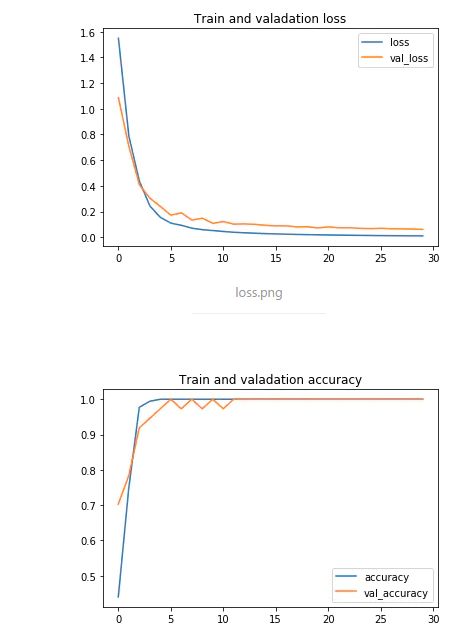
def plot_history(history):
      history_df = pd.DataFrame(history.history)
      history_df[['loss', 'val_loss']].plot()
      plt.title('Train and valadation loss')
      history_df = pd.DataFrame(history.history)
      history_df[['accuracy', 'val_accuracy']].plot()
      plt.title('Train and valadation accuracy')

plot_history(history)
2.8 模型性能评估
- 使用测试集进行评估
- 输出分类报告和混淆矩阵
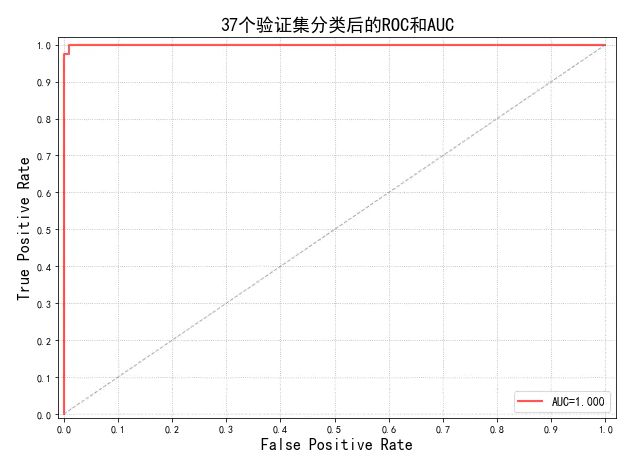
- 绘制ROC和AUC曲线
from sklearn.metrics import classification_report
from sklearn.metrics import confusion_matrix
from sklearn.metrics import accuracy_score
import seaborn as sns
Y_pred_tta=model.predict_classes(test_data) #模型对测试集数据进行预测
Y_test = [np.argmax(one_hot)for one_hot in test_label]# 由one-hot转换为普通np数组
Y_pred_tta=model.predict_classes(test_data) #模型对测试集进行预测
Y_test = [np.argmax(one_hot)for one_hot in test_label]# 由one-hot转换为普通np数组
print('验证集分类报告:\n',classification_report(Y_test,Y_pred_tta))
confusion_mc = confusion_matrix(Y_test,Y_pred_tta)#混淆矩阵
df_cm = pd.DataFrame(confusion_mc)
plt.figure(figsize = (10,7))
sns.heatmap(df_cm, annot=True, cmap="BuPu",linewidths=1.0,fmt="d")
plt.title('PipeLine accuracy:{0:.3f}'.format(accuracy_score(Y_test,Y_pred_tta)),fontsize=20)
plt.ylabel('True label',fontsize=20)
plt.xlabel('Predicted label',fontsize=20)
from sklearn.metrics import precision_recall_curve
from sklearn.metrics import average_precision_score
from sklearn.metrics import roc_curve
from sklearn import metrics
import matplotlib as mpl

# 计算属于各个类别的概率,返回值的shape = [n_samples, n_classes]
y_score = model.predict_proba(test_data)
# 1、调用函数计算验证集的AUC
print ('调用函数auc:', metrics.roc_auc_score(test_label, y_score, average='micro'))
# 2、手动计算验证集的AUC
#首先将矩阵test_label和y_score展开,然后计算假正例率FPR和真正例率TPR
fpr, tpr, thresholds = metrics.roc_curve(test_label.ravel(),y_score.ravel())
auc = metrics.auc(fpr, tpr)
print('手动计算auc:', auc)
mpl.rcParams['font.sans-serif'] = u'SimHei'
mpl.rcParams['axes.unicode_minus'] = False
#FPR就是横坐标,TPR就是纵坐标
plt.figure(figsize = (10,7))
plt.plot(fpr, tpr, c = 'r', lw = 2, alpha = 0.7, label = u'AUC=%.3f' % auc)
plt.plot((0, 1), (0, 1), c = '#808080', lw = 1, ls = '--', alpha = 0.7)
plt.xlim((-0.01, 1.02))
plt.ylim((-0.01, 1.02))
plt.xticks(np.arange(0, 1.1, 0.1))
plt.yticks(np.arange(0, 1.1, 0.1))
plt.xlabel('False Positive Rate', fontsize=16)
plt.ylabel('True Positive Rate', fontsize=16)
plt.grid(b=True, ls=':')
plt.legend(loc='lower right', fancybox=True, framealpha=0.8, fontsize=12)
plt.title('37个验证集分类后的ROC和AUC', fontsize=18)
plt.show()
3 1000种图像分类
这是学长训练的能识别1000种类目标的图像分类模型,演示效果如下

