GAN-生成对抗神经网络(Pytorch)-合集(1)GAN-DCGAN-CGAN
原生GAN
(Generative Adversarial Nets)
训练过程也是老三步了,再啰嗦一遍:
- 使用真实图片训练辨别器,标签为真
- 使用生成器生成的图片训练判别器,标签为假,此时图片使用生成器计算得来的,喂给判别器时要截断梯度,防止更新时把生成器也更新了
- 训练生成器,使用生成的图片喂给判别器,标签为真,更新生成器
论文地址:https://arxiv.org/abs/1406.2661
GAN之父了可以说是,
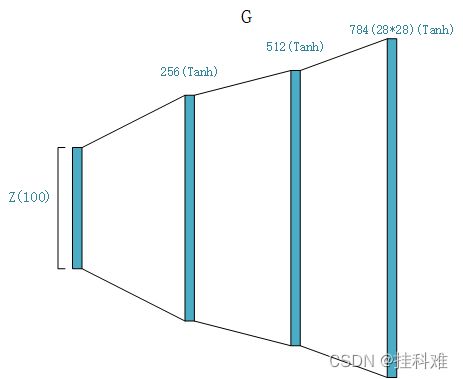
在mnist数据集上的生成器网络架构,详细代码见我以前博文的第二段代码:原生GAN代码-mnist数据集
# 生成器,输入100噪声输出(1,28,28)
class Generator(nn.Module):
    def __init__(self):
        super(Generator, self).__init__()
        self.linear = nn.Sequential(
            nn.Linear(100, 256),
            nn.Tanh(),
            nn.Linear(256, 512),
            nn.Tanh(),
            nn.Linear(512, 28*28),
            nn.Tanh()
        )

    def forward(self, x):
        x = self.linear(x)
        x = x.view(-1, 28, 28)
        return x


#  辨别器,输入(1,28,28),输出真假,推荐使用LeakRelu
class Discriminator(nn.Module):
    def __init__(self):
        super(Discriminator, self).__init__()
        self.linear = nn.Sequential(
            nn.Linear(28*28, 512),
            nn.LeakyReLU(),

            nn.Linear(512, 256),
            nn.LeakyReLU(),

            nn.Linear(256, 1),
            nn.Sigmoid()
        )

    def forward(self, x):
        x = x.view(-1, 28*28)
        x = self.linear(x)
        return x
生成器:
判别器:
DCGAN
(Deep Convolutional GAN)
你可能想说,不就是把全连接层换成卷积层吗?不完全对,不仅仅如此,DCGAN在GAN的基础上做了大量改进,包括但不限于舍弃池化层,使用反卷积层,使用BN层等等,感兴趣的可以去看下原论文,我就不罗嗦了,https://arxiv.org/pdf/1511.06434.pdf
网络架构代码:
dropout不好画,别忘了这个就行,防止判别器学的太快
# 定义生成器,依然输入长度100的噪声
class Generator(nn.Module):
    def __init__(self):
        super(Generator, self).__init__()
        self.linear1 = nn.Linear(100, 256*7*7)
        self.bn1 = nn.BatchNorm1d(256*7*7)
        self.deconv1 = nn.ConvTranspose2d(256, 128,
                                          kernel_size=(3, 3),
                                          stride=1,
                                          padding=1
                                          )
        self.bn2 = nn.BatchNorm2d(128)
        self.deconv2 = nn.ConvTranspose2d(128, 64,
                                          kernel_size=(4, 4),
                                          stride=2,
                                          padding=1
                                          )
        self.bn3 = nn.BatchNorm2d(64)
        self.deconv3 = nn.ConvTranspose2d(64, 1,
                                          kernel_size=(4, 4),
                                          stride=2,
                                          padding=1
                                          )

    def forward(self, x):
        x = F.relu(self.linear1(x))
        x = self.bn1(x)
        x = x.view(-1, 256, 7, 7)
        x = F.relu(self.deconv1(x))
        x = self.bn2(x)
        x = F.relu(self.deconv2(x))
        x = self.bn3(x)
        x = torch.tanh(self.deconv3(x))
        return x


# 判别器,输入(28,28)图片
class Discriminator(nn.Module):
    def __init__(self):
        super(Discriminator, self).__init__()
        self.conv1 = nn.Conv2d(1, 64, kernel_size=3, stride=2)
        self.conv2 = nn.Conv2d(64, 128, 3, 2)
        self.bn = nn.BatchNorm2d(128)
        self.fc = nn.Linear(128*6*6, 1)

    def forward(self, x):
        x = F.dropout2d(F.leaky_relu(self.conv1(x)), p=0.3)
        x = F.dropout2d(F.leaky_relu(self.conv2(x)), p=0.3)
        x = self.bn(x)
        x = x.view(-1, 128*6*6)
        x = torch.sigmoid(self.fc(x))
        return x
当然在这里也可以看到全部的训练代码,以前的博文,第三段代码为DCGANhttps://blog.csdn.net/qq_45882032/article/details/123432603
或者生成动漫头像的也很有意思https://blog.csdn.net/qq_45882032/article/details/124306864
DCGAN生成器
转置卷积输入与输出大小关系:
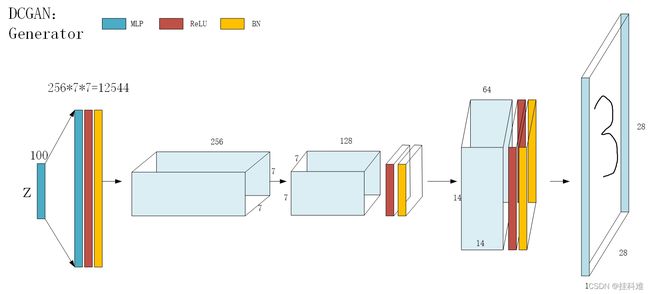
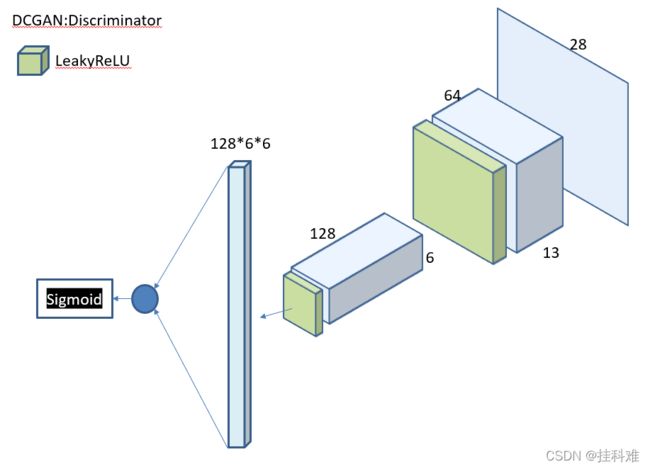
visio第一次用,画了好久。。。。。最后还要带入Tanh激活函数,图中忘画了。。。
DCGAN判别器
CGAN
(Conditional Generative Adversarial Network)条件GAN,PPT画的好像比vison好一点
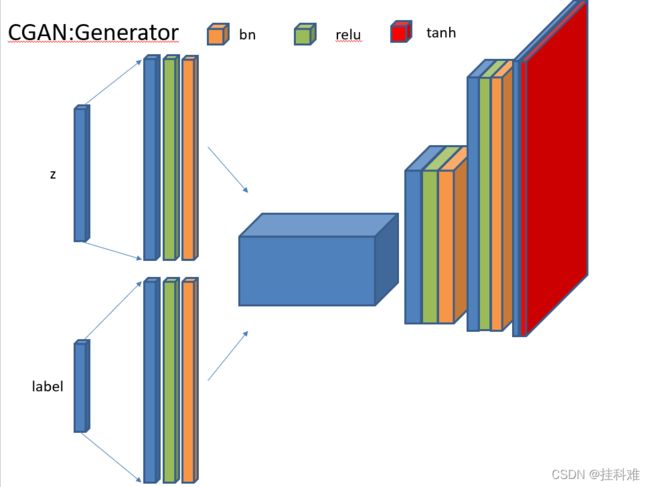
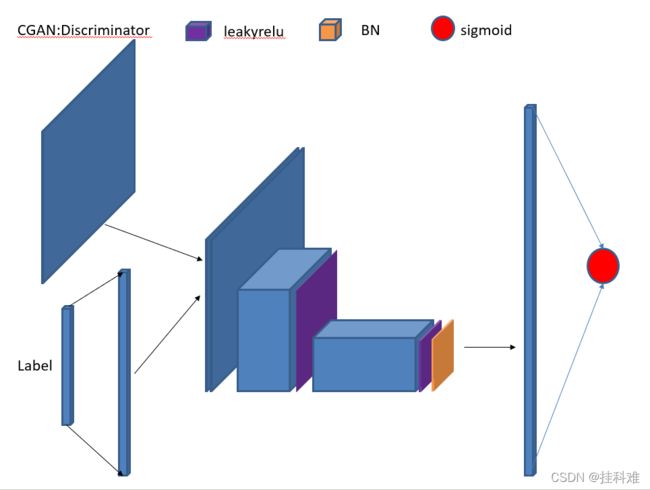
成功把输入标签的label影响到了网络中,在判别器中即使生成的是张不错的图片,但如果label不对依然会被判别为假
原论文:https://arxiv.org/pdf/1411.1784.pdf
CGAN生成器
CGAN判别器
这个以前没写过,代码放下面,还有两个小技巧再提一下,1,使用dropout防止判别器学的太快,2,Adam优化时,把判别器的刚开始的学习率调小一点,让他慢点学,判别器很容易训练的太好,这样他每次都能准确的分出生成器的假图,生成器就不知道怎么更新了。还有输入的label是one_hot编码
import torch
import torch.nn as nn
import torch.utils.data as Data
import torch.nn.functional as F
import torch.optim as optim
import numpy as np
import matplotlib.pyplot as plt
import torchvision
from torchvision import transforms

# 数据归一化(-1,1)
transform = transforms.Compose([
    transforms.ToTensor(),  # 0-1
    transforms.Normalize(0.5, 0.5)  # 均值0.5方差0.5
])


# 用eye对target进行one_hot编码
def one_hot(x, class_count=10):
    return torch.eye(class_count)[x]


# 加载内置数据集  ,返回tuple(data,label)
dataset = torchvision.datasets.MNIST('data',
                                     train=True,
                                     transform=transform,
                                     target_transform=one_hot,
                                     download=True)

dl = Data.DataLoader(dataset, batch_size=64, shuffle=True)


# 定义生成器,依然输入长度100的噪声and label
class Generator(nn.Module):
    def __init__(self):
        super(Generator, self).__init__()
        self.linear1 = nn.Linear(100, 128*7*7)
        self.bn1 = nn.BatchNorm1d(128*7*7)

        self.linear2 = nn.Linear(10, 128*7*7)
        self.bn2 = nn.BatchNorm1d(128*7*7)

        self.deconv1 = nn.ConvTranspose2d(256, 128,
                                          kernel_size=(3, 3),
                                          stride=1,
                                          padding=1
                                          )
        self.bn3 = nn.BatchNorm2d(128)
        self.deconv2 = nn.ConvTranspose2d(128, 64,
                                          kernel_size=(4, 4),
                                          stride=2,
                                          padding=1
                                          )
        self.bn4 = nn.BatchNorm2d(64)
        self.deconv3 = nn.ConvTranspose2d(64, 1,
                                          kernel_size=(4, 4),
                                          stride=2,
                                          padding=1
                                          )

    def forward(self, x, label):
        x = F.relu(self.linear1(x))
        x = self.bn1(x)
        x = x.view(-1, 128, 7, 7)

        label = F.relu(self.linear2(label))
        label = self.bn2(label)
        label = label.view(-1, 128, 7, 7)

        x = torch.cat([x, label], axis=1)  # batch,256,7,7

        x = F.relu(self.deconv1(x))
        x = self.bn3(x)
        x = F.relu(self.deconv2(x))
        x = self.bn4(x)
        x = torch.tanh(self.deconv3(x))
        return x


# 判别器,输入(28,28)图片 + 10
class Discriminator(nn.Module):
    def __init__(self):
        super(Discriminator, self).__init__()
        self.linear = nn.Linear(10, 1*28*28)

        self.conv1 = nn.Conv2d(2, 64, kernel_size=3, stride=2)
        self.conv2 = nn.Conv2d(64, 128, 3, 2)
        self.bn = nn.BatchNorm2d(128)
        self.fc = nn.Linear(128*6*6, 1)

    def forward(self, x, label):
        label = F.leaky_relu(self.linear(label))
        label = label.view(-1, 1, 28, 28)
        x = torch.cat([label, x], axis=1)  # batch,2,28,28

        x = F.dropout2d(F.leaky_relu(self.conv1(x)), p=0.3)
        x = F.dropout2d(F.leaky_relu(self.conv2(x)), p=0.3)
        x = self.bn(x)
        x = x.view(-1, 128*6*6)
        x = torch.sigmoid(self.fc(x))
        return x


device = 'cuda' if torch.cuda.is_available() else 'cpu'
if device == 'cuda':
    print('using cuda:', torch.cuda.get_device_name(0))
else:
    print(device)

Gen = Generator().to(device)
Dis = Discriminator().to(device)

loss_fun = nn.BCELoss()
d_optimizer = torch.optim.Adam(Dis.parameters(), lr=1e-5)  # 小技巧
g_optimizer = torch.optim.Adam(Gen.parameters(), lr=1e-4)


def generate_and_save_image(model, label_input, test_input):
    predictions = np.squeeze(model(test_input, label_input).cpu().numpy())
    fig = plt.figure(figsize=(4, 4))
    for i in range(predictions.shape[0]):
        plt.subplot(4, 4, i+1)
        plt.imshow((predictions[i]+1) / 2, cmap='gray')
        plt.axis('off')
    plt.show()


noise_seed = torch.randn(16, 100, device=device)
label_seed = torch.randint(0, 10, size=(16,))  # 生成16个0-9的整数
label_seed = one_hot(label_seed).to(device)
D_loss = []
G_loss = []


for epoch in range(30):
    d_epoch_loss = 0
    g_epoch_loss = 0
    count = len(dl)
    for step, (img, label) in enumerate(dl):
        img = img.to(device)
        label = label.to(device)
        size = img.size(0)
        random_noise = torch.randn(size, 100, device=device)

        d_optimizer.zero_grad()
        real_output = Dis(img, label)  # 判别器输入真实图片
        # 判别器在真实图像上的损失
        d_real_loss = loss_fun(real_output,
                                    torch.ones_like(real_output)
                                    )
        d_real_loss.backward()

        gen_img = Gen(random_noise, label)
        fake_output = Dis(gen_img.detach(), label)  # 判别器输入生成图片,fake_output对生成图片的预测
        # gen_img是由生成器得来的,但我们现在只对判别器更新,所以要截断对Gen的更新
        # detach()得到了没有梯度的tensor,求导到这里就停止了,backward的时候就不会求导到Gen了

        d_fake_loss = loss_fun(fake_output,
                                    torch.zeros_like(fake_output)
                                    )
        d_fake_loss.backward()
        d_loss = d_real_loss + d_fake_loss
        d_optimizer.step()

        # 更新生成器
        g_optimizer.zero_grad()
        fake_output = Dis(gen_img, label)
        g_loss = loss_fun(fake_output,
                               torch.ones_like(fake_output))
        g_loss.backward()
        g_optimizer.step()

        with torch.no_grad():
            d_epoch_loss += d_loss.item()
            g_epoch_loss += g_loss.item()

    with torch.no_grad():  # 之后的内容不进行梯度的计算(图的构建)
        d_epoch_loss /= count
        g_epoch_loss /= count
        D_loss.append(d_epoch_loss)
        G_loss.append(g_epoch_loss)
        print('Epoch:', epoch+1)
        generate_and_save_image(model=Gen, label_input=label_seed, test_input=noise_seed)

    plt.plot(D_loss, label='D_loss')
    plt.plot(G_loss, label='G_loss')
    plt.legend()
    plt.show()
