【GANs】Conditional Generative Adversarial Nets
【GANs】Conditional Generative Adversarial Nets
- 2 CGAN
-
- 2.1 CGAN简介
-
- 前言
- 流程图
- 目标函数
- 2.2 CGAN代码
2 CGAN
2.1 CGAN简介
Conditional Generative Adversarial Nets原文链接
本文提出了GAN的改进版本,条件GAN:
通过为数据增加 l a b e l ( y ) label(y) label(y)进行构造,在 G G G和 D D D的输入上都增加了 l a b e l label label然后做了两个有条件的GAN实验。也就是给定条件 y y y,结合随机分布,生成条件 y y y的样本。
1.mnist数据集,基于给定 l a b e l label label生成特定数字的模拟实验。
2.用于多模态学习,生成不属于训练标签的描述性标记。
前言
-
原始GAN
之前介绍的无条件GAN中,生成的数据是不可控的,代码运行结果也可以看出,只能生成 0 ∼ 9 0 \sim 9 0∼9的数字,但是无法保证是哪一个。但是本文给定标签的CGAN网络可以基于 c l a s s l a b e l class label classlabel生成特定数字的图像。 -
存在的问题
对于one-to-many mapping模型,比如image tag问题,一张图片可以能不止一个tag,传统模型无法解决,因此可以使用条件生成概率,将图像视为conditional variable(条件变量),使用条件预测分布去获取一对多的映射关系。 -
CGAN的应用
CGAN可以应用于图像修补,多模态深度学习等任务。目前这些领域也已经有很深入的研究。
流程图
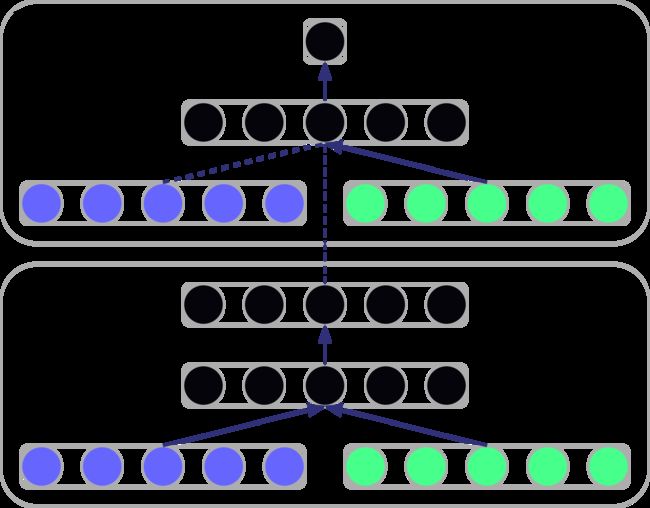
- D判别器的输入图像之外加入了 y y y标签。 y y y这个特征维度与 x x x相同,是因为在模型内部进行了embedding处理。
- G生成器的输入除了噪声之外,也加入了 y y y标签。维度关系同上。然后将生成的图像作为一半输入与 y y y结合送入到D判别器。
目标函数
GAN:
G m i n D m a x V ( D , G ) = E x ∼ P d a t a ( x ) [ l o g D ( x ) ] + E z ∼ P z ( z ) [ l o g ( 1 − D ( G ( z ) ) ) ] \begin{align} {^{min}_{\space\space\space G}} {^{max}_{\space\space\space D}} V(D,G)=E_{x \sim P_{data}(x)}[logD(x)] + E_{z \sim P_{z}(z)}[log(1-D(G(z)))] \end{align} Gmin DmaxV(D,G)=Ex∼Pdata(x)[logD(x)]+Ez∼Pz(z)[log(1−D(G(z)))]
CGAN:
G m i n D m a x V ( D , G ) = E x ∼ P d a t a ( x ) [ l o g D ( x ∣ y ) ] + E z ∼ P z ( z ) [ l o g ( 1 − D ( G ( z ∣ y ) ) ) ] \begin{align} {^{min}_{\space\space\space G}} {^{max}_{\space\space\space D}} V(D,G)=E_{x \sim P_{data}(x)}[logD(x|y)] + E_{z \sim P_{z}(z)}[log(1-D(G(z|y)))] \end{align} Gmin DmaxV(D,G)=Ex∼Pdata(x)[logD(x∣y)]+Ez∼Pz(z)[log(1−D(G(z∣y)))]
可以看出,CGAN引入条件 y y y,在已知 y y y条件的情况下计算样本 x x x的特征分布。
2.2 CGAN代码
# -*- coding = utf-8 -*-
# @Time    : 2022/9/27 14:05
# @Author  : VvV
# @File    : CGAN_2014.py
import numpy as np
import matplotlib.pyplot as plt
from tensorflow.keras.models import Sequential, Model
from tensorflow.keras.layers import Dense, LeakyReLU, BatchNormalization, Reshape
from tensorflow.keras.layers import Input, Embedding, Flatten, multiply, Dropout
from tensorflow.keras.datasets import mnist
from tensorflow.keras.optimizers import Adam


class CGAN():
    def __init__(self):
        # 写入输入维度
        self.img_rows = 28
        self.img_cols = 28
        self.img_channels = 1
        self.img_shape = (self.img_rows, self.img_cols, self.img_channels)

        self.num_classes = 10    # 类别数
        self.latent_dim = 100

        optimizer = Adam(0.0002, 0.5)
        self.generator = self.build_generator()
        self.discriminator = self.build_discriminator()
        self.discriminator.compile(loss=['binary_crossentropy'],
                                   optimizer=optimizer,
                                   metrics=['accuracy'])

        self.discriminator.trainable = False
        noise = Input(shape=(100,))
        label = Input(shape=(1,))

        img = self.generator([noise, label])

        valid = self.discriminator([img, label])

        self.combined = Model([noise, label], valid)
        self.combined.compile(loss=['binary_crossentropy'],
                              optimizer=optimizer)

    def build_generator(self):
        model = Sequential()
        model.add(Dense(256, input_dim=self.latent_dim))
        model.add(LeakyReLU(alpha=0.2))
        model.add(BatchNormalization(momentum=0.8))
        model.add(Dense(512))
        model.add(LeakyReLU(alpha=0.2))
        model.add(BatchNormalization(momentum=0.8))
        model.add(Dense(1024))
        model.add(LeakyReLU(alpha=0.2))
        model.add(BatchNormalization(momentum=0.8))
        model.add(Dense(np.prod(self.img_shape), activation='tanh'))
        model.add(Reshape(self.img_shape))

        model.summary()      # 记录参数情况

        noise = Input(shape=self.latent_dim)
        label = Input(shape=(1,), dtype='int32')

        label_embedding = Flatten()(Embedding(self.num_classes, self.latent_dim)(label))  # 将10个种类(词向量种类)的label映射到latent_dim=100维
        # 将100维转化为(None,100),这里的None会随着batch而改变。

        model_input = multiply([noise, label_embedding])  # 合并方法:指定对应位置相乘

        img = model(model_input)    # 生成图片
        return Model([noise, label], img)  # 输入按noise和label,合并由内部完成。

    def build_discriminator(self):
        model = Sequential()
        model.add(Dense(512, input_dim=np.prod(self.img_shape)))  # 784个输入神经元
        model.add(LeakyReLU(alpha=0.2))
        model.add(Dense(512))
        model.add(LeakyReLU(alpha=0.2))
        model.add(Dropout(0.4))
        model.add(Dense(512))
        model.add(LeakyReLU(alpha=0.2))
        model.add(Dropout(0.4))
        model.add(Dense(1, activation='sigmoid'))   # activation

        model.summary()
        img = Input(shape=self.img_shape)
        label = Input(shape=(1,), dtype='int32')

        # label与img 的shape不同
        label_embedding = Flatten()(Embedding(self.num_classes, np.prod(self.img_shape))(label))
        # label_embedding shape (None, 784)
        flat_img = Flatten()(img)

        model_input = multiply([flat_img, label_embedding])  # 完成对应元素相乘,shape(None, 784)

        validity = model(model_input)  # 获取输出概率结果

        return Model([img, label], validity)  # 注意:合并和维度操作是由模型内部完成

    def train(self, epochs, batch_size=128, sample_interval=50):
        # 获取数据集
        (X_train, Y_train,), (_, _) = mnist.load_data()

        # 将获取到的图像转化为(-1,1)
        X_train = (X_train.astype(np.float32) - 127.5) / 127.5
        X_train = np.expand_dims(X_train, axis=3)
        # 将60000*28*28维度的图像拓展为60000*28*28*1

        # 将Y_train reshape成60000*1
        Y_train = Y_train.reshape(-1, 1)  # -1自动计算第0维的维度空间数

        # 写入 真实输出 与 虚假输出
        valid = np.ones((batch_size, 1))
        fake = np.zeros((batch_size, 1))

        for epoch in range(epochs):

            # 训练判别器

            # 从0-6w中随机获取batch_size个索引数
            idx = np.random.randint(0, X_train.shape[0], batch_size)
            imgs, labels = X_train[idx], Y_train[idx]
            # 完成随机获取batch_size个图像对应的标签
            # imgs shape (batch_size,28,28,1)
            # labels shape (32,1)

            noise = np.random.normal(0, 1, (batch_size, self.latent_dim))
            # 符合正态分布, shape (batch_size,100)

            gen_imgs = self.generator.predict([noise, labels])

            d_loss_real = self.discriminator.train_on_batch([imgs, labels], valid)
            d_loss_fake = self.discriminator.train_on_batch([gen_imgs, labels], fake)
            d_loss = 0.5*np.add(d_loss_fake, d_loss_real)

            # 训练生成器
            sampled_label = np.random.randint(0, 10, batch_size).reshape(-1, 1)
            # 固定鉴别器,训练生成器 在联合模型中
            g_loss = self.combined.train_on_batch([noise, sampled_label], valid)

            print('%d [D loss: %f, acc.: %.2f%%] [G loss: %f]' % (epoch, d_loss[0], 100 * d_loss[1], g_loss))

            if epoch % sample_interval == 0:
                self.sample_images(epoch)

    def sample_images(self, epoch):
        r, c = 2, 5
        noise = np.random.normal(0, 1, (r * c, self.latent_dim))
        sampled_labels = np.arange(0, 10).reshape(-1, 1)

        gen_imgs = self.generator.predict([noise, sampled_labels])

        # Rescale image 0 - 1
        gen_imgs = 0.5 * gen_imgs + 0.5

        fig, axs = plt.subplots(r, c)
        cnt = 0
        for i in range(r):
            for j in range(c):
                axs[i, j].imshow(gen_imgs[cnt, :, :, 0], cmap='gray')
                axs[i, j].set_title('Digit: %d' % sampled_labels[cnt])
                axs[i, j].axis('off')
                cnt += 1
        fig.savefig('images/%d.png' % epoch)
        plt.close()


if __name__ == '__main__':
    cgan = CGAN()
    cgan.train(epochs=20000, batch_size=32, sample_interval=200)
tree
test
│  CGAN_2014.py
└─ images
