3D人脸重建:Joint 3D Face Reconstruction and Dense Alignment with position Map Regression Network
2019/10/31,想起来之前看的没做笔记,重新总结下吧。
论文地址:http://openaccess.thecvf.com/content_ECCV_2018/papers/Yao_Feng_Joint_3D_Face_ECCV_2018_paper.pdf
github地址:https://github.com/YadiraF/PRNet
摘要
本文提出一种直接的方法,来实现3D人脸重建和稠密对齐。设计了一种2D表达,称之为UV坐标图,可以在UV空间保存完整的人脸3D形状。然后就可以训练CNN网络从一张2D图回归出3D形状。
一、简介
早期的3D重建和稠密对齐研究中,使用过2D关键点,但2D关键点无法处理大角度和遮挡;
使用了3DMM方法,又受限于透视投影和3D样条曲线(3D ThinPlate Spline)的计算量大;
有的端到端方案,摆脱了这些限制,但需要额外的网络来估计深度信息,且并没有提供稠密对齐;
VRN提出了体素表示法,该方法计算量大,分辨率低,且由于点云稀疏特性,存在大量无效计算。
本文提出了一种端到端的PRN多任务方法,能够同时完成稠密人脸对齐和3D人脸形状重建。主要几个贡献:
- 以端到端方式,实现了高分辨率的3D人脸重建和稠密对齐;
- 设计了UV位置图,来记录人脸的3D位置信息;
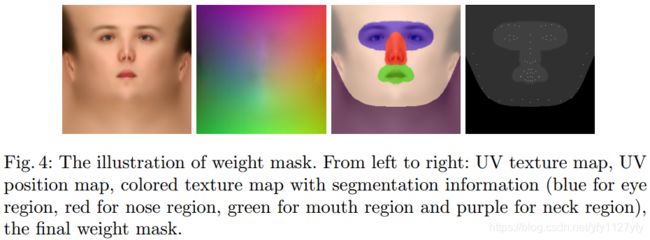
- 设计了权重掩模用于loss计算,loss中每个点权重不同,可明显提高网络性能
- CNN采用轻量级模式,单张人脸任务可达到100FPS
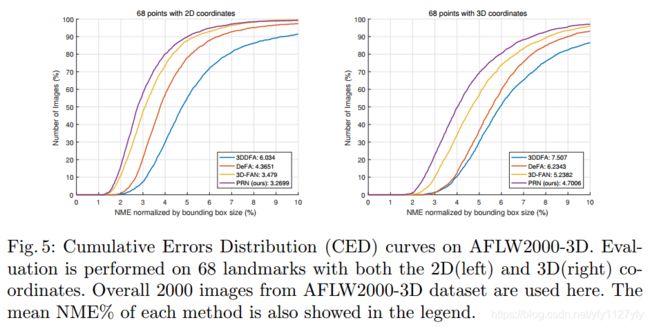
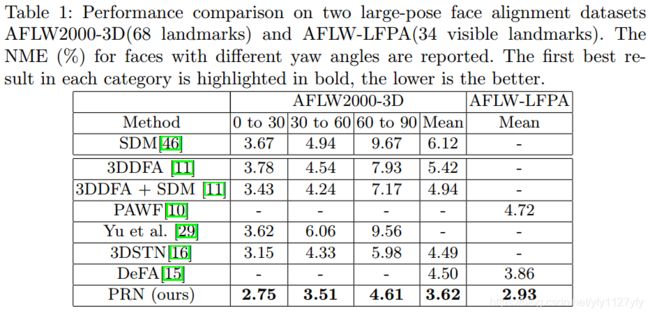
- 在AFLW200-3D和Florence数据集上可达到25%的性能提升
二、方法介绍
拿之前写的ppt用一下吧。
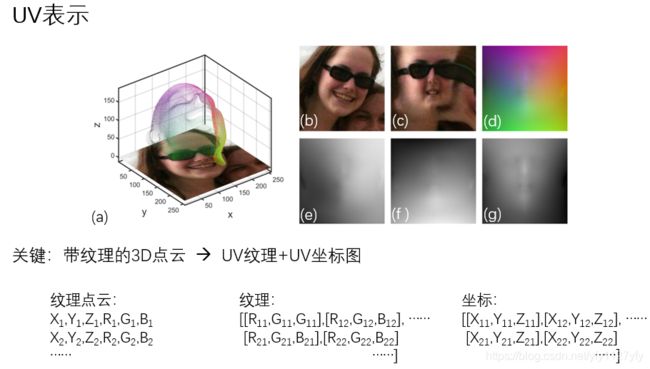
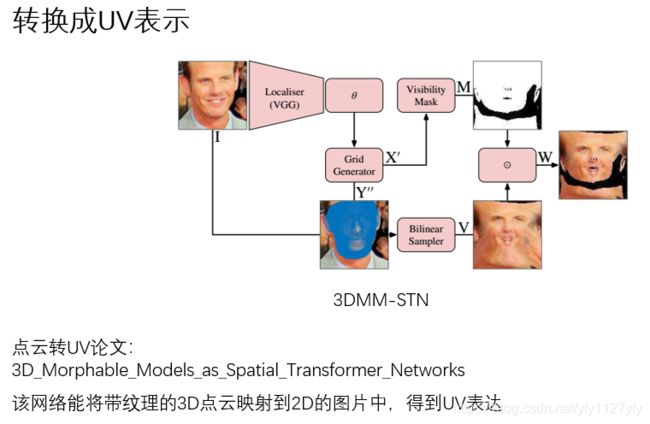
开源数据集,如300W-LP,ground-truth是没有用UV表示的,所以要先生成UV训练数据。将(a)中的点云坐标转变成(d)的表达形式,该方法如图2:
生成需要的训练数据后就可以用轻量级的CNN网络来处理了:
网络结构代码如下:
se = tcl.conv2d(x, num_outputs=size, kernel_size=4, stride=1) # 256 x 256 x 16
se = resBlock(se, num_outputs=size * 2, kernel_size=4, stride=2) # 128 x 128 x 32
se = resBlock(se, num_outputs=size * 2, kernel_size=4, stride=1) # 128 x 128 x 32
se = resBlock(se, num_outputs=size * 4, kernel_size=4, stride=2) # 64 x 64 x 64
se = resBlock(se, num_outputs=size * 4, kernel_size=4, stride=1) # 64 x 64 x 64
se = resBlock(se, num_outputs=size * 8, kernel_size=4, stride=2) # 32 x 32 x 128
se = resBlock(se, num_outputs=size * 8, kernel_size=4, stride=1) # 32 x 32 x 128
se = resBlock(se, num_outputs=size * 16, kernel_size=4, stride=2) # 16 x 16 x 256
se = resBlock(se, num_outputs=size * 16, kernel_size=4, stride=1) # 16 x 16 x 256
se = resBlock(se, num_outputs=size * 32, kernel_size=4, stride=2) # 8 x 8 x 512
se = resBlock(se, num_outputs=size * 32, kernel_size=4, stride=1) # 8 x 8 x 512

pd = tcl.conv2d_transpose(se, size * 32, 4, stride=1) # 8 x 8 x 512
pd = tcl.conv2d_transpose(pd, size * 16, 4, stride=2) # 16 x 16 x 256
pd = tcl.conv2d_transpose(pd, size * 16, 4, stride=1) # 16 x 16 x 256
pd = tcl.conv2d_transpose(pd, size * 16, 4, stride=1) # 16 x 16 x 256
pd = tcl.conv2d_transpose(pd, size * 8, 4, stride=2) # 32 x 32 x 128
pd = tcl.conv2d_transpose(pd, size * 8, 4, stride=1) # 32 x 32 x 128
pd = tcl.conv2d_transpose(pd, size * 8, 4, stride=1) # 32 x 32 x 128
pd = tcl.conv2d_transpose(pd, size * 4, 4, stride=2) # 64 x 64 x 64
pd = tcl.conv2d_transpose(pd, size * 4, 4, stride=1) # 64 x 64 x 64
pd = tcl.conv2d_transpose(pd, size * 4, 4, stride=1) # 64 x 64 x 64
pd = tcl.conv2d_transpose(pd, size * 2, 4, stride=2) # 128 x 128 x 32
pd = tcl.conv2d_transpose(pd, size * 2, 4, stride=1) # 128 x 128 x 32
pd = tcl.conv2d_transpose(pd, size, 4, stride=2) # 256 x 256 x 16
pd = tcl.conv2d_transpose(pd, size, 4, stride=1) # 256 x 256 x 16
pd = tcl.conv2d_transpose(pd, 3, 4, stride=1) # 256 x 256 x 3
pd = tcl.conv2d_transpose(pd, 3, 4, stride=1) # 256 x 256 x 3
pos = tcl.conv2d_transpose(pd, 3, 4, stride=1, activation_fn = tf.nn.sigmoid)
残差块代码如下,激活是relu,归一化是BN,shortcut对应三次卷积,随后通道合并,最后归一化和激活:
def resBlock(x, num_outputs, kernel_size = 4, stride=1, activation_fn=tf.nn.relu, normalizer_fn=tcl.batch_norm, scope=None):
        assert num_outputs%2==0 #num_outputs must be divided by channel_factor(2 here)
        with tf.variable_scope(scope, 'resBlock'):
            shortcut = x
            if stride != 1 or x.get_shape()[3] != num_outputs:
                shortcut = tcl.conv2d(shortcut, num_outputs, kernel_size=1, stride=stride,
                            activation_fn=None, normalizer_fn=None, scope='shortcut')
            x = tcl.conv2d(x, num_outputs/2, kernel_size=1, stride=1, padding='SAME')
            x = tcl.conv2d(x, num_outputs/2, kernel_size=kernel_size, stride=stride, padding='SAME')
            x = tcl.conv2d(x, num_outputs, kernel_size=1, stride=1, activation_fn=None, padding='SAME', normalizer_fn=None)

            x += shortcut
            x = normalizer_fn(x)
            x = activation_fn(x)
        return x
Loss
P(x,y) 是UV位置空间的预测结果,代表着每个像素的xyz位置
W(x,y) 是UV位置空间的权重,对UV空间进行权重控制,2D关键点:眼鼻嘴:脸部其他:其他 = 16:4:3:0;
训练
训练数据来源: 使用了300W-LP数据集
- 拥有各个角度的人脸数据,resize到256x256
- 3DMM系数的标注
- 使用3DMM 生成3D点云,并转换3D点云至UV空间
虽然生成GT使用了3DMM的标注系数,但是模型本身不包含3DMM模型的任何线性约束.
数据增广:各种场景
- 角度变换:-45 ~ 45 度
- 平移:系数0.9 ~ 1.2 (原图大小为基准)
- 颜色通道变换:系数0.6 ~ 1.4
- 添加噪音、纹理遮挡,模拟真实情况遮挡.
- adam优化器,初始学习率0.0001,每5个epoch,衰减1半,batch size:16
三、测试结果
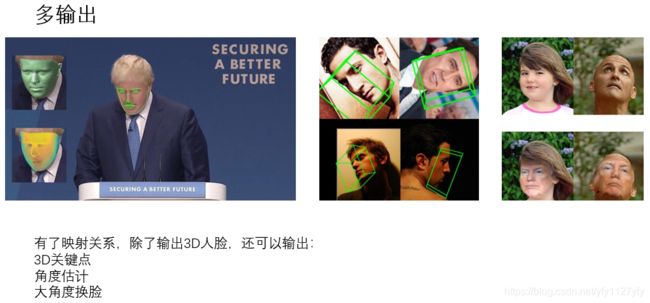
先提一下这个方法能做的事,由于学习到了2D与3D之间的映射,因次能实现的功能如下:
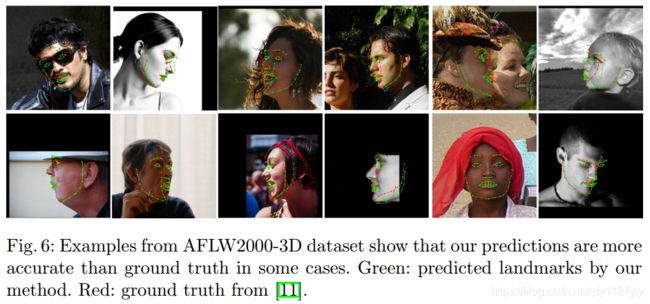
论文中部分测试指标如下:
