docker 安装多版本php,Docker搭建多版本PHP共存同时在线运行的方法
一台服务器可能需要运行多个php网站,但是有的php程序只能在php 5.x版本上运行,尤其是php 7.x上线后,很多程序都不支持,这个时候在服务器上搭建多版本php共存显得尤为重要,即在一台服务器上既能运行php5.x版本的程序也能运行php7.x版本的程序,多个版本的php同时在一台服务器上运行起来。
本文将介绍在docker上运行多个php版本,具体如何安装docker可以参考这篇文章:https://www.zyku.net/centos/1700.html
使用docker搭建LNMP环境可以参考这篇文章:https://www.zyku.net/centos/1704.html
1、docker安装mysql :
docker pull mysql:5.6
运行并启动mysql所在容器:
docker run -d -p 3307:3306 -e MYSQL_ROOT_PASSWORD=dk123456 --name dk_mysql mysql:5.6
进入MySQL容器:
docker exec -ti dk_mysql /bin/bash
2、docker安装php-fpm:
这里以php 5.6和php 7.0为例,搭建两个版本php环境
首先拉取php-fpm的镜像:
docker pull php:5.6-fpm
docker pull php:7.0-fpm
先创建一个php 5.6的容器:
docker run -d -v /var/nginx/www/html/56:/var/www/html/56 -p 9000:9000 --link dk_mysql:mysql --name dk_php56 php:5.6-fpm
再创建一个php 7.0的容器:
docker run -d -v /var/nginx/www/html/70:/var/www/html/70 -p 9001:9000 --link dk_mysql:mysql --name dk_php70 php:7.0-fpm
执行命令“docker ps -a”可以查看我们刚刚创建的容器,如下图所示:
下面分别进入php 5.6和7.0的容器中安装模块:
php5.6容器:
docker exec -ti dk_php56 /bin/bash
docker-php-ext-install pdo_mysql
docker-php-ext-install mysqli
php7.0容器:
docker exec -ti dk_php70 /bin/bash
docker-php-ext-install pdo_mysql
docker-php-ext-install mysqli
如果在安装的过程中有报错“configure: error: png.h not found.”就需要在容器中安装libpng和libpng-devel:
apt-get update
apt-get install libpng libpng-devel
3、docker安装nginx:
docker pull nginx:1.10.3
创建nginx容器:
docker run -d -p 80:80 --name dk_nginx -v /var/nginx/www/html/56:/var/www/html/56 -v /var/nginx/www/html/70:/var/www/html/70 --link dk_php56:php56 --link dk_php70:php70 --name dk_nginx nginx:1.10.3
进入nginx容器,修改配置文件:
docker exec -ti dk_nginx /bin/bash
配置文件默认在/etc/nginx目录下,这里我们到“conf.d”目录下创建两个虚拟机配置文件分别对应到php5.6和7.0来进行演示,如下图所示:
56.aitest.top.conf:
server {
listen 80;
server_name 56.aitest.top;
#charset koi8-r;
#access_log /var/log/nginx/log/host.access.log main;
location / {
root /var/www/html/56;
index index.html index.htm index.php;
}
location ~ \.php$ {
root /var/www/html/56;
fastcgi_index index.php;
fastcgi_pass php56:9000;
fastcgi_param SCRIPT_FILENAME $document_root$fastcgi_script_name;
include fastcgi_params;
}
#error_page 404 /404.html;
# redirect server error pages to the static page /50x.html
#
error_page 500 502 503 504 /50x.html;
location = /50x.html {
root /usr/share/nginx/html;
}
# proxy the PHP scripts to Apache listening on 127.0.0.1:80
#
#location ~ \.php$ {
# proxy_pass http://127.0.0.1;
#}
# pass the PHP scripts to FastCGI server listening on 127.0.0.1:9000
#
#location ~ \.php$ {
# root html;
# fastcgi_pass 127.0.0.1:9000;
# fastcgi_index index.php;
# fastcgi_param SCRIPT_FILENAME /scripts$fastcgi_script_name;
# include fastcgi_params;
#}
# deny access to .htaccess files, if Apache's document root
# concurs with nginx's one
#
#location ~ /\.ht {
# deny all;
#}
}
70.aitest.top.conf:
server {
listen 80;
server_name 70.aitest.top;
#charset koi8-r;
#access_log /var/log/nginx/log/host.access.log main;
location / {
root /var/www/html/70;
index index.html index.htm index.php;
}
location ~ \.php$ {
root /var/www/html/70;
fastcgi_index index.php;
fastcgi_pass php70:9000;
fastcgi_param SCRIPT_FILENAME $document_root$fastcgi_script_name;
include fastcgi_params;
}
#error_page 404 /404.html;
# redirect server error pages to the static page /50x.html
#
error_page 500 502 503 504 /50x.html;
location = /50x.html {
root /usr/share/nginx/html;
}
# proxy the PHP scripts to Apache listening on 127.0.0.1:80
#
#location ~ \.php$ {
# proxy_pass http://127.0.0.1;
#}
# pass the PHP scripts to FastCGI server listening on 127.0.0.1:9000
#
#location ~ \.php$ {
# root html;
# fastcgi_pass 127.0.0.1:9000;
# fastcgi_index index.php;
# fastcgi_param SCRIPT_FILENAME /scripts$fastcgi_script_name;
# include fastcgi_params;
#}
# deny access to .htaccess files, if Apache's document root
# concurs with nginx's one
#
#location ~ /\.ht {
# deny all;
#}
}
修改配置文件后我们可以使用“service nginx reload”来重新加载nginx配置信息
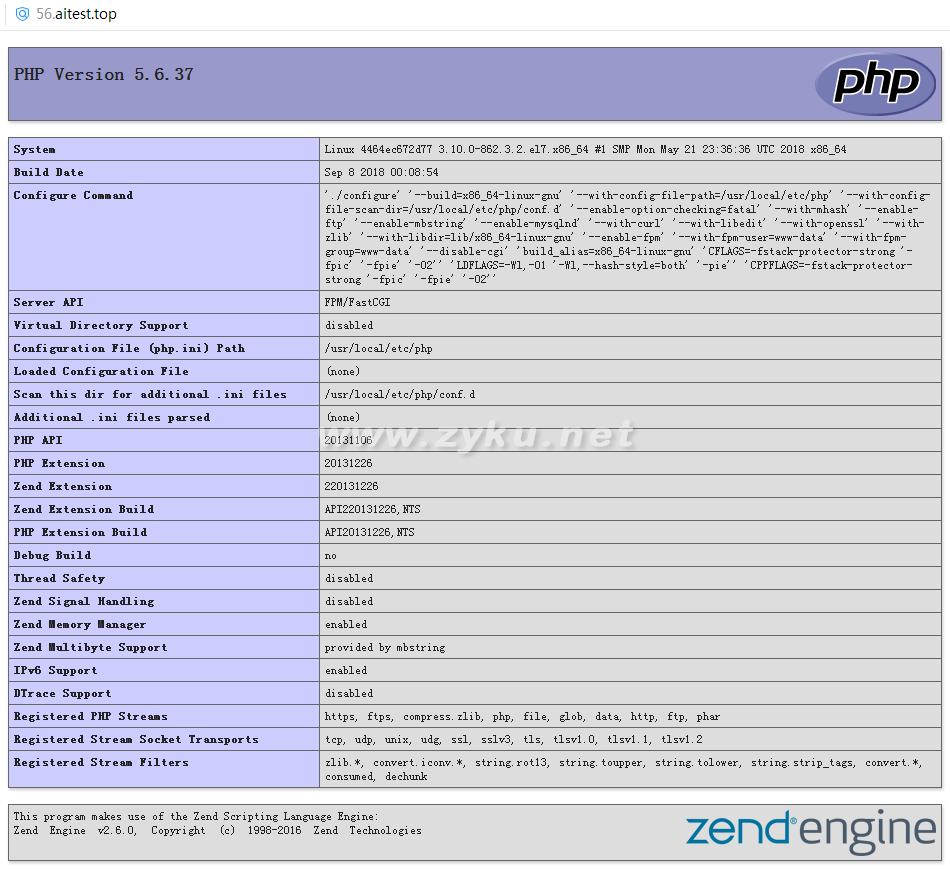
紧接着到“/var/www/html/56”和“/var/www/html/70”目录下分别新建一个index.php文件并且写入 phpinfo(); 来测试我们的安装是否成功了,浏览器访问域名效果如下:
(资源库 www.zyku.net)


