NNDL 作业5:卷积
目录
作业1
编程实现
作业2
一、概念
卷积
卷积核
特征图
特征选择
步长
填充
感受野
二、探究不同卷积核的作用
blur(模糊)编辑
emboss(浮雕)
outline(边缘检测)
top sobel
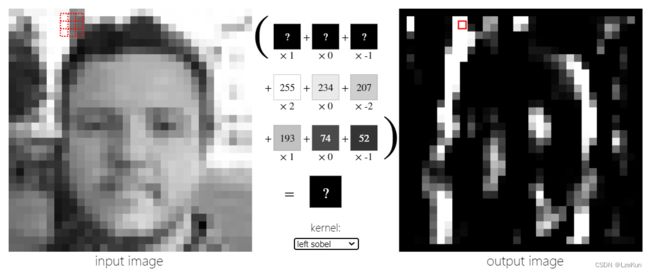
left sobel
bottom sobel
三、编程实现
总结
作业1
编程实现

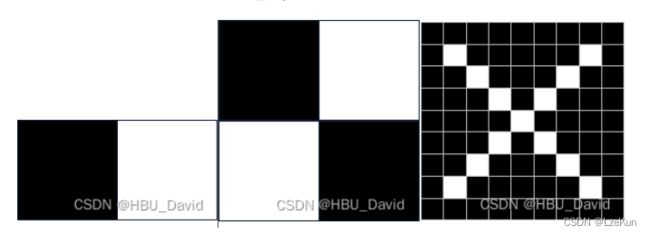
1. 图1使用卷积核 ,输出特征图
import torch
import matplotlib.pyplot as plt
import torch.nn.functional as F

picture = torch.Tensor([[0,0,0,255,255,255],
                      [0,0,0,255,255,255],
                      [0,0,0,255,255,255],
                      [0,0,0,255,255,255],
                      [0,0,0,255,255,255]])
#确定卷积网络
class GJ(torch.nn.Module):
    def __init__(self,kernel,kshape):
        super(GJ, self).__init__()
        kernel = torch.reshape(kernel,kshape)
        self.weight = torch.nn.Parameter(data=kernel, requires_grad=False)
    def forward(self, picture):
        picture = F.conv2d(picture,self.weight,stride=1,padding=0)
        return  picture
#确定卷积层
kernel = torch.tensor([-1.0,1.0])
#更改卷积层的形状适应卷积函数
kshape = (1,1,1,2)
#生成模型
model = GJ(kernel=kernel,kshape=kshape)
#更改图片的形状适应卷积层
picture = torch.reshape(picture,(1,1,5,6))
output = model(picture)
output = torch.reshape(output,(5,5))
plt.imshow(output,cmap='gray')
plt.show()
2. 图1使用卷积核 ,输出特征图
kernel = torch.tensor([-1.0, 1.0])
# 更改卷积和的形状为转置
kshape = (1, 1, 2, 1)
model = GJ(kernel=kernel, kshape=kshape)
picture = torch.reshape(picture, (1, 1, 5, 6))
output = model(picture)
output = torch.reshape(output, (6, 4))
plt.imshow(output, cmap='gray')
plt.show()
3. 图2使用卷积核,输出特征图
kernel = torch.tensor([-1.0, 1.0])
kshape = (1, 1, 1, 2)
# 生成模型
model = GJ(kernel=kernel, kshape=kshape)
picture = torch.reshape(picture, (1, 1, 6, 6))
print(picture)
output = model(picture)
output = torch.reshape(output, (6, 5))
print(output)
plt.imshow(output, cmap='gray')
plt.show()
4. 图2使用卷积核,输出特征图
kernel = torch.tensor([-1.0,1.0])
kshape = (1,1,2,1)
model = GJ(kernel=kernel,kshape=kshape)
picture = torch.reshape(picture,(1,1,6,6))
print(picture)
output = model(picture)
output = torch.reshape(output,(5,6))
print(output)
plt.imshow(output,cmap='gray')
plt.show()
5. 图3使用卷积核,, ,输出特征图
import torch
import matplotlib.pyplot as plt
import torch.nn.functional as F


#确定卷积网络
class GJ(torch.nn.Module):
    def __init__(self,kernel,kshape):
        super(GJ, self).__init__()
        kernel = torch.reshape(kernel,kshape)
        self.weight = torch.nn.Parameter(data=kernel, requires_grad=False)
    def forward(self, picture):
        picture = F.conv2d(picture,self.weight,stride=1,padding=0)
        return  picture


picture = torch.Tensor(
                     [[255,255,255,255,255,255,255,255,255],
                      [255,0  ,255,255,255,255,255,0  ,255],
                      [255,255,0  ,255,255,255,0  ,255,255],
                      [255,255,255,0  ,255,0  ,255,255,255],
                      [255,255,255,255,0  ,255,255,255,255],
                      [255,255,255,0  ,255,0  ,255,255,255],
                      [255,255,0  ,255,255,255,0  ,255,255],
                      [255,0  ,255,255,255,255,255,0  ,255],
                      [255,255,255,255,255,255,255,255,255],])

#生成卷积核
kernel = torch.tensor([-1.0,1.0])
#更改卷积核的形状适应卷积函数
kshape = (1,1,1,2)
model = GJ(kernel=kernel,kshape=kshape)
picture = torch.reshape(picture,(1,1,9,9))
print(picture)
output = model(picture)
output = torch.reshape(output,(9,8))
print(output)
plt.imshow(output,cmap='gray')
plt.show()
import torch
import matplotlib.pyplot as plt
import torch.nn.functional as F


# 确定卷积网络
class GJ(torch.nn.Module):
    def __init__(self, kernel, kshape):
        super(GJ, self).__init__()
        kernel = torch.reshape(kernel, kshape)
        self.weight = torch.nn.Parameter(data=kernel, requires_grad=False)

    def forward(self, picture):
        picture = F.conv2d(picture, self.weight, stride=1, padding=0)
        return picture


picture = torch.Tensor(
    [[255, 255, 255, 255, 255, 255, 255, 255, 255],
     [255, 0, 255, 255, 255, 255, 255, 0, 255],
     [255, 255, 0, 255, 255, 255, 0, 255, 255],
     [255, 255, 255, 0, 255, 0, 255, 255, 255],
     [255, 255, 255, 255, 0, 255, 255, 255, 255],
     [255, 255, 255, 0, 255, 0, 255, 255, 255],
     [255, 255, 0, 255, 255, 255, 0, 255, 255],
     [255, 0, 255, 255, 255, 255, 255, 0, 255],
     [255, 255, 255, 255, 255, 255, 255, 255, 255], ])

kernel = torch.tensor([-1.0, 1.0])
kshape = (1, 1, 2, 1)
model = GJ(kernel=kernel, kshape=kshape)
picture = torch.reshape(picture, (1, 1, 9, 9))
print(picture)
output = model(picture)
output = torch.reshape(output, (8, 9))
print(output)
plt.imshow(output, cmap='gray')
plt.show() 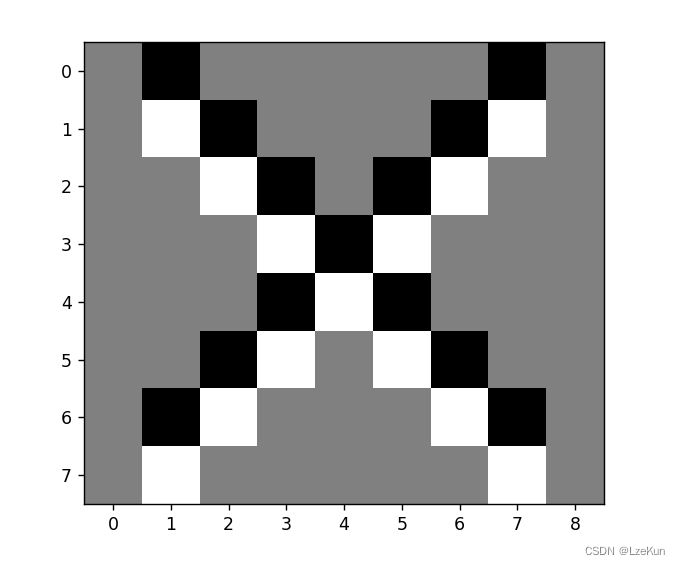
import torch
import matplotlib.pyplot as plt
import torch.nn.functional as F


#确定卷积网络
class GJ(torch.nn.Module):
    def __init__(self,kernel,kshape):
        super(GJ, self).__init__()
        kernel = torch.reshape(kernel,kshape)
        self.weight = torch.nn.Parameter(data=kernel, requires_grad=False)
    def forward(self, picture):
        picture = F.conv2d(picture,self.weight,stride=1,padding=0)
        return  picture


picture = torch.Tensor(
                     [[255,255,255,255,255,255,255,255,255],
                      [255,0  ,255,255,255,255,255,0  ,255],
                      [255,255,0  ,255,255,255,0  ,255,255],
                      [255,255,255,0  ,255,0  ,255,255,255],
                      [255,255,255,255,0  ,255,255,255,255],
                      [255,255,255,0  ,255,0  ,255,255,255],
                      [255,255,0  ,255,255,255,0  ,255,255],
                      [255,0  ,255,255,255,255,255,0  ,255],
                      [255,255,255,255,255,255,255,255,255],])

#确定卷积核
kernel = torch.tensor([[1.0,-1.0],
                       [-1.0,1.0]])
#更改卷积核的大小适配卷积函数
kshape = (1,1,2,2)
#生成网络模型
model = GJ(kernel=kernel,kshape=kshape)
picture = torch.reshape(picture,(1,1,9,9))
print(picture)
output = model(picture)
output = torch.reshape(output,(8,8))
print(output)
plt.imshow(output,cmap='gray')
plt.show()
作业2
一、概念
用自己的语言描述“卷积、卷积核、特征图、特征选择、步长、填充、感受野”。
卷积
是一种特殊的积分变换,表征函数f与g经过翻转和平移的重叠部分函数值乘积对重叠长度的积分。
卷积核
卷积核就是图像处理时,给定输入图像,输入图像中一个小区域中像素加权平均后成为输出图像中的每个对应像素,其中权值由一个函数定义,这个函数称为卷积核。
特征图
在每个卷积层,数据都是以三维形式存在的。你可以把它看成许多个二维图片叠在一起,其中每一个称为一个feature map。在输入层,如果是灰度图片,那就只有一个feature map;如果是彩色图片,一般就是3个feature map(红绿蓝)。层与层之间会有若干个卷积核(kernel),上一层和每个feature map跟每个卷积核做卷积,都会产生下一层的一个feature map。
特征选择
特征选择( Feature Selection )也称特征子集选择( Feature Subset Selection , FSS ),或属性选择( Attribute Selection )。是指从已有的M个特征(Feature)中选择N个特征使得系统的特定指标最优化,是从原始特征中选择出一些最有效特征以降低数据集维度的过程,是提高学习算法性能的一个重要手段,也是模式识别中关键的数据预处理步骤。对于一个学习算法来说,好的学习样本是训练模型的关键。
步长
步长的选取很关键,如果步长过长,那么每次 w 偏移过大,永远都找不到真正的最小值。而如果步长选取过小,那么收敛会变得很慢,而且有可能在中间某段平滑处停下来,找到的也不是真正的最小值。
填充
填充也就是在矩阵的边界上填充一些值,以增加矩阵的大小,通常都用“0”来进行填充的。
感受野
感受野是卷积神经网络每一层输出的特征图(Feature Map)上的像素点在原始图像上映射的区域大小。
二、探究不同卷积核的作用
sharpen(锐化)

blur(模糊)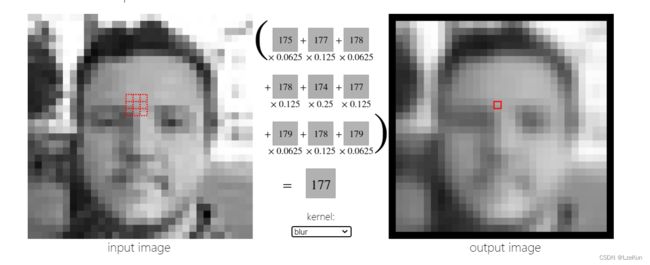
emboss(浮雕)

outline(边缘检测)

top sobel

left sobel
bottom sobel

三、编程实现
1.实现灰度图的边缘检测、锐化、模糊。(必做)
import numpy as np
import torch
from torch import nn
from torch.autograd import Variable
from PIL import Image
import matplotlib.pyplot as plt
import os
os.environ["KMP_DUPLICATE_LIB_OK"] = "TRUE"
plt.rcParams['font.sans-serif'] = ['SimHei'] # 用来正常显示中文标签
plt.rcParams['axes.unicode_minus'] = False # 用来正常显示负号 #有中文出现的情况,需要u'内容
file_path = 'rn.png'
im = Image.open(file_path).convert('L') # 读入一张灰度图的图片
im = np.array(im, dtype='float32') # 将其转换为一个矩阵
print(im.shape[0], im.shape[1])
plt.imshow(im.astype('uint8'), cmap='gray') # 可视化图片
plt.title('原图')
plt.show()
im = torch.from_numpy(im.reshape((1, 1, im.shape[0], im.shape[1])))
conv1 = nn.Conv2d(1, 1, 3, bias=False) # 定义卷积
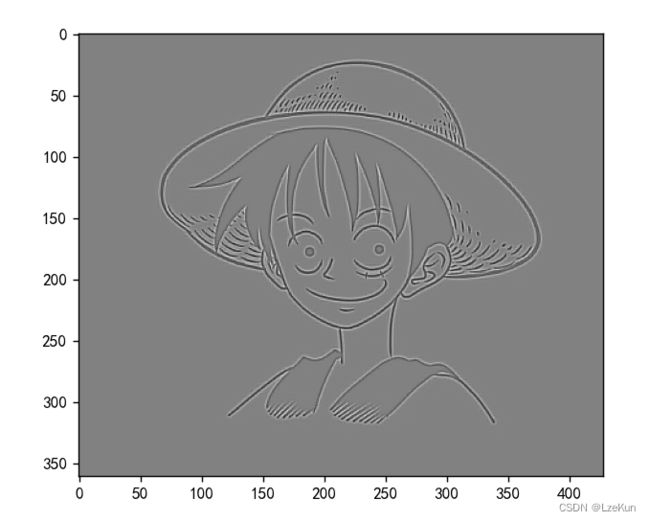
# 边缘检测
sobel_kernel = np.array([[-1, -1, -1],
[-1, 8, -1],
[-1, -1, -1]], dtype='float32') # 定义轮廓检测算子
sobel_kernel = sobel_kernel.reshape((1, 1, 3, 3)) # 适配卷积的输入输出
conv1.weight.data = torch.from_numpy(sobel_kernel) # 给卷积的 kernel 赋值
edge1 = conv1(Variable(im)) # 作用在图片上
x = edge1.data.squeeze().numpy()
print(x.shape) # 输出大小
plt.imshow(x, cmap='gray')
plt.show()
边缘检测
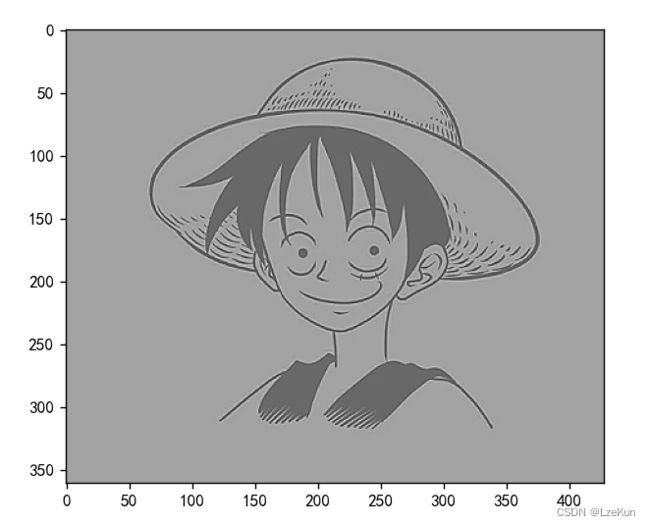
锐化
# 锐化
sobel_kernel = np.array([[0, -1, 0],
                         [-1, 5, -1],
                         [0, -1, 0]], dtype='float32')  # 定义轮廓检测算子
模糊
# 模糊
sobel_kernel = np.array([[0.0625, 0.125, 0.0625],
                         [0.125, 0.25, 0.125],
                         [0.0625, 0.125, 0.0625]], dtype='float32')  # 定义轮廓检测算子
2.调整卷积核参数,测试并总结。(必做)
stride=1时

步长为5时
conv1 = nn.Conv2d(1, 1, 3,stride=5, bias=False)
步长为10时

步长增加,图像变得模糊
3.使用不同尺寸图片,测试并总结。(必做)
熊猫原图

边缘检测

锐化

模糊

总结
本次实验是对图像的处理,通过不同的图像进行边缘检测、模糊和锐化,并且修改卷积核参数,比较图之间的不同。卷积核参数的不同,图片的尺寸都会影响最后的结果。