k8s 之 list-watch 机制、节点调度以及亲和性
文章目录
-
- 一、list-watch机制
-
- 1. list-watch介绍
- 2. list-watch工作流程
- 二、节点调度
-
- 1. 调度策略
- 2. 预算策略
- 3. 优选策略
- 4. 指定调度节点
-
- 4.1 方法一:nodeName
- 4.2 方法二:nodeSelector
- 三、亲和性
-
- 1. 官方文档
- 2. 节点亲和性
- 3. Pod亲和性
- 4. 键值运算关系
- 5. 节点亲和性(硬策略)测试
- 5. 节点亲和性(软策略)测试
- 6. 软硬策略结合测试
- 7. 亲和性的调度策略
- 四、亲和总结
- 五、污点(Taint)和容忍(Tolerations)
-
- 1. 污点(Taint)
-
- 1.1 污点的组成格式
- 1.2 taint effect支持的三个选项
- 1.3 master 污点设置
- 1.4 node上设置污点
- 1.5 实例
- 2. 容忍(Tolerations)
-
- 2.1 容忍示例
- 2.2 其它注意事项
- 六、Pod启动阶段(相位 phase)
-
- 1. pod启动过程
- 2. phase的状态
- 3. 故障排除步骤
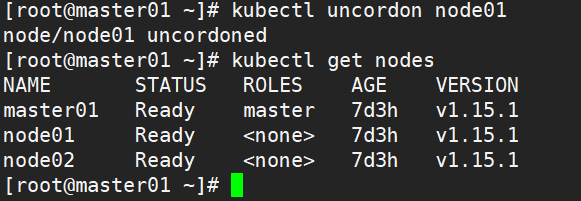
- 4. 对节点执行维护操作
一、list-watch机制
1. list-watch介绍
Kubernetes 是通过 List-Watch 的机制进行每个组件的协作,保持数据同步的,每个组件之间的设计实现了解耦。
用户是通过 kubectl 根据配置文件,向 APIServer 发送命令,在 Node 节点上面建立 Pod 和 Container。
APIServer 经过 API 调用,权限控制,调用资源和存储资源的过程,实际上还没有真正开始部署应用。这里需要 Controller Manager、Scheduler 和 kubelet 的协助才能完成整个部署过程。
在 Kubernetes 中,所有部署的信息都会写到 etcd 中保存。实际上 etcd 在存储部署信息的时候,会发送 Create 事件给 APIServer,而 APIServer 会通过监听(Watch)etcd 发过来的事件。其他组件也会监听(Watch)APIServer 发出来的事件。
2. list-watch工作流程
Pod是Kubernetes的基础单元,Pod 启动典型创建过程如下
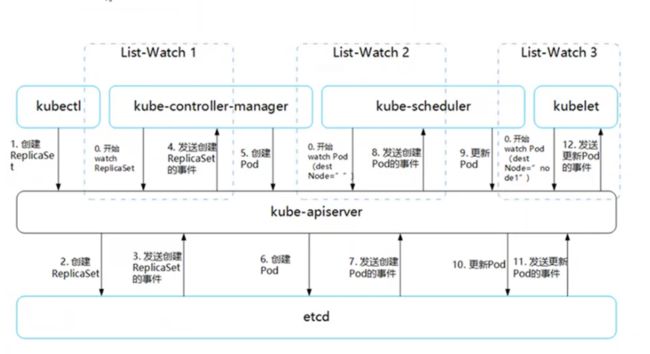
(1)这里有三个 List-Watch,分别是 Controller Manager(运行在 Master),Scheduler(运行在 Master),kubelet(运行在 Node)。他们在进程已启动就会监听(Watch)APIServer 发出来的事件。
(2)用户通过 kubectl 或其他 API 客户端提交请求给 APIServer 来建立一个 Pod 对象副本。
(3)APIServer 尝试着将 Pod 对象的相关元信息存入 etcd 中,待写入操作执行完成,APIServer 即会返回确认信息至客户端。
(4)当 etcd 接受创建 Pod 信息以后,会发送一个 Create 事件给 APIServer。
(5)由于 Controller Manager 一直在监听(Watch,通过http的8080端口)APIServer 中的事件。此时 APIServer 接受到了 Create 事件,又会发送给 Controller Manager。
(6)Controller Manager 在接到 Create 事件以后,调用其中的 Replication Controller 来保证 Node 上面需要创建的副本数量。一旦副本数量少于 RC 中定义的数量,RC 会自动创建副本。总之它是保证副本数量的 Controller(PS:扩容缩容的担当)。
(7)在 Controller Manager 创建 Pod 副本以后,APIServer 会在 etcd 中记录这个 Pod 的详细信息。例如 Pod 的副本数,Container 的内容是什么。
(8)同样的 etcd 会将创建 Pod 的信息通过事件发送给 APIServer。
(9)由于 Scheduler 在监听(Watch)APIServer,并且它在系统中起到了“承上启下”的作用,“承上”是指它负责接收创建的 Pod 事件,为其安排 Node;“启下”是指安置工作完成后,Node 上的 kubelet 进程会接管后继工作,负责 Pod 生命周期中的“下半生”。 换句话说,Scheduler 的作用是将待调度的 Pod 按照调度算法和策略绑定到集群中 Node 上。
(10)Scheduler 调度完毕以后会更新 Pod 的信息,此时的信息更加丰富了。除了知道 Pod 的副本数量,副本内容。还知道部署到哪个 Node 上面了。并将上面的 Pod 信息更新至 API Server,由 APIServer 更新至 etcd 中,保存起来。
(11)etcd 将更新成功的事件发送给 APIServer,APIServer 也开始反映此 Pod 对象的调度结果。
(12)kubelet 是在 Node 上面运行的进程,它也通过 List-Watch 的方式监听(Watch,通过https的6443端口)APIServer 发送的 Pod 更新的事件。kubelet 会尝试在当前节点上调用 Docker 启动容器,并将 Pod 以及容器的结果状态回送至 APIServer。
(13)APIServer 将 Pod 状态信息存入 etcd 中。在 etcd 确认写入操作成功完成后,APIServer将确认信息发送至相关的 kubelet,事件将通过它被接受。
注意:在创建 Pod 的工作就已经完成了后,为什么 kubelet 还要一直监听呢?原因很简单,假设这个时候 kubectl 发命令,要扩充 Pod 副本数量,那么上面的流程又会触发一遍,kubelet 会根据最新的 Pod 的部署情况调整 Node 的资源。又或者 Pod 副本数量没有发生变化,但是其中的镜像文件升级了,kubelet 也会自动获取最新的镜像文件并且加载。
二、节点调度
1. 调度策略
Sheduler是作为单独的程序运行的,启动之后会一直监听APIServer,获取spec.nodeName为空的pod,对每个pod都会创建一个binding,表明该pod应该放到哪个节点上。
调度分为几个部分:首先是过滤掉不满足条件的节点,这个过程称为预算策略(predicate);然后对通过的节点按照优先级排序,这个是优选策略(priorities);最后从中选择优先级最高的节点。如果中间任何一步骤有错误,就直接返回错误。
2. 预算策略
Predicate(预算策略)常见的算法可以使用
● PodFitsResources:节点上剩余的资源是否大于 pod 请求的资源。
● PodFitsHost:如果 pod 指定了 NodeName,检查节点名称是否和 NodeName 匹配。
● PodFitsHostPorts:节点上已经使用的 port 是否和 pod 申请的 port 冲突。
● PodSelectorMatches:过滤掉和 pod 指定的 label 不匹配的节点。
● NoDiskConflict:已经 mount 的 volume 和 pod 指定的 volume 不冲突,除非它们都是只读。
如果在 predicate 过程中没有合适的节点,pod 会一直在 pending 状态,不断重试调度,直到有节点满足条件。 经过这个步骤,如果有多个节点满足条件,就继续 priorities 过程:按照优先级大小对节点排序。
3. 优选策略
优先级由一系列键值对组成,键是该优先级项的名称,值是它的权重(该项的重要性)。有一系列的常见的优先级选项包括:
● LeastRequestedPriority:通过计算CPU和Memory的使用率来决定权重,使用率越低权重越高。也就是说,这个优先级指标倾向于资源使用比例更低的节点。
● BalancedResourceAllocation:节点上 CPU 和 Memory 使用率越接近,权重越高。这个一般和上面的一起使用,不单独使用。比如 node01 的 CPU 和 Memory 使用率 20:60,node02 的 CPU 和 Memory 使用率 50:50,虽然 node01 的总使用率比 node02 低,但 node02 的 CPU 和 Memory 使用率更接近,从而调度时会优选 node02。
● ImageLocalityPriority:倾向于已经有要使用镜像的节点,镜像总大小值越大,权重越高。
优选策略通过算法对所有的优先级项目和权重进行计算,得出最终的结果。
4. 指定调度节点
4.1 方法一:nodeName
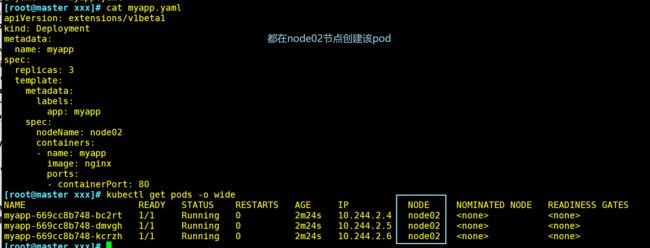
使用pod.spec.nodeName 参数,将Pod直接调度到指定的Node节点上,会跳过 Scheduler 的调度策略,该匹配规则是强制匹配
vim myapp.yaml
apiVersion: extensions/v1beta1
kind: Deployment
metadata:
  name: myapp
spec:
  replicas: 3
  template:
    metadata:
      labels:
        app: myapp
    spec:
      nodeName: node02
      containers:
      - name: myapp
        image: niginx
        ports:
        - containerPort: 80

kubectl apply -f myapp.yaml

kubectl get pods -o wide
4.2 方法二:nodeSelector
使用pod.spec.nodeSelector参数,通过 kubernetes 的 label-selector 机制选择节点,由调度器调度策略匹配 label,然后调度 Pod 到目标节点,该匹配规则属于强制约束
kubectl label --help                                                    #获取标签帮助

需要获取 node 上的 NAME 名称
kubectl get node

给对应的 node 设置标签分别为 abc=a 和 abc=b
kubectl label nodes node01 abc=aaa
kubectl label nodes node02 abc=bbb

查看标签
kubectl get nodes --show-labels

修改成 nodeSelector 调度方式
vim myapp1.yaml
apiVersion: extensions/v1beta1
kind: Deployment
metadata:
  name: myapp1
spec:
  replicas: 3
  template:
    metadata:
      labels:
        app: myapp1
    spec:
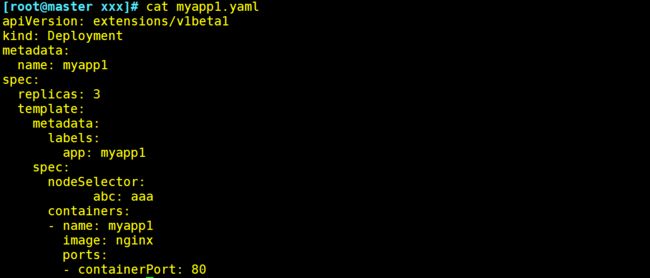
      nodeSelector:
        kgc: a
      containers:
      - name: myapp1
        image: soscscs/myapp:v1
        ports:
        - containerPort: 80

kubectl apply -f myapp1.yaml

kubectl get pods -o wide
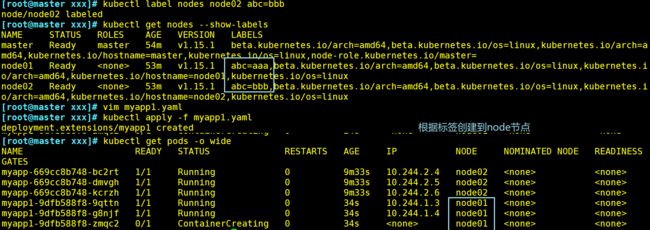
查看详细事件(通过事件可以发现要先经过 scheduler 调度分配)
kubectl describe pod myapp1-9dfb588f8-9qttn

修改一个 label 的值,需要加上 --overwrite 参数(表示覆盖,新增label不需要)
kubectl label nodes node02 abc=ccc --overwrite
删除一个 label,只需在命令行最后指定 label 的 key 名并与一个减号相连即可:
kubectl label nodes node02 abc-
指定标签查询 node 节点
kubectl get node -l abc=aaa
三、亲和性
1. 官方文档
https://kubernetes.io/zh/docs/concepts/scheduling-eviction/assign-pod-node/
2. 节点亲和性
pod.spec.nodeAffinity
● preferredDuringSchedulingIgnoredDuringExecution:软策略
● requiredDuringSchedulingIgnoredDuringExecution:硬策略
3. Pod亲和性
pod.spec.affinity.podAffinity/podAntiAffinity
● preferredDuringSchedulingIgnoredDuringExecution:软策略
● requiredDuringSchedulingIgnoredDuringExecution:硬策略
4. 键值运算关系
● In:label 的值在某个列表中
● NotIn:label 的值不在某个列表中
● Gt:label 的值大于某个值
● Lt:label 的值小于某个值
● Exists:某个 label 存在
● DoesNotExist:某个 label 不存在
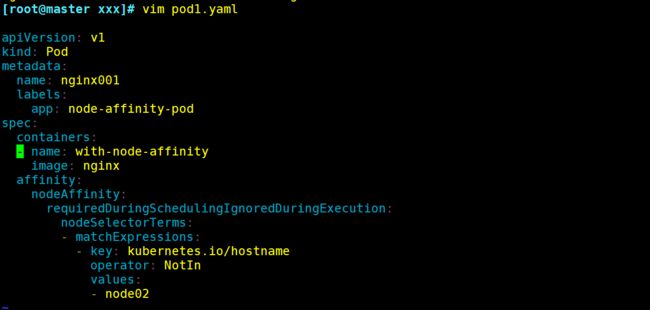
5. 节点亲和性(硬策略)测试
requiredDuringSchedulingIgnoredDuringExecution:硬策略
vim pod1.yaml
apiVersion: v1
kind: Pod
metadata:
  name: nginx001
  labels:
    app: node-affinity-pod
spec:
  containers:
  - name: with-node-affinity
    image: soscscs/myapp:v1
  affinity:
    nodeAffinity:
      requiredDuringSchedulingIgnoredDuringExecution:
        nodeSelectorTerms:
        - matchExpressions:
          - key: kubernetes.io/hostname
#指定node的标签
            operator: NotIn
#设置Pod安装到kubernetes.io/hostname的标签值不在values列表中的node上
            values:
            - node02

kubectl apply -f pod1.yaml

kubectl get pods -o wide

kubectl delete pod --all && kubectl apply -f pod1.yaml && kubectl get pods -o wide
#如果硬策略不满足条件,Pod 状态一直会处于 Pending 状态
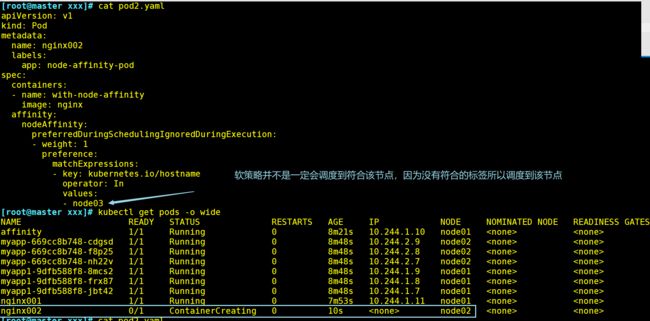
5. 节点亲和性(软策略)测试
preferredDuringSchedulingIgnoredDuringExecution:软策略
vim pod2.yaml
apiVersion: v1
kind: Pod
metadata:
  name: affinity
  labels:
    app: node-affinity-pod
spec:
  containers:
  - name: with-node-affinity
    image: soscscs/myapp:v1
  affinity:
    nodeAffinity:
      preferredDuringSchedulingIgnoredDuringExecution:
      - weight: 1
#如果有多个软策略选项的话,权重越大,优先级越高
        preference:
          matchExpressions:
          - key: kubernetes.io/hostname
            operator: In
            values:
            - node03

kubectl apply -f pod2.yaml

kubectl get pods -o wide
把values:的值改成node01,则会优先在node01上创建Pod

kubectl delete pod --all && kubectl apply -f pod2.yaml && kubectl get pods -o wide
6. 软硬策略结合测试
如果把硬策略和软策略合在一起使用,则要先满足硬策略之后才会满足软策略
示例:
apiVersion: v1
kind: Pod
metadata:
  name: affinity
  labels:
    app: node-affinity-pod
spec:
  containers:
  - name: with-node-affinity
    image: soscscs/myapp:v1
  affinity:
    nodeAffinity:
      requiredDuringSchedulingIgnoredDuringExecution:        #先满足硬策略,排除有kubernetes.io/hostname=node02标签的节点
        nodeSelectorTerms:
        - matchExpressions:
          - key: kubernetes.io/hostname
            operator: NotIn
            values:
            - node02
      preferredDuringSchedulingIgnoredDuringExecution:         #再满足软策略,优先选择有abc=aaa标签的节点
      - weight: 1
        preference:
          matchExpressions:
          - key: abc
            operator: In
            values:
            - aaa
7. 亲和性的调度策略
| 调度策略 | 匹配标签 | 操作符 | 拓扑域支持 | 调度目标 |
|---|---|---|---|---|
| nodeAffinity | 主机 | In, NotIn, Exists,DoesNotExist, Gt, Lt | 否 | 指定主机 |
| podAffinity | Pod | In, NotIn, Exists,DoesNotExist | 是 | Pod与指定Pod同一拓扑域 |
| podAntiAffinity | Pod | In, NotIn, Exists,DoesNotExist | 是 | Pod与指定Pod不在同一拓扑域 |
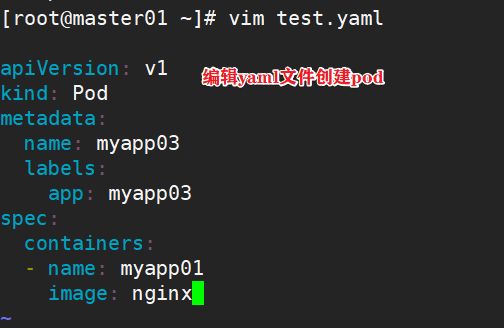
创建一个标签为 app=myapp01 的 Pod
vim pod3.yaml
apiVersion: v1
kind: Pod
metadata:
  name: myapp01
  labels:
    app: myapp01
spec:
  containers:
  - name: with-node-affinity
    image: nginx
kubectl apply -f pod3.yaml

kubectl get pods --show-labels -o wide
使用Pod亲和性调度
vim pod4.yaml
apiVersion: v1
kind: Pod
metadata:
  name: myapp02
  labels:
    app: myapp02
spec:
  containers:
  - name: myapp02
    image: nginx
  affinity:
    podAffinity:
      requiredDuringSchedulingIgnoredDuringExecution:
      - labelSelector:
          matchExpressions:
          - key: app
            operator: In
            values:
            - myapp01
        topologyKey: kubernetes.io/hostname
kubectl apply -f pod4.yaml

kubectl get pods --show-labels -o wide
vim pod5.yaml
apiVersion: v1
kind: Pod
metadata:
  name: myapp03
  labels:
    app: myapp03
spec:
  containers:
  - name: myapp03
    image: nginx
  affinity:
    podAntiAffinity:
      preferredDuringSchedulingIgnoredDuringExecution:
      - weight: 100
        podAffinityTerm:
          labelSelector:
            matchExpressions:
            - key: app
              operator: In
              values:
              - myapp01
          topologyKey: kubernetes.io/hostname

#如果节点处于 Pod 所在的同一拓扑域且具有键“app”和值“myapp01”的标签, 则该 pod 不应将其调度到该节点上。 (如果 topologyKey 为 kubernetes.io/hostname,则意味着当节点和具有键 “app”和值“myapp01”的 Pod 处于相同的区域,Pod 不能被调度到该节点上。)

kubectl apply -f pod5.yaml

kubectl get pods --show-labels -o wide
四、亲和总结
节点亲和
调度到满足 Node 节点的标签条件的Node节点 nodeAffinity
硬策略:必须满足条件 requiredDuringSchedulingIgnoredDuringExecution
软策略:尽量满足条件,满足不了也没关系 preferredDuringSchedulingIgnoredDuringExecution
硬策略配置:
spec:
  affinity:
    nodeAffinity:
      requiredDuringSchedulingIgnoredDuringExecution:
        nodeSelectorTerms:
        - matchExpressions:
          - key: KEY_NAME
            operator: In/NotIn/Exists/DoesNotExist/Gt/Lt
            values:
            - KEY_VALUE
软策略配置:
spec: affinity: nodeAffinity: preferredDuringSchedulingIgnoredDuringExecution: - weight: WEIGHT_VALUE preference: matchExpressions: - key: KEY_NAME operator: In/NotIn/Exists/DoesNotExist values: - KEY_VALUE
pod亲和
pod亲和(podAffinity):调度到满足pod的标签条件所对应的node节点(用的硬策略)
spec: affinity: podAffinity: requiredDuringSchedulingIgnoredDuringExecution: - labelSelector: matchExpressions: - key: app operator: In/NotIn/Exists/DoesNotExist values: - KEY_VALUE topologyKey: kubernetes.io/hostname #Pod亲和必须携带拓扑域字段
pod反亲和(podAntiAffinity):不调度到满足pod的标签条件所对应的node节点(用的软策略)
spec: containers: affinity: podAntiAffinity: preferredDuringSchedulingIgnoredDuringExecution: - weight: WEIGHT_VALUE podAffinityTerm: labelSelector: matchExpressions: - key: app operator: In/NotIn/Exists/DoesNotExist values: - KEY_VALUE topologyKey: kubernetes.io/hostname
五、污点(Taint)和容忍(Tolerations)
1. 污点(Taint)
节点亲和性,是Pod的一种属性(偏好或硬性要求),它使Pod被吸引到一类特定的节点。Taint 则相反,它使节点能够排斥一类特定的 Pod。
Taint 和 Toleration 相互配合,可以用来避免 Pod 被分配到不合适的节点上。每个节点上都可以应用一个或多个 taint ,这表示对于那些不能容忍这些 taint 的 Pod,是不会被该节点接受的。如果将 toleration 应用于 Pod 上,则表示这些 Pod 可以(但不一定)被调度到具有匹配 taint 的节点上。
使用 kubectl taint 命令可以给某个 Node 节点设置污点,Node 被设置上污点之后就和 Pod 之间存在了一种相斥的关系,可以让 Node 拒绝 Pod 的调度执行,甚至将 Node 已经存在的 Pod 驱逐出去。
1.1 污点的组成格式
key=value:effect
每个污点有一个key和value作为污点的标签,其中value可以为空,effect描述污点的作用
1.2 taint effect支持的三个选项
NoSchedule:表示 k8s 将不会将 Pod 调度到具有该污点的 Node 上
PreferNoSchedule:表示 k8s 将尽量避免将 Pod 调度到具有该污点的 Node 上
NoExecute:表示 k8s 将不会将 Pod 调度到具有该污点的 Node 上,同时会将 Node 上已经存在的 Pod 驱逐出去
1.3 master 污点设置
master 就是因为有 NoSchedule 污点,k8s 才不会将 Pod 调度到 master 节点上
kubectl describe node master01
1.4 node上设置污点
#设置污点
kubectl taint nodes node01 key1=value1:NoSchedule

#节点说明中,查找 Taints 字段
kubectl describe node node-name

#去除污点
kubectl taint nodes node01 key1:NoSchedule-
1.5 实例
kubectl taint nodes node02 check=mycheck:NoExecute
#查看 Pod 状态,会发现 node02 上的 Pod 已经被全部驱逐(注:如果是 Deployment 或者 StatefulSet 资源类型,为了维持副本数量则会在别的 Node 上再创建新的 Pod)
kubectl get pods -o wide
2. 容忍(Tolerations)
设置了污点的 Node 将根据 taint 的 effect:NoSchedule、PreferNoSchedule、NoExecute 和 Pod 之间产生互斥的关系,Pod 将在一定程度上不会被调度到 Node 上。但我们可以在 Pod 上设置容忍(Tolerations),意思是设置了容忍的 Pod 将可以容忍污点的存在,可以被调度到存在污点的 Node 上。
2.1 容忍示例
#两个节点都设置污点
kubectl taint nodes node01 check=mycheck:NoExecute
kubectl taint nodes node02 check2=mycheck2:NoExecute

vim test.yaml
apiVersion: v1
kind: Pod
metadata:
  name: myapp01
  labels:
    app: myapp01
spec:
  containers:
  - name: with-node-affinity
    image: soscscs/myapp:v1

kubectl apply -f pod3.yaml
#设置容忍
vim demo2.yaml

apiVersion: v1
kind: Pod
metadata:
  name: myapp04
  labels:
    app: myapp04
spec:
  containers:
  - name: myapp01
    image: nginx
  tolerations:
  - key: "check"
    operator: "Equal"
    value: "mycheck"
    effect: "NoExecute"
    tolerationSeconds: 15

#其中的 key、vaule、effect 都要与 Node 上设置的 taint 保持一致
#operator 的值为 Exists 将会忽略 value 值,即存在即可
#tolerationSeconds 用于描述当 Pod 需要被驱逐时可以在 Pod 上继续保留运行的时间
2.2 其它注意事项
当不指定 key 值时,表示容忍所有的污点 key
tolerations:
- operator: "Exists"

当不指定 effect 值时,表示容忍所有的污点作用
tolerations:
- key: "key"
  operator: "Exists"
有多个 Master 存在时,防止资源浪费,可以如下设置
kubectl taint nodes Master-Name node-role.kubernetes.io/master=:PreferNoSchedule
如果某个 Node 更新升级系统组件,为了防止业务长时间中断,可以先在该 Node 设置 NoExecute 污点,把该 Node 上的 Pod 都驱逐出去
kubectl taint nodes node01 check=mycheck:NoExecute
此时如果别的 Node 资源不够用,可临时给 Master 设置 PreferNoSchedule 污点,让 Pod 可在 Master 上临时创建
kubectl taint nodes master node-role.kubernetes.io/master=:PreferNoSchedule
待所有 Node 的更新操作都完成后,再去除污点
kubectl taint nodes node01 check=mycheck:NoExecute-
六、Pod启动阶段(相位 phase)
1. pod启动过程
- 调度到某台 node 上。kubernetes 根据一定的优先级算法选择一台 node 节点将其作为 Pod 运行的 node
- 拉取镜像
- 挂载存储配置等
- 运行起来。如果有健康检查,会根据检查的结果来设置其状态
2. phase的状态
● Pending:表示APIServer创建了Pod资源对象并已经存入了etcd中,但是它并未被调度完成(比如还没有调度到某台node上),或者仍然处于从仓库下载镜像的过程中。
● Running:Pod已经被调度到某节点之上,并且Pod中所有容器都已经被kubelet创建。至少有一个容器正在运行,或者正处于启动或者重启状态(也就是说Running状态下的Pod不一定能被正常访问)。
● Succeeded:有些pod不是长久运行的,比如job、cronjob,一段时间后Pod中的所有容器都被成功终止,并且不会再重启。需要反馈任务执行的结果。
● Failed:Pod中的所有容器都已终止了,并且至少有一个容器是因为失败终止。也就是说,容器以非0状态退出或者被系统终止,比如 command 写的有问题。
● Unknown:因为某些原因无法取得 Pod 的状态,通常是因为与 Pod 所在主机通信失败
3. 故障排除步骤
//查看Pod事件
kubectl describe TYPE NAME_PREFIX

//查看Pod日志(Failed状态下)
kubectl logs  [-c Container_NAME]

//进入Pod(状态为running,但是服务没有提供)
kubectl exec –it  bash

//查看集群信息
kubectl get nodes

//发现集群状态正常
kubectl cluster-info

//查看kubelet日志发现
journalctl -xefu kubelet
4. 对节点执行维护操作
#将 Node 标记为不可调度的状态,这样就不会让新创建的 Pod 在此 Node 上运行
kubectl cordon <NODE_NAME> 		 #该node将会变为SchedulingDisabled状态
#kubectl drain 可以让 Node 节点开始释放所有 pod,并且不接收新的 pod进程。drain 本意排水,意思是将出问题的 Node 下的 Pod 转移到其它 Node 下运行
kubectl drain 